3. General Maintenance for the Derivatives Module
Before you begin any operations in the Derivatives module you have to maintain certain basic information. This information is necessary for the successful functioning of the module. The information that you need to maintain includes:
- Defining Derivative Types
- Bank and Branch Parameter details
- Revaluation details
- Specifying Limits
- Messaging party details
- Counter-party details
- Interest, Tax and Charge classes.
Although you maintain this information at the outset before beginning any transactions in this module it is imperative that you periodically review and update this information to reflect the latest changes.
The procedure to maintain these details is documented in the subsequent sections:
This chapter contains the following sections:
- Section 3.1, "Derivative Type Maintenance"
- Section 3.2, "Derivatives Branch Parameters Maintenance"
- Section 3.3, "Counterparty Master Agreement Maintenance"
- Section 3.4, "Clearing House Maintenance"
- Section 3.5, "Messaging Parties Maintenance"
3.1 Derivative Type Maintenance
This section contains the following topics:
3.1.1 Maintaining Derivative Types
The difference between this module and the other modules in Oracle FLEXCUBE is that before you begin to maintain products you are required to define Derivative Types. In maintaining derivative types you can broadly classify the derivative instrument as an FRA, CCS or IRS.
Additionally you can also capture relevant information about the instrument. For instance indicating whether schedules are allowed or whether interest is to be paid in advance or in arrears and so on.
The advantage of defining derivative types is that at the time of creating a product you need to specify the code assigned to the derivative type. The basic details you have specified for the derivative type will be automatically inherited by the product and consequently by any contract entered using that product.
You can invoke the ‘Derivative Type Maintenance’ screen by typing ‘DVDDTMNT’ in the field at the top right corner of the Application tool bar and clicking on the adjoining arrow button. The ‘Derivative Type Maintenance’ screen will be displayed.

If you are maintaining details of a new derivative type, select ‘New’ from the Actions menu in the Application tool bar or click new icon. The ‘Derivative Type Maintenance detailed’ screen will be displayed without any details.
If you are calling a derivative type maintenance record that has already been defined, choose the Summary option under Derivative Type. From the ‘Summary’ screen, double click a record of your choice to open it.
Derivative Type
The first attribute that you define for the derivative is its type. A type defines the basic characteristics of the instrument. It indicates whether the:
- Deal involves a single currency or two currencies.
- Deal involves multiple interest schedules.
- Interest will be liquidated in a single payment.
By suitably defining a derivative type, you will be able to define the following basic instrument types and their variants:
- Forward Rate Agreements (FRA).
- Cross Currency Swaps (CCS).
- Interest Rate Swaps (IRS).
Type Description
You can also assign a brief description for the derivative type that you are defining. This description will be associated with the type only for information purposes. Under each Derivative Type you can create any number of products.
Principal Details
As part of specifying the principal details you have to indicate whether two separate currencies can be maintained for both the inward and outward legs of all the contracts linked to the derivative type you are creating. If you choose allow cross currencies for the in and out legs of contracts linked to the derivative type then you have to also indicate whether the contract principal has to be exchanged upon initiation and maturity.
Apart from this you also have to indicate whether multiple schedules can be defined for the principal component. If you choose to define multiple schedules then the frequency of these schedules can be indicated at the time of specifying the product preferences. You can select any one as the frequency for the principal schedules:
- Daily
- Weekly
- Monthly
- Quarterly
- Half-yearly
- Yearly
But if you choose not to define multiple schedules then the principal liquidation for all the contracts linked to this type will be done on contract maturity.
Also the in leg and out leg principal schedules that you define for a contract need not be in sync with each other. You can choose to have asynchronous schedules for both the in and out legs of the contract.
Amortization Start Date
In the case of termination of hedge deals, you have to indicate the date from which the amortization of gains and or losses should start. While terminating swaps, amortization should start as of the termination date and in the case of FRAs amortization should start as of the settlement date.
Holiday Treatment
You can indicate the way in which a particular schedule date should be treated if it falls due on a holiday. The holiday movement of the principal, interest and revision schedules for each of the in and out legs can be based on:
- The holiday table maintained for a single financial centre or single currency specified at the leg level, or
- The combination of holiday tables of multiple financial centres/currencies.
Select the Combined option in this screen if you want the movement of schedules to be based on the combination of holiday tables maintained for multiple financial centers/currencies at both the legs of the contract. This will be applicable if the holiday treatment (specified at the contract level) is based on the holiday calendars of the currencies or financial institutions involved in the contract.
You specification will be automatically inherited by the product associated with the derivative type and consequently by any contract entered using the respective product.
Interest Details
Specify the following details.
Netting Required
If two or more accounting entries for an interest schedule payment are to be passed in the same currency on the same Value Date, then in Oracle FLEXCUBE you are allowed to net these entries.
However netting of entries is allowed only in the case of single currency derivative types. If you are maintaining details of a cross currency type you will not be allowed to net entries.
Asynchronous Schedules
Netting of interest schedules is allowed for synchronous schedules for In leg and Out leg.
But for asynchronous schedules of In leg and out leg, the netting is applied only for the interest schedules which have same value dates. Netting is applicable only for Interest Rate Swap.
In/Out Leg Interest Details
Interest Schedules Allowed for the leg type
While maintaining the derivative type you are required to indicate whether contracts linked to the derivative type can have multiple schedules or whether the schedules have to be bulleted.
In Oracle FLEXCUBE you can choose to have multiple schedules for one leg and bullet schedules for the other leg. For instance you can indicate that the in leg schedules have to be bulleted and the out leg schedules have to be multiple. Consequently for all contracts linked to this type the in leg schedules will be bulleted while the out leg can have multiple schedules.
You can also choose to define multiple schedules for both the inward and outward legs and indicate that the frequency of repayment should differ.
Revision schedules allowed for the leg type
Just as in the case of interest schedules so also revision schedules too can either be multiple or bulleted, depending upon your specification.
A revision schedule is the time period for which a floating interest rate is to be used. Normally this would be the same as the interest schedule but in Oracle FLEXCUBE you are allowed to maintain separate interest and revision schedules. Therefore you have to specify whether the revision schedules defined for the particular (In or Out) leg of the contract need to be in sync with the interest schedules or whether they can be asynchronous. For instance you may like to permit contracts with semi-annual interest payments with quarterly revision in interest rate.
Payment Method
Interest amount repayments for both the inward and outward interest legs can be made either at the start of the interest period or at the end of the interest period. For instance a typical FRA would require a discounted cash-flow to be paid at the commencement of the period while an interest rate swap would require cash-flows to be exchanged at the end of each interest period.
Your choice of the payment method at the derivative type definition level will be defaulted to all the contracts linked to the derivative type.
Internal Remarks
When creating the derivative type you can capture additional information about the type intended for the internal reference of your bank. Your remarks will not be printed on any correspondence with the customer.
However you can choose to include these remarks in the reports that you generate.
Note
You will not be allowed to change the details of an existing derivative type except change the Description Type and the Internal Remarks.
3.1.2 Fields Button
You can associate values to all the User Defined fields created and attached to the ‘Derivative Type Maintenance’ screen. You can view the list of User Defined fields associated to this screen by clicking ‘Fields’ button in the ‘Derivative Type Maintenance’ screen.

You can specify the value for the UDFs listed here in the ‘Value’ column.
For more details on how to create user Defined fields, refer chapter ‘Creating custom fields in Oracle FLEXCUBE’ in the User Defined Fields User Manual under Modularity.
3.2 Derivatives Branch Parameters Maintenance
This section contains the following topic:
3.2.1 Maintaining Branch Parameters
You can maintain branch level parameters that govern the processing of derivatives in a particular branch of your bank through the ‘Derivatives Branch Parameters Maintenance’ screen.
You can invoke the ‘Derivatives Branch Parameter Maintenance’ screen by typing ‘DVDBRNPM’ in the field at the top right corner of the Application tool bar and clicking on the adjoining arrow button.
The ‘Derivatives Branch Parameter Maintenance’ screen will be displayed.

Those events, which have to be triggered automatically, will be processed accordingly during batch process. However you are required to indicate how automatic events falling due on a holiday should be processed.
You have the option to specify whether the batch process should process automatic events falling due on a holiday either
- as part of the EOD process on the last working date before the holiday; or
- as part of the BOD process on the next working day after the holiday.
For example,
Assume today is 15th November 2000, 16th November 2000 and 17th November 2000 are holidays. If you check this field, during the Automatic Batch Update function run, only the events scheduled for 15th November 2000 will be processed.
The events scheduled for the holidays, i.e., 16th November 2000 and 17th November 2000 will be processed during the Automatic Batch Update function run during beginning of day operations on 18th November 2000.
Revaluation Reversal
As a branch level parameter you can indicate the manner in which deal level reversal of Unrealized Revaluation with Previous Year Adjustment should be processed. The options available are:
- Along with Revaluation – reversals of entries for a particular revaluation will be performed at the time of the next revaluation.
- Next Day in BOD – select this option to indicate that any revaluation gain/loss should be reversed the very next day during the BOD process. If the BOD processing date happens to be the first day of the financial year, revaluation reversal will be done from the Previous Year Adjustment GL maintained in the Chart of Accounts.
For instance,
You have entered a deal with the following parameters:
- Revaluation method is Fair Value
- Revaluation Netting Required option is set to Yes; and
- Revaluation Frequency is monthly
- Frequency Start Day as 1.
Assume that the deal comes into existence on the 15th of July. The fair value of the In Leg is USD 500 and that of the Out Leg is USD 350 as on the 1st of August. This results in a revaluation gain of USD 150 (500 –350)
Scenario I - Along with the next Revaluation
Accounting entries passed on the 1st of August will be as follows:
Event DRVL (Contract Revaluation)
Accounting Role |
Amount Tag |
Debit/Credit Indicator |
Amount |
CONT_FAIR_VAL (Contract Fair Value GL) |
CUR_NETRVL_INC |
Debit |
150 |
NET_RVL_INC (Revaluation Income) |
CUR_NETRVL_INC |
Credit |
150 |
There is a net revaluation loss of USD 75 on the 1st of September. When the event DRRL (Revaluation Reversal) is triggered, the entries posted are as follows:
Accounting Role |
Amount Tag |
Debit/Credit Indicator |
Amount |
NET_RVL_INC (Revaluation Income) |
PRV_NETRVL_INC |
Debit |
150 |
CONT_FAIR_VAL (Contract Fair Value GL) |
PRV_NETRVL_INC |
Credit |
150 |
Next, the DRVL for the day is triggered.
Accounting Role |
Amount Tag |
Debit/Credit Indicator |
Amount |
NET_RVL_EXP (Revaluation Expense) |
CUR_NETRVL_EXP |
Debit |
75 |
CONT_FAIR_VAL (Contract Fair Value GL |
CUR_NETRVL_EXP |
Credit |
75 |
Scenario II - Next Day in BOD
Accounting entries passed on 01 August EOD
Event DRVL (Contract Revaluation)
Accounting Role |
Amount Tag |
Debit/Credit Indicator |
Amount |
CONT_FAIR_VAL (Contract Fair Value GL) |
CUR_NETRVL_INC |
Debit |
150 |
NET_RVL_INC (Revaluation Income) |
CUR_NETRVL_INC |
Credit |
150 |
Accounting entries passed on the 2nd of August at BOD for the event DRRL are:
Accounting Role |
Amount Tag |
Debit/Credit Indicator |
Amount |
NET_RVL_INC (Revaluation Income) |
PRV_NETRVL_INC |
Debit |
150 |
CONT_FAIR_VAL (Contract Fair Value GL) |
PRV_NETRVL_INC |
Credit |
150 |
Entries passed on the 1st of September for the event DRVL are:
Accounting Role |
Amount Tag |
Debit/Credit Indicator |
Amount |
NET_RVL_EXP (Revaluation Expense) |
CUR_NETRVL_EXP |
Debit |
75 |
CONT_FAIR_VAL (Contract Fair Value GL |
CUR_NETRVL_EXP |
Credit |
75 |
If the 2nd of August happens to be the first day of a new financial year, the entries passed on that day during BOD are:
Event DRRL
Accounting Role |
Amount Tag |
Debit/Credit Indicator |
Amount |
Previous Year adjustment GL |
PRV_NETRVL_INC_PY |
Debit |
150 |
CONT_FAIR_VAL (Contract Fair Value GL) |
PRV_NETRVL_INC_PY |
Credit |
150 |
This is because the revaluation profit and loss for the previous year (ending 1st August) would have been transferred to the Previous Year P&L Adjustment GL.
Note
The revaluation reversal program will be called during termination of the contract and final liquidation to reverse out any previous revaluation gain or loss.
See the chapter on Accounting Entries of this manual.
3.3 Counterparty Master Agreement Maintenance
This section contains the following topic:
3.3.1 Maintaining Counterparty Master Agreement Details
Through the Derivatives ‘Counterparty Master Agreement Maintenance’ screen you can enter the details of the master agreement(s) with each counterparty.
You can invoke the ‘Counterparty Master Agreement Maintenance’ screen by typing ‘DVDCPMNT’ in the field at the top right corner of the Application tool bar and clicking on the adjoining arrow button.
The ‘Counterparty Master Agreement Maintenance’ screen will be displayed.
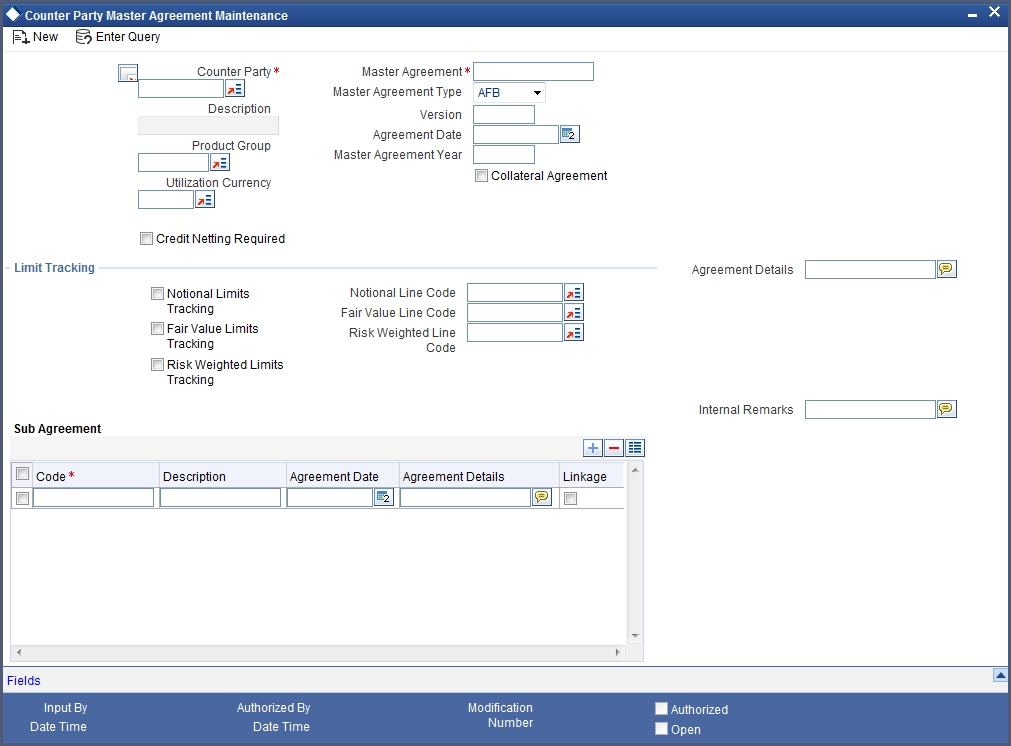
If you are maintaining details of a new master agreement, click new icon. The ‘Counterparty Master Agreement Maintenance’ screen will be displayed without any details.
If you are calling a master agreement record that has already been defined, choose the Summary option under Counterparty. From the ‘Summary’ screen double click a record of your choice to open it.
Counter Party and Master Agreement code
Each master agreement that you create can be associated with a counter party. You have to indicate the code assigned to the counterparty for whom the master agreement is being maintained.
After you specify the customer for which the master agreement is being maintained you have to enter a code to uniquely identify the master agreement. You can follow your own conventions while devising this code.
Master Agreement Type
You can indicate the type of master agreement under which the contract falls. The options available in the option list provided contain a list of standard master agreement types. They are as follows:
- AFB
- BBAIRS
- ISDA
- FRABBA
- DEVR
- FBF
- OTHERS
Product Group
A product is a specific service that you offer your customers. In Oracle FLEXCUBE you are required to group together products according to the common attributes that they share. This kind of grouping of products helps you organize information pertaining to the services that you provide. Besides it also simplifies information retrieval.
Maintenance of product groups is done through the ‘Product Group Definition’ screen. You can indicate the product group whose contracts can be linked to the master agreement.
Version
You need to indicate the version number of the master agreement for which you are maintaining details.
Utilization Currency
If you have indicated that Limit Tracking is required then you need to specify the utilization currency. The currency that you specify here will be taken as the credit limit utilization currency for the master agreement.
Agreement Date
Specify the date as of which the master agreement was signed.
Credit Netting required
One of the main advantages in maintaining a master agreement is the credit netting provision. While defining the master agreement you can indicate whether the positive and negative contract fair values should be netted for the counterparty.
This concept can be explained with the help of an example:
Example
CHASEMANN is a customer of your bank and currently you are managing ten contracts for your customer. You have linked the contracts according to their attributes to different master agreements in the following manner:
MA Code and Description |
Contract Reference No. |
MTM Value |
MA 1 (Master Agreement for CCS) |
000DV21992950261 |
USD 100. |
000DV21992950262 |
USD 20. |
|
000DV21992950264 |
USD 100. |
|
MA 2 (Master Agreement for FRAs) |
000DVFR992950002 |
GBP 100. |
000DV21992950277 |
GBP 50. |
|
000DV01992951117 |
GBP -50. |
|
MA 3 (Master Agreement for IRS) |
000DV21992950278 |
FRF -20. |
000DV21992950279 |
FRF 100. |
|
000DV21992950182 |
FRF 50. |
|
000DV21992950188 |
USD -50. |
The Utilization Currency that you have indicated for the three Master Agreements is as follows:
MA 1 - USD.
MA 2 - GBP.
MA 3 - FRF.
Scenario 1
You have indicated that for all contracts falling under MA 1 credit netting is required both at the MA level and the contract level.
Since you have indicated that credit netting is required the system does the necessary computations and the credit exposure in this case will be USD 180.
Scenario 2
For all contracts falling under MA 2, you have indicated that credit netting is not required.
The credit exposure in this case will be 100 GBP.
Scenario 3
While processing the contract you have indicated that contract bearing the reference number 000DV21992950188 should be excluded from netting.
Now the credit exposure in this case will be FRF 130.
Note
In the above example you will notice that the contract currency and the utilization currency are the same. Therefore the system did not have to do any currency conversions. However most often than not, the base currency of the contract will be different from the utilization currency. In such cases the system converts the MTM value of the contract using the rates maintained in the ‘Exchange Rates Maintenance’ screen and thus arrives at the credit exposure amount.
Master Agreement Year
Every master agreement that you define will invariably refer to the Book of Definitions (ISDA Definition).
You have to indicate the year of definition, which is applicable for the master agreement in this field.
Collateral Agreement
You have to indicate whether collateral agreements are applicable for the master agreement.
Note
The system checks this box by default. If you do not want the collateral agreements to become a part of the master agreement, leave this box unchecked.
Limits Tracking Details
You have to indicate whether exposure against the master agreement needs to be tracked for the counterparty limits. If you want to track counterparty limits for exposure against the master agreement then you need to specify the default credit line against which the credit limit utilization of contracts under the master agreement will be tracked.
You can specify whether Notional Limits tracking is required for the Customer and also specify the line code against which the notional limit should be tracked.
If you have indicated that Fair Value Limit tracking is required for the master agreement then you are required to specify the default fair value credit line against which the credit limit utilization of contracts under the master agreement will be tracked.
Additionally, you can specify whether Risk Weighted Limits Tracking is required and also select the line code against which the Risk Weighted Limit should be tracked.
The options Notional Limits Tracking, Fair Value Limits Tracking and Risk Weighted Limits Tracking will be enabled only if the Limits tracking option is selected.
Subsequently you also have to indicate the utilization currency. This currency will be taken as the credit limit utilization currency for the master agreement.
Agreement Details and Internal remarks
After specifying the main details about the master agreement you can summarize the entire agreement and store details about it. This information is basically for the internal reference of your bank and will not be reflected on any customer correspondence.
Additionally you can also capture your own internal remarks about the master agreement that you have created. These remarks too will not be reflected in your correspondence with the customer.
Sub Agreements
With every master agreement that you create you can link one or more sub agreements. Subsequent to creating a sub agreement you can either choose to link it to the master agreement or choose to link it at a future point in time.
Code
Specify a code to identify the sub agreement that you are creating. The code that you specify will have to be a unique code at the counterparty level.
Description
Enter a brief description that will enable you to identify the sub agreement code being maintained quickly. The description that you specify here is for information purposes only and will not be printed on any customer correspondence.
Date
Specify the date as of which the sub agreement was signed.
Agreement Details
You can summarize and capture all the details about the sub agreement. The details that you enter here will not be printed on any customer correspondence.
Linkage
You can check this box to indicate that the sub agreement for which you are maintaining details should be associated with the master agreement.
3.4 Clearing House Maintenance
This section contains the following topic:
3.4.1 Maintaining Clearing Houses
You can maintain the details of financial centers through the ‘Clearing House Maintenance’ screen. The reason for maintaining clearing houses or financial centers is that at the time of processing the contract you can indicate that holiday treatment for principal and interest schedules and for rate resets should be according to the holiday calendar of the financial center.
You can invoke the ‘Clearing House Maintenance’ screen by typing ‘STDCLMNT’ in the field at the top right corner of the Application tool bar and clicking on the adjoining arrow button.
The ‘Clearing House Maintenance’ screen will be displayed.

If you are maintaining details of a new financial center, select ‘New’ from the Actions menu in the Application tool bar or click new icon. The ‘Clearing House Maintenance’ screen will be displayed without any details.
If you are calling a clearing house record maintenance record that has already been defined, choose the Summary option under Clearing House. In the ‘Summary’ screen double click on a record of your choice.
In Oracle FLEXCUBE you have to assign a unique three-character code to the clearing house that you are maintaining. The code that you assign is used to identify the particular clearing house whenever you link it to a particular contract. You can follow your own convention while devising this code.
Description
In addition to assigning a code you can give it a brief description so that you can identify it easily while retrieving information. The description that you enter is for information purposes only and will not be printed on any customer correspondence.
Swift Code
Specify the SWIFT Code that you wish to maintain for the Clearing House.
3.5 Messaging Parties Maintenance
This section contains the following topic:
3.5.1 Maintaining Messaging Parties Details
At every stage in the life cycle of a transaction you will need to send various messages to your customer. You need to send these messages to the recipient of the message whom your customer has identified as the receiver of the message.
The ‘Messaging Parties Maintenance’ screen will enable you to capture details of the recipients of derivative messages that have to be sent to the various counterparties.
You can invoke the ‘Messaging Parties Maintenance’ screen by typing ‘DVDMGMNT’ in the field at the top right corner of the Application tool bar and clicking on the adjoining arrow button.
The ‘Messaging Parties Maintenance’ screen will be displayed.

If you are maintaining details of a new receiver on behalf of the counterparty, select ‘New’ from the Actions menu in the Application tool bar or click new icon. The ‘Messaging Parties Maintenance’ screen will be displayed.
You can identify the person who is to receive the message on behalf of the counterparty and the medium through which the message should be sent. To do this you have to assign a unique code to the receiver and medium combination. Subsequently you have to capture the name of the receiver.
Receiver Id
This is the code assigned to the receiver of the message. Specify a unique code to identify the receiver of the message.
Medium
Choose the medium through which you wish to send the message. This can be any of the following:
- Telex
- Fax
- SWIFT
Receiver Name
This is the name of the receiver of the message. Specify the name of the party who will receive the message on behalf of the customer.
Address
While maintaining the messaging party details you are required to indicate the mailing address of the receiver of the message. All the messages addressed to the counterparty will be directed to the receiver address that you specify.
During contract input when you indicate the ID of the receiver, the default address specified for the receiver will be displayed.
Note
If you specify that the message should be sent through SWIFT then you have to indicate the SWIFT address of the receiver in the first line of the address box before you specify the mailing address.
Language
The message can be sent to the receiver in the language of the receiver. This adjoining option list displays a list of language codes. You can choose the appropriate one available in this field.
Note
Remember that to send a message to a receiver in a particular language you should have also maintained a message format for the language in the ‘Advice Format Maintenance’ screen.
Message Party Details
Specify the following details.
Message Type
Your customer can identify more than one receiver as the recipient of messages that you need to send the customer as and when required. Additionally your customer can also instruct you to send specific messages to different receivers.
Customer Identification File
After you select the list of messages that have to be sent to your customer you have to specify the ID assigned to the particular customer for whom you are maintaining recipient details. The adjoining option list displays list of all the CIF ID’s you have maintained through the Customer Information Maintenance file.
Thus every time you send a message to the particular customer it will reach the recipient whom the customer has identified as the official receiver of the message.
Example
CHASEBANK is the customer of your bank. CHASEBANK has identified Peter and Yvonne as the recipients of any mail messages that need to be communicated to them. You have also been instructed by CHASEBANK that all cancellation messages should be sent to Peter and all other messages can be sent to Yvonne.
While maintaining Messaging Party Maintenance details you have to enter Peter in the Receiver ID field and Mail as the medium of sending the message. Select DV_CANC_CCS in the Party Type field.
Secondly since CHASEBANK has instructed you to send all cancellation messages to Peter you have to select from the list and associate all possible cancellation messages that may have to be sent to CHASEBANK with Peter’s ID.
While maintaining receiver details you can identify a particular receiver as the default receiver of messages that need to be sent to the customer. All those messages that have been marked for the particular will be sent to the default receiver.