5. Processing Fixed Assets
In Fixed assets module of Oracle FLEXCUBE you can capture static details such as Asset Code, Asset Cost, Date of Acquisition, Date of capitalization, Location, Asset category code etc. You cannot change the FA product associated with the contract during the entire life cycle of the asset.
Fixed Assets purchase/acquisition online processing function enables you to perform the following functions:
- Amendment/ change in FA details
- Copy existing FA details for recording details of new FA
- Delete/Undo of a FA record from one user to another
- Recording of individual items for an Asset
- Recording of FA-XP contract linkages
- Any other fields may be captured using UDF
This chapter explains the processing of purchase or acquisition of an FA.
This chapter contains the following sections:
- Section 5.1, "Fixed Asset Details"
- Section 5.2, "Asset Transfer Details"
- Section 5.3, "Asset Sale Details"
- Section 5.4, "Asset Write Off Details"
- Section 5.5, "Authorizing Fixed Asset Contracts "
- Section 5.6, "Contract Reassign to another User"
5.1 Fixed Asset Details
This section contains the following topics:
- Section 5.1.1, "Invoking the Fixed Asset Capture Screen"
- Section 5.1.2, "Asset Details Tab"
- Section 5.1.3, "Depreciation Details Tab"
- Section 5.1.4, "Linkage Details Button"
- Section 5.1.5, "Asset Details Button"
- Section 5.1.6, "Ad hoc-Schedule Button"
5.1.1 Invoking the Fixed Asset Capture Screen
You can capture the various details of the asset such as asset code, asset cost, date of acquisition, date of capitalization, location, asset category code etc. Through this screen you can associate the asset to a product code and the all the restrictions maintained at the Product level will be enforced while you record the new asset. You are not allowed to change the product associated with the asset during the life cycle of the asset once you have associated the product to the asset.
You can invoke the ‘Fixed Assets Asset Capture’ screen by typing ‘FADTRONL’ in the field at the top right corner of the Application tool bar and clicking on the adjoining arrow button.
The Asset capture screen consists of the following screens:
- FA Main details
- FA Items
- Depreciation details
- FA-XP contract linkage
- FA depreciation view
Each of the above mentioned screens and the data captured in each screen are explained in detail in this chapter.
Specify the following details:

Product Code
Choose a product code from the option list. All the preferences defined at the product level will be defaulted. Once you specify the product code, the system will create the reference number in the next field for the asset.
Contract Reference Number
The system automatically creates the reference number for the asset.
The reference number generated is a combination of branch code, product code, the Julian date of transaction input and a running serial number.
Product Description
Once you have selected the product code, the product description is displayed.
User Reference Number
You can enter any reference number for a FA contract that you process. The FA contract will be identified through this number in addition to the Contract Reference Number generated by the system. Two FA contracts cannot have the same User Reference Number. By default, the Contract Reference Number generated by the system will be taken as the User Reference Number. You can use this number, to retrieve information relating to an FA contract.
5.1.2 Asset Details Tab
Capture the following details:
Category
You can link the asset to an existing asset category that is not restricted for the branch. Choose the category of the asset from the option list.
Location
Identify the location at which the asset is currently stationed. The option list will display the list of locations based on the restrictions maintained at the product definition screen.
Location Description
On selecting the location, the description of the location is displayed.
Asset Currency
This is the local currency of the branch. You will not be allowed to modify this data.
Asset Cost
Enter the value of the asset in this field.
Asset Description
In this field, you can enter the description of the asset stating whether the asset is an office building or computers etc.
Status
Here you have to mention the status of the asset your branch is holding. The available options are:
- Capitalized
- Work in progress
Booking Date
The system date is defaulted as the booking date of the asset. You will not be allowed to modify this date.
Acquisition Date
Mention the date on which the asset is acquired in the date/month/year format.
Acquired Depreciation
You can specify the acquired depreciation in case of the asset being transferred from a previous branch. The system arrives at the accumulated depreciation based on the acquired depreciation that you specify as well as the depreciation calculated. The acquired depreciation is considered to track depreciation on books and not for tax purposes.
You will not be allowed to specify the acquired depreciation once you save and authorize a contract.
Residual Value
The Residual Value is taken into account for the purpose of computing the depreciation of the asset. However, you must ensure to enable the Asset Cost – Residual Value option in the Asset Category screen.
Note
The total depreciation for the asset will not exceed the residual value.
Original Reference Number
This field is updated only during Fixed Asset Transfers. Transferred asset is automatically created in the branch/location on Save of transfer. This field displays the original reference number of the asset in the old branch/location. You cannot modify this number.
All other details of the transferred asset will remain the same as before except for a few conditions.
Please refer the section Asset Transfer Process for more details.
Capitalization Date
If you have selected the status of the asset as Capitalized then you have to specify the date on which the asset was capitalized.
Effective Depreciation Date
In this field, you have to mention the date from which the depreciation should be charged for the asset. The capitalization date will be taken as the default date if you do not mention the date. You can choose to change this but this date cannot be less than the capitalization date. Also this date cannot be a future date.
Useful Life
Specify the following:
Useful Life
This is the unit to measure the useful life of asset (months/years). The data is defaulted from asset category maintenance. You can choose to change this unit.
Useful Life Units
This is the useful life of the asset. The data is defaulted from asset category maintenance however you can choose to change this.
Depreciation Suspension
Specify the following:
Suspend Depreciation
By choosing this preference you can stop the depreciation calculation for an asset. If there is a negotiation for sale or change in Residual Value for the asset, then choose this option to suspend the depreciation. Otherwise you can leave it unchecked.
Suspension Date
If you choose to suspend the depreciation then the system takes the application date as the suspension date. You will not be allowed to modify this date.
5.1.3 Depreciation Details Tab
You can view the depreciation charged for the asset from this screen.
Depreciation view screen displays the depreciation details of the asset recorded for book and tax purposes.

Specify the following:
Asset Reference Number
The system will generate the asset reference number based on the branch, product, Julian date and a running sequence of 4 bytes.
You cannot change this reference number.
Depreciation Book and Tax
Capture the following details:
Year To Days Depreciation
This field displays the depreciation charged on an asset from the start of the current financial year till the last depreciation date. This data is recorded for book and tax purpose.
No modification is allowed in this field.
Accumulated Depreciation
This field displays the depreciation charged on an asset for account book and tax purpose. The depreciation is calculated from the effective date of depreciation till the system date.
No modification is allowed in this field.
Year open Written Down Value
The field displays the value of the asset that was written down at the beginning of the financial year for book and tax purpose.
No modification is allowed in this field.
Current Written Down Value
This field displays the value of the asset that was written down on the system date for book and tax purpose.
No modification is allowed in this field.
5.1.4 Linkage Details Button
When an asset is purchased against a purchase order, you can link the asset to the contracts in Expense Processing module.
To access this screen, click ‘Linkage Details’ button in the Asset Capture Online’ screen under Asset Capture, Fixed Assets from the Application Browser.

This screen enables you to add or delete a record.
Asset Reference Number
The reference number of the asset is defaulted from the asset capture screen. You will not be able to change this number.
Specifying the Expense Block
Expense Processing Contract Reference Number
Here you have to mention the reference number of the contract in the XP module. You can pick the reference number from the option list available or you can mention the number which will be validated against the XP contract.
Vendor Code
Once you choose the XP contract, the code for the vendor will be defaulted automatically.
Contract Amount
Once you choose the XP contract, the contract amount will be defaulted automatically in this field.
Note
The XP contract amount is displayed in asset currency.
Linked Amount
You have to specify the amount of the XP contract that has been used for the purchase of the asset.
Make sure that the sum of the linked amounts for all the linked contracts is less than or equal to the actual cost of the asset.
5.1.5 Asset Details Button
This screen is used to record individual item details under a single asset code in cases where many similar assets are grouped under one category.
To access this screen, click ‘Asset Details’ button in the ‘Asset Capture Online’ screen under Asset Capture, Fixed Assets from the Application Browser.

In this screen you are allowed to add or delete a asset from the asset group.
Asset Reference Number
The reference number of the asset is defaulted from the asset capture screen. You will not be able to change this number.
Asset Item Block
Item Number
You need to enter a unique number for the asset to identify the particular asset.
Description
You can record the general information regarding the asset in the Description field.
Item Cost
You need to specify the cost of the individual item.
Note
Take care that the sum of all item costs does not exceed the asset cost.
Expected Delivery Date
Mention the date on which the item is scheduled for delivery.
Note
Ensure that the delivery date is not less than the capitalization date.
Delivered
Check the box if the delivery of the asset has been carried out. Keep the box unchecked to indicate that the asset has not been delivered.
Inspected
If the asset has been inspected then check the box. Leave it unchecked to indicate that the asset has not undergone inspection.
Note
You will also be able to perform queries about assets delivered but not inspected and assets inspected but not capitalized, based on the Delivery Date and Status.
Remarks
In this field you can enter general remarks for the asset for future reference.
5.1.6 Ad hoc-Schedule Button
You will be able to define different rates for depreciation. This is exclusively done for adhoc type of depreciation.
To access this screen, click ‘Adhoc Schedule’ button in the ‘Asset Capture Online’.

Asset Reference Number
The reference number of the asset and its description is defaulted from the contract input screen. You will not be able to modify this number.
Specifying the Schedule For Book and Tax
Year
You have to maintain the depreciation schedule for the asset if you have chosen Ad-hoc as the depreciation type in the ‘Asset Category location rule mapping’ screen.
If the useful life is in months, then also, the adhoc depreciation schedule needs to be recorded in terms of years.
The sum of the depreciation rate across the useful life of the asset should be add up to 100. Additionally, you have to ensure that you have maintained depreciation rates for all the years of Useful Life.
Rate
You need to maintain the depreciation rate for the asset across the useful life of the asset.
Note
The depreciation rate will always be in percentage terms per annum.
5.2 Asset Transfer Details
This section contains the following topics:
5.2.1 Invoking the Asset Transfer Details Screen
Through the Transfer of Fixed Asset screens you can transfer a Fixed Asset to a different branch/ location. All the necessary details such as date of sale/transfer/write off, sale price, transfer details etc is captured through these screens.
You can invoke the ‘Asset Transfer’ screen by typing ‘FADTRTFR’ in the field at the top right corner of the Application tool bar and clicking on the adjoining arrow button.

The process of transfer is automated and the transferred asset is automatically created in the branch/location on Save of transfer.
Transfer value of the asset will be the current book value of the asset itself and cannot be modified. Book Value is arrived at by subtracting the accumulated depreciation from the asset cost.
Note
At least one of the two (new location and branch) must be different than current location and branch of the asset. Oracle FLEXCUBE will display an error message if this condition is not met.
The reference number of the asset is defaulted from the contract input screen. You will not be able to modify this number. To move to the next asset or previous asset, use the Up and Down arrow keys in the keyboard.
Asset Details
Click ‘New’ button in the toolbar to make a new entry for sale/write off.
Depending on the reference number you choose, the details for the asset will be defaulted in the following fields:
- Asset Description - the general information regarding the asset in this free format text field
- Asset Cost - the cost of the individual item
- Category – the code of the category under which the asset is placed
- Location – the location code where the asset is currently stationed
- Accumulated Depreciation – the accumulated depreciation from previous branch in case of transfer
Transaction Details
Specify the following details:
Transfer Amount
This is the net sale value of the asset. This field is mandatory if the asset is being sold.
For a Write off, this value will be the current book value and is not modifiable.
Value Date
This is the date on which the asset is sold or written off.
In case of a Sale, the default date will be the system date and you can choose to change this date.
For a Writeoff, this date will always be the system date and you will not be allowed to modify this date.
Officer Incharge
For both Sale and Write off, you have to mention the name of the officer in charge of the sale or transfer of the asset. This data is recorded for general information purpose.
Remarks
You can enter general remarks for the asset in this free format text field for information purposes.
Note
Any sale/transfer/write off has to be authorized before the end of day.
Transfer Details
Specify the following details:
New Branch
This is the branch where the asset is to be transferred. This field is mandatory for asset transfer. Select the branch from the option list.
New Location
This is the location to which the asset is to be transferred. This field is mandatory for asset transfer. Select the branch from the option list.
New Reference
This is the asset reference number of the asset created in the new branch/location and you will not be allowed to modify the number.
This number is automatically generated by the system when you save the asset transfer.
5.2.2 Asset Transfer Process
The following conditions are mandatory for asset transfer –
- The category - location rule mapping for the new location should be rule based
- If only the branch is being changed and not the location, the existing category – location depreciation type can be ad hoc. In this case ad hoc schedules will be copied from the old asset to the new asset.
- If the location is being changed, then the new category – location combination should have depreciation type as rule based. Old category – location combination can have ad hoc depreciation. Transfer is possible only if the new category location rule mapping has the same rule type as the old category.
Example,
Assume category=’a’; location=’x’;’y’ ; rule=’r1’(adhoc);’r2’(rule based).
Mapping is a-x-r1 and a-y-r2. branch’s are b1, b2. asset 0001 has category=’a’; location=’x’.
Asset cannot be transferred from b1-b2-y; b1-b1-y.
- In branch parameters, depreciation period, cut off date and cut off period fields should have the same value in both the old and the new branches
- If the asset is being transferred to a new branch, the new branch should have exactly the same definition of financial year and financial periods. If not, it might result in erroneous depreciation calculation.
While doing an asset transfer, system will check the preferences maintained at the branch parameters level to complete or reverse depreciation for the period in which the asset is being transferred to a new branch/location.
- If the asset is being transferred after the cut off date, then depreciation will be completed for the current period in the transferor branch. Further depreciation will happen in the transferee branch for rest of the depreciation period in the current financial year.
- If the asset is being transferred on or before the cut off date, any depreciation which might have happened in the current period will be reversed out for the transferor branch. Further depreciation from the current period onwards will happen in the transferor branch according to the category –location rule maintenance for the new location (in case the location has changed).
The original reference number for the transferred asset will be the original reference number of the asset in the old branch/location.
All other details of the asset will be the same as they were before transfer except for the following:
- Acquired depreciation – This will be updated with the total depreciation amount (Accumulated depreciation) for the asset in the previous branch/location.
- Ad hoc Schedules – The new asset created will not have ad hoc depreciation schedules if the asset is transferred to a new location as the new category – location combination must allow for rule based depreciation. If the location is the same, then the original ad hoc schedules will be replicated to the new asset.
- Asset Acquisition date will be the transfer date
- In case a capitalized asset is transferred, capitalization date will be the transfer date else it will not be updated (if asset is transferred in WIP stage).
- In case a capitalized asset is transferred, effective depreciation date will be the transfer date else it will not be updated (if asset is transferred in WIP stage).
The new asset created will be automatically authorized once the transfer of the asset is authorized. Till such time, the new asset cannot be modified independently. After authorization of the transfer, the new asset created will be independent of the original transferred asset.
On deletion of the transfer, the new asset created will also be deleted.
Refer the examples in the accounting entry process in the Appendix manual for the above two scenarios.
5.3 Asset Sale Details
This section contains the following topics:
5.3.1 Invoking Asset Sale Detail Button
You can specify the asset sale details in the ‘Fixed Assets Sale Details’ screen. You can invoke this screen by typing ‘FADTRSLE’ in the field at the top right corner of the Application tool bar and clicking on the adjoining arrow button.
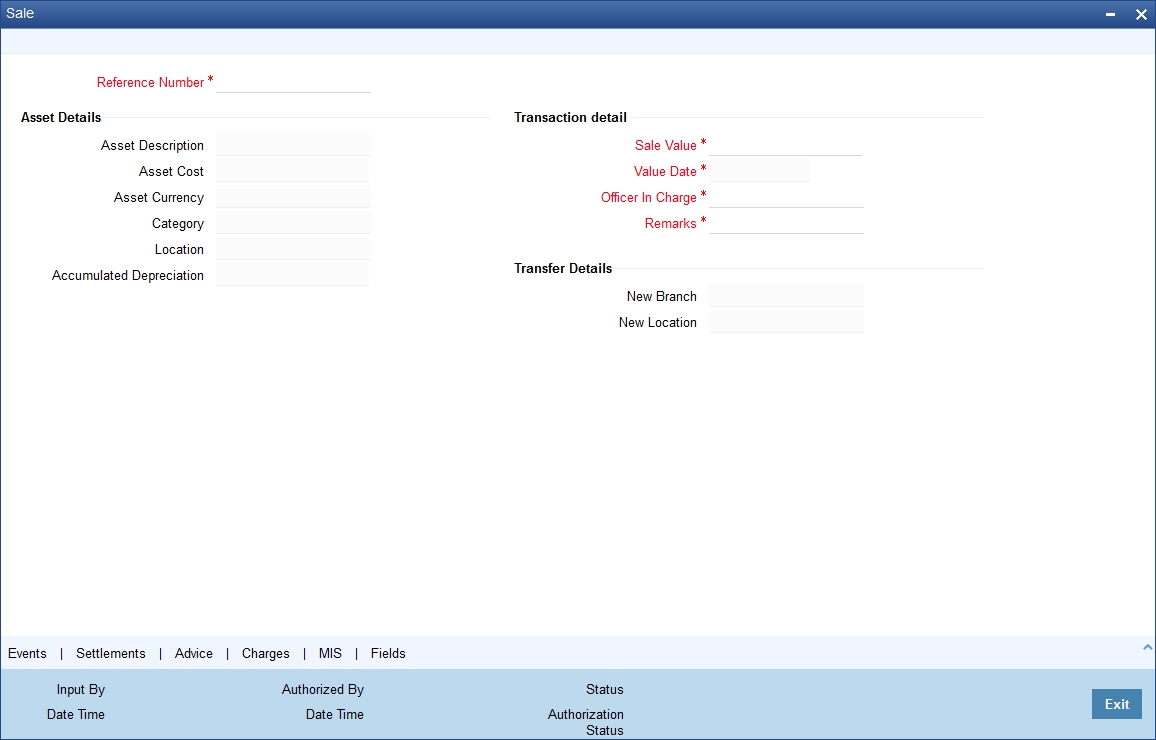
For more details on the screen refer section ‘Specifying the Asset Transfer Details’ in this chapter.
5.4 Asset Write Off Details
This section contains the following topics:
5.4.1 Invoking the Asset Write Off Screen
You can specify the asset write off details in the ‘Asset Write Off’ screen. You can invoke this screen by typing ‘FADTRWRF’ in the field at the top right corner of the Application tool bar and clicking on the adjoining arrow button.
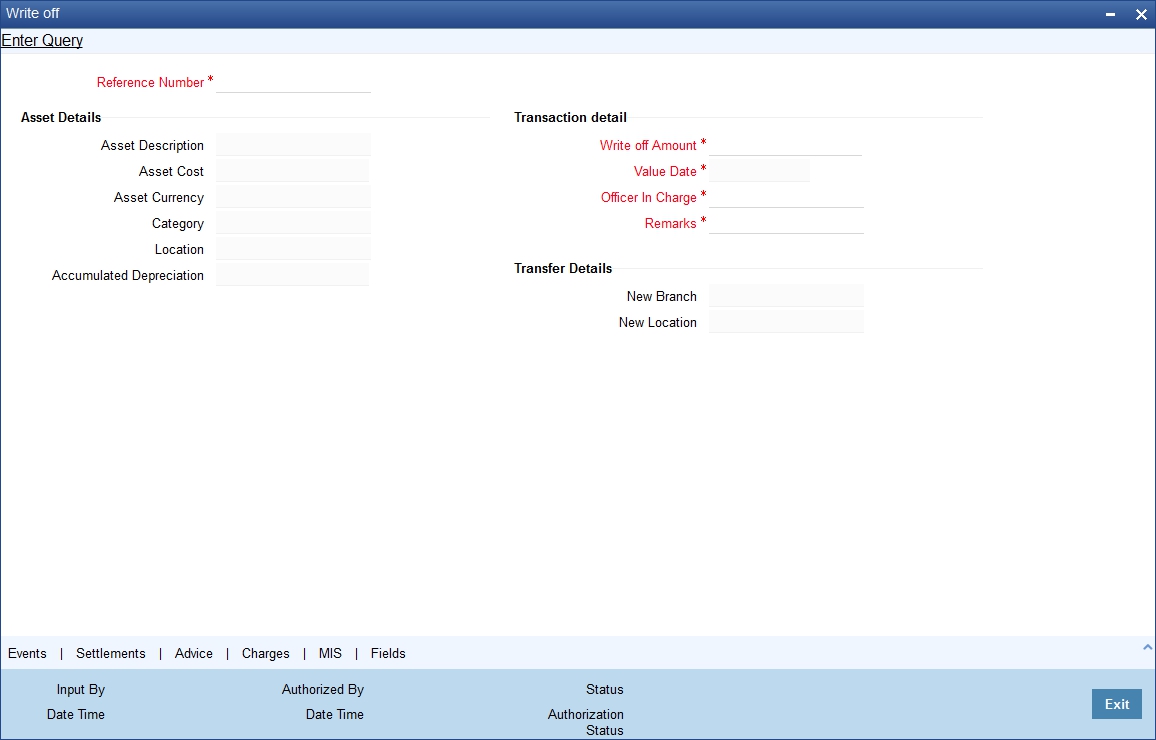
Write Off value, value date, details of the officer authorizing the write off and internal remarks are captured through this screen.
For more details on the screen refer section ‘Specifying the Asset Transfer Details’ in this chapter.
5.5 Authorizing Fixed Asset Contracts
This section contains the following topics:
5.5.1 Invoking the Fixed Assets Authorization Screen
You can use the ‘Fixed Assets Authorize Contract’ screen to authorize asset capture, sale, write-off and transfer operations performed on any fixed asset contract.
You can invoke this screen by typing ‘FADTRAUT’ in the field at the top right corner of the Application tool bar and clicking on the adjoining arrow button. The screen is displayed below:

Specify the following details:
Contract Reference
Specify the contract number which you are authorizing.
Event Date
Current system date is displayed here.
Event Code
A code for this authorizing event is displayed here.
Maker
On selecting the contract number, the Maker ID is displayed.
Rekey Fields
Rekey the following details for authorizing a contract.
- Asset Currency
- Asset Cost
- Capatalization Date
- Effective Depreciation Date
Change Log Details
If there are any values changed in the contract, then the following details are displayed here:
- Field Description
- Old Value
- New Value
Overrides
The following override details of the contract for all operations is displayed here:
- Confirmed
- Remarks
- Authorized By
- Authorized Date
- Status
- Remarks
5.6 Contract Reassign to another User
This section contains the following topics:
5.6.1 Invoking the Fixed Assets Contract Reassign Screen
A contract can be deleted only by the user who entered it. If a contract has to be deleted and the user who input the same is not available to do it, you can reassign the contract to another user so that the other user can delete it. Typically, this situation may arise during EOD operations, when a contract that is not authorized has to be deleted and the user who input it has left office for the day.
You can invoke the ‘Fixed Assets Contract Reassign’ screen by typing ‘FADTREAS’ in the field at the top right corner of the Application tool bar and clicking on the adjoining arrow button.

To reassign a contract to another user, the following steps are required:
Product Code
- Indicate the product associated with the contract. You can select a product code from the option list, which contains a list of the authorized products that you have created.
Contract Reference
- Indicate the contract reference number of the fixed asset you wish to reassign, to another user. You can select a reference number from the option list, which contains a list of all the active fixed asset contracts.
New User Identity
- Select the User ID of the user to whom you are assigning the contract.
Note
This user to whom you reassign a contract should have access rights to enter fixed asset contracts.
Your User ID will be defaulted from the login screen. Select ‘Save’ from the Actions menu in the Application toolbar or click save icon to save the specifications you have made. Click ‘Exit’ or ‘Cancel’ button if you do not want to save the details that you entered.