6. Contract Processing
6.1 Introduction
Before you begin foreign exchange operations in Oracle FLEXCUBE, you must maintain the following information:
- Exchange rates
- Forward rates
- Discounting rates
- Netting details
This data is required to process the foreign exchange deals that you enter into.
This chapter contains the following sections:
- Section 6.2, "FX Deal"
- Section 6.3, "Operations on a Contract"
- Section 6.4, "The Liquidation and Cancellation Function"
- Section 6.5, "Reassign Contract"
- Section 6.6, "Online Querying for FX positions"
- Section 6.7, "FX Affirmation Input"
- Section 6.8, "Internal Swap Transactions"
6.2 FX Deal
This section contains the following topics:
- Section 6.2.1, "Entering an FX Deal"
- Section 6.2.2, "Invoking Foreign Exchange Contract Input Screen"
- Section 6.2.3, "Main Tab"
- Section 6.2.4, "Specifying the ‘Rollover instructions’ Tab Details"
- Section 6.2.5, "Specifying the ‘Netting’ Tab Details"
- Section 6.2.6, "Process of updating of Limit Tracking options "
- Section 6.2.7, "Manual Netting"
- Section 6.2.8, "Automatic and Manual FX Netting Batch"
- Section 6.2.9, "Capturing the ‘Revaluation Details Tab’ Details"
- Section 6.2.10, "Specifying ‘Non-Deliverable Forward’ Tab Details"
- Section 6.2.11, "Saving the Contract You Entered"
- Section 6.2.12, "Processing a Contract Involving a Product Combination"
- Section 6.2.13, "FX Contracts Processing with Netted Limits Tracking"
- Section 6.2.14, "Upload"
- Section 6.2.15, "Amendment of Uploaded Deals"
- Section 6.2.16, "Indicating the Option Period and the Rate"
- Section 6.2.17, "Viewing Event Details"
- Section 6.2.18, "Suppressing or Prioritizing Advices"
- Section 6.2.19, "Charge Details"
- Section 6.2.20, "Brokerage Details"
- Section 6.2.21, "Settlement Details"
- Section 6.2.22, "Viewing FX Linkage Details"
6.2.1 Entering an FX Deal
To enter a foreign exchange contract you must invoke the ‘FX Contract Input’ screen. You can invoke the contract input screen from the Application Browser. You can also go to the ‘FX Contract Input’ screen from the following screens:
- FX Contract summary view
- FX Contract detailed view
6.2.2 Invoking Foreign Exchange Contract Input Screen
You can invoke the ‘Foreign Exchange Contract Input’ screen by typing ‘FXDTRONL’ in the field at the top right corner of the Application tool bar and clicking on the adjoining arrow button.

Now, to input a contract in the screen, select ‘New’ icon in the Application tool bar or click new icon.
You can enter the details of a contract in two ways. You can:
- Copy the details from another contract and change the details that are different for the contract you are entering; or
- Enter all the details of the new contract in the contract input form.
Based on the type of contract that you are entering, you have to select a product or a product combination that you have maintained in the branch.
To select a product, click on option list icon in the Product Code field. A list of the products that you have maintained in the branch will be displayed. Click on the product which you would like to offer the counterparty.
When you select a product the transaction acquires the attributes that you defined for the product. On entering the Product code and tabbing-out, the product details get populated.
Product Description
The description of the selected FX product is defaulted here.
Source
This indicates the name of a registered external system in Oracle FLEXCUBE UBS.
External Swap Reference Number
This is the swap reference number generated by the external system for the FX Swap deal. In case of amendment (by reversal of parent and rebooking) when a child contract is booked the External swap reference of the parent will be nullified and the external swap reference number will be copied to the child contract. Both the legs of the swap contract will have the same reference no.
Note
The SWAP reference number is only for information purpose and no processing will be done based on this in Oracle FLEXCUBE.
The External SWAP ref no. can be viewed in the ‘Foreign Exchange Contract Summary’ screen.
NDF Related Reference Number
Select the NDF Related reference number from the option list. The list displays all unfixed authorized NDF Forward contracts.Contract Reference
All contracts that are entered into the system are assigned a unique identification number known as the Contract Reference number.
The reference number for a contract is based on the Branch Code, the Product Code, the date on which the contract is entered (in the Julian Date format) and a running serial number for the day.
The Julian Date is of the following format:
“YYDDD”
Here, YY stands for the last two digits of the year and DDD for the number of day(s) that has/have elapsed in the year.
Reject Reason
The system displays the reject reason.
Contract Reference
Select the contract reference number of the check for which financing is required from the adjoining option list. System displays contract reference numbers which has Active status Once you have specified the above details, click 'P' button to populate the details of the contract.
User Reference
In addition to the automatically generated Reference Number, you can identify the contract you are processing with unique reference number.
Typically, you would use this field to capture the reference number assigned to a contract by the counterparty.
Related Reference
Specify the related reference number for the contracts. For an NDF Forward Contract this field indicates the reference number of the corresponding NDF Fixing Contract. For an NDF Fixing Contract it indicates the NDF Forward Contract reference number.
It is a mandatory field for the NDF Fixing Contract. It is NULL while booking the NDF Forward Contract and while booking the NDF Fixing Contract, it is set to NDF Fixing Contract.
External Reference
This is the reference number sent from the external system This is a mandatory field during an upload from an external system.
Bill Reference
This is the reference number of the bill contract in the BC module.
Confirmation Status
The system displays the confirmation status.
Confirmation status will be ‘Unconfirmed’ for a contract at the time of booking or after any amendment. The status will be moved to ‘Confirmed’ when the confirmation is done for the contract by auto/manual matching or manually. A deal which is already confirmed by message matching can be marked as unconfirmed manually from the Manual Matching screen and the confirmation status will be changed to Unconfirmed.
If affirmation is done for an FX contract with an Affirmation Type for which the field for ‘Consider for contract confirmation’ is checked, then also the contract status will be moved to ‘Confirmed’. If after such an affirmation, unaffirm action is done for the contract, then confirmation status will change back to unconfirmed.
Entering the Confirmation waiver will change the confirmation status of the deal as ‘Waived’. If the confirmation is un-waived for such a deal, then confirmation status will be moved back as ‘Unconfirmed’. Confirmation can be unwaived for a deal with confirmation status as ‘Waived ‘only. The system will validate the same.
If the confirmation received or affirmation received with affirmation type is checked for ‘Consider for Contract Confirmation’, then Confirmation Status is ‘Confirmed’ for the deal.’
If confirmation status of a deal is ‘unconfirmed’ and confirmation waiver is not marked for a deal then related payment messages will be generated in ‘Confirmation Pending’ status.
Reversed Reference
The reference number of the contract that is being reversed and rebooked is displayed here.
For further details on reversing and rebooking of a contract, refer the section titled ‘Reversing and Rebooking a Contract’ of this user manual.
6.2.3 Main Tab
Counterparty
Select the counterparty who is involved in the foreign exchange deal that you are entering.
The adjoining option list displays a list of all the customers allowed for the product (that you have chosen in the product field). Double click on the ID of the customer to choose it.
Counterparty Name
The name of the selected counterparty is defaulted here.
Booking Date
This is the date on which the contract begins. The system defaults to today’s date, which can be changed.
- This date cannot be earlier than the Start Date or later than the End Date of the product.
- This date should be earlier than or the same as the Value Date of the contract.
Option Date
You can specify an option date for forward deals if it has been allowed for the product it involves.
If a value date is specified then the maturity date of the deal can be changed to any day on or before the option date.
Broker
Specify the broker involved in an FX deal in this field. The adjoining option list displays a list of the brokers that you have maintained in your bank. Choose the broker involved in the deal by double clicking on the ID of the broker.
If brokers have been disallowed for the product that you chose in the Product Code field, you cannot specify a broker for the deal.
When a deal involving a broker is processed, the brokerage applicable to the broker will be picked up and the necessary accounting entries passed.
Dealer
You can enter the code of the foreign exchange dealer in your bank who entered into this deal. From a list of dealers available, choose the dealer. Double click on the ID of the dealer who entered into the deal.
Linked Deal Details
After entering the combination deal and clicking on Linked Deal, the system displays an information message “Only 1st leg request processed successfully” and defaults the second.
Deal Type
In an Foreign Exchange deal you would either buy or sell currency. Indicate if the contract that you are entering is a Buy deal or a Sell deal.
To indicate that the deal is a buy deal, click on the button against Buy. You can indicate that a deal is a Sell deal by clicking on the button against it.
Bought Currency
Specify the currencies that are involved in the contract. Indicate the currency that you are buying.
The adjoining option list displays all the currencies that are allowed for the product. Choose the appropriate one.
Note
For MT300/304 messages, the system restricts the display of the following currency codes in the option list.
ISO 4217 Currency Code |
Currency |
XAU |
Gold (one troy ounce) |
XAG |
Silver (one troy ounce) |
XPD |
Palladium (one troy ounce) |
XPT |
Platinum (one troy ounce) |
Bought Amount
Adjacent to the Currency field, is the Amount field. You must enter the bought amount of the bought currency here.
Against the Bought currency, enter the bought amount in the Amount column. You can enter the amount in numerals and then enter
- ‘T’ - to indicate that the amount is in thousands
- ‘M’ - to indicate that the amount is in millions
- ‘B’ - to indicate that the amount is in billions
On saving the transaction after entering all the required details in the system, the system validates the value of the bought amount against the following:
- Product transaction limit
- User Input limit
If the transaction currency and the limit currency are different, then the system converts the amount financed to limit currency and checks if the same is in excess of the product transaction limit and user input limit. If this holds true, the system indicates the same with below override/error messages:
- Number of levels required for authorizing the transaction
- Transaction amount is in excess of the input limit of the user
Bought Value Date
Enter the value date for the bought leg of the contract in the Value date column. Against the bought currency and bought amount, indicate the value date for the bought leg in the Value Date column.
Sold Currency
Specify the currencies that are involved in the contract. Indicate the currency that you are selling.
The adjoining option list displays a list of all the currencies that are allowed for the product. Choose the appropriate one.
Note
For MT300/MT304 messages, the system restricts the displays of the following currency codes in the option list.
ISO 4217 Currency Code |
Currency |
XAU |
Gold (one troy ounce) |
XAG |
Silver (one troy ounce) |
XPD |
Palladium (one troy ounce) |
XPT |
Platinum (one troy ounce) |
Sold Amount
Adjacent to the Currency field, is the Amount field. You must enter the sold amount of the sold currency here.
Against the Sold currency, enter the sold amount in the Amount column. You can enter the amount in numerals and then enter
- ‘T’ - to indicate that the amount is in thousands
- ‘M’ - to indicate that the amount is in millions
- ‘B’ - to indicate that the amount is in billions
On saving the transaction after entering all the required details in the system, the system validates the value of the bought amount against the following:
- Product transaction limit
- User Input limit
If the transaction currency and the limit currency are different, then the system converts the amount financed to limit currency and checks if the same is in excess of the product transaction limit and user input limit. If this holds true, the system indicates the same with below override/error messages:
- Number of levels required for authorizing the transaction
- Transaction amount is in excess of the input limit of the user
Sold Value Date
Enter the value date for the sold leg of the contract in the Value date column.
Similarly, against the sold currency and sold amount indicate the value date of the sold leg of the contract.
The Value Date will be the same except in the case of Split Value Date deals.
Deal Rate
Based on the counterparty, the Currency Pair and the Value Date for the transaction, the System automatically assigns the deal rate that is to be used for the funds transfer deal, if currency conversion is involved.
The Deal Rate applicable for the transaction = Base Rate +/- Customer Spread (depending on whether it is a Buy or a Sell).
Customer Spread
Similarly, the spread that you have maintained for the specified Counterparty, Currency Pair and Tenor combination in the ‘Customer Spread Maintenance’ screen is picked up and applied for the customer involved in the deal.
While picking up the Customer Spread, the System ascertains the tenor of the contract according to the following logic:
Buy Tenor = Buy value date – (System date + Spot date)
Sell Tenor = Sell value date – (System date + Spot date)
Note
If spread details for a specific counterparty (for the currency pair) are unavailable, the System looks for the customer spread maintained for the wildcard ALL entry. If even that is not available, then the Customer Spread defaults to zero.
The spread definition which indicates whether spread is calculated in percentage or points is displayed here.
Base Rate
The Base Rate is derived from the Mid Rate and the Buy/Sell Spreads that you maintain for the currency pair in the exchange rate maintenance table.
Local Currency Eqv
The local currency equivalent of the contract amount will be displayed in this field. The local currency amount is calculated as follows:
In case of a direct quote currency:
LCY = FCY x Rate
In case of indirect quote currency:
LCY = FCY / Rate
Outstanding Balance
The outstanding balance for a particular contract is displayed here. This is the amount which is not yet Cancelled or Liquidated.
Internal Remarks
Enter remarks about the contract.
Capturing Other Details
The following details are captured here:
Fund Identity
Select the fund id from the adjoining option list.
Auto Liquidate
Foreign exchange deals can be liquidated automatically or manually.
Deals for which you have specified the automatic mode of liquidation will automatically be liquidated on the Value Date during the beginning-of-day processing (by the Automatic Contract Update function).
If you do not specify auto liquidation for a product, you have to give specific instructions for liquidation, through the ‘Manual Liquidation’ screen, on the day you want to liquidate a deal.
If the Value Date of a deal is a holiday, the deal will be liquidated depending on your specifications in the Branch Parameters table. In this table
- If you have specified that processing has to be done on the last working day (before the holiday), for automatic events, the deal falling on the holiday will be liquidated during the beginning-of-day processing on the last working day before the holiday.
- If you have specified that processing has to be done only on the system date, for automatic events, the deal falling on a holiday will be processed on the next working day after the holiday, during beginning-of-day processing.
To indicate that you would like to liquidate a contract automatically on the value date, click on the box adjacent to Auto Liquidation.
Continuous Linked Settlements Eligible
This field will be automatically updated by the system based on certain criteria. Only if the conditions are satisfied, the deal will be processed via the ‘CLS Bank’. Otherwise, it will be considered as a normal FX transaction.
Payment on Confirmation
Check this box to confirm the payment.
If this field is checked then the payment messages will be sent only in the following conditions:
- If Confirmation Status is ‘Confirmed’ for the deal. This status can be the result of confirmation received or affirmation received with affirmation type checked for ‘Consider for Contract Confirmation’.
- If Confirmation waiver is marked for the contract.
The linked payment messages for an event will be generated only if ‘Payment on confirmation’ is checked for the contract. Otherwise message will be held in ‘Pending for Confirmation’ status.
Exclude From Continuous Linked Settlements
This option will enable you to process a CLS eligible deal as a non-CLS deal. You have to select the ‘Exclude From CLS’ option to process a CLS deal as a normal FX transaction.
Refer the ‘Continuous Linked Settlements’ chapter of the Foreign Exchange User Manual for details on the maintenances required for CLS deals and processing the same in Oracle FLEXCUBE.
Specifying Limits Tracking Details
The following details are captured here:
Limit/Risk Tracking
Check this option to specify that limit tracking for settlement risk, pre-settlement risk and weighted risk should be done for FX contracts. When this option is checked, the risk tracking option will also be enabled.
By default this field will be checked.
Risk Percentage
The risk percent for the contract is displayed here.
The risk percent will be fetched from risk percent maintenance for combination of risk category+ ‘FX’+ product combination or risk category+ ‘FX’+ ‘ALL’ combination using original tenor of the contract.
Risk Weighted Amount
The risk weighted amount will be displayed here.
The risk percent will be applied on the bought amount to arrive at risk weighted amount.
Note
When a contract is copied, the limit tracking, risk tracking options and credit lines will be copied from the contract. The risk percent and risk weighted amount will be zero.
Whenever the counterparty is changed, the credit lines will be made NULL as the credit lines are dependant on the counterparty.
If credit lines are changed during amendment then the existing utilization will be transferred to the new credit line and the utilization for the old credit line will be made Zero. If limits tracking option is unchecked during amendment, the utilizations will be nullified for the credit lines.
The tenor for calculation of risk weighted amount will be calculated based on tenor type (‘Fixed’ or ‘Rolling’) maintained at the product.
The tenor of FX contract will be arrived as follows:
Fixed: Bought value date – booking date
Rolling : Bought value date – Branch date
During rollover event, the tenor of rollover version of FX contract will be arrived as follows:
Fixed: Rollover Bought value date – original booking date (the tenor will be calculated from the original booking date).
Rolling: Rollover Bought value date – Branch date (the tenor will be calculated from the rollover date).
Track Settlement Risk
This option will be enabled only when the Limits Tracking option is checked.
Check this option to specify that limit tracking should be done on bought amount of FX Contracts.
Track Pre-Settlement Risk
This option will be enabled only if the Revaluation is set to Y at the Product level and the Limits Tracking option is checked.
Check this option if limit tracking on the revaluation gain for FX contracts is required.
Track Weighted Risk
This option will be enabled only when the Limits Tracking option is checked.
Check this option to specify that limit tracking should be carried out on the risk weighted amount for FX contracts under this product.
Settlement Risk Credit Line
Settlement risk is the risk that one party will fail to deliver the terms of a contract with another party at the time of settlement. Select the credit line that should be used for netted settlement risk tracking from the option list. The list displays all valid credit lines applicable for the counterparty.
Pre-Settlement Risk Credit Line
Pre-settlement risk is the risk that one party of a contract will fail to meet the terms of the contract and default before the contract's settlement date, prematurely ending the contract. This field will be enabled only if the Limits Tracking option and Risk Tracking option is selected else it will be made NULL and disabled.
Select the Credit line to be used for tracking revaluation gain/ loss from the option list. The list will display all valid credit lines applicable for the counterparty and product.
Weighted Risk Credit Line
Select the credit line that should be used for netted risk weighted limit tracking from the option list. The list displays all valid credit lines applicable for the counterparty.
Specifying Settlement Instructions Pickup Details
The following details are captured here:
Settlement Sequence Number (Buy)
Specify the settlement sequence number of the settlement instruction. Alternatively, you can select the settlement sequence number from the option list. The list displays all the available settlement instruction.
Settlement Instruction Description
The system displays the description of the selected Settlement Instuction.
Settlement Sequence Number (Sold)
Choose a settlement instruction by specifying a settlement sequence number.You can skip this field if any default settlement instruction is specified.
Settlement Sequence Description
The system displays the description of the selected Settlement Instuction
.The exchange rate type
Different types of exchange rates can be maintained in your branch. For example, you can define a set of exchange rates (buy and sell) for USD for deals with banks and another set of rates for deals with walk-in customers.
When you define a product, you specify an ‘Exchange Rate Type’ for it. The exchange rate, corresponding to the Rate Type, defaults to all contract entered for the product.
You can change the exchange rate that is maintained for the currency in the currency table. Only, the changed value should be within a certain range. This range is referred to as the Exchange Rate Variance.
The exchange rate variance is specified while creating a product.Oracle FLEXCUBE will carry out the following validations while saving a Contract:
- Ensure that Credit lines are different for each limit tracking.
- Checks for the existence of risk category in the Customer maintenance if risk weighted limit tracking is set at the contract level.
- Checks for the existence of risk percent maintenance for risk category + ‘FX’+ (‘ALL’/product) combination if risk weighted limit tracking is set at the contract level.
- Checks for the presence of credit lines if risk tracking options are set at the contract level.
- Displays an error message if pre settlement risk option credit line is maintained and if the product is not set for revaluation
Displays an error message if limits tracking required is ‘N’ and risk tracking options are ‘Y’.
6.2.4 Specifying the ‘Rollover instructions’ Tab Details
By default, a forward contract that is marked for roll-over will be rolled-over with the terms of the original contract. However, you can change certain terms by specifying them in the ‘Roll-over Instructions’ screen. Click on Roll-over In the FX Contract to go to the ‘Roll-over Instructions’ screen.
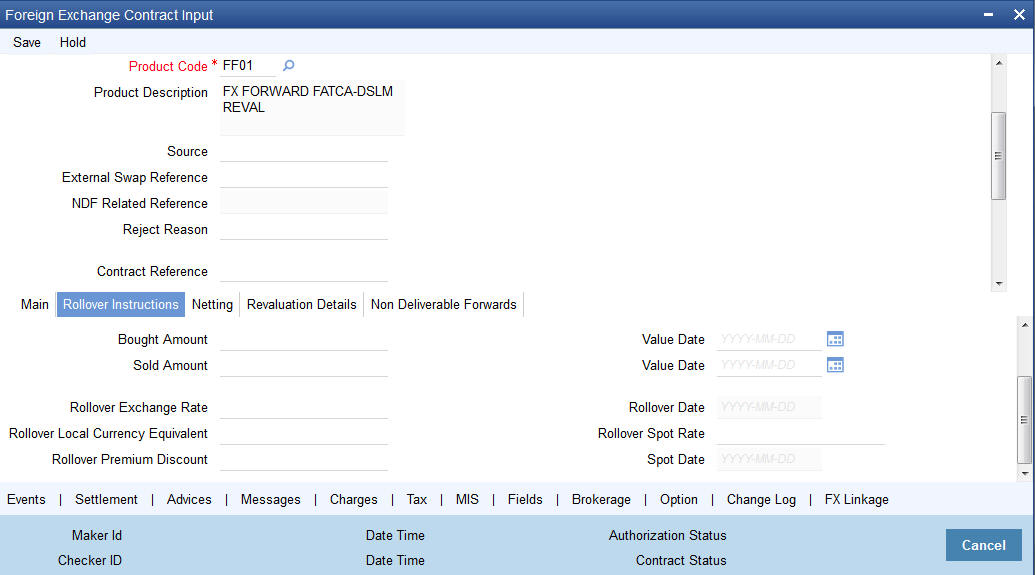
Roll-over instructions (for forward contracts) can be input only through the Unlock operation. You cannot input them when you are entering the contract details through the New or Copy operation.
Auto Rollover
While setting up a product, you should specify whether contracts involving the product should be rolled over on the maturity date. If rollover is applicable, you can specify in this field whether contracts involving this product should be rolled over automatically or manually.
If you want the contract to be automatically rolled over, click on the check box against this field. The contract will be automatically rolled over on its Value Date (settlement date).
If you do not click on the check box, you should manually roll over the contract. To manually roll over a contract, enter the date on which the contract should be rolled over in the Rollover Date field.
Rollover Required
In this field, you can specify whether rollover is required or not, for contracts involving this product.
If check this box, rollover is allowed for contracts involving this product. During contract processing, you can specify whether such contracts should be automatically or manually rolled over.
If you do not check this box, rollover is not allowed for contracts involving this product.
Note
If you have selected Yes in the Auto Liquidation field, the Rollover Allowed field should be set to No. In other words, if contracts involving this product are to be automatically liquidated on the maturity date, these contracts cannot be automatically rolled over.
Sold Amount
This is the Sold amount of the new contract. The Sold amount of the old contract will default here if the Deal Type is Sell.
Sold Value Date
This is the settlement date of the Sell contract as specified in the Contract Details table.
If Split Value Dates are allowed for the contract, the Bought and Sold legs of the contract can have different settlement dates
Bought Amount
This is the Bought Amount of the new contract. The Bought Amount of the original contract defaults here if the Deal Type is Buy.
Bought Value Date
This is the settlement date of the new contract. Enter a date that is later than the Value Date of the original contract.
For forward contracts, enter a date that is later than the Spot Date of the currency. If an Option Date is allowed for the product involving the contract, enter a date that is later than the Transaction Date and earlier than the Value Date of the contract.
Rollover Exchange Rate
The Exchange Rate between the currency pair involved in the contract is displayed here.
You can change the Exchange Rate that is displayed here. Since the rate that you enter here would be different from the Standard Exchange Rate it is referred to as a Exchange Rate Variance.
You cannot enter a rate that exceeds the Maximum Exchange Rate Variance that you have defined for the product (in the ‘Product Preferences’ screen).
- If the variance is less than the Normal Exchange Rate Variance defined for the product, the contract will be stored without an override.
- If the variance is greater than the Normal Exchange Rate Variance and less than the Maximum Exchange Rate Variance, you will be prompted for an override. The contract will be stored only if you provide an override.
- If the variance is greater than the Maximum Exchange Rate Variance With Override, the contract will not be stored. You have to change the Exchange Rate before storing the contract.
Rollover Spot Rate
For contracts involving local currency, the Spot Rate of the foreign currency is taken as the default Spot Rate.
For cross currency contracts, the rate between the two currencies as maintained in the Currency table is taken as the default Spot Rate. If the rate between the two currencies has NOT been maintained, the Spot Rate of the P & L Currency against the local currency is taken as the default Spot Rate.
You can change the Spot Rate displayed in this field.
Rollover Date
This is the date on which the contract is to be rolled over.
Spot Date
For contracts involving the local currency, the Spot Date of the foreign currency in the pair is taken as the default Spot Date.
For cross currency contracts, the Spot Date of the P & L Currency is taken as the default Spot Date. For example, if the currency pair involved is GBP/USD and if you are buying GBP, the Spot Date of GBP is displayed here.
You can change the Spot Date displayed in this field.
Rollover Local Currency Equivalent
The local currency equivalent of the amount involved in the contract is displayed here. This amount can be changed. This is calculated according to the rate maintained in the Currency table. For cross currency contracts, this amount is calculated as:
(Bought Amount * Spot LCY Rate for Bought CCY) * (Sold Amount * Spot LCY rate for Sold CCY)/2
Rollover Premium Discount
For forward contracts, this is the Premium or Discount Amount that is applicable as on the date the contract was initiated. It is calculated as the difference between the amount in Term Currency (as on the Transaction Date) and the amount in Term Currency (as on the Value Date).
The following terms can be different for the new contract:
- Amount
- Value Date
- Roll-over Date
- Roll-over Spot Rate
After you enter the details click on the ‘Yes’ button. If you do not want to save the details you entered, click on the ‘No’ button.
6.2.5 Specifying the ‘Netting’ Tab Details
You can specify the netting preferences in the ‘Netting’ tab of the ‘FX Contract’ screen.
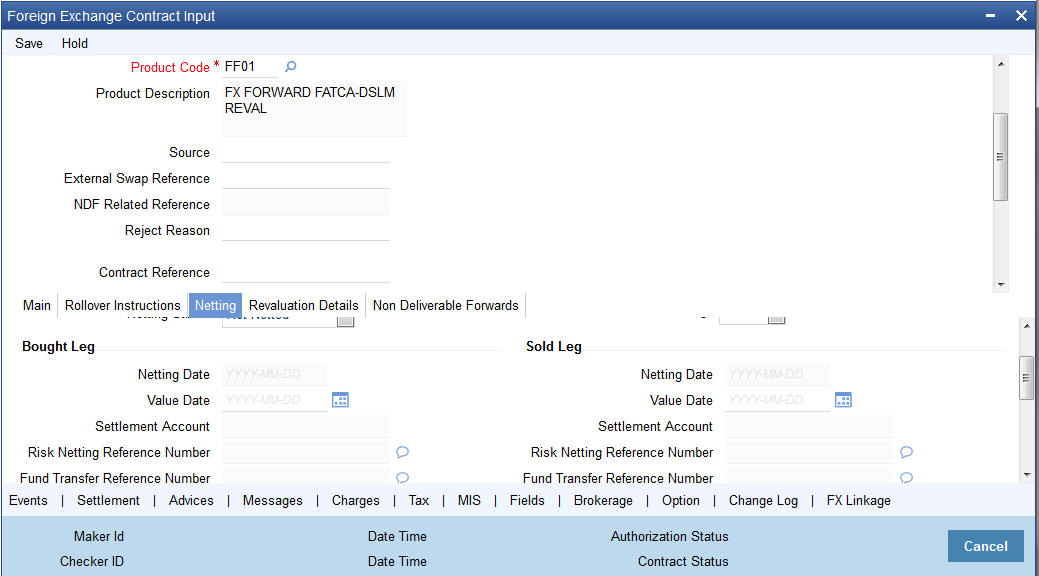
The following details can be captured here:
Netting Type
In this field you must first indicate the type of netting. You can net the contracts involving a customer in two different ways. Contracts can either be netted
- Pair wise
- Currency wise
If you choose to net contracts pair wise, the system selects all contracts that have been specified for pair wise netting, for the counterparty. Contracts that have the same currency pair, irrespective of whether they are bought or sold, will be netted.
If you choose to net contracts currency wise, the system selects all contracts that have been specified for currency wise netting, for the counterparty. The value date of the bought currency leg and that of the sold currency leg are considered individually to arrive at the netting date.
Netting Customer
The FX netting customer of the contract’s counterparty will be displayed here. This would be defaulted from the FX Netting Customer which you have specified for the Counterparty in Customer Information maintenance for the Counterparty. A reference is made to the Customer Maintenance while entering a new contract or amending an existing one.
For every customer, FX contracts are collated based on the FX Netting Customer during the Netting Process-Automatic and Manual.
Netting Status
The status of netting is displayed in this field. Depending on whether the netting type is currency-wise or currency pair-wise, the status will be displayed as any of the following:
- Not Netted
- Bought Leg Netted
- Sold Leg Netted
- Fully Netted
Mode of Netting
Mode of netting is defaulted from the netting agreement maintenance of the FX Netting customer. You cannot override the value of this field for the specific contract. But by changing the value of ‘Netting Type’, Mode of Netting will undergo certain alterations.
If you choose Currency Wise or Pair wise netting as the ‘Netting Type’, a reference is made in the netting agreement maintenance of the counterparty and the corresponding mode is reflected here also.
If you choose ‘No Netting’ as the Netting Type, Mode of Netting will be reset as a blank value.
6.2.5.1 Bought Leg
Specify the following details.
Netting Date
Specify the date on which you want to net the bought leg of the deal.
Value Date
This is the date on which the bought leg of the contract is to be settled.
Settlement Account
Specify the settlement account to be used while netting the Bought leg of the deal.
Risk Netting Reference Number
The reference number being used to utilize the limit for the netted amount for the bought leg will be displayed here.
Fund Transfer Reference Number
The reference number of the funds transfer used for netting the bought leg is displayed here.
Netting Reference Number
The netting reference number of the bought leg is displayed here.
Related Foreign Exchange Contract
Specify the related FX contract for netting.
6.2.5.2 Sold Leg
Specify the following details.
Netting Date
Specify the date on which you want to net the sold leg of the deal.
Value Date
This is the date on which the sold leg of the contract is to be settled.
Settlement Account
Specify the settlement account to be used while netting the sold leg of the deal.
Risk Netting Reference Number
The reference number being used to utilize the limit for the netted amount for the sold leg will be displayed here.
Fund Transfer Reference Number
The reference number of the funds transfer used for netting the bought leg is displayed here.
Netting Reference Number
The netting reference number of the sold leg is displayed here.
6.2.5.3 Specifying Netted Limit Tracking details
You can also specify if Netted Limit Tracking is required for the FX contract.
Settlement Risk
You can specify whether settlement risk tracking should be done on the netted amount for all FX being netted for the customer. This will be defaulted from the Limits netting agreement.
Risk Weighted Risk
You can specify whether risk weighted limit tracking should be done on the netted amount for all FX being netted for the customer. This will be defaulted from the Limits netting agreement.
Pre-Settlement Risk
You can specify whether pre-settlement risk tracking should be done on the netted amount (net of revaluation gain/ loss) for all FX being netted for the customer. This will be defaulted from the Limits netting agreement.
Risk Netting Type
The netting type will be displayed here. This will be defaulted from the limits netting agreement of the counterparty or FX netting group customer.
6.2.6 Process of updating of Limit Tracking options
The limits tracking options will be defaulted from the limits netting agreement maintenance applicable for the counterparty. You can modify the limits tracking options during FX contract input.
The process for defaulting from the limits netting agreement is as follows:
- The system will check if the limit netting agreement exists for the counterparty of FX contract. If the agreement exists then the risk tracking options will be defaulted to the contract from limits netting agreement.
- If the limit netting agreement does not exist for the counterparty then the system will check if the counterparty is part of FX netting group customer from customer maintenance.
- If the netting group customer is not maintained for the counterparty then all the risk tracking options will be unchecked at contract level.
- If the netting group customer exists then the system will check if the limit netting agreement exists for the netting group customer. If the agreement exists then all the risk tracking options will be defaulted to FX contract from limits netting agreement.
- If the limit netting agreement does not exist for the netting group customer then all the risk tracking options will be unchecked at contract level.
- The pre-settlement risk tracking option will be unchecked at the contract level even though the line is maintained in agreement and revaluation is ‘No’ at the product level. The same cannot be changed during amendment or any other event.
During copy operation, the limits tracking options will not be copied from contract. These will be defaulted from limits netting agreement.
During limits processing, the credit lines and limits netting type will be picked from the limits netting agreement.
6.2.7 Manual Netting
You can invoke the ‘Manual Netting’ screen by typing ‘FXDMANNT’ in the field at the top right corner of the Application tool bar and clicking on the adjoining arrow button.
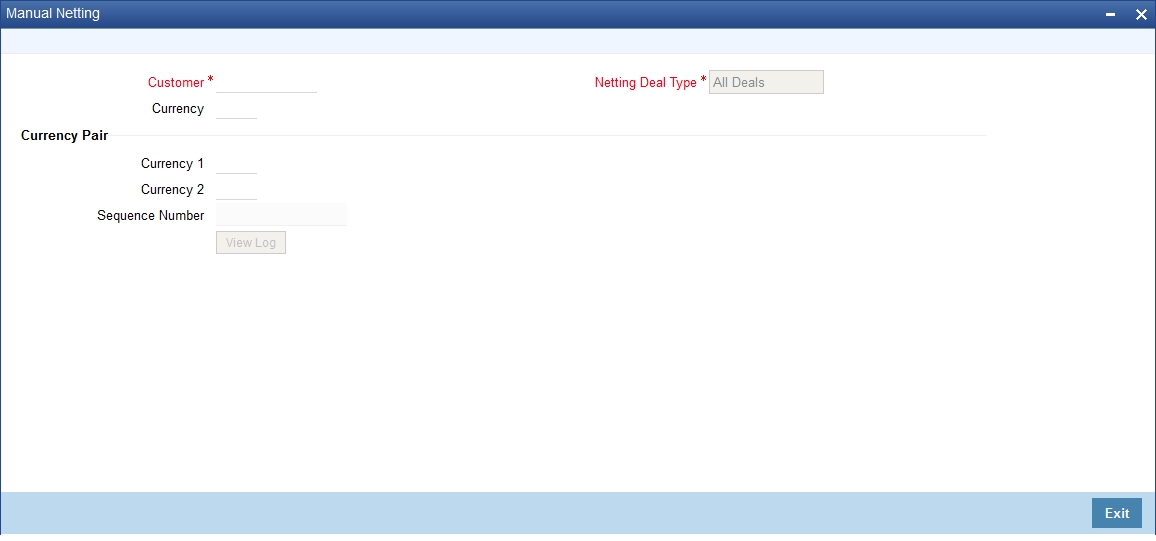
To initiate manual netting of FX contracts for a specific customer, you have to enter the following details in the ‘Manual Netting’ screen:
Customer
The adjoining option list displays the customer number of the customer for whom you wish to initiate manual netting. Choose the appropriate one.
You can also choose customers whose contracts are marked for auto netting. If you choose to manually net the contact of an auto netting customer, an override will be displayed prompting you for confirmation. On confirmation, you will be allowed to initiate manual netting.
Currency
The adjoining option list displays a list all the currencies in which the specified customer has contracted that requires ‘netting’. You can choose the currency which has to be manually netted. Alternatively, you may choose currency ‘All’ whereby all currencies in which the customer has dealt with will be manually netted.
Currency Pair
The adjoining option list displays a list of all currency pairs that the specified customer has dealt which also require to be ‘netted’. You can specify the pair for which you wish to initiate manual netting. Alternatively, you may specify ‘All, All’ as the currency pair whereby all the currency pairs in which the customer has dealt with will be chosen for manual netting. Choose the appropriate one.
While initiating the manual netting process:
If you have specified a currency for manual netting, the system will pick up all contracts of the customer having the particular bought or sold currency whose value date is less than or equal to the netting date and which requires netting. If you have selected currency, ‘All’, all the contracts of the given customer will be chosen.
If you have chosen a currency pair, the system will pick up all the contracts having the same currency pair that requires netting. If you have specified the ‘All, All’ as the currency pair, all the contracts for that customer will be picked up for manual netting.
Note
If currency ‘All’ or currency pair ‘All, All’ has been chosen, an override will be displayed, to confirm whether netting needs to be performed for all the currencies.
Netting Deal Type
Select netting deal type from the drop-down list. Following are the options available:
- Spot Deals: Only spot deals are considered for netting
- Forward Deals: Only forward deals are considered for netting.
- NDF Deals Only: Only NDF deals and corresponding fixing deal are considered for Netting.
- Non-NDF Deals Only: Non NDF, i.e. spot and forward deals are considered for Netting.
- All Deals: All deals are considered. By default, this option is selected.
- Split Netting: Netting is done based on the product wise, namely, Spot, Forward and NDF separately. The External Payment System creates separate payment contracts based on these products.
- Net NDF/Non NDF: Netting is done for NDF and Non NDF (Spot and Forward) separately. The External Payment System creates separate payment contracts both NDF and Non NDF contracts.
6.2.8 Automatic and Manual FX Netting Batch
Automatic netting process will pick up all those contracts marked for automatic netting for the specified customer. Netting will be done irrespective of the currency chosen.
Manual netting process can be initiated for contracts that are marked for manual netting and auto netting. Netting will be done only for those contracts that have specified a currency/currency pair unless you have chosen ‘All’ option.
The following steps involved in netting are done irrespective of the mode of netting chosen:
If you have chosen ‘Netting Agreement’ as the ‘Netting Days Basis’ for the customer, the netting days will be picked up from the netting agreement screen.
If you have chosen ‘Currency’ as the ‘Netting Days Basis’, the FX netting days will be picked up from the currency definition screen for the bought/ sold currency.
If FX netting days is not specified for a currency, netting days will be the same as spot days.
Currency wise netting is done for each customer for all currencies if the netting mode is automatic and for specific or ‘All’ currencies if netting mode is manual.
Pair wise netting is done for each customer for all currency pairs if it is automatic mode and for specific or ‘All’ currency pairs if the netting mode is manual
If the netting days basis is set as ‘Netting Agreement’ then the Netting days will be picked up from the netting agreement screen for that customer. If the Netting Days basis is set as ‘Currency’ then the FX netting days will be picked up from the currency definition screen for the bought and sold currency to derive the FX Netting Date for both the currencies. Subsequently the earlier of the Netting Date will be used to pickup contracts for netting. The netting days will be added to the system date / processing date to arrive at the netting date. All the contracts with a bought value date / sold value date lesser than or equal to the respective netting date will be picked up for netting.
The FX contracts are netted to createa consolidated payment contract.
Note
Netting Process will collate contracts based on the FX Netting Customer
6.2.8.1 EOD Processing
During end of transaction input (EOTI), the system will ensure that as on the system date all contracts have been netted for customers who require manual netting. If any contract is found with a bought or sold value date earlier than or similar to the system date, where the respective leg is not netted, the system will show an error.
6.2.9 Capturing the ‘Revaluation Details Tab’ Details
Revaluation and P&L information should be specified for a contract involving a product defined for revaluation using the Straight Line revaluation method.
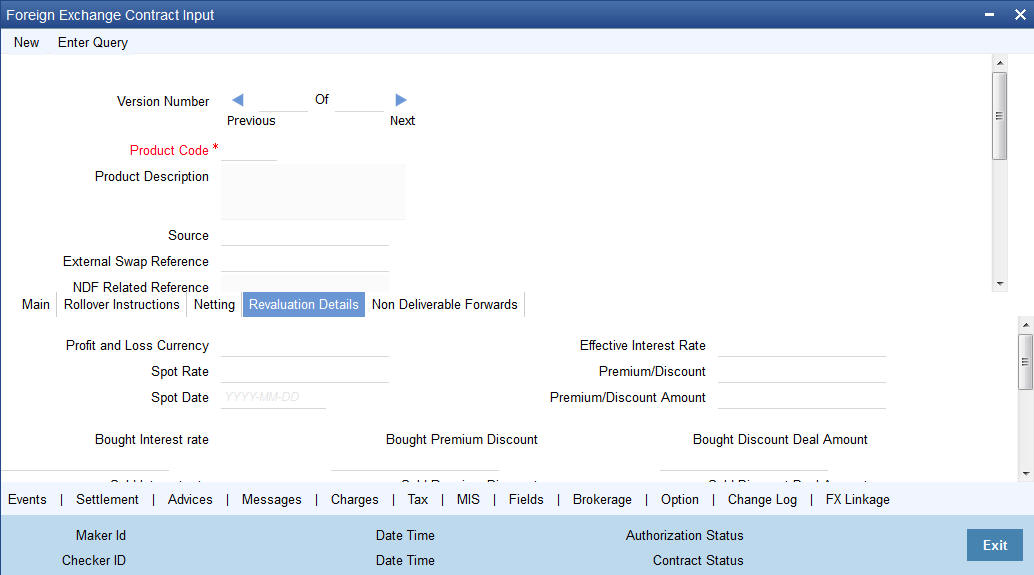
Profit and Loss Currency
If a forward contract is being revalued using the Straight-Line Revaluation method, the revaluation details should be specified in this screen.
For contracts involving the local currency, the local currency is taken to be the P & L Currency. You cannot change the P & L currency to any other currency.
For cross currency contracts, you must enter either the bought currency or the sold currency as the P & L currency.
Spot Date
For contracts involving the local currency, the Spot Date of the foreign currency in the pair is taken as the default Spot Date.
For cross currency contracts, the Spot Date of the P & L Currency is taken as the default Spot Date. For example, if the currency pair involved is GBP/USD and if you are buying GBP, the Spot Date of GBP is displayed here.
You can change the Spot Date displayed in this field.
Spot Rate
For contracts involving local currency, the Spot Rate of the foreign currency is taken as the default Spot Rate.
For cross currency contracts, the rate between the two currencies as maintained in the Currency table is taken as the default Spot Rate. If the rate between the two currencies has NOT been maintained, the Spot Rate of the P & L Currency against the local currency is taken as the default Spot Rate.
You can change the Spot Rate displayed in this field.
Effective Interest Date
This field represents the interest rate, which the system computes after considering the spot date and spot rate entered.
To check if the interest rates of both the bought and sold currencies have been quoted reasonably, the premium paid or discount received for that contract is projected into an annualized effective interest rate.
This rate is calculated by the system based on the total profit or loss for the period from the spot date to maturity date or option date (in case an option date is used) using the formula:
Rate = P X 360 X 100 / S X N
Where,
- P = the profit or loss on the contract
- S = spot equivalent
- For non-arbitrage contracts:
- S = FCY amount X spot rate
- For arbitrage contracts:
- S = FCY amount X spot rate
- (FCY amt identified in P/L CY.)
N = the number of days for the profit or loss to be apportioned on a straight-line basis. It is calculated from the spot date to the maturity date (or option date) minus 1.
This rate is then compared to the difference between the two rates that were entered in "Interest Rate Bought Ccy." and "Interest Rate Sold Ccy." If it does not match, the system will display an error message and ask for an override.
Premium/Discount
This indicates whether the contract results in a premium or a discount.
Premium /Discount Amount
The difference between the Spot Equivalent in LCY and the Contract Amount in LCY is the Premium or Discount Amount. A minus sign indicates that the contract is at a discount.
For contracts involving the local currency, the local currency is taken as the P & L Currency. When such a contract is revalued, the Spot Rate (of the P & L Currency as on the revaluation date) is applied on the contract amount to calculate the Spot Equivalent in LCY. The difference between the Contract Amount in LCY and the Spot Equivalent in LCY is the Premium or Discount Amount. A minus sign indicates that the contract is at a discount.
For cross currency contracts, the Spot Rate of the P & L Currency, as against the other currency, is used to calculate the amount in terms of the P & L Currency. The local currency equivalent of this amount is calculated as the Spot Equivalent in LCY. The difference between the Contract Amount in LCY and the Spot Equivalent in LCY is the Premium or Discount Amount.
If the cross currency rate has NOT been maintained, the Spot Rate of the P & L Currency is applied on the contract amount to calculate the amount in terms of the P & L Currency. The local currency equivalent of this amount is calculated as the Spot Equivalent in LCY. The difference between the Contract Amount in LCY and the Spot Equivalent in LCY is the Premium or Discount Amount.
Interest Rate Bought Leg
This is the Interest rate applicable to the Bought leg of the contract.
Interest Rate Sold Leg
This is the Interest rate applicable to the Sold leg of the contract.
Discount Bought Leg
Specify the (notional) interest that you will earn on the bought currency (interest receivable) when a forward deal is settled. On the booking date, the buy deal amount is reduced by the discount amount and contingent entries are passed for the discounted bought amount. Accrual entries are passed for the discount amount till the maturity date, depending on the accrual frequency.
Note
You can specify the ‘Discount Bot Leg’ and ‘Discount Sold Leg’ only if the product involved in the deal is associated with the ‘Discounted Straight Line’ method of revaluation.
Discounted Deal Amount Bought Leg
This is populated only in case of Discounted Straight Line method of Revaluation. This is just a display field. This will be the result of
Bought Amount – Revalued Discount amount for Bought Leg
Discounted Deal Amount Sold Leg
This is populated only in case of Discounted Straight Line method of Revaluation. This is just a display field. This will be the result of
Sold Amount – Revalued Discount amount for Sold Leg
Spot Local Currency Equivalent
When the contract is revalued, this information will be used.
Discounted Amount in Local Currency
For an LCY-FCY deal, the discounted amount of the LCY leg is displayed in this field.
For an FCY-FCY deal, the local currency equivalent of the discounted amount of the non-deal currency (calculated at the prevailing exchange rate) is displayed.
Note
Partial payments/cancellations and rollover are not allowed for products with ‘Discounted Straight Line’ method of revaluation.
Contract Amount in Local Currency
The local currency equivalent of the contract amount (as specified in the LCY Equivalent field of the ‘Contract Details’ screen) is displayed here.
6.2.10 Specifying ‘Non-Deliverable Forward’ Tab Details
Note‘
Non Deliverable Forwards’ tab is enabled only if you select an FX product for which NDF indicator is checked. In other cases NDF tab is disabled

The following details are captured here:
NDF Currency
The NDF currency is one among the Bought and Sold currency of the NDF Forward contract. For an NDF Forward Contract, this field is defaulted from product selected, but can be changed. For an NDF Fixing Contract, NDF currency is defaulted from NDF Forward Contract, and it cannot be changed.
NDF Fixing Status
Indicate the fixing status of the NDF Forward Contract. It is applicable only for NDF Forward Contract. The values of the field are ‘Fixed’ and ‘Not Fixed’.
NDF Fixing Date
Indicate the date on which the difference between the existing market exchange rate and the agreed upon exchange rate is calculated. This date will be the settlement days (which are maintained for the settlement currency) before the maturity date of NDF Forward Contract. This field is applicable only for the NDF Forward Contract.
Settlement Currency
Specify the settlement currency other than the NDF currency involved in the deal.
Settlement Amount
Indicate the net settlement amount of the NDF Forward Contract. The net settlement amount is the difference between the settlement currency amount of the NDF Forward Contract and the NDF Fixing Contract. The value of this field is computed after booking the NDF Fixing Contract.
6.2.10.1 Processing an NDF Forward Deal
An NDF deal is booked as FX Forward Contract with all the NDF details maintained in it. The product for the NDF Forward Contract is Forward type with the NDF indicator is set to ‘True’.
When an NDF Forward Contract is booked, an advice (NDF_Conf_Advice) is generated through mail to inform the counterparty about the booking. When an NDF Fixing Contract is booked against the NDF Forward Contract, the fixing status of the NDF Forward Contract is marked as ‘Fixed’.
In case of the NDF Forward Deal, the settlement amount tags SETBOTAMT and SETSOLDAMT is replaced by NDF_PROFIT and NDF_LOSS respectively.
The following are the new events for the NDF Forward Contract:
- FIXG (Fixing) – It is processed for the NDF Forward Contract
when the NDF Fixing Contract is booked against it. It will create an
unauthorized version of the NDF Forward Contract with following details
updated:
- NDF Related Reference Number changed to NDF Fixing Contract Reference Number
- Net Settlement Amount of the NDF Forward Contract
- Fixing Status as Fixed
- UFIX (Unfixing) – It is processed for the NDF Forward Contract
to reverse all accounting entries on reversal of NDF Fixing Contract.
It creates an unauthorized version of NDF forward contract with the following
details updated:
- NDF Related Reference Number is set to NULL
- NDF Settlement amount is set to NULL
- Fixing status is set as Unfixed
The following operations are changed for an NDF Forward Contract:
- Amendment - This operation is not allowed for an NDF Forward Contract, if the fixing status is FIXED
- Rollover - This operation is not allowed for an NDF Forward Contract, if the fixing status is FIXED
- Liquidation – This operation is not allowed until the contract is FIXED and FIXG is authorized
- Other operations
Note
If the maturity date is less than the current date, then the LIQD and SGEN event will be executed on authorization of FIXG event. Otherwise the liquidation will happen with the EOD batch.
The Liquidation event is changed for the NDF Forward Contract to use the net settlement amount and settle the amount between the NDF profit or loss account and the customer.
The SGEN event (Settlement message event generation) generates the payment message for the net amount only. SGEN event is fired after the NDF Forward Contract is marked as Fixed and FIXG is authorized.
6.2.10.2 Processing an NDF Fixing Deal
An NDF fixing deal will be booked against an authorized unfixed NDF Forward contract. The NDF Related reference number is selected from the option list of all unfixed authorized NDF Forward contract. The product for the NDF Fixing Contract is Spot type of product with the NDF indicator set to ‘True’.
While selecting the NDF Forward Contract, the following fields are defaulted for an NDF Fixing Contract:
- The Buy and Sell indicators of the NDF Forward Contract is interchanged in the NDF Fixing Contract and it cannot be modified
- The bought and sold currency of the NDF Forward Contract is interchanged in the NDF Fixing Contract and it cannot be modified
- The Value date is defaulted and it is same for both the currency
- The Counter Party is same customer from the NDF Forward Contract
- The Amount in the NDF currency is same in both the deals
- The settlement accounts in the Fixing deal are defaulted from those of the original NDF deal
- The amount in the settlement currency for the NDF Fixing Contract cannot be same as the amount of the NDF Forward Contract
The following are the processing steps for an NDF Fixing Contract:
- The booking of the NDF Fixing Contract will process the FIXG event of the NDF Forward Contract which creates an unauthorized version of NDF Forward Contract.
- Authorization of the NDF Fixing Contract will authorize the unauthorized version of NDF Forward Contract.
- Deletion (Include version delete)
- Amendment
- Reverse
The following are the operations carried out for an NDF Fixing Contract:
- The Save operation executes the unauthorized FIXG event of the NDF Forward Contract.
- The Authorization operation will change the authorize status of an unauthorized FIXG/UFIX event of the NDF Forward contract to authorize status and generates advice associated to FIXG/UFIX.
- The Liquidation event for the NDF Fixing Contract does not have accounting entries. It only marks the contract as liquidated.
- While Amending, if LIQD/ SGEN have been fired for NDF Forward contract then the NDF Fixing Contract cannot be amended. Otherwise it executes another version of FIXG event for NDF Forward Contract with new settlement amount and the fixing status as fixed.
- While Deleting the NDF Fixing Contract, it deletes unauthorized FIXG event for the NDF Forward Contract.
- While Reversing the NDF Fixing Contract, an unauthorized UFIX event is executed for the NDF Forward Contract.
- The NDF Fixing Contract cannot be copied.
The table below explains the operations carried out and corresponding action undertaken for the NDF Forward Contract and the NDF Fixing Contract:
NDF Forward Contract |
NDF Fixing Contract |
Action |
BOOK + Authorized |
|
|
|
Book |
Execute the unauthorized FIXG event of the NDF Forward Contract, update the related reference number and fixing status, and compute the settlement amount. |
Amendment |
|
Not Allowed |
Reverse |
|
Not Allowed |
Liquidation |
|
Not Allowed |
SGEN |
|
Not Allowed |
|
Authorization |
Authorize the unauthorized event (FIXG, UFIX) of the NDF Forward contract. |
SGEN |
|
After the Settlement days of the NDF Forward contract SGEN will be executed. |
Liquidation |
|
If Fixing has been done, the SGEN is executed and maturity date is reached, then LIQD executed. |
|
Amendment |
If LIQD or SGEN for the NDF Forward Contract is fired then NDF Fixing Contract cannot be amended. Otherwise, |
|
Delete |
Delete the unauthorized FIXG version of NDF Forward Contract related to the Fixing Contract. |
|
Reverse |
Execute the UFIX for the
NDF Forward Contract and rollback all changes for the NDF Forward Contract.
|
Amendment |
|
Allowed |
Reverse |
|
Allowed |
Deletion |
|
Allowed |
6.2.10.3 FX Limits processing
The various Limits defined for FX contracts will be processed as follows:
- The risk tracking for the contract will be done only when the risk tracking options are checked at the contract level.
- During FX contract initiation, the system will create new utilization for weighted risk credit line with the Weighted risk amount of contract online.
- During FX contract amendment, if credit lines are changed then the system will nullify the utilization of old credit lines and reinstate the same on new credit line.
- During FX contract amendment, if limits tracking required option is disabled then utilization of the credit lines will be nullified.
- During FX liquidation the system will decrease the utilization of weighted risk credit line with the liquidated weighted risk amount of the contract online. The weighted risk amount during liquidation event will be calculated on liquidated bought amount using risk percent of contract online.
- During FX cancellation the system will decrease the utilization of weighted risk credit line with the cancelled weighted risk amount of the contract online. The weighted risk amount during cancellation event will be calculated on cancelled bought amount using risk percent of contract online.
- During Rollover event, the system will decrease the utilization of weighted risk credit line with the liquidated weighted risk amount for the old version. At the same time the system will increase the utilization of settlement credit line with the rollover bought amount. The system will recalculate the risk percent based on rollover bought value date and rollover bought amount. The system will recalculate the risk weighted amount based new risk percent.
- During revaluation event, the system will increase the utilization of pre-settlement credit line with revaluation gain. When loss is encountered, the utilization will be reduced to zero. The utilization of the credit line for the revaluation gain will be passed in LCY.
- During reversal of revaluation event, system will force decrease the utilization of pre-settlement credit line with revaluation gain.
- During contract deletion, the system will delete the utilizations of the credit line for the FX contract reference number. The utilization of the settlement risk credit line, pre-settlement risk credit line and weighted risk credit will be deleted.
- During contract reversal, the system will delete the utilizations of the credit line for the FX contract reference number. The utilization of the settlement risk credit line, pre-settlement risk credit line and weighted risk credit will be deleted.
- The available amount of non revolving lines will not be modified in case the utilization needs to be decreased during Liquidation/Cancellation events.
6.2.10.4 Upload Processing
FX contract upload functionality will accept or default the values for pre-settlement risk tracking, settlement risk tracking, risk weighted risk tracking and the respective line codes.
FX contract upload functionality will also update utilizations of risk weighted credit line.
The risk percent obtained for a contract will be stored at a contract level post upload.
FX Contract upload will also support brokerage upload. The external brokerage amount and brokerage currency passed from the external system will override the brokerage amount maintained in Oracle FLEXCUBE. In case the external system doesn’t send any brokerage amount then the default brokerage setup in Oracle FLEXCUBE will be used.
6.2.11 Saving the Contract You Entered
You should give valid inputs in all the mandatory fields. If not, you cannot save the contract. After you have finished giving all your inputs, save the contract using one of the following methods:
- Click on save icon in the Toolbar; or
- Select ‘Save’ icon.
At the time of saving a Foreign Exchange contract, certain information about the Foreign Exchange contract will be passed to the FATCA accounts and obligations maintenance for the customer. This will be done if the beneficiary account’s customer has a reportable FATCA classification and if the Foreign Exchange product used to book the contract is present in the FATCA Products, account class and Instruments maintenance.
If the FX contract is closed or liquidated completely, then the corresponding row in FATCA accounts and obligations maintenance will be archived. If you delete the FX contract before authorization, you should also delete the corresponding entry in FATCA accounts and obligations maintenance.
6.2.12 Processing a Contract Involving a Product Combination
If the product code input by you is that for a product combination, the input screen defined for the first leg will be displayed. After you finish your inputs for the first leg, choose ‘Linked Deal Details’ button to input the details of the next leg of the contract. All the validations that are applicable for the first leg of the contract will be performed before the input screen for the next leg is displayed.
The product code of the product combination will be displayed. You cannot change it. Likewise, if the product combination is for a swap deal, the fields whose values you have defined as Defaults will be displayed. You cannot change them.
In second leg of a combination deal, Bought/Sold Currency and the deal type are always
opposite to the first leg of combination deal.For example, if the primary leg is 'Buy' then the secondary leg is defaulted as 'Sell'. If the primary leg is 'Sell' then the secondary leg is defaulted as 'Buy'.
If the deal type of the second leg is changed, then the system displays an error message "Deal type Buy/Sell cannot be modified in second leg".
In a combination deal, Bought & Sold value date in the second leg should be greater than the primary leg. You cannot modify or amend the combination deal, both primary and secondary leg.
In a combination deal, second leg is liquidated after first leg liquidation.The system displays an error message as: "Primary Leg has to be fully liquidated before liquidating Second Leg" if you try to liquidate second leg without fully liquidating first leg.
In a combination deal, Primary leg status should be “Cancelled” before cancelling second leg.The system displays an error message as 'Primary leg status should be cancelled before cancelling second leg' if you try to cancel second leg completely without cancelling first leg.
After you have given inputs to all the fields necessary, save all the legs of the contract using one of the following methods:
- Click on save icon in the Toolbar; or
- Select ‘Save’ icon.
6.2.13 FX Contracts Processing with Netted Limits Tracking
The risk tracking on the netted amounts of the FX contracts will be done only when the netted risk tracking options are checked at the contract level (‘Netting’ screen of FX contract).
The risk tracking on netted amounts will be done even when the contract is not marked for netting of settlements. The settlement netting and limits netting are totally independent features.
The non netted risk tracking options and netted risk tracking options are totally independent features. In case both are checked then Oracle FLEXCUBE supports tracking of risk contract wise as well as netting bucket wise. In case both features need to be tracked it is better you maintain a separate set of credit lines. The system will not cross validate the credit lines maintained for contract wise risk tracking and netting bucket wise. However the system will validate the credit lines maintained for netted risk tracking alone.
The netted risk tracking will be done on both bought leg and sold leg separately. The risk netting reference number of the bought leg in FX contract online will identify the contracts for which the bought leg is tracked. The risk netting reference number of the sold leg in FX contract online will identify the contracts for which the sold leg is tracked.
Oracle FLEXCUBE will internally store the net inflow/outflow amount for both sold and bought legs of FX contracts which have risk netting feature set for any of the 3 risks.
The following details will be stored in net inflow/outflow details:
- Branch
- Customer
- value date
- currency
- currency pair
- Netted reference number
- Netted amount for settlement risk
- Netted amount for pre settlement risk
- Netted amount for weighted risk
When the FX contract which forms part of netting bucket is input the following will be done:
- The system will check if the netted limits tracking options are set for the contract. If it is not set then the system will not do netted limit tracking.
- If either of the netted limit tracking options is set then the system will check the netting type.
- Depending on the netting type the system will check if any net inflow/outflow details are stored for the customer + branch + currency +value date combination or customer + branch + currency + value date + currency pair combination. This will be checked for both the sold and bought legs.
- If no match is found then the system will insert the inflow/outflow details for both bought and sold legs. During insertion of buy leg, the system will calculate net settlement amount as bought currency amount and net weighted risk amount will be computed using risk percent on bought amount. During insertion of sell leg, the system will calculate net settlement amount as sold currency amount and net weighted risk amount will be computed using risk percent on sold amount. The system will create new utilization for respective credit lines if the net amount is inflow. The risk reference number for both the legs will be displayed in FX contract online.
- If any match is found then the system will add/subtract the bought/sold leg amount to the netted settlement amount to arrive at new netted settlement amount. For the risk weighted amount, the system will compute new netted risk weighted amount using risk percent.
- If the new and old netted amounts are inflow and the new netted amount is greater than the old netted amount then the system will increase the utilization of the line with the incremental value. If the old netted amount was an outflow and the new netted amount is inflow then the system will increase utilization for the net inflow amount.
- If the new netted amount is inflow but is lesser than the previous netted amount then the line utilization will be decreased with the differential amount (provided the line is revolving).
- If the new netted amount is outflow and the old netted amount was inflow then the system will reduce the line utilization to 0(provided the line is revolving).
- If the new netted amount is outflow and the old netted amount was also an outflow, then there won’t be any utilization.
During the above process the tenor will be calculated based on rolling tenor of the contract.
When FX contract which forms part of netting bucket is deleted then the system will compute the new netted amounts in the net inflow/outflow details and accordingly increase/decrease the utilization depending on old and new netted amounts. During deletion or reversal of the contract, the system will always force decrease the utilization of the credit line irrespective of the type of line.
The same logic will apply for other events like Liquidation, Amendment, cancellation and Rollover. In all these events new netted amount is calculated using liquidated/amended/cancelled amount and the system will either decrease/increase utilization based on old and new netted amounts.
If the option ‘Netted Limit Tracking for Pre-Settlement Risk’ is set for the contract then system will net the revaluation gain/ loss of all such contracts using netting limits reference of the contract. If the netted amount is a revaluation gain then the system will create utilization for the difference between the total gain amount and old utilization.
If the netted amount is a revaluation loss then no utilization will be done and the previous utilization if any will be nullified.
The BOD revaluation reversal process will reinstate the limit utilization for pre-settlement risk.
During limits tracking the credit lines will be picked from netting agreement for the counterparty.
6.2.14 Upload
FX contract upload will also be enhanced to default the value of the netted limit tracking options from the limits netting agreement.
FX contract upload functionality will be enhanced to update utilizations of settlement risk and weighted risk credit line.
6.2.15 Amendment of Uploaded Deals
You will be able to amend the uploaded deals in Oracle FLEXCUBE upon pressing the unlock button. These deals are the one that are uploaded as unauthorized from external system.
6.2.16 Indicating the Option Period and the Rate
For a forward contract having a multi option period you can specify the period for which the forward rate is to be captured. After you specify the period you have to indicate the forward rate for the respective period.
To maintain a forward rates list click on the ‘Option’ button in the ‘FX Contract Details’ screen. The ‘Multi Option Details’ screen will be displayed.
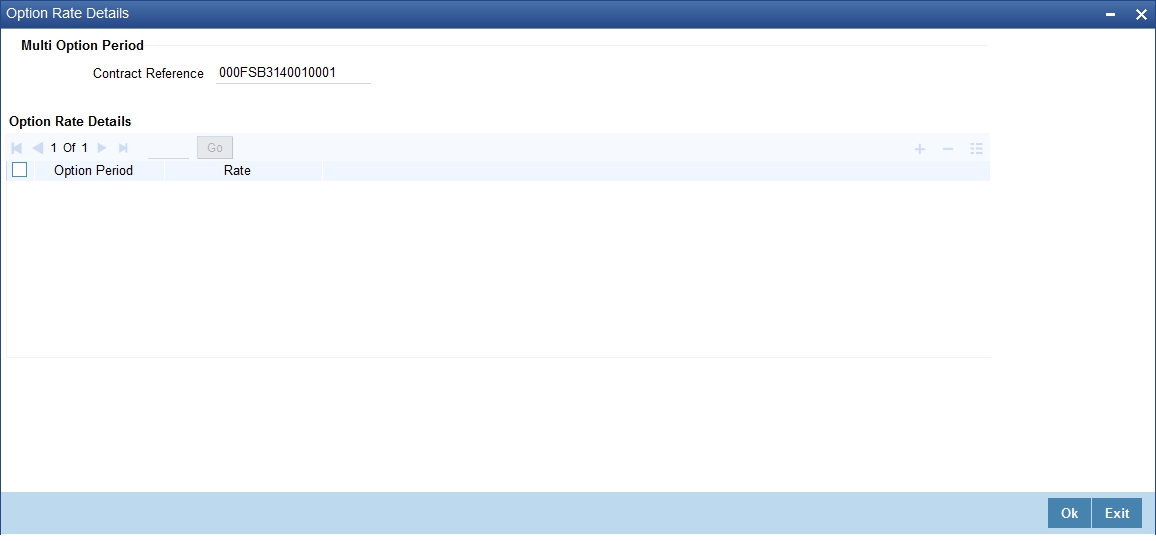
Note
The details captured in this screen are meant for your bank’s reference and will not be used while processing the contract.
6.2.17 Viewing Event Details
Click on ‘Events’ in the ‘FX Contract’ screen to go to the ‘Events’ screen.
Along with the details of events that have already taken place on the contract, the details of pending events will also be displayed.
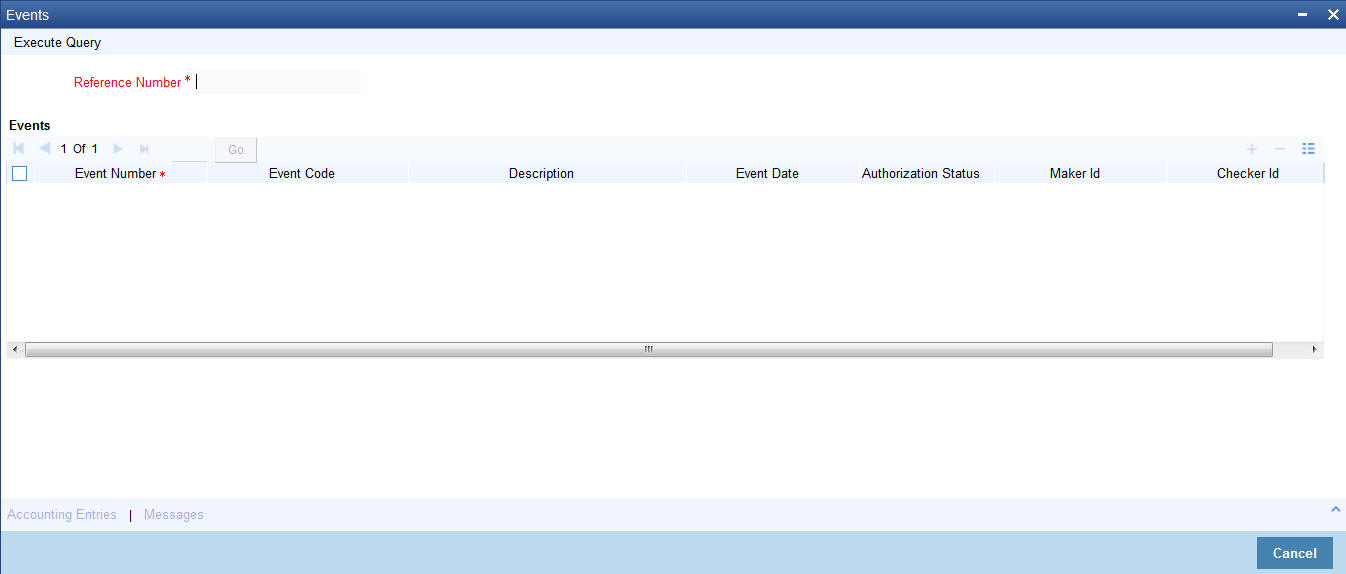
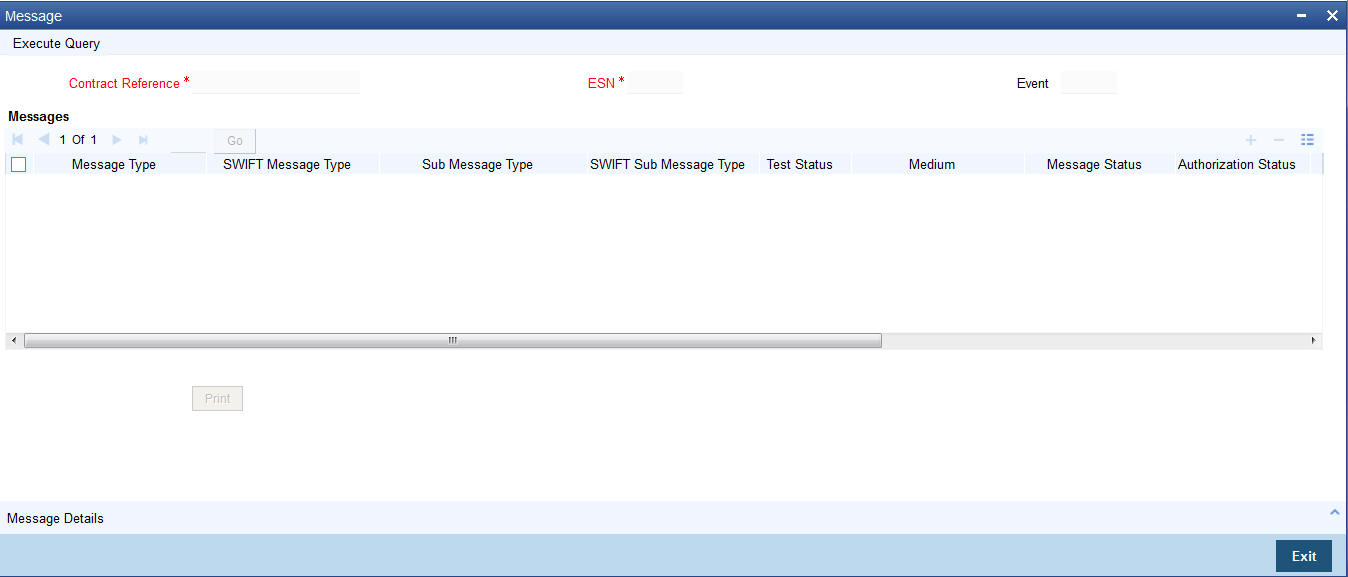
Click on ‘Messages’ button to view the messages linked to each event.
Click on ‘Accounting Entries’ button to view the accounting entries for the event.
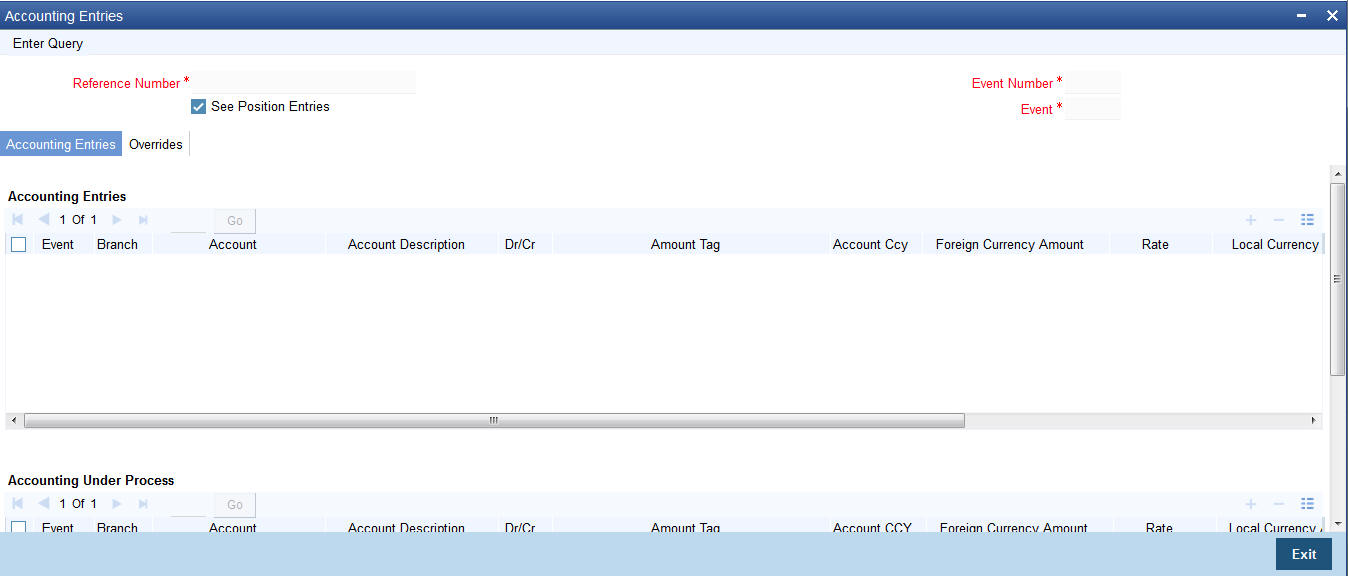
The following details will be provided for each entry:
- Booking Date
- Account
- Value Date
- Currency
- Amount
- Dr/Cr indicator
- Transaction Code
6.2.18 Suppressing or Prioritizing Advices
The advices that have to be generated for the various events of a contract should be defined at product level and would be generated once the product is authorized. This will be applicable to all contracts involving the product.
Click on ‘Advices’ button in the ‘FX Contract’ screen. The ‘Advices’ screen will be displayed.
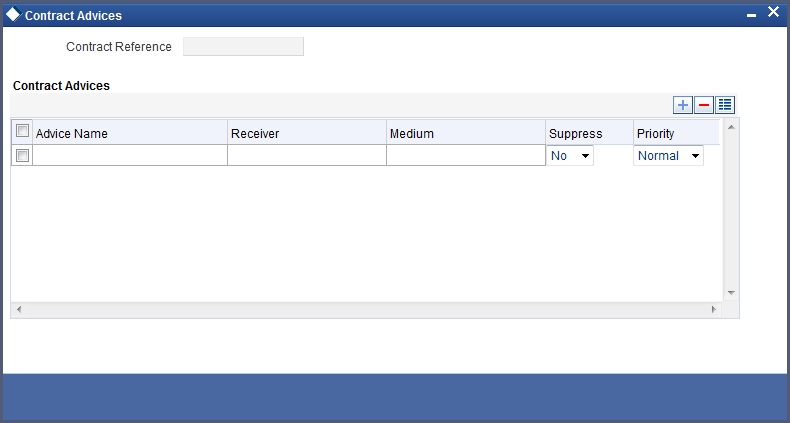
You can change the following information regarding the advices generated for a contract:
- The priority; and
- Whether the generation of the advice should be suppressed.
6.2.18.1 Suppressing the Generation of an Advice
By default, all the advices that have been defined for a product will be generated for a contract. However, you can suppress the generation of an advice for a contract by specifying so in this screen. Select Yes if the advice has to be suppressed.
6.2.18.2 Indicating the ‘Priority’ of an Advice
All advices will be sent on a Normal priority. You can change the priority of an advice to Urgent through the ‘Advices’ screen. In the Priority column in this screen, select Urgent if the advice has to be sent on an Urgent basis.
After you have made the changes, click on ‘Yes’ button to save the changes. Click on ‘No’ button to reject the changes you have made. In either case, you will be taken back to the screen from where you invoked this screen.
6.2.19 Charge Details
Click on the Charges button to view the Charges details for the contract. Please refer to the Charges_Fees User Manual for details.
6.2.20 Brokerage Details
Click on the Brokerage button to view the Brokerage details for the contract. Please refer to the Brokerage User Manual for details.
6.2.21 Settlement Details
Click on the Settlements button to view the Settlement details for the contract. Please refer to the Settlements User Manual for details.
6.2.22 Viewing FX Linkage Details
Oracle FLEXCUBE supports linkage of FX deal in funds transfer cross currency transaction. An FX forward contract can be linked to more than a single payment; however, a payment can have only one FX forward contract. An FX contract can be linked to both incoming and outgoing payments. You can view these linkage details in FX linkage screen.
Click ‘FX Linkage’ link in the ‘Foreign Exchange Contract Input’ screen.
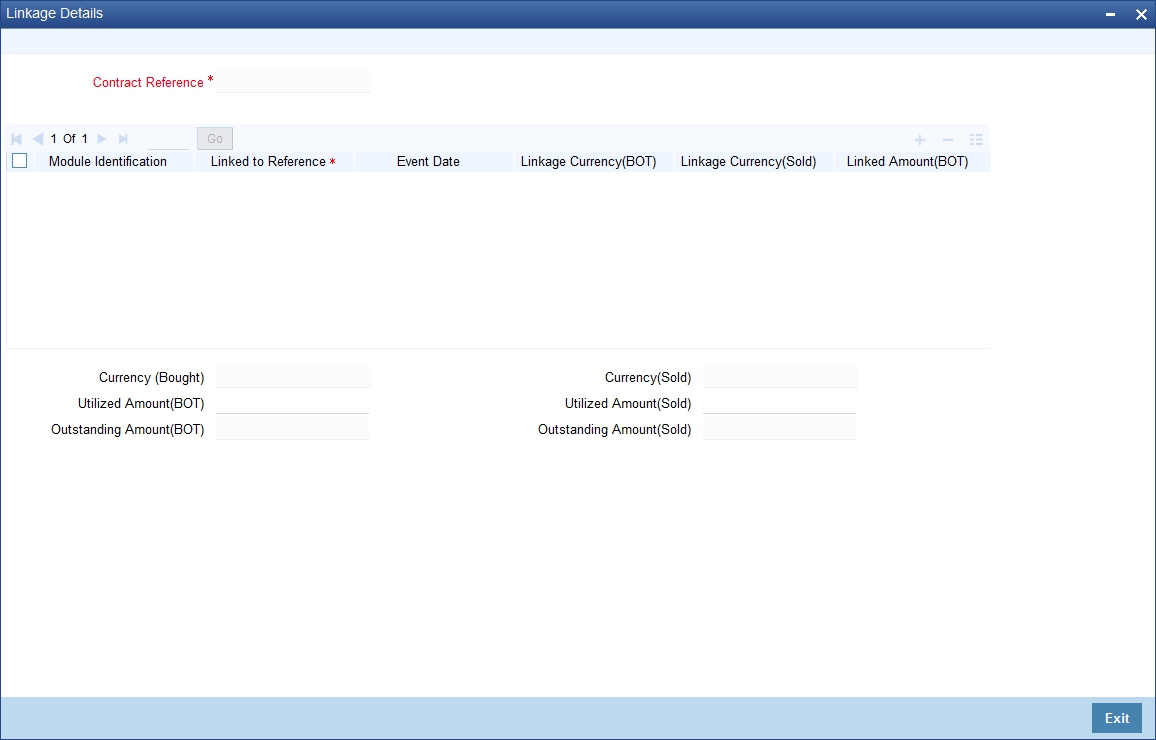
You can view the following details here:
- Contract Reference
- Module Identification
- Linked to Reference
- Event Date
- Linkage Currency(BOT)
- Linkage Currency(SOLD)
- Linkage Amount(BOT)
- Linkage Amount(SOLD)
- Linkage Status
- Currency(BOT)
- Currency(SOLD)
- Utilized Amount(BOT)
- Utilized Amount(SOLD)
- Outstanding Amount(BOT)
- Outstanding Amount(SOLD)
For further details on processing linked FX contracts refer Processing Linked FX Contracts section of this chapter.
6.3 Operations on a Contract
You can perform the following operations on a deal that is saved:
- Amend
- Copy
- View different versions of a deal
- Delete
- Reverse
- Put a deal on hold
- Roll-over
- Liquidate
- Reassign
- Authorize
Choose the operation you want to perform by one of the following methods:
- Click on the respective operation in the Toolbar.
- Select the operation from the Action Menu.
Choose the operation when the contract is highlighted in the ‘Contract Summary View’ screen or when the contract details are displayed in the ‘Contract Detailed View’ screen.
This section contains the following topics:
- Section 6.3.1, "Amending deal details"
- Section 6.3.2, "Uploading the contracts for amendment"
- Section 6.3.3, "Identifying Financial and Non-Financial fields for Amendment"
- Section 6.3.5, "Copying contract details"
- Section 6.3.6, "Viewing different versions of the contract"
- Section 6.3.7, "Deleting a contract"
- Section 6.3.8, "Reversing a contract"
- Section 6.3.9, "Putting a Contract on ‘Hold’"
- Section 6.3.9, "Putting a Contract on ‘Hold’"
- Section 6.3.10, "Multilevel Authorization of a Contract"
- Section 6.3.11, "Authorizing a Contract"
- Section 6.3.12, "Authorizing Bulk FX contracts"
- Section 6.3.13, "Authorizing the Contracts"
- Section 6.3.14, "Viewing the Errors"
- Section 6.3.15, "Viewing the Settlement Details"
- Section 6.3.16, "Viewing the Details of the Contract"
- Section 6.3.17, "Rolling Over a Contract Manually"
- Section 6.3.18, "Registering the Confirmation for a Contract"
- Section 6.3.19, "Liquidating a contract manually"
6.3.1 Amending deal details
Certain values in a contract can be amended after it has been stored and authorized. You can also amend a contract that has been input but is yet to be authorized. For each amendment, a new “version” of the contract will be generated. During Contract Detailed View, you can view the different versions by clicking on back arrow button for the previous version and forward arrow button for the next one.
To amend the details of a contract, select ‘Unlock’ icon in the Application tool bar when you are in the Contract Detailed View for the contract.
You can use the Unlock operation to extend or advance the Value Date of a contract. If it is advanced to today’s date, an error message will be displayed and the date will not be accepted. In such a case, you should use the Liquidate operation.
Apart from the Counterpart and the Booking Date of the contract you will be allowed to modify the details of an FX contract such as the Exchange Rate, Value Date, and Settlement Instructions, before the settlement date. Upon authorizing this event you have to generate the appropriate MT 300. The revaluation will be corrected when the contract get automatically revalued at the specified frequency.
Note the following
You will not be allowed to amend a contract once you have performed a partial liquidation or cancellation.
Financial amendments are not allowed post authorization of a FX contract.
Accounting entries for the amendment
If you change the amount or the exchange rate involved in the contract, the accounting entries that were passed for the contract when it was stored will be reversed and fresh entries will be passed for the new values.
Amending a deal involving a product combination
You can amend the details of a leg only if it is yet to be liquidated. The fields that can be amended in such a case and the impact of the amendment are the same as that for fields in a contract that does not involve a product combination.
Note
The roll-over instructions cannot be specified for a contract involving a product combination.
6.3.2 Uploading the contracts for amendment
From an external system, you can upload contracts that require amendment in Oracle FLEXCUBE. The system will distinguish between the new and the contracts that require amendment based on the action code of the uploaded record. For a contract requiring amendment, the action code will be ‘AMND’. If the action code is ‘AMND’, Oracle FLEXCUBE will first check whether the contract exists in the system or not. If the contract does not exist in the system, an error message will be displayed to notify that the contract cannot be amended.
The Reference Number provided by the external system has to same if it is a new contract or if it is an amendment to an existing contract.
When you upload a new contract, the Reference Number will be displayed in the User Reference Number field for that contract. The User Reference Number will be the basis for checking whether the contract exists or not.
The upload for contract amendment will trigger the ‘AMND’ event. The same event is triggered even when the amendment is done in the ‘FX Contract’ screen.
The fields that can be amended for the FX module are as follows:
- Internal Remarks,
- Credit Line, and
- Settlement Information
6.3.3 Identifying Financial and Non-Financial fields for Amendment
Oracle FLEXCUBE will not allow you to make amendments to the fields that are having financial impact. Therefore you need to first identify the set of fields those are having financial impact. In FX contracts following are the fields that are classified as financial fields:
- Branch
- Counterparty
- Buy/Sell Currency
- Sold Currency
- Net Settlement Risk
- Net Weighted Risk
- Net Pre-Settlement Risk
Following are the sequence of steps according to which system identifies a financial amendment:
- It compares the value of the above listed fields between the upload request and with the values in the base table for the contract that is being amended. Even if value of the one field differs, then it will consider the entire contract as financial amendment.
- If the system has identified request as non-financial amendment, then it will do the amendment using the normal amendment procedure.
- If the system has identified request as financial amendment, then
it will do the reverse-rebooking of the contract. Following special handling
will be done for settlement instruction in case of a financial amendment:
- If a non-financial request has settlement details, then the settlement values sent as part of the upload is uploaded.
- If settlement details are not sent and if they are maintained as list of amendable fields, then system will copy the details corresponding to the parent contract to the child contract.
- System will not upload a financial amendment if SGEN message is already generated.
- In case of financial amendment, system will not generate any confirmation message for the reversed deal. It will generate the confirmation message as part of processing new deal.
6.3.4 Reversing and Rebooking a Contract
To enable amendment of FX Contract details Oracle FLEXCUBE will reverse the old contract and rebook a new contract with the old user reference number and external reference number. During reversal, the old contract is first reversed and a new contract is booked with Reversed Oracle FLEXCUBE ref as the parent contract.
While reversing and rebooking, the parent contract details including the subsystems will be copied to a new contract and the parent will be reversed and the screen will be in new mode so that any details of the contract can be changed. It will be validated that no payment messages have been sent for the Reversed Oracle FLEXCUBE ref no. A configurable override will be displayed. If the payment messages have been generated then the Cancellation request messages (REVSWIFT) will be generated.
The user reference number at the branch parameters maintenance should be checked.
The user reference number and the external reference number of the parent contract number will be copied to the new contract. Deletion of the new contract will delete the reversal of the parent contract and set the value of user reference number and external reference number in the parent contract from the child contract. Authorization of the new contract will authorize the parent contract. It is not possible to delete or authorize the reversal of the parent contract reference number without deleting or authorizing the child.
The Confirmation message of the parent message will be suppressed if the counterparty of the parent contract and the current contract are the same. In case the counterparty of the parent and child are the same and if the parent contract is confirmed then the child will also be marked as confirmed. If the parent is not confirmed then it will be marked as confirmed and the incoming confirmation will be matched with the child contract.
6.3.5 Copying contract details
From the ‘Contract Detailed View’ screen, you can copy the details of a contract onto a new one. Select ‘Copy’ icon. The following changes will be done to the details copied:
- A new Reference Number will be allotted to the contract.
- The User Reference field will be left blank.
- The Transaction Date will be given a value of today and the Value Date will be left blank.
- The Amount fields will be left blank.
- The brokerage, tax and settlement instructions will be copied. These details will be validated afresh before the contract is stored.
Enter a value in the fields that are not copied. You can change the values in the fields that have been copied.
When a contract on Hold is copied and the new contract saved, the Hold on the contract will be released. Thus, to release a contract from Hold, you should copy it onto a new contract. In such a case, All the details will be copied (including the Reference Number, the User Reference, the Transaction Date, Value Date and the amounts.
If the contract from which you copied details, involved a product combination, the details of both the legs will be copied.
6.3.6 Viewing different versions of the contract
When a contract is input, it is allotted a version number of 1. From then on, each amendment results in the next version of the contract being created. When you come to the ‘Detailed View Screen’ for a contract, the latest version will be displayed. Click on back arrow button to see the previous version. Click on forward arrow button from a previous version to see the next version.
6.3.7 Deleting a contract
You can delete:
- A contract that has been input by you and is not yet authorized; or
- A contract that has been put on hold.
In the ‘Contract Detailed View’ screen, select ‘Delete’ icon in the Application tool bar or click delete icon. You will be prompted to confirm the deletion. Once you confirm it, all the details of the contract, including the accounting entries will be deleted. You can choose not to confirm the deletion. In either case, you will be returned to the ‘Contract Detailed View’ screen.
If the contract involves a product combination, the details of all the legs of the contract will be deleted.
6.3.8 Reversing a contract
To cancel out an authorized contract, you should use the Contract Reversal function. In the ‘Contract Detailed View’ screen, select Reverse from the Processing sub - icon. You will be prompted to confirm the reversal. Once you confirm it, all the accounting entries that have been passed for the contract will be reversed (this is done by passing the entries with a negative sign). These entries could be the contract initiation entries or any liquidation entries. A contract that is past its Value Date and has been settled can also be reversed. You can choose to suppress or change the priority of the reversal advices.
Reversal advices to the counterparty will be sent if they are on TELEX or Mail.
Note
Settlement Messages for the reversed payments will not be generated automatically by the Contract Reversal function. You have to generate them manually.
After the reversal has been done, you will be returned to the ‘Contract Detailed View’ screen.
6.3.9 Putting a Contract on ‘Hold’
If you do not have all the details of the contract you are entering, you can put it on ‘Hold’ instead of saving it. No accounting entries and advices are generated for a contract that is on Hold. You need not authorize a contract that is on Hold. During information retrieval, such a contract will be reported as Held.
When all the details about the contract are available, you can remove the Hold status from the contract and store it. This activity can be performed on the same day on which the contract was put on Hold or on any subsequent day.
Removing the Hold status on a contract
To store a contract that has been put on Hold, you should Copy it onto another contract. Select ‘Copy’ icon at the Contract Summary View when the contract on Hold is highlighted. The details that have been entered for the contract, except the Reference Number, the User Reference, Transaction Date, Value Date and the amounts will be copied.
6.3.10 Multilevel Authorization of a Contract
High value transactions may require multilevel of authorization. The levels of authorizations are defined in the ‘Product Transaction Limits’ screen. You can use the ‘Multilevel Authorization Detailed’ screen for authoring a contract n-1 times. However, final authorization can take place only in the contract screen.
For more details, refer the ‘Multilevel Authorization of Contract/Loan Account’ section in the ‘Procedures’ User Manual.
6.3.11 Authorizing a Contract
All operations on a deal (input, modification, reversal, manual liquidation or manual roll-over) have to be authorized by a user other than the one who performed the operation. This user should have the requisite access rights. All deals should be authorized before you can begin end of day operations.
You can invoke the ‘Contract Authorization’ screen by selecting ‘Authorize’ icon from one of the following screens:
- Contract Summary View
- Contract Detailed View
From Contract Summary View, select the Authorize option when the contract is highlighted. From the ‘Contract Detailed View’ screen, choose Authorize when the details of the contract are being displayed.
The ‘Contract Authorization’ screen will be displayed.
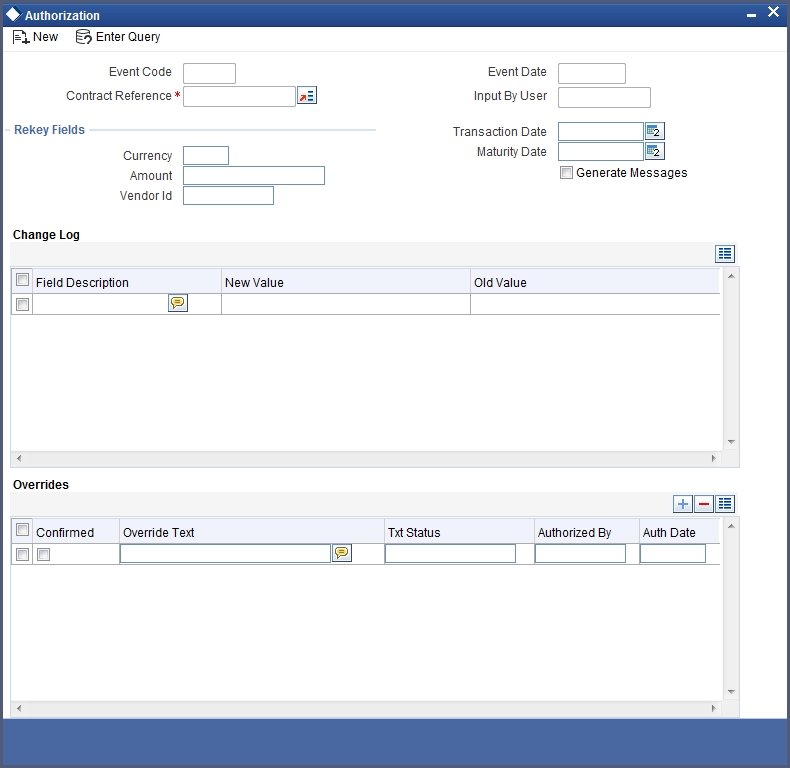
The following details will be displayed here:
Contract Reference Number
The FX contract reference number is displayed here.
Event Code
The code of the event happening on the contract is displayed here.
Event Date
The date on which the event happened is displayed here.
Maker
The name of the maker of the contract is displayed here.
Generate Messages
Check this box if you want the system to generate messages for the event once it is authorized.
6.3.11.1 Displaying the Rekey Fields
If the contract involves a product for which some Re-key fields have been defined, the details of the contract will be displayed only after you input the values in those fields. If no Re-key fields have been defined, the details of the contract will be displayed in the ‘Authorization’ screen.
If you are authorizing an amendment, the old values of the fields that were modified will be displayed along with the new values. In the re-key fields, you should enter the values that were given during the amendment.
All the overrides that were given during the input or modification will be displayed when the contract is being authorized. The central liability checks (checks to see whether the credit limit allotted to the customer have been exceeded due to this contract) will be done now. If there are any excesses, you will be prompted to give an override. The contract will be authorized only if you give the overrides. If not, the contract will not be authorized and you will be returned to the ‘Contract Detailed View’ screen.
6.3.11.2 Capturing Change Log
When an amendment is authorized, the old values will be replaced with the new ones. The details of the contract with the old values will be available in the earlier version of the contract.
Click on ‘No’ button if you do not want to authorize the contract. Click on ‘Yes’ button if you want to authorize the contract.
You will be prompted to confirm the authorization. After the contract has been authorized, you will be returned to the screen from where you invoked the ‘Contract Authorization’ screen (Contract Summary View or Contract Detailed View).
Note
You cannot authorise a contract in the following cases:
- the contract has multilevel of authorization pending, the same will be done using the ‘Multilevel Authorization Detailed’ screen
- the level of authorization is greater than or equal to ‘N’
- the ‘Nth’ or the final level of the users authorisation limit is less than the difference between amount financed and sum of the limits of all the users involved in authorizing a transaction, this case holds good when the ‘Cumulative’ field is checked in the ‘Product Transaction Limits Maintenance’ screen
- the transaction amount is greater than the authoriser’s authorisation limit if the ‘Cumulative’ field is unchecked in the ‘Product Transaction Limits Maintenance’ screen
6.3.12 Authorizing Bulk FX contracts
Typically, FX contracts must be authorized in the respective ‘Contract Online’ screens. This method of authorizing the contracts can be quite cumbersome, especially if the volume of transactions is large. In view of that, Oracle FLEXCUBE allows bulk authorization of all unauthorized FX contracts from the ‘Unauthorized Contracts’ screen. Invoke this screen from the Application Browser.
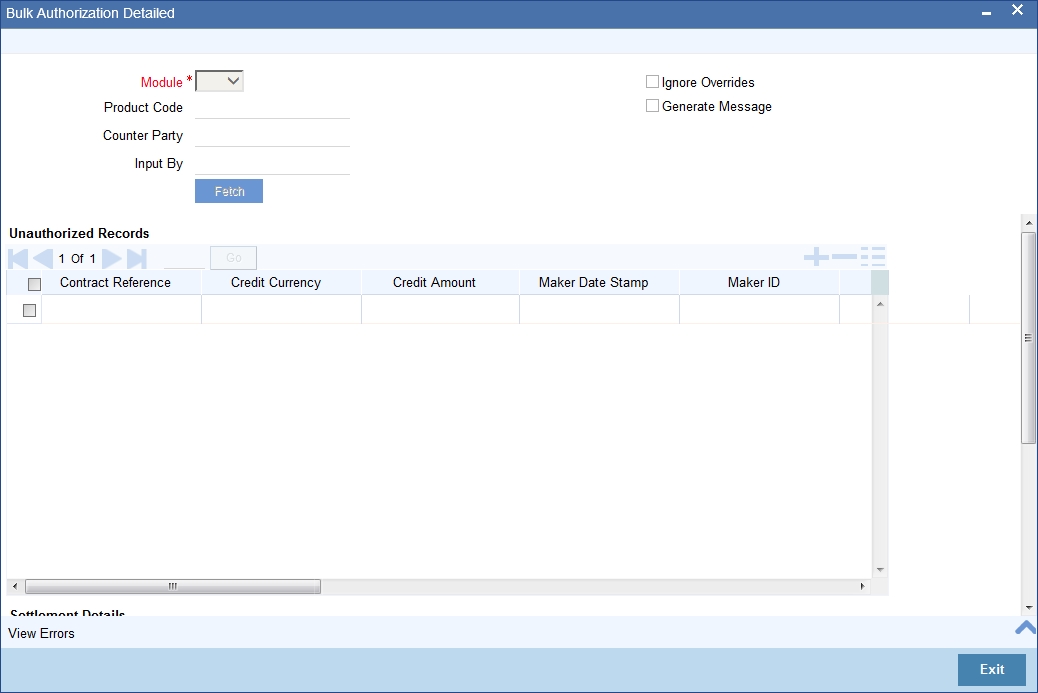
In the ‘Unauthorized Contracts’ screen, you can indicate the following parameters:
Module
Specify the module (LD, MM or FX) whose contracts have to be authorized.
On selection of the module, all unauthorized contracts pertaining to that module will be displayed in the grid.
Ignore Overrides
Check this box if you want the system to ignore the overrides generated at the time of authorization.
If the overrides of the contract are not authorized, system displays an error message.
For example, if the maturity date of a contract is 30th December 2009 and is a holiday for your bank, system will display an override message as “30-DEC-2009 is a holiday”.
However, you can opt to ignore such overrides by checking against ‘Ignore Overrides’.
Generate Messages
Check this box if you want the system to generate messages associated with authorization.
On authorization of a contract, the messages associated with the contract will be generated.
6.3.13 Authorizing the Contracts
You can either opt to authorize all the contracts that are displayed or choose only certain contracts for authorization.
- To authorize only specific contracts, check against the boxes positioned before each contract reference number.
- If all the contracts that are displayed have to be authorized, check
against the box positioned before ‘Contract Ref No’.
After selecting the contracts, click on ‘Authorize’ button to authorize the contracts.
6.3.14 Viewing the Errors
If the system encounters any errors during the authorization of a particular contract, it will record the error and move on to the next contract.
For example, among the contracts selected for authorization, there may be certain contracts, which are created by the user who is authorizing. As the maker and checker cannot be same, system will record an error, as it cannot authorize the contract.
Click on ‘View Error’ button to view the details of the errors recorded. In this screen, system will display the reference number of the contracts, which could not be authorized and the reason for the failure of contract authorization.
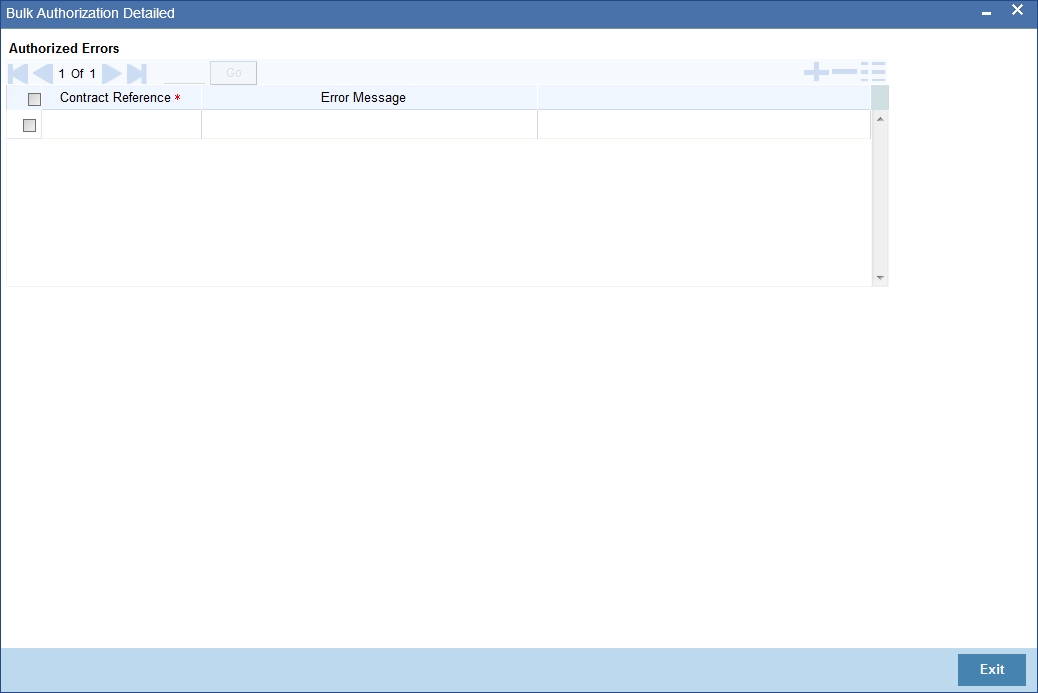
6.3.15 Viewing the Settlement Details
The settlement account details of each contract will be displayed in the ‘Settlement Instructions’ screen. Click on the contract for which you want to view the settlement details and it will be displayed in the ‘Settlement Instructions’ section. For each amount tag, the following settlement details are displayed:
- Settlement account
- Currency of the settlement account
- Settlement account branch
- Payable or Receivable
- Ordering Institution
- Ordering Customer
- Beneficiary Institution
- Ultimate Beneficiary
Note
The settlement details for the latest event of the contract will be displayed.
6.3.16 Viewing the Details of the Contract
The details of the unauthorized contracts can be viewed by double clicking on the contract reference number in this screen.
In case of FX contracts, the screen that is displayed on double clicking a contract depends on the stage of the contract that is unauthorized.
- If booking, initiation or contract amendment is not authorized, the ‘Contract Online’ screen is displayed.
- If a payment of a contract is unauthorized, the ‘Payment’ screen is displayed.
- If a value dated amendment is unauthorized, the ‘Value Dated Amendment’ screen is displayed.
The ‘FX Contract Online’ screen and ‘FX Liquidation- Cancellation’ screen will be displayed depending on the event that is unauthorized.
6.3.17 Rolling Over a Contract Manually
A contract that has not been marked for Auto Roll-over has to be rolled-over manually through Rollover in the Processing sub-menu.
To be rolled-over into a new contract, a contract has to be
- Authorized
- Should be past its Value Date, but unsettled
By default, the contract will be rolled-over with the same terms as the original contract. However, you can change certain terms through the ‘Roll-over Instructions’ Screen. If you have given any rollover instructions, they will be displayed. In either case, you will be prompted to confirm the rollover. All the terms of the contract including the brokerage and settlement details will be attributed to the new contract.
Two activities take place when a contract is rolled-over -- the original contract is liquidated and a new contract is initiated. The validations that are performed when a contract is rolled-over will be those for the liquidation and initiation of a contract. If the liquidation of the original contract cannot be done for some reason, the new contract will not be initiated.
The authorization session for a manual rollover involves the authorization of two operations -- the manual liquidation of the original contract and the initiation of the new contract.
When a contract has been rolled-over manually, you have to perform two authorizations: one for the liquidation of the original contract and another for the initiation of the new contract. When you invoke such a contract for authorization, the details of the liquidation of the original contract will be displayed. The procedure for authorizing the rolled-over contract is similar to the one for authorizing a new contract.
6.3.18 Registering the Confirmation for a Contract
You can register two types of confirmations on an authorized contract. They are:
- Counter party confirmation
- Broker confirmation
Not all authorized contracts need to be confirmed. You can confirm a contract only if there is a necessity. Further, for a contract you can register:
- Only the counter party confirmation
- Only the broker confirmation
- Both the confirmations
You can register a confirmation on a contract that has been liquidated.
You can invoke the ‘Contract Confirmation’ screen from one of the following screens:
- Contract Summary View
- Contract Detailed View
In Contract Summary View, select ‘Confirm’ from the Processing sub-menu when the contract is highlighted. From the Contract Detailed View, choose this option when the details of the contract are being displayed. You will be prompted for an override if the contract has been liquidated.
The following details are displayed/captured here:
Contract Reference Number
This is defaulted from the contract online screen.
User Reference Number
This is defaulted from the contract online screen.
Counter Party
This is defaulted from the contract online screen.
Broker Code
This is defaulted from the contract online screen.
Bought Currency
This is defaulted from the contract online screen.
Sold Currency
This is defaulted from the contract online screen.
Amount
This is defaulted from the contract online screen.
Value Date
This is defaulted from the contract online screen.
6.3.18.1 Confirmation Details
Confirmation Type
Specify the confirmation type. Alternatively you can select Confirmation Type from the option list. The list displays all valid confirmation type maintained in the system.
6.3.18.2 Capturing ‘Broker’ Confirmation
Broker Reference Number
Specify the broker reference number here.
Broker Reference Date
By default, the field takes up the Maturity Date of the old deal. But for a deal with a fixed maturity date, you can enter the changed date on which the deal should be liquidated.
Broker Remarks
Enter the counterparty remarks about the contract.
6.3.18.3 Capturing ‘Counterparty’ Confirmation
Counterparty Reference Number
Specify the Counterparty Reference Number in this field.
Counterparty Reference Date
This is the Date on which the contract is confirmed by the counterparty. It should be later than the Transaction Start Date and before the Value Date. The system defaults to the current date.
Counterparty Remarks
Enter the counterparty remarks about the contract.
Select ‘Yes’ button to save the confirmation. After the confirmation has been registered, you will be returned to the screen from where you invoked this screen.
Note
A confirmation does not need authorization. No advice will be generated for a confirmation.
Click on ‘No’ button if you do not want to register the confirmation. You will be returned to the ‘FX Contract Detailed View’ screen.
6.3.19 Liquidating a contract manually
An authorized contract can be liquidated manually. A contract need not necessarily be defined with manual liquidation for you to liquidate it manually. Even if the contract is defined for automatic liquidation, you can liquidate it through this option, on a day earlier than the Value Date of the contract. You can invoke the ‘Manual Contract Liquidation’ screen from one of the following functions:
- Contract Summary View
- Contract Detailed View
In the ‘Contract Summary View’ screen, select ‘Liquidate’ from the Processing sub-menu when the contract is highlighted; or in the Contract Detailed View, select ‘Liquidate’ from the Processing sub-menu when the details of the contract are being displayed.
An override will be sought before you can go ahead with the liquidation under the following circumstances:
- The contract does not have split value dates and the Value Date is a date in the future; or
- The contract has split value dates and the Value Date of the Buy leg is in the future.
An override will be sought if the contract has been marked for roll-over. If you override, the contract will be liquidated and not rolled-over.
You will be prompted to confirm the liquidation. If you give the confirmation, all the related accounting entries will be passed. The list of advices that will be generated for the liquidation will be displayed in the ‘FX Advices’ screen where you can choose to suppress any advice you do not want to generate. The advices that are not suppressed thus will be generated when the liquidation is authorized.
6.4 The Liquidation and Cancellation Function
Through the FX Liquidation/Cancellation function of Oracle FLEXCUBE you can cancel or liquidate FX deals either partially or completely. You can invoke the ‘Foreign Exchange Payment Input’ screen by typing’FXDTRPAY’ in the field at the top right corner of the Application tool bar and clicking on the adjoining arrow button.
The basic details of the deal indicating whether it is a Buy or Sell type of deal, the currency of the deal and the buy and sell currency and amounts will be displayed. You have to indicate whether the deal amount is to be liquidated or cancelled, and specify relevant details such as the Deal Rate and Amount.
To maintain details of a new FX Cancellation/Liquidation record, select ‘New’ icon in the Application tool bar or click new icon. The ‘FX Liquidation/Cancellation’ screen will be displayed without any details.
Every record that you create will be processed in Oracle FLEXCUBE only after it is authorized. A user bearing a different Login ID can authorize the record that you have created.
The following details are displayed/captured here:
Reference Number
This is defaulted from the contract online.
You can fetch the transactions of all branches by choosing either contract reference number or branch from this option list.
User Reference Number
This is defaulted from the contract online.
Outstanding Amount
This is defaulted from the contract online.
Currency
This is defaulted from the contract online.
Counterparty Name
The system displays the name of the specified counterparty based on the details maintained at ‘Customer Maintenance’ level.
Dealer
This is defaulted from the contract online.
Buy/Sell
The Buy option is selected if it is a Buy type of deal. If it is a Sell type of deal, the Sell option is selected.
Liquidate/Cancel
This indicates whether the deal is liquidated or cancelled.
Bought/Sold Currency
The currency of the bought leg and the sold leg of the FX contract is displayed in the Bought Currency and Sold Currency respectively.
Bought/Sold Amount
FX deals can be cancelled partially and the balance either extended or settled. You also have the option of cancelling the deal completely. Similarly, you also have the option of liquidating the deal either partially or fully.
The entire amount involved in the deal will be picked up and defaulted in the Bought/Sold Amount fields respectively. If you are performing a partial liquidation you have to specify the amount that is to be liquidated. If not, the entire amount will be liquidated, and the system will treat it as an early settlement of the deal.
Similarly, if you are performing a partial deal cancellation, you have to indicate the amount that is to be cancelled. When the deal amount is left as it is the system will treat it as deal cancellation.
On saving the transaction after entering all the required details in the system, the system validates the value of the bought/sold amount against the following:
- Product transaction limit
- User Input limit
If the transaction currency and the limit currency are different, then the system converts the amount financed to limit currency and checks if the same is in excess of the product transaction limit and user input limit. If this holds true, the system indicates the same with below override/error messages:
- Number of levels required for authorizing the transaction
- Transaction amount is in excess of the input limit of the user
Deal Rate
The Deal Rate is used when the buy currency of the deal is different from the sold currency. It will be defaulted from the ‘FX Contract Online’ screen. While liquidating a contract, you can choose to change the deal rate.
When you change the deal rate of a buy type of contract the system automatically calculates the new Sold Amount and displays it in the respective field. For instance, let us assume that you are partially liquidating a Buy Type of FX Contract. The contract amount is USD 2000. The other details of the contract are as follows:
- Bought Amount = USD 2000
- Sold Amount = GBP 1000
- Deal Rate = 0.5
If you choose to change the Bought Amount to USD 1200. The system does the necessary calculations and displays the Sold Amount as GBP 600. On the other hand, if you change the Deal Rate from 0.5 to 0.6, the Sold Amount will be changed to GBP 1200.
Similarly when you are liquidating a Sell Type of FX Contract you can choose to change either the Sold Amount or the Deal Rate. Accordingly, the system will calculate the Bought Amount.
Value Date
This is the date on which the contract was liquidated or cancelled.
Remarks
While liquidating or cancelling an FX deal, you can enter information about the deal intended for your bank’s internal reference. This information will not be printed on any correspondence with the customer.
Premium Discount
This indicates whether the contract results in a premium or a discount.
Premium Discount Amount
The difference between the Spot Equivalent in LCY and the Contract Amount in LCY is the Premium or Discount Amount. A minus sign indicates that the contract is at a discount.
For contracts involving the local currency, the local currency is taken as the P & L Currency. When such a contract is revalued, the Spot Rate (of the P & L Currency as on the revaluation date) is applied on the contract amount to calculate the Spot Equivalent in LCY. The difference between the Contract Amount in LCY and the Spot Equivalent in LCY is the Premium or Discount Amount. A minus sign indicates that the contract is at a discount.
For cross currency contracts, the Spot Rate of the P & L Currency, as against the other currency, is used to calculate the amount in terms of the P & L Currency. The local currency equivalent of this amount is calculated as the Spot Equivalent in LCY. The difference between the Contract Amount in LCY and the Spot Equivalent in LCY is the Premium or Discount Amount.
If the cross currency rate has NOT been maintained, the Spot Rate of the P & L Currency is applied on the contract amount to calculate the amount in terms of the P & L Currency. The local currency equivalent of this amount is calculated as the Spot Equivalent in LCY. The difference between the Contract Amount in LCY and the Spot Equivalent in LCY is the Premium or Discount Amount.
Specifying Settlement Instructions Pickup Details
The following details are captured here:
Settlement Sequence Number (Buy)
Choose a settlement instruction by specifying a settlement sequence number.You can skip this field if any default settlement instruction is specified.
Settlement Instruction Description
Displays the description of the selected Settlement Instruction.
Settlement Sequence Number (Sold)
Choose a settlement instruction by specifying a settlement sequence number.You can skip this field if any default settlement instruction is specified.
Settlement Sequence Description
Displays the description of the selected Settlement Instruction.
6.4.1 Authorizing FX Payment Details
After entering the deal details, click ‘Save’ icon to save the details. The system updates this as an unauthorized contract. You can authorize a payment by clicking the ‘Authorize’ icon on the Application toolbar.
You cannot authorise a contract from the ‘Foreign Exchange Payment Input’ screen in the following cases:
- the contract has multilevel of authorization pending, the same will be done using the ‘Multilevel Authorization Detailed’ screen
- the level of authorization is greater than or equal to ‘N’
- the ‘Nth’ or the final level of the users authorisation limit is less than the difference between amount financed and sum of the limits of all the users involved in authorizing a transaction, this case holds good when the ‘Cumulative’ field is checked in the ‘Product Transaction Limits Maintenance’ screen
- the transaction amount is greater than the authoriser’s authorisation limit if the ‘Cumulative’ field is unchecked in the ‘Product Transaction Limits Maintenance’ screen
Note
- When you save the manual payment details, the system will check whether the deal is a fixed NDF forward deal. Here, the bought amount or the sold amount needs to be the same as the contract bought or sold amount associated with the payment. Also, there should not be any outstanding balance after manual payment.
- You cannot initiate partial payment for NDF forward deals. If you try to perform a partial payment for NDF forward deals, the system will display the following error.
6.5 Reassign Contract
This section contains the following topics:
- Section 6.5.1, "Reassigning a Contract to Another User"
- Section 6.5.2, "Viewing FX Payment Details"
- Section 6.5.3, "Viewing FX Contract"
6.5.1 Reassigning a Contract to Another User
A contract can be deleted only by the user who entered it. If a contract has to be deleted, and the user who input it is not able to do it, you can reassign the contract to another user so that the other user can delete. You can invoke this screen by typing ‘FXDREAS’ in the top right corner of the Application toolbar and clicking the adjoining arrow button.You can perform the reassigning operation in the ‘Reassign User – Prior to Authorization’ screen.
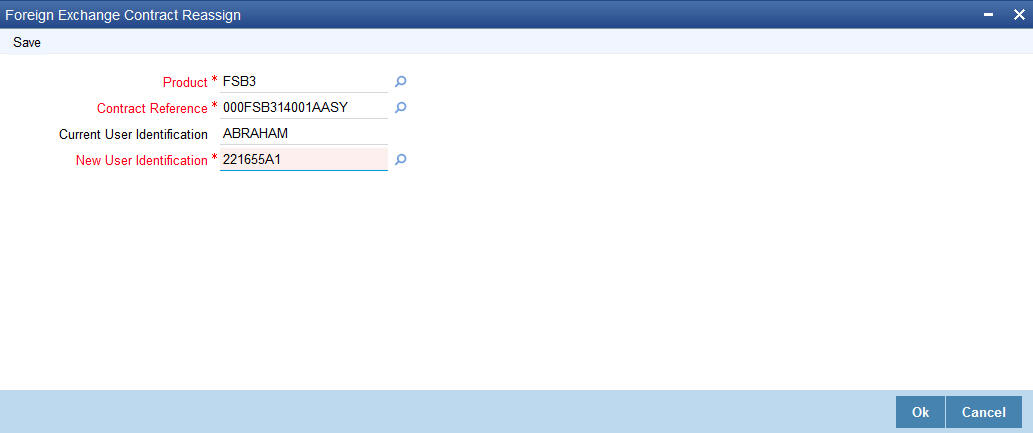
Typically, this situation may arise during end-of-day operations when a contract that is not authorized has to be deleted and the user who input it has left the office for the day.
You can invoke the ‘Foreign Exchange Contract Reassign’ screen by typing ‘FXDREAS’ in the field at the top right corner of the Application tool bar and clicking on the adjoining arrow button.
The ‘Contract Reassign User - Prior to Authorization’ screen will be displayed and you can enter the user-id of the user to whom you want to assign the contract. This user should have access rights to enter FX contracts.
The following details needs to be entered here:
Product
Enter the product code of the contract you want to assign to another user.
Contract Reference Number
Each contract has a unique Reference Number. This number is automatically generated by the system during contract processing. Enter the Reference Number of the contract that you want to assign to another user.
Current User Identification
Specify the user id of the current user.
New User Identification
Specify the user id of the new user to whom you want to assign the task.
Click the option list next to the respective fields to select the required inputs for Product, Contract Ref. No and New User ID.
Click on ‘Yes’ button to save the details you entered. Click on ‘No’ button if you do not want to save the details.
6.5.2 Viewing FX Payment Details
You can view the FX payment details in the ‘Foreign Exchange Payment Summary’ screen. To invoke this screen, type ‘FXSTRPAY’ in the field at the top right corner of the Application tool bar and click the adjoining arrow button.
The screen is given below:
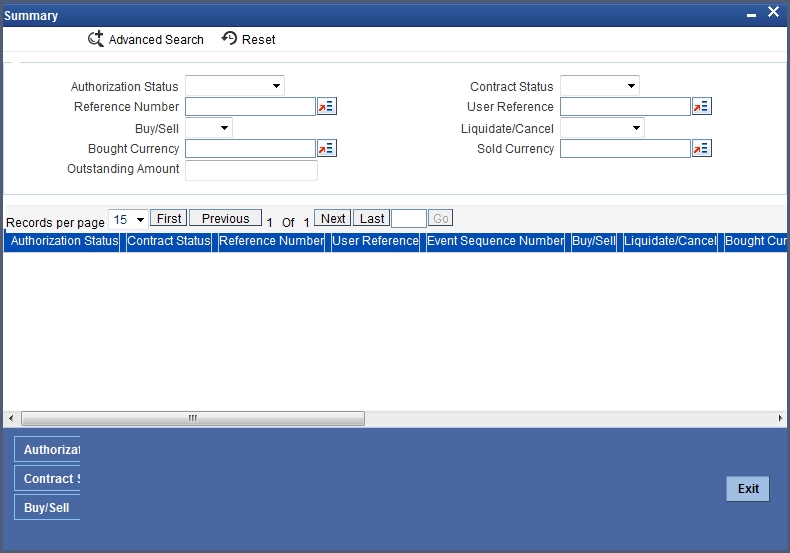
You can click ‘Search’ button to view all the pending functions. However, you can to filter your search based on any of the following criteria:
Authorization Status
Select the authorization status of the contract from the drop-down list.
Reference Number
Select the reference number from the option list.
Buy/Sell
Indicate whether buy or sell from the drop-down list.
Bought Currency
Select the bought currency from the option list.
Outstanding Amount
The outstanding amount maintained is displayed here.
User Reference Number
Select the user reference number from the option list.
Contract Status
Select the status of the contract for which you want to check the pending function from the drop-down list.
Liquidate/ Cancel
Indicate whether liquidate or cancel from the drop-down list.
Sold Currency
Select the sold currency from the option list.
When you click ‘Search’ button the records matching the specified search criteria are displayed. For each record fetched by the system based on your query criteria, the following details are displayed:
- Authorization Status
- Reference Number
- Buy/Sell
- Bought Currency
- Outstanding Amount
- User Reference Number
- Contract Status
- Liquidate/ Cancel
- Sold Currency
- Value Date
Click ‘Advanced Search’ to display the screen below:

You can query a contract based on any of the following details:
- Authorization Status
- Contract Status
- Reference Number
- User Reference Number
- Buy/Sell
- Liquidate/ Cancel
- Bought Currency
- Sold Currency
- Outstanding Amount
6.5.3 Viewing FX Contract
You can view the FX contract using ‘Foreign Exchange Contract Summary’ screen. To invoke this screen, type ‘FXSTRONL’ in the field at the top right corner of the Application tool bar and click the adjoining arrow button.
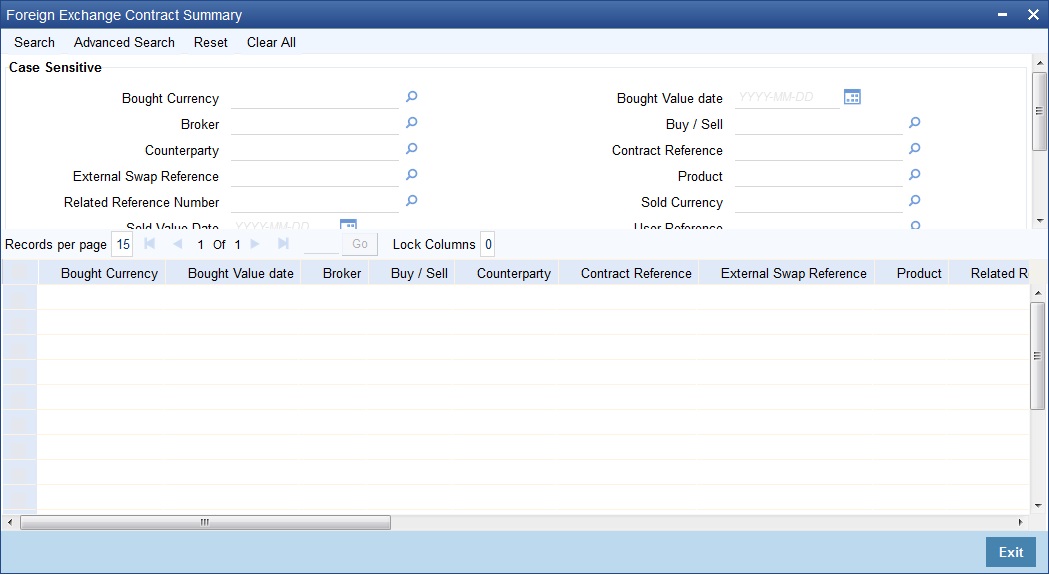
You can click ‘Search’ button to view all the pending functions. However, you can to filter your search based on any of the following criteria:
- Bought Currency
- Bought Value Date
- Broker
- Buy/Sell
- Counterparty
- Contract Reference
- External Swap Reference
- Product
- Related Reference Number
- Sold Currency
- Sold Value Date
- User Reference
- Authorization Status
- Contract Status
- Sold Amount
- Bought Amount
When you click ‘Search’ button the records matching the specified search criteria are displayed. For each record fetched by the system based on your query criteria, the following details are displayed:
- Bought Currency
- Bought Value Date
- Broker
- Buy/Sell
- Counterparty
- Contract Reference
- External Swap Reference
- Product
- Related Reference Number
- Sold Currency
- Sold Value Date
- User Reference
- Authorization Status
- Contract Status
- Sold Amount
- Bought Amount
- Booking Date
- Checker ID
- Maker ID
Click ‘Advanced Search’ to display the screen below:
You can query a contract based on any of the following details:
- Contract Reference Number
- User Reference Number
- Buy/Sell
- Bought Amount
- Bought Currency
- Bought Value Date
- Sold Amount
- Sold Currency
- Sold Value Date
- Option Date
- Profit and Loss Currency
- Broker
- Booking Date
- Related Reference Number
- Deal Rate
- External SWAP Reference
- Branch
- Booking Date
- Checker ID
- Maker ID
6.6 Online Querying for FX positions
Your bank would have entered into numerous FX deals involving different currency combinations. During the day or end of day, you may want to view the FX positions for different currencies. Oracle FLEXCUBE allows you to view the currency positions through the online query feature. In the Application toolbar, type ‘CYDCCYPO’ in the field at the top right corner and click the adjoining arrow button to invoke the ‘Currency Position Query’ screen.
In this screen, system calculates and displays the FX positions for different currencies.
System calculates the FX positions for each currency for a particular day by using the accounting entries posted to different GL’s.
- The sum of all entries of settled FX transactions contributes to Cash Position.
- The sum of all entries of FX deals which fall within the spot days of each currency results in Spot Position.
- The sum of all entries of FX deals settled beyond the spot days for the currencies maintained at your bank contributes to Forward Position.
- The sum of all profit and loss entries that have been accrued but not collected or paid from FX deals results in Accrual Position. For the GL’s for which accrual position is not allowed, system will include the accrual entries in ‘Cash Position’.
Note
System will calculate the accrual position separately for the GL’s for which the option ‘Report as Accrual’ is checked. Refer to the chapter ‘Setting up the chart of Accounts’ for further details.
For information purpose, system will also calculate and display the Open Position (Cash Position + Spot Position + Forward Position) and Global Position (Cash position + Spot Position + Forward Position + Accrual Position) for all the currencies.
6.6.1 Viewing the details of the individual deals that contribute to the position
In the ‘Currency Position Details’ screen, you can double click on each cash, spot and forward positions to view the details of the individual FX deals that have contributed to the position. The details of the individual deals that will be available include:
- Reference number of the contract
- Short name of the customer
- Debit or Credit indicator
- Amount
- Value Date
- Exchange Rate
- Against Currency
Type ‘CYDCHPOS’ in the field at the top right corner of the Application toolbar and click the adjoining arrow button to invoke the ‘Currency Change Position’ screen.

Similarly, double click on spot, forward and accrual positions to view the details of the deals that have contributed to the respective positions.
The details are displayed in the Spot Position Details, Forward Position details and ‘Accrual Position Details’ screen respectively.
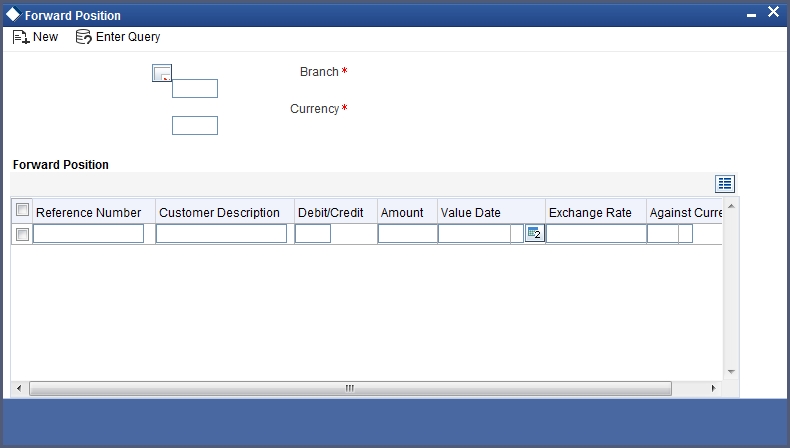
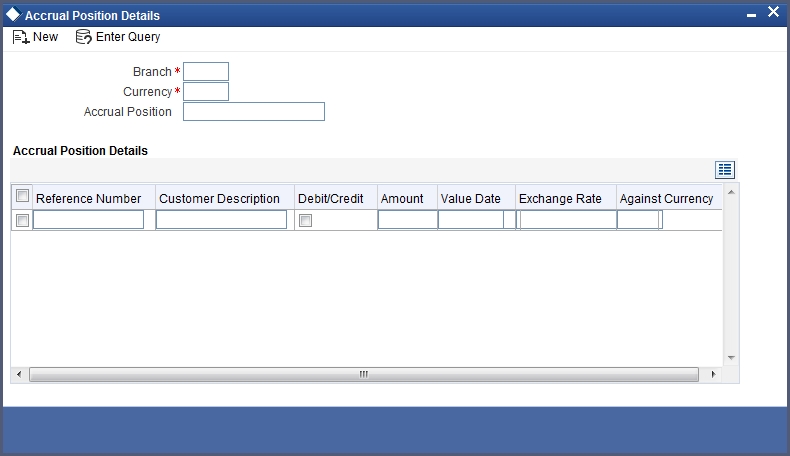
Note
You will notice that for cash and accrual positions, system displays the opening balances as on the date on which you are viewing the FX positions.
6.7 FX Affirmation Input
This section contains the following topic:
6.7.1 Invoking FX Affirmation Input Screen
You can affirm or un-affirm, waive or un-waive a deal from ‘MM Affirmation Input’ screen. You can invoke this screen by typing ‘ FXDAFFRM’ in the field at the top right corner of the Application tool bar and clicking the adjoining arrow button.
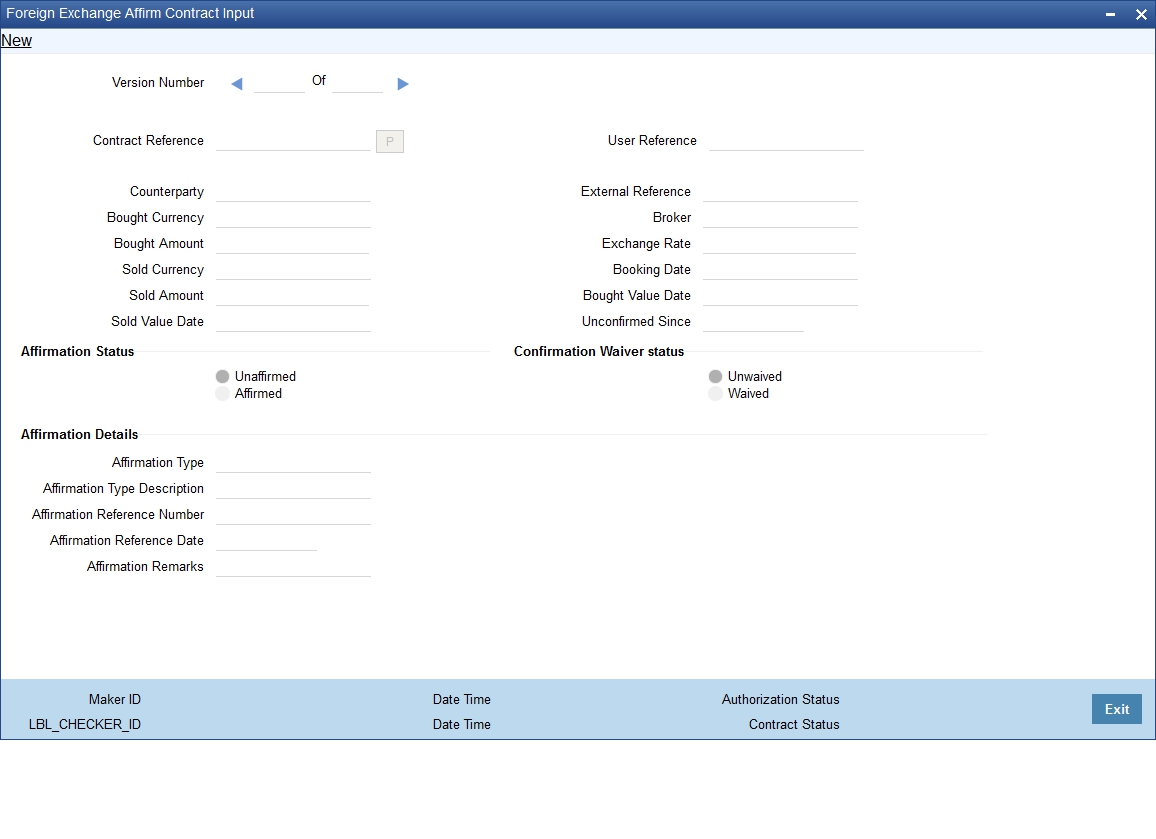
You can maintain only one MM contract record in ‘MM Affirmation Input’ screen.The system displays the following fields in this screen:
- Contract Reference Number
- Counterparty
- Bought Currency
- Bought Amount
- Sold Currency
- Sold Amount
- Sold Value Date
- User Reference
- External Reference
- Broker Code
- Exchange Rate
- Booking Date
- Booking Date
- Booking Value Date
- Sold Value Date
- Unconfirmed Since
Affirmation Status
Select the affirmation status of the FX deal. The options available are as follows:
- Unaffirmed - If the status of the FX deal is not affirmed.
- Affirmed - If the status of the FX deal is affirmed.
If the affirmation status is changed from unaffirmed to affirmed and the affirmation type or affirmation reference number is not specified then the system displays an error message.
Confirmation Waiver Status
Select the FX deal confirmation waiver status. The options available are as follows:
- Unwaived - If the FX deal is not waived off.
- Waived - If FX deal is waived off.
You can modify either ‘Affirmation Status’ or ‘Confirmation Waiver Status’ at a time.
Affirmation Details
Affirmation Type
Specify the affirmation type. Alternatively, you can select the affirmation type from the option list. The list displays all valid affirmation type maintained in the system.
Affirmation Type Description
The system displays the description for the selected affirmation type.
Affirmation Reference Number
Specify the affirmation reference number.
Affirmation Reference Date
Select the affirmation reference date from the adjoining calendar.
Affirmation Remarks
Specify remarks, if any.
6.8 Internal Swap Transactions
This section contains the following topics:
- Section 6.8.1, "Defining Internal Swap Transactions"
- Section 6.8.2, "Validations for Internal Swap Transactions"
- Section 6.8.3, "Processing Internal Swap Transactions"
6.8.1 Defining Internal Swap Transactions
You can define internal swap transactions through the ‘Internal Swap Transactions’ screen. An internal swap transaction is a combination of FX and MM transactions generated for a deal between the FX desk and MM desk.
You can invoke the ‘Internal Swap Input’ screen by typing ‘FXDSWPIN’ in the field at the top right corner of the Application tool bar and clicking on the adjoining arrow button.
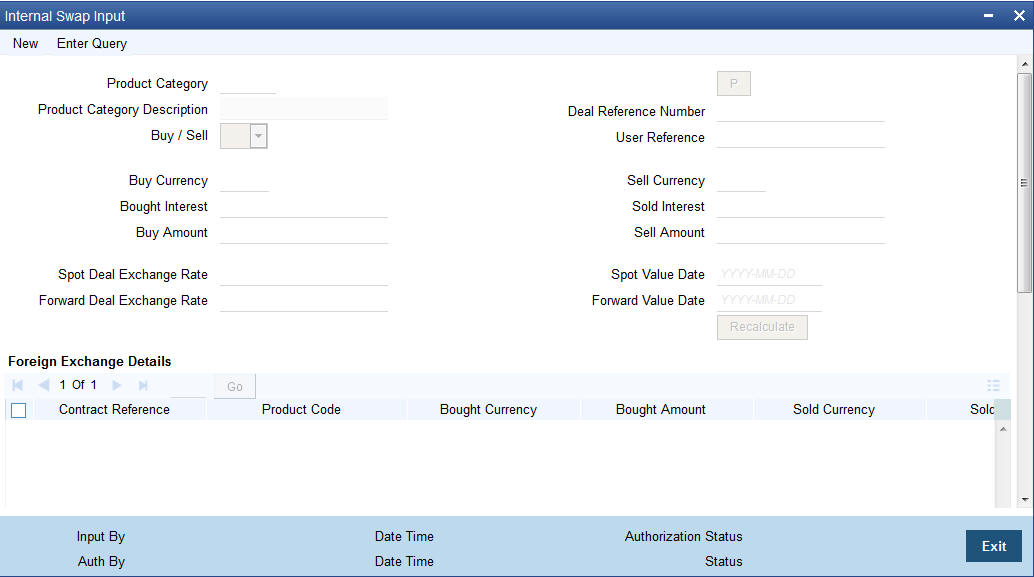
Specify the following details.
Product Category
You need to specify a product category for an internal swap transaction. All valid (Open and authorized) internal swap product categories will be available for selection.
Deal Reference Number
This is a 16 digit system generated reference number that will be used to link all the generated transactions. This will be generated using the product category which has been selected. This is a display field.
User Reference No.
You need to specify a User Reference Number. It should not exceed 16 characters. The number cannot be modified once it has been authorized
Buy Sell Indicator
You need to select the Buy/Sell indicator from the option list provided.
Buy Currency
You need to specify a currency. This will be used as the bought currency for the FX Spot transaction, the sold currency for the FX forward transactions and the currency for the placement transaction.
Sell Currency
You need to specify a currency. This will be used as the sold currency for the sold currency of the FX spot transaction, the bought currency for the FX forward transaction and the currency for the borrow transaction.
Buy Amount
You need to specify an amount. This will be used as the bought amount for the FX Spot transaction and the amount for the Placement transaction.
Sell Amount
You need to specify an amount. This will be used as the sold amount for the FX Spot transaction and the amount for the borrowing transaction.
Bought Interest
You need to specify the interest rate for the MM placement transaction. You can enter this value if the buy/sell indicator is chosen as Buy. If the internal swap transaction is Sell, then the system will calculate the interest rate during the processing of the transaction and the same will be displayed in this field.
Sold Interest
You need to specify the interest rate for the MM borrow transaction. You can enter this amount if the Buy/Sell indicator is chosen as Sell. If the internal swap transaction is Buy, then the system will calculate the interest rate during the processing of the transaction and the same will be displayed in this field.
Spot Deal Exchange Rate
You need to specify the exchange rate for the Spot FX transaction. If the amounts are specified, then the system will calculate the exchange rate.
Spot Value Date
This indicates the settlement date for the spot FX transaction and the value date for the MM borrow and placement transactions. The Application Date appears in this field by default and cannot be changed.
Forward Deal Exchange Rate
You need to specify the exchange rate for the forward FX transactions.
Forward Value Date
You need to specify the date. This will be used as the settlement date for the Forward transactions and the maturity date for borrowing and placement transactions.
The screen will also display the individual transactions created in detail blocks upon authorization of the internal swap input transaction. Three FX transactions created will be created within a single block and two MM transactions will be created in the other.
The information displayed for the FX transactions will be as follows:
- FX Contract Reference Number
- Product Code
- Bought Currency
- Bought Amount
- Sold Currency
- Sold Amount
- Value Date
- Exchange Rate
On double clicking a row, the individual FX transaction will be displayed.
The information displayed for the MM transactions will be as follows:
- MM Contract Reference Number
- Product Code
- Currency
- Amount
- Value Date
- Maturity date
- Interest Rate
On double clicking a row, the individual MM transaction will be displayed.
6.8.2 Validations for Internal Swap Transactions
The Buy/Sell indicator is from the perspective of the Spot FX deal. All other deals will be derived from this.
The Buy/Sell currencies cannot be the same.
If the Buy/Sell indicator is chosen as Buy, it will be mandatory to input the interest rate for the Buy leg (Placement). In such a case the Sell leg interest rate will be disabled.
If the Buy/Sell indicator is chosen as Sell, it will be mandatory to input the interest rate for the Sell leg (Placement). In such a case, the Buy leg interest rate will be disabled.
The Forward Exchange Rate will be a mandatory field
The Spot Value Date and Forward Value Date will be mandatory fields.
If the Buy/Sell indicator is Buy, the field Buy Amount will remain constant for any combination with Sell Amount and Spot Rate
If the Buy/Sell indicator is Sell, the field Sell Amount will remain constant for any combination with Buy Amount and Spot Rate
The user can input any two of the three values – Buy Amount/Sell Amount/Spot Rate. The other value will be calculated by the system
If the Buy/Sell indicator is Buy and the Spot Rate is modified, the Sell Amount will be recalculated keeping the Buy Amount constant
If the Buy/Sell indicator is Buy and the Sell Amount is modified, the Spot Rate will be recalculated keeping the Buy Amount constant.
If the Buy/Sell indicator is Sell and the Spot Rate is modified, the Buy Amount will be recalculated keeping the Sell Amount constant
If the Buy/Sell indicator is Sell and the Buy Amount is modified, the Spot Rate will be recalculated keeping the Sell Amount constant.
The User Reference number will be defaulted to the Deal Reference Number and will be unique across all internal swap transactions.
You can close the swap deal. This will reverse the linked FX/MM deals on authorization
6.8.3 Processing Internal Swap Transactions
The FX Spot Contract created will be a cash deal settling on the Spot Value Date itself.
All the transactions will have the internal swap customer as the counterparty and the settlement instructions will be defaulted based on that.
The day count fraction for finding out the interest amount and the interest rate for the corresponding MM transactions will be derived from the currency of the respective MM contracts.
The interest rate type will be fixed for MM contracts.
If the Spot FX transaction is a Buy, then the other two Forwards will be Sells
If the Spot FX transaction is a Sell, then the other two Forwards will be Buys
MM placement transaction will have the deal currency as the Buy currency of the Spot FX Deal.
MM Borrow Transaction will have the deal currency as the Sell currency of the Spot FX deal.
The FX Interest Forward will be based on the interest amounts of the two MM deals. For example, if the FX Spot is a Buy deal, then the Placement Interest Rate will be provided. Using this, the interest amount of the MM Placement (which is also the Sell Amount of the FX Interest Forward) will be computed. The interest amount of the MM borrow (and the buy amount of the FX interest forward) is the maturity amount (maturity amount of the MM placement * forward exchange rate) – original borrow amount (sell amount of the FX spot). The interest rate for the MM borrow deal can be calculated by using the interest amount and the day count fraction of the deal currency.
For a Buy Internal Swap Transaction:
Interest amount of MM borrow Contract = Maturity amount of Placement * Fwd exchange rate – MM borrow amount
Interest Rate of the MM borrow = Interest amount of MM borrow Contract / (MM borrow amount * Day count)
For a Sell Internal Swap transaction:
Interest amount of MM placement Contract = Maturity amount of borrow * Fwd exchange rate – MM Placement amount
Interest Rate of the MM Placement = Interest amount of MM placement / (MM placement amount * Day count)
The exchange rate of the FX interest forward contract will be derived based on the buy/sell amounts.
If the interest rate calculated for the MM placement/borrow contracts does not lie between the minimum and maximum rates defined for the contract currency in the MM product, they will be updated to null at the contract level.
After the contracts are uploaded, they will behave like independent transactions.