3. 1Setting up Chart of Accounts
Oracle FLEXCUBE supports a multilevel structure for your bank’s Chart of Accounts. You can create broad groups of accounts in the categories of assets, liabilities, income, expenses, etc., and further divide these groups into several levels. The groups at each of these levels are referred to as GLs. For instance, you can create a three level GL structure as follows:
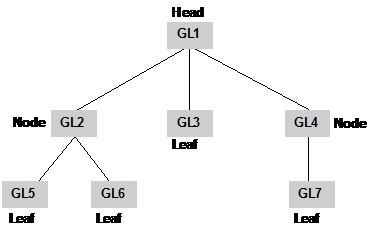
The GLs at the lowermost level are referred to as Leaf GLs. The balances and turnovers of leaf GLs are consolidated at higher level GLs called Node GLs. The GL at the top of the structure is referred to as the Head GL.
In the GL reporting hierarchy, a GL is a parent GL for GLs reporting to it. For instance, GL2 is the parent of GL 5 and 6, and GL1 is the parent GL for GLs 2, 3, and 4. The reporting GLs, GLs 5 and 6 in the first instance, are referred to as child GLs of GL 2. Similarly, GLs 2, 3, and 4 are child GLs with respect to GL1.
This multilevel GL structure can be maintained in the Chart of Accounts screen by the branch marked as the Head Office of your bank.
In Oracle FLEXCUBE, the GL balances are stored as currency wise balances as well as overall balance in LCY on GL level. This enables currency-wise break up of each GL account. However overall balance in local currency is also available.
This chapter contains the following sections:
- Section 3.1, "Chart of Account Maintenance"
- Section 3.2, "Reposting of FCY Entries for Realized P&L GLs in LCY"
3.1 Chart of Account Maintenance
This section contains the following topics:
- Section 3.1.1, "Maintaining Chart of Account"
- Section 3.1.2, "GL Details Tab"
- Section 3.1.3, "GL Linkages Tab"
- Section 3.1.4, "GL Lines Tab"
- Section 3.1.5, "Other GL Linked to this Parent Button"
- Section 3.1.6, "Statement Button"
- Section 3.1.7, "IBAN Account Number Button"
- Section 3.1.8, "Position GL Maintenance Button"
- Section 3.1.9, "BIC Button"
3.1.1 Maintaining Chart of Account
You can invoke the ‘Chart of Accounts Maintenance’ screen by typing ‘GLDCHACC’ in the field at the top right corner of the Application tool bar and clicking the adjoining arrow button.
To define the details of a new GL, click new icon.
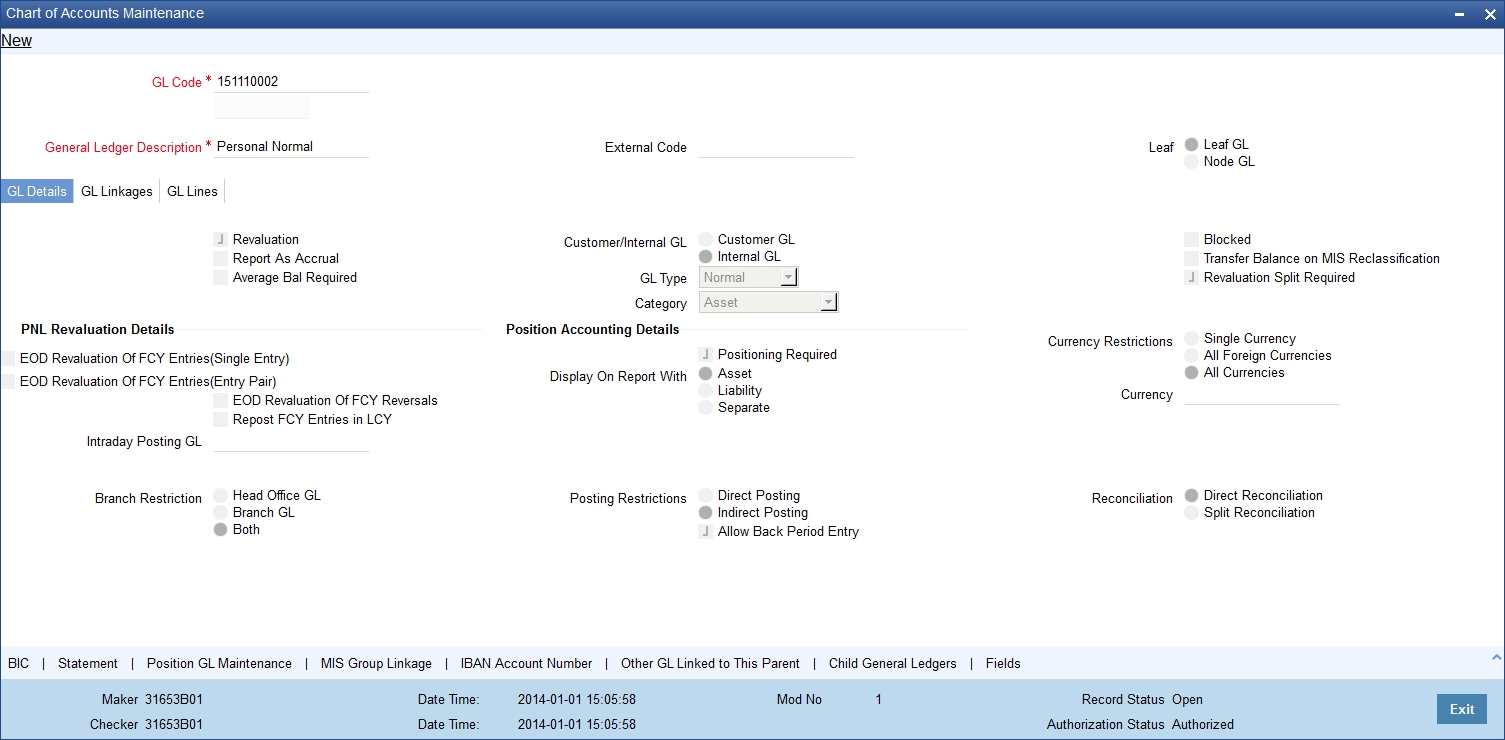
GL Code
In Oracle FLEXCUBE, a GL is identified by a Code. The length and composition of the code depends upon the GL Mask defined in the ‘Bank-wide Parameters’ Screen. The code that you enter can have a maximum of twenty alphanumeric characters.
External Code
Using External Code, you can upload the existing record into Oracle FLEXCUBE, when the record is loaded for the first time. The old GL code will be defaulted as external code and you can enter new code and save it as well. External Code has to do nothing while entering new GL entries after installation of Oracle FLEXCUBE.
Description
You can enter a brief description to help identify the GL in this field. You can use this description for the internal reference of your bank.
Leaf GL
In Oracle FLEXCUBE, a GL that you create can be one of the following:
- Node GL
- Leaf GL
A Node GL is one that reports to another GL and has other GLs reporting to it. In the reporting relationship, if a GL reports to another GL, but no GLs report to it, then it is a Leaf GL. A Head GL is a Node that does not report to another GL.
The Chart of Accounts detailed screen is designed with four tabs. By invoking the screens that correspond with these tabs you can create GLs and maintain a GL structure of your bank.
- GL Details — In this screen, you can set up a GL, indicate its type, assign a category to the Head GL.
- GL Linkages — Click this tab to define the GLs that constitute your Chart of Accounts.
- Reporting Lines — In this screen, you can define the debit and credit reporting lines for leaf GLs. This helps to organize reports on the lines of your Head Office and Central Bank.
3.1.2 GL Details Tab
To define details for a GL, click on the tab titled GL Details. The details that you can specify for a GL depend on the type of GL that you create. If a particular field is disabled, it means that the field is not relevant to the type of GL that you are creating.
You can capture the GL Details in the following fields:
GL Type
For both customer and internal GLs that you create, you should indicate the type. The GL type is indicative of the type of accounting entries that are posted into the GL. For a customer GL, the GL type could be Normal, Misc. Debit, Misc. Credit, and Nostro. For an Internal GL, the GL type could be Normal, Misc. Debit, misc. Credit, cash, and inter-branch.
Those GLs in which a debit entry is to be offset with multiple credit entries or a credit entry to be offset with multiple debit entries should be assigned the Misc. Debit and Misc. Credit type respectively.
Miscellaneous debit and credit entries should be associated with an instrument number. This will ensure proper reconciliation of the debit and credit entries made to the GL. Choose this option to indicate that the GL should cater only to entries related to your bank s account with another bank. All cash transactions, like in the Data Entry module, are posted directly into a GL by linking the GL with the Till ID. Choose this option to indicate that only interbranch related accounting entries can be posted to the GL.
The debit or credit entries of accounts that do not fall into any of the other types can be assigned to the Normal Type GL. The leaf GLs that you create will be taken as Normal Type by default.
GL Category
GL category can be specified only for a GL head. A Head GL can be assigned any of the following categories:
- Asset
- Liability
- Expense
- Income
- Contingent Asset
- Contingent Liability
- Memo
- Position
- Position Equivalent
Two Head GLs can have the same category. All GLs that fall under a Head GL will essentially belong to the category defined for the Head. Each category can have any number of GLs under it. But, the category allocated to a GL should be assigned at the head of any GL stream; all nodes and leaves by default take the category of the Head GL to which they report.
Customer/Internal GL
A GL that you create in Oracle FLEXCUBE can be defined as a Customer or an Internal GL. Internal GLs are accounts that are internal to the bank, such as cash accounts, interest income and expense accounts, and so on. These also comprise of customer account balances from the front-end modules - Loans, Deposits, Money Market, etc. The customer savings, current, and nostro accounts of your bank are opened under GLs designated as customer GLs.
The GL combinations that you can have include:
GL type |
Direct posting of entries |
Internal Node |
No |
Customer Node |
No |
Internal Leaf |
Yes |
Customer Leaf |
No |
As indicated above, you can post direct entries (i.e., link it to your bank’s internal accounts) only to internal leaf GLs. For internal and customer node GLs and customer leaf GLs, you would associate accounts with them.
Avg Bal Required
Oracle FLEXCUBE will compute and store average balances for customer GLs on a daily basis. However, the average balance computation is performed on the basis of transaction dated balance and any value dated adjustment will not be considered for this computation.
If a working day is followed by any holiday(s), the average balance computation will be done as per the specifications defined in the GL Branch Parameter Maintenance screen. That is, the balance will either include the accumulated balance for the number of days inclusive of the following holidays or the system will compute the balance on the next working day.
Note
The system will compute and store average balances for customer GLs only if you select the Avg Bal Required option. You will not be allowed to modify this option at a later date. The balances will be computed on a daily basis and will be based only on booking dated transactions.
The system will store debit, credit and net average balances in FCY as well as in LCY.
Note
In the case of back dated transactions, the system will not update the average balances of previous periods.
You can query the average balances of customer GLs in the GL Average Balances screen. The query can be done using the following, either individually or in combination:
- GL Code
- Currency Code
- Branch
- Financial Year
- Period Code
Note
- The computation can be enabled only for internal leaf GLs. If you enable this option the system will compute average balance for GLs as part of EOD processing. The average balance will be computed on the Book-Dated balance. The Debit, Credit and Net average balances in FCY as well as LCY will be stored.
- Back-period entries do not affect average balance retrospectively.
- Computation includes the effect of revaluation entries and fin-closure entries.
- Data is stored and displayed as Period-to-Date and Year-to-Date figures.
- Computation can be based on the Next Working Day-1 or System Date as specified in the GL Branch Parameters screen. If the average balance calculation basis is ‘NWD-1’, the balances of holidays will be included in the previous working day. If the calculation basis is System Date, the balances of holidays will be included on the next working day provided the next working day is in the same period. If the basis is System Date but the next working day is in the next period, the holidays will be considered during the current run.
Report As Accrual
Check against this field if you want the system to calculate the accrual entries posted to this GL independently for displaying during the online query of FX positions. Depending on your selection in this field, system will arrive at the cash and accrual positions.
Revaluation
Specify whether currency revaluation is applicable to the GL. Check against the Revaluation option to indicate that the GL should be revalued. Leave it unchecked to indicate otherwise.
You can revalue the balances of asset, liability, contingent asset, and contingent liability GLs. You can also revalue the balances in Income / Expense GLs. If you indicate that revaluation is applicable, Oracle FLEXCUBE will revalue the GL when the End of Day (EOD) process is run.
Note
If transaction entry happens on STANDARD rate then the system does not post any revaluation, even though you have enabled revaluation for the GL002C
Transfer Balance on MIS Reclassification
Indicate whether the MIS balances in the GL must be transferred, upon MIS reclassification, into the new MIS code.
A batch process performs the transfer of balances upon reclassification, for each GL for which this option has been set.
Blocked
Oracle FLEXCUBE offers you the option to temporarily mark the status of the GL as Blocked. During this period, no entries can be passed into the GL. You can open a GL marked with blocked status by unchecking the blocked status box.
This feature is useful as you need not close the GL. Blocking is temporary whereas closure is permanent.
Reval Split Required
You can choose to break-up revaluation profit/loss for the GL you are defining into:
- Trading P&L – P&L due to revaluation of foreign currency transactions during the day.
- Revaluation P&L – P&L due to revaluation of opening balances (balances without current day’s turnover).
The following example compares the accounting entries posted when you do not choose to split revaluation profit/loss and when you do.
Note
The revaluation splitting is done for revaluation-into GL’s also.
Refer the chapter ‘Account Revaluation Maintenance’ in the Core Services User Manual for further details about revaluation.
3.1.2.1 Indicating Profit and Loss Revaluation Details
EOD Reval Of FCY Entries (Single Entry)
Journal entries that do not have an offset entry cannot be revalued using the EOD revaluation of FCY entries option. Enable this option if such journal entries are to be revalued.
EOD Reval Of FCY Entries (Entry Pair)
As part of the End of Day processes, before the account revaluation batch process executes on a given business day, the revaluation batch process for performing accounting entry-based revaluation for FCY entries in Income/Expense GLs is run.
This process performs entry-based revaluation for those Income/Expense GLs for which such revaluation has been indicated in the Chart of Accounts. You can enable this option to indicate that the entry wise revaluation of FCY entries posted during the day should be performed during the EOD processes, for each entry pair in the same FCY.
EOD Reval Of FCY Reversals
Enable this option if the revaluation of reversal entries has to be performed as part of the EOD processes. If you leave this box unchecked, the reversal entries will be posted with the Exchange Rate as of event date.
As mentioned earlier, if entry-based revaluation is indicated for a GL, the FCY Entries Revaluation batch, which executes before the normal revaluation batch, will perform the revaluation for the GL.
Refer the Entry-based Revaluation of Income/Expense GLs section for detailed information on the entry-based revaluation batch.
Repost FCY Entries in LCY
While defining Income or Expense type of Leaf GL’s you can indicate whether FCY entries have to be reposted as LCY entries during the EOD processes by checking this option.
If you enable this option, you must trigger the GL Reporting Batch (ACIDPRVL) as part of the EOD processes to post FCY entries in LCY. While doing this you should consider the logical order of revaluation as well as intraday posting processes.
The exchange rate at which the original FCY entry was posted is used for reposting in LCY.
Refer the Reposting of FCY entries for Realized P&L GL’s in LCY section for detailed information on the batch.
Note
The revaluation parameters that you set for a GL cannot be modified after it is authorized.
Intraday Posting GL
You can choose to post FCY income/expenses booked during the day into a balance sheet GL and have them transferred to the P & L GL after revaluation at the EOD exchange rate. Profit or loss due to this revaluation is posted in LCY equivalent with ‘0’ FCY postings.
While defining an Income/Expense GL in the Chart of Accounts screen, you can specify an intra-day GL into which FCY entries posted into this GL are to be transferred. This designated Intraday GL should be of Asset/Liability type.
The option of specifying an intra-day GL is allowed only for Income/Expense GLs. Another pre-condition is that either or both of EOD Reval of FCY Entries options should be enabled.
Given below is an example that illustrates the entries that are posted if you choose to post income/expense entries into an intra-day GL.
Processing features
- You need to run a batch process at EOD from the following functions:
- Revaluation of the entry/entries posted into the intra-day GL using the EOD exchange rate.
- Moving the intra-day GL balances into the actual income/expense GLs.
- If you have defined an intra-day posting GL for the Income/Expense GL that you are defining, then all entries meant for the latter throughout the day (starting with the BOD batch processes) are transferred into the intra-day GL. This continues till you run the batch process to post intra-day entries into the actual Income/Expense GL. Subsequent entries get posted directly into the actual Income/Expense GL.
- The revaluation entries are posted with the same Contract Reference and Event Sequence as that of the original entry.
- The entries are posted with respective event codes for entry-pair and single entry. Thus, for entry-pair the entries are posted using the event RVEP whereas for single entry, entries are posted using the event RVSE.
The revaluation accounting entries for the contract can be seen from the accounting entry view in the contract online.
Currency Restrictions
You can specify currency restrictions only for Internal GLs. In effect, you indicate the currencies in which postings can be made to the GL. The options available are:
- Single currency
- All foreign currencies
- All currencies
By default, you will be able to post entries of transactions in all currencies into a GL. If you indicate Single currency then you should also indicate the specific currency in which transactions can be posted to the GL.
If you indicate ‘All’ foreign currencies then you can post entries of all transactions in any currency other than the local currency of your bank.
If you select ‘All’ currencies then no currency based restriction is applicable for transactions posted to the GL.
3.1.2.2 Indicating Position Account Details
Positioning Required
You can retrieve the position of a foreign currency, any time, by opting for Position Accounting in your bank. When you opt for position accounting, you maintain a Position GL and a Position Equivalent GL for every foreign currency maintained in your bank. The Position GL reflects the current position in the currency. You can opt for position accounting while indicating your preferences in the Bank-Wide Parameters screen.
If you opt for position accounting while defining Bank-Wide Parameters, you can maintain Position GLs and Position Equivalent GLs for every foreign currency that your bank deals in. When maintaining the GLs in your bank, you can opt to link the different currencies, associated with the GL, to:
- The Position GLs that you have specified for the currency (Your specifications in the Currency Definition screen will default here), or
- Position GLs of your choice
In the GL Category field, indicate if you are maintaining a Position GL or a Position Equivalent GL.
The position accounting happens event and entry pair-wise. Each entry is considered. If any currency mismatch is found then position accounting for each posting pairs are considered for position accounting.
Example
You have initiated an FT transaction where account is denominated in USD but the transfer amount is EUR. Charge is calculated in USD. In this case, the system will pass position entries for transfer amount as well as charge amount.
If transfer happens in USD from an USD account while charge is settled in EUR from an EUR account number position entry will be posted as no currency mismatch exists.
Display on Report With
When you maintain a Position GL, you can define the manner in which you would like the currency position to be reported in the Currency-Wise Position report.
In the Display on Report With field, under Position Accounting Details, indicate if you would like the currency position to be reported under one of the following:
- The head Asset
- The head Liability
- Under a separate head (that is, separately, as Currency Position)
Branch Restrictions
You have the option to indicate branch restrictions for an internal leaf GL. By default, both the Head Office and the branches of your bank can post and view entries made to a GL.
You can allow the Head Office, the branches of your bank or both to post entries to a GL. If you indicate Branch GL, only the branches of your bank can post entries to the GL. The Head Office can however view the accounting entries passed to Branch GLs. If you specify Head Office GL then only the Head Office can post entries to the GL. The branches can however view the entries posted to a Head Office GL.
Note
It is important to note that you cannot restrict specific branches from posting entries to a GL.
Posting Restrictions
Posting restrictions, like branch restrictions, can be specified only for internal leaf GLs. This is because, in Oracle FLEXCUBE, you can post entries only to internal leaf GLs.
The posting of entries to an internal leaf GL can be direct or indirect. In the case of direct posting, accounting entries are posted directly to the Internal GL through Data Entry Module of Oracle FLEXCUBE. In case of indirect posting, accounting entries are passed into the GL from the various modules of Oracle FLEXCUBE, for example - a loan or a money market contract.
Back Period Entry Allowed
You can also choose to post back period entries to the GL by enabling the Back Period Entry Allowed option. If you choose not to restrict back period entries, you will be allowed to post journal entry transactions for the GL as long as the period is open.
Note
While posting back-valued transactions, the System verifies whether the Back Period Entry Allowed option has been enabled for the GL. If the option has not been enabled an error message is displayed. This check is also performed while uploading journal entry transactions.
Reconciliation
If the GL that you are creating belongs to the miscellaneous debit or credit type, you should indicate reconciliation preferences. The method in which entries posted to a GL can be reconciled could be one of the following:
- Direct
- Split
In the case of direct reconciliation, each debit entry is offset by the corresponding credit entry and vice versa (e.g. Manager’s Check). For Split reconciliation, one debit entry can be offset against multiple credit entries and vice versa (e.g. Sundry Debtors and Creditors).
Revaluing unrealized P&L GLs in Oracle FLEXCUBE
Using Oracle FLEXCUBE, you can compute and book the due income earned not collected and the expense incurred not paid into unrealised (memo) income/expense accounts in a specified currency.
The revaluation process that performs revaluation of the total balance in the GL can be used to revalue unrealised Income/Expense GLs.
The movement of entries from unrealized to realized GLs is performed at the contract level.
3.1.3 GL Linkages Tab
Click the tab titled GL Linkages from the Chart of Accounts screen to define linkages for the GL that you are defining.
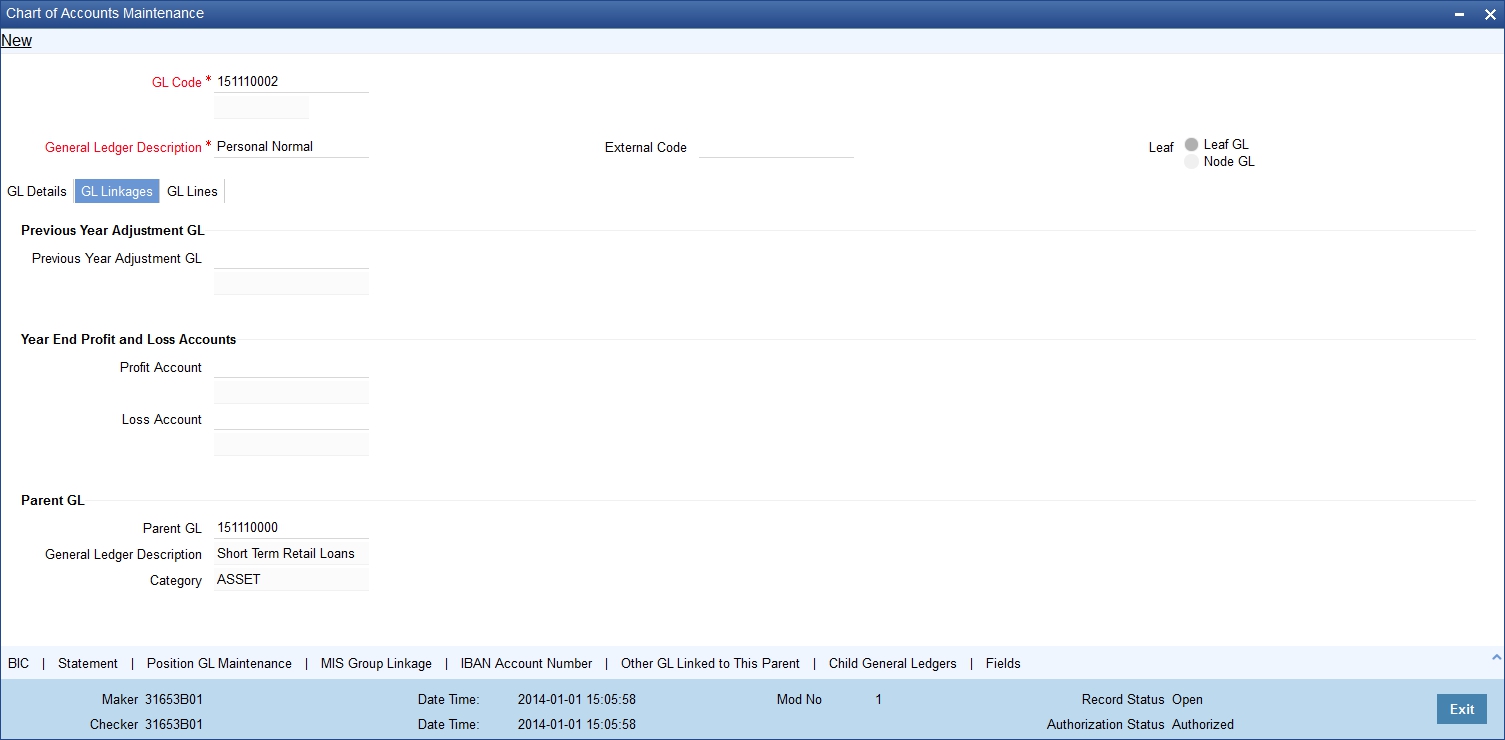
In the GL Linkages screen you maintain the following:
- the parent to which a GL should report
- the year-end profit and loss accounts into which balances would be posted
3.1.3.1 Indicating Parent GL
Parent GL
You can indicate the GL to which the current GL should report. This GL in effect becomes the parent of the current GL. You can select a parent GL from the option list available. The option list will contain only a list of Node GLs that you have already created.
Category
You can assign a Category only to a Head GL (a GL that does not report to another GL). If the GL that you indicated as the parent GL, is a Head GL the category assigned to it is also displayed.
3.1.3.2 Indicating Year-End Profit & Loss Accounts
Profit A/C
You can specify the accounts into which the year-end profit or loss entries for the GL should be posted.
The profit account is the account into which all income GL account balances are posted at the end of the year. On the last day of the financial cycle all balances from the account are posted into the year-end profit account. You can select an account code from the option list available.
Loss A/C
The Loss account is the account into which all expense GL account balances are posted at the end of the year. On the last day of the financial cycle, all balances from the loss accounts are posted into the year-end loss account.
You can specify the same GL for posting both your profits and losses.
3.1.3.3 Identifying Previous Year Adjustment GL
Prev Yr Adj GL
You can indicate the GL to which the previous year’s adjustment entries for unrealized income and expense are to be posted. As a result the system automatically posts adjustment entries between Unrealised Income/Expense GL and an Adjustment GL for the interest/commission accrued in the Previous year, as these would already have moved to the year-end P and L GL during financial closure.
Adjustment entries are passed at the contract level to the effect that the improper balances on Revaluation Income/Expense GL’s on account of Reversal of Previous Day’s Revaluation entries (if there was a financial movement in between), get corrected.
Note
Revaluation of unrealized P and L GLs is performed only for interest and commission entries and is therefore applicable for the Money Markets, Trade Finance (LC, BC), Securities and Derivatives modules of Oracle FLEXCUBE.
3.1.4 GL Lines Tab
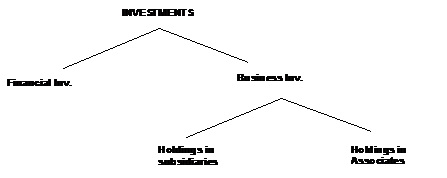
To understand the sequence of steps involved in creating a new reporting line structure, let us take the following example:
Requirement
Assume you need to create a reporting line for your Head Office, representing investments of your bank. Under the head Investments, your Head Office wants information classified under financial investments and business investments.
Further, under business investments, you require to report holdings in subsidiaries and holdings in associates.
Solution
To create this new reporting structure, invoke the Reporting Lines Maintenance screen. First create the Head Reporting Line. In our example, it is Investments and assign it a description and a category - asset. Leave the parent details blank, since this does not report to another line.
Then create the lines at the second level, Financial investments, and Business investments. Indicate Investments as the Parent line for both these lines.
Thereafter, create the third level of GLs holdings in subsidiaries and holdings in associates respectively. Specify their parent line as Business investments. The category assigned to the Parent Line is defaulted.
The hierarchical structure of this Head Office reporting line would be as follows:
After you have defined Central Bank and Head Office lines, you can indicate the leaf GLs that should report to the line. While creating a GL, you can indicate the Central Bank or Head Office line to which it should report.
Click on the ‘Reporting Lines’ tab on the ‘Chart of Accounts Maintenance’ screen to indicate the reporting lines to which leaf GLs should report. A GL that you create can report to Central Bank and Head Office reporting lines.

3.1.4.1 Associating GL with Central Bank Reporting Line
For Central Bank reporting purposes, you should associate a GL with a debit and credit reporting line.
Debit Line
The Central Bank debit line indicates the line to which an account under a GL should report, if in debit.
Credit Line
Similarly, you can indicate the line to which an account under a GL should report, if in credit.
You can select a reporting line from the option list. The option list will contain a list of all the lines maintained in the Reporting Line Maintenance screen. The description of each specified reporting line appears alongside the line number. The debit and credit reporting lines you define for a leaf can be the same.
3.1.4.2 Associating GL with Head Office Reporting Line
In order to include a GL under a Head Office reporting line, you should associate it with debit and credit reporting line.
Debit Line
The Head Office debit line indicates the line to which an account under a GL should report, if in debit.
Credit Line
Similarly, you can indicate the line to which an account under a GL should report, if in credit.
You can select a reporting line from the option list. The option list will contain a list of all the lines maintained in the Reporting Line Maintenance screen. The description of each specified reporting line appears alongside the line number. The debit and credit reporting lines you define for a leaf can be the same. After you have made the required entries save the entries.
3.1.5 Other GL Linked to this Parent Button
Click ‘Other GL Linked to this Parent’ button from the ‘Chart of Accounts’ screen to view the hierarchical position of any GL.


You can view the structural hierarchy of a GL based on two criteria:
- The GLs that are at the same level as the GL you are creating
- The GLs that report to the GL you are creating
For example, let us assume that your GL Head of Overdrafts is structured as follows:
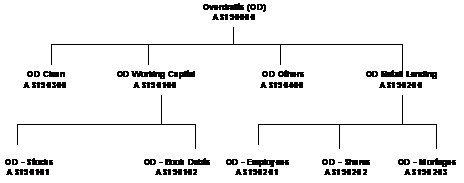
Suppose AS190100 is on display in the field GL Code. On choosing the other GLs linked to this parent option, the following list will be displayed:
GL Code |
GL Description |
AS190200 |
OD Retail Lending |
AS190300 |
OD Clean |
AS190400 |
OD Others |
If you click on Child GLs for the Current GL the following list will be displayed:
GL Code |
GL Description |
AS190101 |
OD Stocks |
AS190102 |
OD Book Debts |
Thus by clicking on the second option under hierarchy level, you can view the list of GLs that report to the current GL.
To understand the sequence of steps involved in creating a new GL structure, let us take an example:
For example, assume you are creating an asset Head GL for bank balances held with other banks.
Your GL mask is defined as NNNNNAAAD in the Bank-wide Parameters screen. You assign a GL code 50000ASS D to the Head GL. D is the last element of the code, which is system generated and is called the check digit. It will be an alphabet of the English language if it is represented in the mask as d and will be numeric if it is represented as D.
Under GL 50000ASS, you want to create two sub-GLs - 50100ASS representing balances with Federal Reserve Bank and 50200ASS representing balances with Commercial banks.
Under sub-GL 50200ASS stand two GLs -- 50201ASS and 50202ASS representing balances with commercial banks in local currency and foreign currency respectively.
The hierarchical structure of this GL tree is as follows:

To create this new GL structure, invoke the 'Chart of Accounts' screen, the 'GL Linkages' screen is displayed. Click new icon. A new screen with no prior inputs will be invoked.
You can click on any of the four broad heads listed atop the screen to activate that screen. Follow the given sequence of steps:
Step 1:

Step 2:
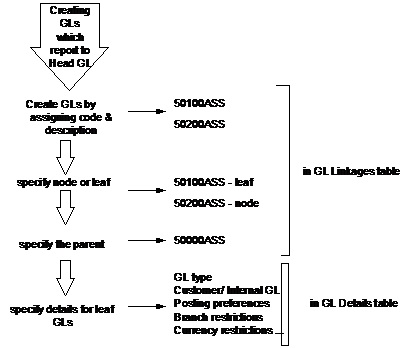
Step 3:

and so on...
3.1.6 Statement Button
For each new GL that you define in the Chart of Accounts, you may need to generate a periodic statement of accounts for transactions involving the GL.
You can indicate whether a periodic statement of accounts needs to be generated for transactions involving the GL through the Statement Details sub-screen in the GL Chart of Accounts screen.
To specify the statement related details click on the ‘Statement’ button in the Chart of Accounts screen. The ‘Statements Detail’ screen will be displayed.

Indicate that an account statement is to be generated periodically by the system for the particular account by specifying the format in which the statement is to be generated.
The options available are:
- Detailed – indicating that the statement should be a detailed account of all the transactions tracked against the particular GL Code
- Summary - indicating that only a summary of the transaction details is enough
Note
If you do not want a periodic statement of transactions involving the account, you can specify so by selecting the None option.
Cycle
Select the frequency at which the account statement should be generated from the adjoining drop-down list. This list displays the following values:
- Annual
- Semi-annual
- Quarterly
- Monthly
- Fortnightly
- Weekly
- Daily
On
Select the start date and month for the generation of the statement based on the frequency that you specify from the adjoining drop-down list. For a weekly generation of the account statement, specify the day of the week on which account statements should be generated.
For a monthly generation of statement you can specify the day of month. To specify the day of the month for the monthly generation of statements enter a number between 1 and 31 (corresponding to the system date).
If you set the statement date to 30, then account statements will be generated on:
- The last working day for months with less than 30 days
- For months with 30 days on the 30th day. If the 30th day is a holiday, it will be generated on the next working day
If you set the statement date to the 31st of the month, account statements will be generated on:
- The 31st, for months with 31 days
- The last working day for months for months with less than 31 days
Note
For all other cycles, the account statement will be generated on the last day of that cycle. Based on the preferences that you specify, the system generates a statement of accounts automatically, as part of the end of cycle processing.
Generate
Choose to generate the statement of accounts only when there has been a movement of funds into the account or when funds have been transferred out of the account.
For instance, let us assume that on the 21st of August 2001, you have set the account statement generation frequency as Daily for the account LI0202308. On the 5th of September 2001, there has been no movement of funds in the particular account. If you have opted for the Generate Only on Movement option the system will not generate a statement message for 5th Sept 2001.
You can also choose to generate the statement of accounts regardless of whether or not there has been a movement of funds to and from the account.
Statement Required
There may be times when you would have maintained the relevant account statement details for a particular GL. However, you would like to generate the account statements only a month or two later. You can choose to stall the generation of account statement for a temporary period of time by keeping the statement required check box unchecked.
To enable the generation of account statements you can unlock the contract and uncheck this box to re-start the generation of messages.
Identify the media through which the account statement is to be sent to the receiver. A list of all the different types of media maintained in the Media Maintenance screen will be displayed in the option list positioned next to this field. You can select the appropriate media from the available choices.
You may need to send account statement details to your central bank for statutory reporting purposes. While maintaining account statement details for a GL you can capture the mailing address of the receiver of the account statement details. The address that you specify in the first line will be used for correspondence with the party concerned.
3.1.7 IBAN Account Number Button
For an internal Leaf GL you can maintain the Clearing Account number to be used for outgoing payments where the internal GL is the remitter account. Click ‘IBAN Account Number’ button in the ‘Chart of Accounts’ screen.
The ‘Additional Information’ screen is displayed.

In this screen, you can specify the Clearing Account Number for the GL and the Bank Code of the GL. If a Clearing Account maintained for a GL is found in an uploaded incoming payment the System resolves the actual GL for the payment as per your maintenance in this screen.
Click 'Populate' button to default the IBAN Account Number based on bank code and account number. If the IBAN Number maintained for a GL is found in the incoming payment the System resolves the actual GL as per your maintenance in this screen.
3.1.8 Position GL Maintenance Button
When defining a GL in the Chart of Accounts, you must link all the foreign currencies linked to a GL to a Position GL, and a Position Equivalent GL if you have opted for position accounting in the Bank Wide Parameters screen.
If you do not want position accounting for a particular GL, do not choose the Positioning required option under Position Accounting Details in the Chart of Accounts. Click ‘Position GL Maintenance’ button in the ‘Chart of Accounts’ screen. The ‘Position GL Maintenance’ screen is displayed.

In this screen, you can:
- Choose the currency of the GL
- Indicate the corresponding Position GL and the Position Equivalent GL defined for the Currency, or a Position GL of your choice.
You can choose to retain the Position GL that defaults (according to your specifications in the Currency Maintenance screen), or indicate a Position GL of your choice.
Note
You should maintain Position GLs before you can identify one for a GL that you are maintaining.
3.1.9 BIC Button
For a leaf GL, you can link the SWIFT BICs representing the sender entities that are authorized to specify the GL account as the debit account for a funds transfer transaction.
While uploading an incoming SWIFT payment message, and deriving the debit and credit accounts, the Oracle FLEXCUBE Straight Through Processing (STP) process checks whether the given Sender SWIFT BIC is authorized to specify a the Leaf GL as the Debit Account for incoming SWIFT payment messages.
To specify the Sender SWIFT BIC information for a leaf GL, click ‘BIC’ button in the ‘Chart of Accounts’ screen. The WIN BIC screen is opened, where you can specify the SWIFT BICs of the Sender entities that are authorized to specify the leaf GL as the Debit Account as the Debit Account for incoming SWIFT payment messages.

3.2 Reposting of FCY Entries for Realized P&L GLs in LCY
If you have indicated that the entries posted to realized income and expense GL’s in FCY are to be posted in LCY, you must trigger the Batch Program during the EOD processes whereby all FCY entries for such GLs are reposed as LCY entries.
The reposted entries are posted against the RPOS event but they will have the same Transaction Reference and Event Sequence number as that of the original transaction.
To trigger the batch process invoke common batch function and choose GLREPDLY as the function id and execute, which will post FCY entries in LCY for those GL for which the Repost FCY entries in LCY option has been enabled.
As part of the End of Day processes, before the account revaluation batch process executes on a given business day, the revaluation batch process for performing accounting entry-based revaluation for FCY entries in Income/Expense GLs is run.
This process performs entry-based revaluation for those Income/Expense GLs for which such revaluation has been indicated in the Chart of Accounts.
Note
If transaction entry happens on STANDARD rate then the system does not post any revaluation, even though you have enabled revaluation for the GL,
It executes according to the sequence of processes as shown below:
- Entry-pair revaluation
- Single entry revaluation
- Reversal revaluation
Entry-pair Revaluation
First, the FCY accounting entries passed during the day into Income/Expense marked for entry-based revaluation are revalued, using the revaluation rate for the rate type defined in the Account Revaluation Maintenance for entry-based revaluation. The revaluation is done only for entry pairs in respect of which:
- both the main and offset entries are in the same FCY
- the FCY amount is greater than zero
The revaluation offset entry is posted to the Account/GL of the actual offset entry of the transaction in respect of which the FCY entries were passed. The offset Account/GL is identified based on the Contract Reference Number, Event Sequence Number and Amount Tag combination, and the revaluation entries are posted with the same Contract Reference Number and Event Sequence Number as the original entry. The event code RVEP is used to pass the entries. Appropriate position entries are also passed.
Single Entry Revaluation
After the entry-pair revaluation, the journal FCY accounting entries (that is, entries without corresponding offset entries) passed during the day are revalued, using the revaluation rate for the rate type defined in the Account Revaluation Maintenance for entry-based revaluation. Only those entries with FCY amounts greater than zero are revalued.
The revaluation offset entry is posted to the Profit/Loss GL maintained for the revalued GL in the Account Revaluation Maintenance, with the same Contract Reference Number and Event Sequence Number as the original entry. The event code RVSE is used to pass the entries. Appropriate position entries are also passed.
Reversal Revaluation
Revaluation of FCY reversal entries into Income/Expense GLs is done for those GLs for which such revaluation has been indicated, in the Chart of Accounts.
If an entry is posted into an Income/Expense GL’s with a negative amount, it is considered a reversal entry.
All reversal entries are ordered according to:
- Contract Reference Number
- Event Sequence Number (Reversal event sequence number)
- Debit / Credit Indicator
- Amount Tag
- Account
The entries are consolidated according to amount tags, and the resultant net amounts are revalued using the revaluation rate for the rate type defined in the Account Revaluation Maintenance for entry-based revaluation. The revaluation offset entry is posted into the FX Profit/Loss GL defined for the revalued GL in the Account Revaluation Maintenance, with the same reference number and the event sequence number of the reversal event, with the event code RVRL.
Since the revaluation offset entry in each case is passed with the reference number of the original transaction, the relevant MIS updates are also made just as is done for the original transaction.
The reversal revaluation entries can be viewed in the LCY statement for the revalued Income/Expense GLs.