3. Islamic Bills Maintenance
3.1 Introduction
The Islamic Bills & Collections module requires certain basic information to be set up before becoming operational. You can maintain details for the following:
- Document details
- Clause details
- Goods
- Instruction codes
- Free Format Texts
- Parameters for your branch
- Insurance Company Details
- Exchange Rate Type maintenance for different transaction amount slabs
The procedure for maintaining these details is discussed in the subsequent sections of this chapter.
This chapter contains the following sections
- Section 3.2, "Documents and Clauses"
- Section 3.3, "Goods"
- Section 3.4, "Instruction Codes"
- Section 3.5, "Free Format Texts (FFT)"
- Section 3.6, "Discrepancy Codes"
- Section 3.7, "Insurance Company Details"
- Section 3.8, "Exchange Rate Type based on Transaction Amount"
3.2 Documents and Clauses
This section contains the following topics
- Section 3.2.1, "Maintaining Documents and Clauses"
- Section 3.2.2, "Specifying the Document Details"
- Section 3.2.3, "Specifying Clause Details"
- Section 3.2.4, "Specifying Values for the User Defined Fields"
- Section 3.2.5, "Operations on the Document Maintenance Screen"
3.2.1 Maintaining Documents and Clauses
There are certain standard documents that are required under a documentary bill. As these documents are standard and common to most countries, you need not specify the details of the document each time you need to use it for a bill. Instead, you can maintain its details in the ‘Bills and Collections - Document Code Maintenance’ screen.
The advantage of maintaining document details is that, at the time of creating a product or at the time of entering the details of a bill, you need only specify the code assigned to the document. All the details maintained for the document will be automatically picked up. This reduces effort taken as there is no need to enter the contents of the document every time you use it.
You can invoke the ‘Bills & Collections Document Code Maintenance’ screen by typing ‘BCDDOCCD’ in the field at the top right corner of the Application tool bar and clicking the adjoining arrow button. If you are maintaining the details of a new document, select ‘New’ from the Actions menu in the Application tool bar or click new icon. The ‘Bills and Collections Document Code Maintenance’ screen is displayed without any details. If you are calling a document maintenance record that has already been defined, choose the Summary option, under Documents. From the ‘Summary’ screen, double click on a document code of your choice to open it.
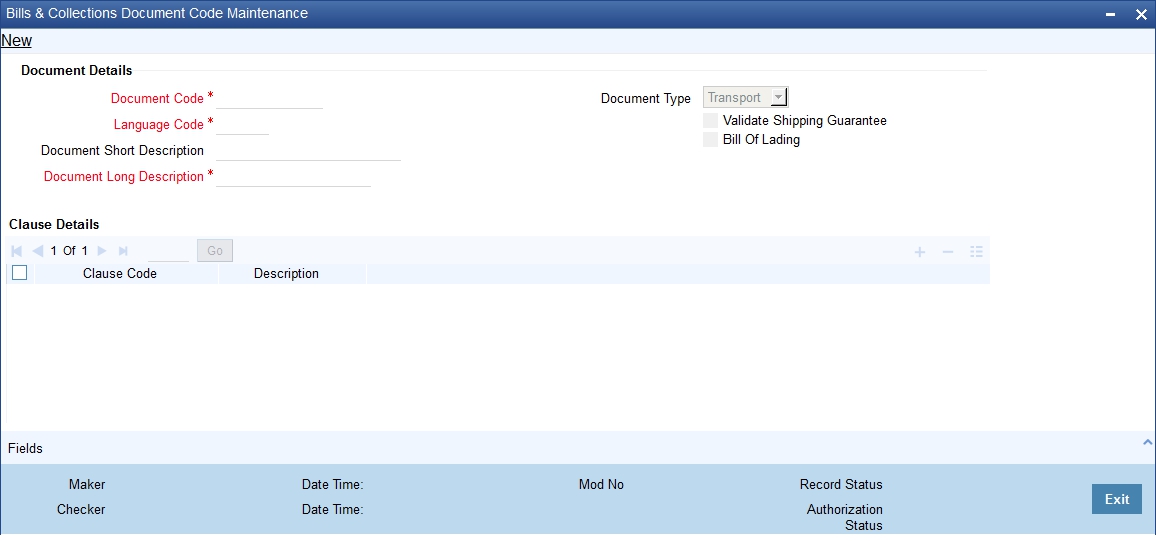
3.2.2 Specifying the Document Details
You can maintain the following details related to the documents in the ‘Bills and Collections Document Code Maintenance’ screen.
Document Code
In Oracle FLEXCUBE, each document that you maintain is identified by a four-character code called a Document code. One of the characters of the code should be a letter of the English Alphabet. You can follow your own conventions for devising this code.
The code should be unique as it is used to identify the document. While creating a product or at the time of entering the details of a bill, where you need to specify the documents that should accompany a bill, you need to only specify the code assigned to the document. The document details will be automatically picked up and defaulted.
Language Code
Specify the language code using which all the correspondences with the party should be carried out. Click the adjoining option list icon to view the list of available language codes.
Document Type
Select the document type from the drop-down list. The available options are Transport, Insurance, Invoice, and Others.
Validate Shipping Guarantee
To track the documents captured during booking of import bill against shipping guarantee issued based on the same set of documents select the ‘Validate Shipping Guarantee’ option in the screen. The tracking will be based on document reference captured in the documents screen of LC and BC contract online.
By default, this field will be unchecked and can be changed before you save the record. This field can be modified at any time using unlock operation.
During Copy operation the value of this field will be copied to the new document code.
Bill of Lading
Check this box to validate the reference number used in the bill against the shipping guarantee Bill of Lading reference number.
Document Short Description
The documents required under a bill are sometimes large and hence difficult to identify. Therefore you can specify a short description or a title, which will enable quick identification of the document.
The short description specified is for information purposes only and will not be printed on the document.
Document Long Description
After specifying a code to identify the document, you can proceed to maintain the contents of the document. The contents of the document can be printed every time it is used under a bill. A document can contain a maximum of two thousand characters.
3.2.3 Specifying Clause Details
A clause is a statement that can accompany a document sent under a bill. Instead of specifying the details of a clause each time you need to use it, you can maintain a list of the standard clauses, which can accompany the documents sent under a bill, in the ‘Bills and Collections Document Code Maintenance’ screen.
The advantage of maintaining clause details is that at the time of creating a product or at the time of entering a bill, you need to only specify the code assigned to the clause. All the details maintained for the clause will be automatically picked up. This reduces the effort involved in entering the contents of the clause each time you use it.
Clause Code
Each clause maintained is identified by a four-character code called a Clause code. One of the characters of the clause code should be a letter of the English Alphabet. You can follow your own convention for devising the code.
This code should be unique as it is used to identify the clause. While creating a product or at the time of entering the details of a bill, instead of specifying the clauses that should accompany a document, you need to only specify the code assigned to the clause. The clause details will be automatically picked up and defaulted.
Clause Description
After specifying a code for the clause, you can proceed to maintain a detailed description of the clause.
The description carries the contents of the clause and they will be printed on the documents that are required for the bill. The clause description can contain a maximum of two thousand characters.
3.2.4 Specifying Values for the User Defined Fields
You can link the User Defined Fields with ‘Branch Parameters Maintenance’ screen using Function field mapping screen which can be invoked from the Application Browser by selecting User defined fields, and then Function field mapping. The value for these fields can be specified in the ‘Branch Parameters Maintenance’ screen.
Note
Value for UDF can be made mandatory or non mandatory as maintained in the Field description screen.
After you have entered the details of the document and clause you should save the record. After you have made the mandatory entries and saved the record, your User ID will be displayed in the Input By field at the bottom of the screen. The date and time at which you saved the record will be displayed in the Date/Time field.
A record that you have created should be authorized by a user, bearing a different login Id, before the EOD is run. Once the record is authorized, the ID of the user who authorized the record will be displayed in the Auth By field. The date and time at which the record has been authorized will be displayed in the Date/Time. The status of the record will be displayed in the check box marked Authorized. The field will remain unchecked until the record is authorized.
Click the ‘Exit’ button to exit the screen. You will be returned to the Application Browser.
3.2.5 Operations on the Document Maintenance Screen
On an existing Document Maintenance record, you can perform any of the following operations (if any function under the Actions Menu is disabled, it means that the function is not allowed for the record):
- Amend the details of a document
- Authorize a document
- Copy the details of a document on to a new one
- Close the document
- Reopen the document
- Print the details of a document
- Delete the details of a document
Refer to the User Manual on Common Procedures for details of these operations.
On an existing Clause Maintenance record, you can perform any of the following operations (if any function under the Actions Menu is disabled, it means that the function is not allowed for the record):
- Amend the details of the record
- Authorize the record
- Copy the details of a clause on to a new record
- Close the record
- Reopen the closed record
- Print the details of a record
- Delete the record
Refer to the User Manual on Common Procedures for details of these operations.
3.3 Goods
This section contains the following topics
- Section 3.3.1, "Maintaining Goods"
- Section 3.3.2, "Specifying Goods Details"
- Section 3.3.3, "Specifying Values for the UDF"
- Section 3.3.4, "Operations on the Goods/Commodity Maintenance Record"
3.3.1 Maintaining Goods
A bill is an instrument used for trade payments and trade involves merchandise. There are certain standard goods or commodities that are transacted under bills. Instead of specifying details of the merchandise each time they are traded, you can maintain the details of the standard commodities in the ’Goods Maintenance’ screen. The advantage of maintaining commodity details is that at the time of entering the details of a bill, you need to only specify the code assigned to the goods. All the details maintained for the commodity code will be automatically picked up. This reduces your effort, as you do not need to enter the description of the commodities each time you need to use it.
This maintenance is common for both BC and Islamic BC modules. To maintain details of the standard commodities transacted under a bill, invoke the ‘Bills & Collections Commodity Code Maintenance’ screen by typing ‘BCDCOMCD’ in the field at the top right corner of the Application tool bar and clicking the adjoining arrow button. If you are maintaining details of a commodity for the first time, select ‘New’ from the Actions menu in the Application tool bar or click new icon. The ‘Bills & Collections Commodity Code Maintenance’ screen is displayed without any details.
If you are calling a maintenance record that has already been defined, choose the Summary option under Commodities. From the Summary screen, double click on a commodity code to open it.

3.3.2 Specifying Goods Details
In this section specify the following details:
Goods Code
In Oracle FLEXCUBE, goods are identified by a four-character code called a ‘Goods Code’. One of the characters of the goods code should be an alphabet. You can follow your own conventions for devising the code.
The goods code that you specify should be unique as it is used to identify the goods. While creating a product or at the time of entering a bill, instead of defining details of the goods transacted under the bill, you need to only specify the code assigned to the goods. The details of the goods will automatically be picked up and defaulted.
Language Code
Specify the language code using which all the correspondences with the party should be carried out. Click the adjoining option list icon to view the list of available language codes.
Goods Short Description
Give a brief description of the goods.
Goods Description
While specifying details of the goods transacted under a bill, you can edit the description that is defaulted to suit the requirements of the bill you are processing. You can also use it to enter specifications such as the quality and quantity of the merchandise.
Goods Classification
Select the type of the goods from the adjoining drop-down list. the options are:
- General
- Licensed
- Prohibitive
Goods classification is mandatory.
3.3.3 Specifying Values for the UDF
You can link the User Defined Fields with ‘Branch Parameters Maintenance’ screen using Function field mapping screen which can be invoked from the Application Browser by selecting User defined fields, and then Function field mapping. The value for these fields can be specified in the ‘Branch Parameters Maintenance’ screen.
Note
Value for UDF can be made mandatory or non mandatory as maintained in the Field description screen.
After making the mandatory entries you can save the record.
On saving the record, your User ID will be displayed in the Input By field at the bottom of the screen. The date and time at which you saved the record will be displayed in the Date/Time field.
A record that you have created should be authorized by a user bearing a different login Id, before the EOD is run. Once the record is authorized, the Id of the user who authorized the record will be displayed in the Auth By field. The date and time at which the record has been authorized will be displayed in the Date/Time field positioned next to the Auth By field. The status of the record will be displayed in the check box marked Authorized. The field will remain unchecked until the record is authorized.
Click the ‘Exit’ button to exit the screen. You will return to the Application Browser.
3.3.4 Operations on the Goods/Commodity Maintenance Record
On an existing Commodity Codes record, you can perform any one of the following operations (if any function under the Actions Menu is disabled, it means that the function is not allowed for the record):
- Amend the details of a record
- Authorize a record
- Copy the details of a commodity on to a new record
- Close a record
- Reopen a closed record
- Print the details of a record
- Delete a record
Please refer to the chapter on common procedures for details of these operations
3.4 Instruction Codes
This section contains the following topics
- Section 3.4.1, "Maintaining Instruction Codes"
- Section 3.4.2, "Specifying Instructions Code Details"
- Section 3.4.3, "Specifying Values for the User Defined Fields"
- Section 3.4.4, "Operations on the Instruction Code Maintenance Record"
3.4.1 Maintaining Instruction Codes
You can register the standard set of instructions or statements that are applicable to the bills that you issue. These standard instructions can be made to appear in the correspondence and messages sent to the parties involved in a bill. Instead of specifying details of an instruction each time you to use it, maintain its details in the ‘Bills & Collections Instruction Code Maintenance’ screen.
The advantage of maintaining Instruction Codes is that at the time of creating a product or while entering the details of a bill, you need to only specify the code assigned to the Instructions. All the details maintained for the instruction code will be automatically picked up. This considerably reduces time and effort as there is not need to enter the description of an instruction each time you use it.
This maintenance is common for both BC and Islamic BC modules. You can invoke the ‘Bills & Collections Instruction Code Maintenance’ screen by typing ‘BCDINSCD’ in the field at the top right corner of the Application tool bar and clicking the adjoining arrow button. If you are maintaining the details for an instruction for the first time, select ‘New’ from the Actions menu in the Application tool bar or click new icon. The ‘Bills & Collection Instruction Code Maintenance’ screen will be displayed.
If you are calling an instruction maintenance record that has already been defined, click on Summary view. From the Summary screen you can click on an instruction to open it.

3.4.2 Specifying Instructions Code Details
In this section specify the following details:
Instruction Code
In Oracle FLEXCUBE, each instruction that you maintain is identified by a four-character code called an Instruction Code. One of the characters of this code should be a letter of the English Alphabet. You can follow your own conventions for devising the code.
The code that you specify should be unique as it is used to identify the instruction. While creating a product, or at the time of entering the details of a bill instead of specifying the Instructions required under a bill, you need to only specify the code assigned to the instruction. The instruction details will be automatically picked up and defaulted.
Language Code
Specify the language code using which all the correspondences with the party should be carried out. Click the adjoining option list icon to view the list of available language codes.
Instruction Text
After assigning a code to identify an instruction, you can proceed to maintain the description of the instruction. The contents of the instruction that you define can contain text up to six thousand five hundred characters.
3.4.3 Specifying Values for the User Defined Fields
You can link the User Defined Fields with ‘Branch Parameters Maintenance’ screen using Function field mapping screen which can be invoked from the Application Browser by selecting User defined fields, and then Function field mapping. The value for these fields can be specified in the ‘Branch Parameters Maintenance’ screen.
Note
Value for UDF can be made mandatory or non mandatory as maintained in the Field description screen.
After making the required mandatory entries, save the record. Click the ‘Exit’ button to exit the screen.
3.4.4 Operations on the Instruction Code Maintenance Record
On an existing Instruction Maintenance record, you can perform any one of the following operations (if any function under the Actions Menu is disabled, it means that the function is not allowed for the record):
- Amend the details of the record
- Authorize the record
- Copy the details of an FFT on to a new record
- Close the record
- Reopen the closed record
- Print the details of a record
- Delete the record
Please refer to the chapter on common procedures for details of these operations
3.5 Free Format Texts (FFT)
This section contains the following topics
- Section 3.5.1, "Maintaining Free Format Texts (FFT)"
- Section 3.5.2, "Specifying Values for the User Defined Fields"
- Section 3.5.3, "Operations on the FFT Maintenance Record"
3.5.1 Maintaining Free Format Texts (FFT)
Free Format Texts (FFT’s) may be a set of instructions or statements that are applicable to the bills that you process.
There are certain standard free format texts that should appear in the correspondence and messages sent to the parties involved in the bill. Instead of specifying the details of the FFT each time you need to use it, you can maintain them in the FFT Maintenance screen.
The advantage of maintaining FFT details is that at the time of creating a product or while entering the details of a bill, you need to only specify the code assigned to the FFT. All the details maintained for the FFT code will be automatically picked up. This reduces your effort, as you do not need to enter the description of the FFT each time you use it.
This maintenance is common for both BC and Islamic BC modules. You can invoke the ‘Bills & Collections Free Format Code Maintenance’ screen by typing ‘BCDFFTCD’ in the field at the top right corner of the Application tool bar and clicking the adjoining arrow button. If you are maintaining the details for the FFT for the first time, select ‘New’ from the Actions menu in the Application tool bar or click new icon. The ‘Bills & Collections Free Format Code Maintenance’ screen will be displayed.

If you are calling an FFT Code Maintenance record that has already been defined, click Summary view. From the Summary screen, click on a record to open it.
3.5.1.1 Specifying Free Format Text Code Details
In this section specify the following details:
In Oracle FLEXCUBE, each FFT that you maintain is identified by a four-character code called an FFT code. One of the characters of this code should be a letter of the English Alphabet. You can follow your own conventions for devising the code.
This maintenance is common for both BC and Islamic BC modules. The code that you specify should be unique as it is used to identify the FFT. While creating a product, or at the time of entering the details of a bill instead of specifying the FFTs required under a bill, you need to only specify the code assigned to the FFT. The FFT details will be automatically picked up and defaulted.
Language Code
Specify the language code using which all the correspondences with the party should be carried out. Click the adjoining option list icon to view the list of available language codes.
Free Format Text
After you have assigned a code to identify an FFT, you can proceed to maintain the description of the FFT. The Description that you specify can contain text up to six thousand five hundred characters.
After you have made the required mandatory entries you can save the record.
On saving the record, your User ID will be displayed in the Input By field at the bottom of the screen. The date and time at which you saved the record will be displayed in the Date/Time field.
A record that you have created should be authorized by a user bearing a different login Id, before the EOD is run. Once the record is authorized the Id of the user who authorized the record will be displayed in the Auth By field. The date and time at which the record has been authorized will be displayed in the Date/Time field positioned next to the Auth By field. The status of the record will be displayed in the check box marked ‘Authorized’. The field will remain unchecked until the record is authorized.
3.5.2 Specifying Values for the User Defined Fields
You can link the User Defined Fields with ‘Branch Parameters Maintenance’ screen using Function field mapping screen which can be invoked from the Application Browser by selecting User defined fields, and then Function field mapping. The value for these fields can be specified in the ‘Branch Parameters Maintenance’ screen.
Note
Value for UDF can be made mandatory or non mandatory as maintained in the Field description screen.
Click the ‘Exit’ button to exit the screen.
3.5.3 Operations on the FFT Maintenance Record
On an existing FFT Maintenance record, you can perform any one of the following operations (if any function under the Actions Menu is disabled, it means that the function is not allowed for the record):
- Amend the details of the record
- Authorize the record
- Copy the details of an FFT on to a new record
- Close the record
- Reopen the closed record
- Print the details of a record
- Delete the record
Please refer to the chapter on common procedures for details of these operations
3.6 Discrepancy Codes
This section contains the following topics
- Section 3.6.1, "Maintaining Discrepancy Codes"
- Section 3.6.2, "Specifying Values for the UDFs"
- Section 3.6.3, "Operations on the Discrepancy Code Maintenance Record"
3.6.1 Maintaining Discrepancy Codes
You can register the standard discrepancy codes that are applicable to the bills you process. Instead of specifying the details of the discrepancy each time you need to use it, you can maintain them in the ‘Bills & Collection Discrepancy Codes Maintenance’ screen. The advantage of maintaining Discrepancy codes is that at the time of creating a product or while entering the details of a bill, you need to only specify the code assigned to the discrepancy code. All the details maintained for the discrepancy code will be automatically picked up. This reduces your effort, as you do not need to enter the description of the discrepancy each time you use it.
This maintenance is common for both BC and Islamic BC modules. You can invoke the ‘Bills & Collections Discrepancy Code Maintenance’ screen by typing ‘BCDDISCD’ in the field at the top right corner of the Application tool bar and clicking the adjoining arrow button. If you are maintaining the details for an instruction for the first time, select ‘New’ from the Actions menu in the Application tool bar or click new icon. The ‘Bills & Collections Discrepancy Code Maintenance’ screen will be displayed. If you are calling a discrepancy maintenance record that has already been defined, click Summary view.
From the Summary screen double click a discrepancy code of your choice to open it.

You can capture the following details related to the Discrepancy Codes here.
Discrepancy Code
In Oracle FLEXCUBE, each discrepancy that you maintain is identified by a four-character code called a Discrepancy Code. One of the characters of this code should be a letter of the English Alphabet. You can follow your own conventions for devising the code.
The code that you specify should be unique as it is used to identify the discrepancy. While creating a product, or at the time of entering the details of a bill, instead of specifying the discrepancy codes applicable to a bill, you need to only specify the code assigned to the discrepancy. The details maintained for the discrepancy code, will be automatically picked up and defaulted.
Language Code
Specify the language code using which all the correspondences with the party should be carried out. Click the adjoining option list icon to view the list of available language codes.
Description
After you have assigned a code to identify a discrepancy, you can proceed to maintain the description of the discrepancy. The contents of the discrepancy that you define can contain text up to six thousand five hundred characters.
After making the mandatory entries you can save the record.
On saving the record, your User ID will be displayed in the Input By field at the bottom of the screen. The date and time at which you saved the record will be displayed in the Date/Time field.
A record that you have created should be authorized by a user bearing a different login Id, before the EOD is run. Once the record is authorized, the Id of the user who authorized the record will be displayed in the Auth By field. The date and time at which the record has been authorized will be displayed in the Date/Time field positioned next to the Auth By field. The status of the record will be displayed in the check box marked Authorized. The field will remain unchecked until the record is authorized.
3.6.2 Specifying Values for the UDFs
You can link the User Defined Fields with ‘Branch Parameters Maintenance’ screen using Function field mapping screen which can be invoked from the Application Browser by selecting User defined fields, and then Function field mapping. The value for these fields can be specified in the ‘Branch Parameters Maintenance’ screen.
Note
Value for UDF can be made mandatory or non mandatory as maintained in the Field description screen.
Click the ‘Exit’ button to exit the screen.
3.6.3 Operations on the Discrepancy Code Maintenance Record
On an existing Discrepancy Code maintenance record, you can perform any one of the following operations (if any function under the Actions Menu is disabled, it means that the function is not allowed for the record):
- Amend the details of the record
- Authorize the record
- Copy the details of a discrepancy code on to a new record
- Close the record
- Reopen the closed record
- Print the details of a record
- Delete the record
Please refer to the chapter on common procedures for details of these operations.
3.7 Insurance Company Details
This section contains the following topics
- Section 3.7.1, "Maintaining Insurance Company Details"
- Section 3.7.2, "Specifying Values for the UDFs"
- Section 3.7.3, "Operations that You can Perform on a Insurance Company Record"
3.7.1 Maintaining Insurance Company Details
A bill, as an instrument used for trade payments involves the shipment of large merchandise over long distances. To cover the loss or damage of the goods during transition, most merchandise that is traded is covered under an insurance policy.
You can maintain the details of different Insurance Companies in Oracle FLEXCUBE.
At the time of capturing the details of a Bill contract in the system, you can associate the appropriate Insurance Company Code with the contract. Upon selection of the code, all the details maintained for the selected code will be automatically picked up by the system. Subsequently, on receipt of the insurance policy from the company, the insurance policy number can also be captured in the relevant contract.
You can maintain the details of an insurance company through the ‘Bills & Collection Insurance Company Maintenance’ screen. This maintenance is common for both BC and Islamic BC modules. You can invoke the ‘Bills & Collection Insurance Company Maintenance’ screen by typing ‘BCDINSCO’ in the field at the top right corner of the Application tool bar and clicking the adjoining arrow button.

In this section, you can maintain the following details of Insurance Companies:
Insurance Company Code
Specify a unique code for each insurance company being defined in the system. The insurance company will be identified by this code throughout the system. This is mandatory information and if not provided, you will not be allowed to save the details of the company.
You can use a maximum of 9 alphanumeric characters to create the company code.
Insurance Company Name
After specifying a unique code for the company, you can also specify the full name of the insurance company.
Address
Specify the mailing address of the insurance company being defined. You can maintain a maximum of four lines of address. Each line of address can accommodate a maximum of 105 alphanumeric characters.
Telephone Number
You can also capture the telephone number of the insurance company.
Fax Number
Specify the Fax number of the insurance company.
Note
The insurance company will be available for association with Bill contracts only after you authorize the company details.
Account Details
Here you can specify the following details for insurance settlement:
Customer
Specify the customer identification number of the insurance company. The adjoining option list displays all valid, open and authorized customers maintained in the system. You can select the appropriate one.
Account
Specify the customer account number of the insurance company. The adjoining option list displays all valid, open and authorized customer accounts attached to the chosen customer identification number. You can select the appropriate one.
Based on the account specified, the branch in which the account resides is displayed alongside.
3.7.2 Specifying Values for the UDFs
You can link the User Defined Fields with ‘Branch Parameters Maintenance’ screen using Function field mapping screen which can be invoked from the Application Browser by selecting User defined fields, and then Function field mapping. The value for these fields can be specified in the ‘Branch Parameters Maintenance’ screen.
Note
Value for UDF can be made mandatory or non mandatory as maintained in the Field description screen.
Click the ‘Exit’ button to exit the screen.
3.7.3 Operations that You can Perform on a Insurance Company Record
In addition to creating the details of an insurance company, you can perform the following operations on an existing record:
- Unlock the record (to amend the details)
- Delete an unauthorized record
- Close the record
- Reopen the closed record
Please refer to the manual on Common Procedures for details of these operations.
3.8 Exchange Rate Type based on Transaction Amount
This section contains the following topics
- Section 3.8.1, "Application of Exchange Rate Type based on Transaction Amount"
- Section 3.8.2, "Specifying the Exchange Rate Maintenance Details"
- Section 3.8.3, "Specifying Values for the User Defined Fields"
3.8.1 Application of Exchange Rate Type based on Transaction Amount
Oracle FLEXCUBE allows you to apply different exchange rates based on the amount involved in the transaction. The cut-off amount slabs are maintained in the local currency of your bank.
If the transaction currency is not the local currency, the system will first convert the transaction amount into the local currency equivalent using the Standard Mid Rate. This is necessary as the cut-off amount slabs are maintained in the local currency. The system will then validate the converted amount against the different amount slabs to determine the appropriate rate type. This is the rate type that will be used for the actual conversion of the transaction currency into the local currency equivalent.
You can capture the exchange rate types for different amount slabs through the screen. You can invoke the ‘Bills and Collections Exchange Rate Type Maintenance’ screen by typing ‘BCDAMTEX’ in the field at the top right corner of the Application tool bar and clicking the adjoining arrow button.

In this screen, you can specify the amount slabs for a branch, module and product combination.
Branch Code, Module Code and Product Code Combination
Each branch of your bank is identified by a unique code. All authorized and active branch codes are available in the option list. You can select the appropriate branch code from the list.
Like wise, all the modules (like Finance & Deposits, Letters of Credit, Bills & Collections etc) available in your bank are also displayed in an option list. All active and authorized records are available for selection. You can select the appropriate module code from the list.
The various products/services offered by your bank are also available in an option list. Select the product code from the list.
Alternatively, you can also maintain the cut-off amounts that will be applicable for all the branches, modules, and products of your bank. You can make the following selections to do this:
- Branch Code – AL (all branches)
- Module Code – ALL (all modules)
- Product Code – ZALL (all products)
Amount Tag
Amount tags identify the various components (eg Bill Amount, Finance Principal, LC Amount etc.) involved in a contract.
You can maintain the cut-off amount slabs for:
- All Amount Tags - The maintenance will be applicable to all the amount tags available in the system (Module tags and Non-module tags).
- Module Tags - The amount tags that are specific to a particular module are known as Module Tags. For eg the amount tag PRINCIPAL is specific to the Finance module, BILL_AMOUNT is defined for the Bills module and so on.
- Non-Module Tags - The amount tags that are internally created by the system are referred to as Non-Module tags. The system will automatically create the amount tags for the Profit, Tax, Charge, and Commission components that you define for a product.
3.8.2 Specifying the Exchange Rate Maintenance Details
In this section, specify the following information:
Basis Amount
You can maintain the different amount slabs in this field. Specify the lower limit of the amount slab here.
Note
For the first slab, the floor basis amount will always be maintained as zero.
Basis Amount To
Specify the upper limit of the slab. The upper limit of the previous amount slab gets defaulted as the Floor Basis Amount. Click the option list to capture each subsequent amount slab.
Currency Rate Type
You can associate a different exchange rate type with each cut-off amount slab that you have maintained. All authorized and active rate types defined in your system are available in the option list. Select the appropriate rate type for each amount slab.
3.8.3 Specifying Values for the User Defined Fields
You can link the User Defined Fields with ‘Branch Parameters Maintenance’ screen using Function field mapping screen which can be invoked from the Application Browser by selecting User defined fields, and then Function field mapping. The value for these fields can be specified in the ‘Branch Parameters Maintenance’ screen.
Note
Value for UDF can be made mandatory or non mandatory as maintained in the Field description screen.
Click the ‘Exit’ button to exit the screen.