6. Capturing Additional Details
This chapter contains the following details:
- Section 6.1, "Additional Details"
- Section 6.2, "Draft Details"
- Section 6.3, "Specifying Settlement Instructions"
- Section 6.4, "Event Details"
- Section 6.5, "Capturing MIS Details"
- Section 6.6, "Defining Commission Details"
- Section 6.7, "Defining Charge Details"
- Section 6.8, "Specifying Tax Details"
- Section 6.9, "Maintaining Collateral Details"
- Section 6.10, "Linking Contracts to Deposits and Accounts"
- Section 6.11, "Viewing Amended Details of Contract"
- Section 6.12, "Specifying Transfer Details"
- Section 6.13, "Capturing UDF Values"
- Section 6.14, "Specifying Loan Preferences"
- Section 6.15, "Split Settlement Screen"
- Section 6.16, "Capturing Brokerage Details"
- Section 6.17, "Specifying Document Details"
- Section 6.18, "Viewing all Messages"
- Section 6.19, "Previewing Messages"
- Section 6.20, "Utilizing Import Licenses"
- Section 6.21, "Remarks"
- Section 6.22, "Common Group Message"
6.1 Additional Details
The buttons on the contract screen enable you to invoke a number of functions vital to the processing of an LC Contract.
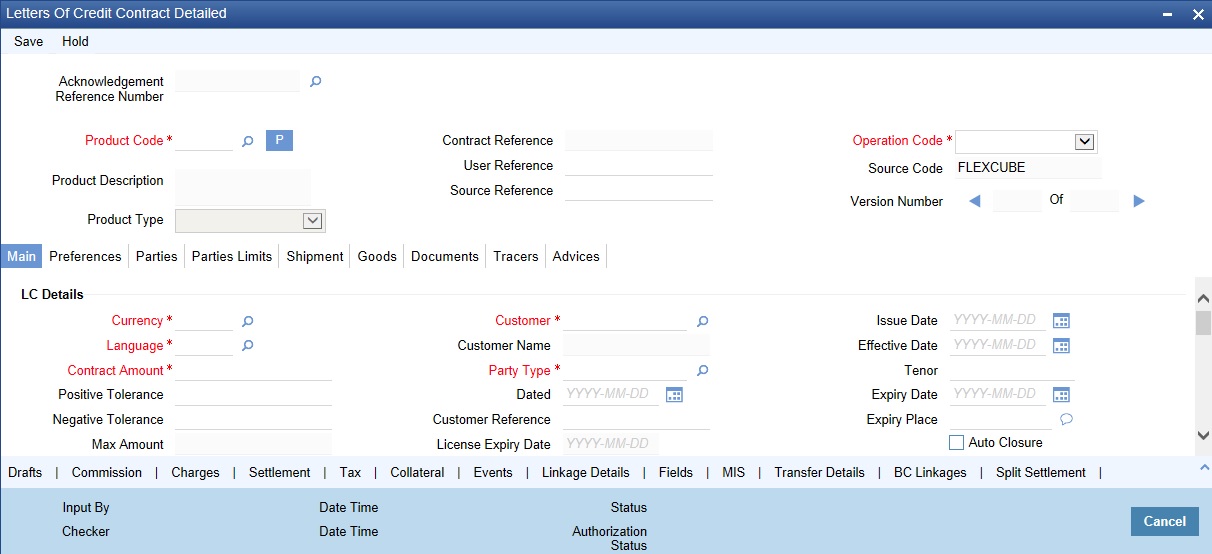
These buttons have been briefly described below.
Buttons |
Description |
Drafts |
Click this button to capture the details of draft drawn for the LC. You can specify the name of the insurance company that is covering the goods traded under the LC. |
Commission |
On invoking this button Commission details of the contract is displayed |
Charges |
This button invokes the Charges, Commissions and Fees (ICCF) service. On invoking this function you will be presented with a screen where the ICCF rate, amount, currency and the waive charge parameter can be specified. The Processing Charges and Fees manual, details the procedure for maintaining charge rules. It also deals with the linking of a charge rules to a product and the application of the rule on an LC. The Processing Commissions manual, details the procedure for maintaining commission rules. It also deals with the linking of a commission rule to a product and the application of the rule on an LC. |
Settlement |
Click this button to invoke the Settlement screens. Based on the details that you enter in the settlement screens the LC will be settled. The details of these screens have been discussed in the Settlements manual. |
Tax |
This button invokes the Tax services. The Processing Tax manual details the procedure for maintaining tax rules and schemes. It also deals with the linking of a tax scheme to a product and the application of the scheme on an LC. |
Collateral |
In the screen that corresponds to this button, you can specify details of the cash that you collect as collateral form a customer for the LC that you process. The details of this screen are discussed under the head Specifying Collateral details for an LC. |
Events |
Click this button to view the details of the events and accounting entries that a contract involves. |
Linkages |
Clicking this button invokes the Contract Linkages screen. In this screen, you can link an LC to a deposit or account, and indicate the funds that you would like to block. |
Fields |
Click this button to specify values for the user defined fields (UDFs). |
MIS |
Click this button to define MIS details for the LC. |
Transfer Details |
If the LC is transferred to a new party, you can view the transaction details. |
BC Linkages |
Click this button to specify BC linkages |
Split Settlement |
Click this button to specify split settlement details |
Loan Preference |
Click this button to invoke the Loan Preference screen. You can maintain the details of the Loan here. |
Brokerage |
Use this button to capture the brokerage details for the LC contract and set your preferences for sharing the brokerage amount among multiple brokers. |
All Messages |
Click this button to view all messages associated to contract. |
Message Preview |
Click this button to view the messages or advices generated for the contract. |
Import License |
Click this button to capture import license details, |
Remarks |
Click this button to view the ‘History of Remarks’ screen |
Common Group Message |
Click this button to open the common group message call form |
Enter valid inputs into all the mandatory fields in screens that can be invoked from the buttons or you will not be able to save the contract. After making the mandatory entries for the LC, save the contract by either clicking save icon in the toolbar.
A contract that you have entered should be authorized by a user bearing a different Login ID, before the EOD is run.
Note
You have the option to amend all the unauthorized entries made for an LC. However, after authorization, certain fields cannot be amended.
Click ‘Exit’ or ‘Cancel’ button to go back to the Application Browser.
6.2 Draft Details
This section contains the following details:
- Section 6.2.1, "Capturing Draft Details"
- Section 6.2.2, "Specifying Drawee Details"
- Section 6.2.3, "Specifying Insurance Company Details"
- Section 6.2.4, "Specifying Breakup Details"
6.2.1 Capturing Draft Details
You can capture the details of the draft that is drawn for the LC, in the Drafts screen. In addition, you can also specify the name of the insurance company that is covering the goods traded under the LC. Click ‘Drafts’ button in the LC Contract to invoke the screen:
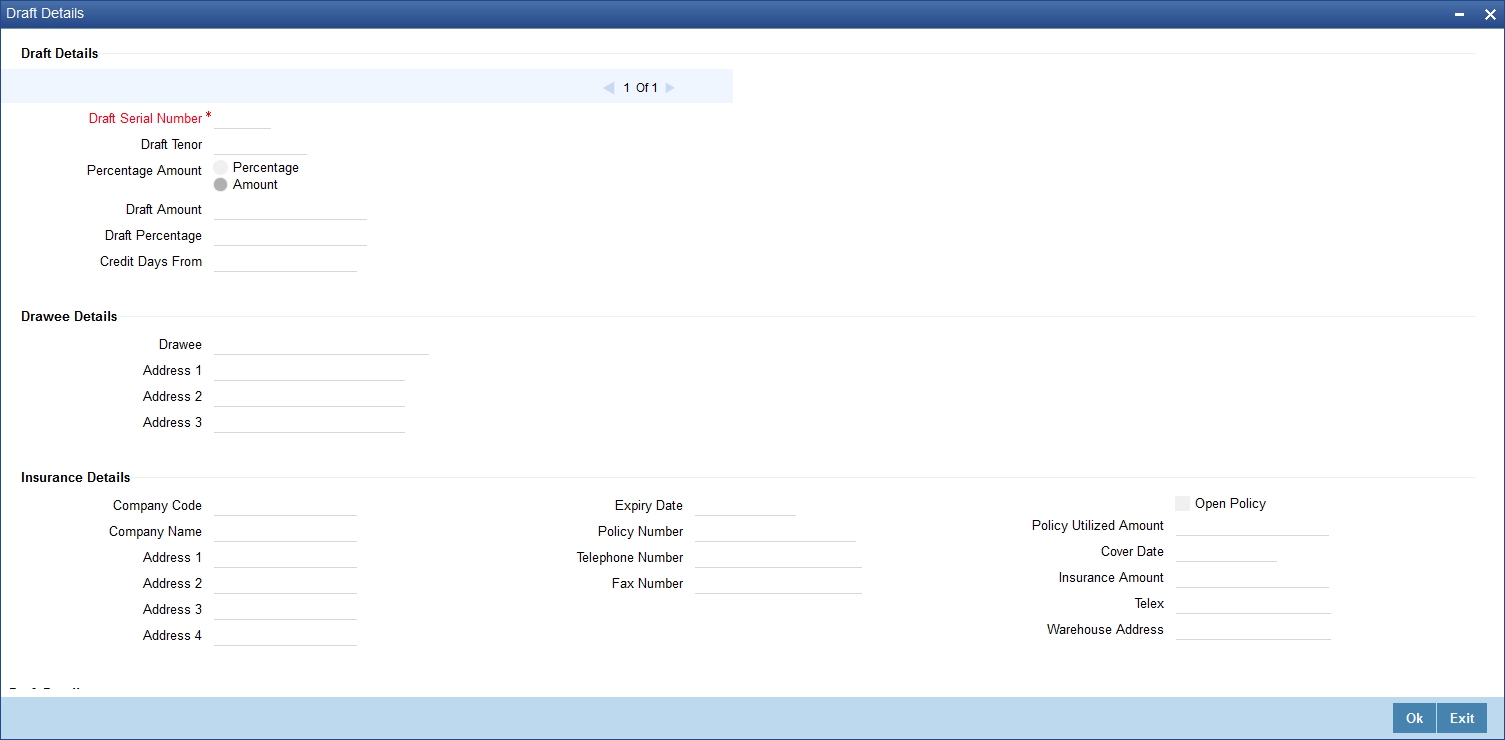
You can capture the following details:
Draft Tenor
Specify the tenor of the draft.
If the LC Type of an LC product is selected as 'Sight', then:
- During LC contract creation, on save, system validates the value entered for Draft Tenor in Drafts sub-system as either 0 or null. If the validation fails, system displays an override message. This validation is also performed on save of LC amendment using LC contract online function.
If the LC Type of an LC product is selected as 'Usance', then:
- During LC contract creation, on save, the system validates whether the values entered for draft tenor in drafts sub-system is between minimum and maximum draft tenor values defined for the product. If the validation is not successful, the system displays a configurable override message. This validation is also performed on save of LC amendment using LC contract online function.
- If multiple drafts are captured for an LC contract, the system validates that the 'Draft Tenor' entered for each individual draft is within the minimum and maximum range defined for the product.If minimum and maximum draft tenor value is not defined for an LC product, then on save of an LC contract, the system will not perform this validation as the range is not defined at the product level.
If either 'Minimum Draft Tenor' or 'Maximum Draft Tenor' is defined for the LC product, then on save of both LC contract creation and amendment, the value defined for the 'Draft Tenor' of LC contract will be validated against the 'Minimum Draft Tenor' (if 'Minimum Draft Tenor' is defined) or will be validated against 'Maximum Draft Tenor' (if 'Maximum Draft Tenor' is defined). If the validation fails, the system displays an override message.
Amount/Percentage
Specify whether the draft is a percentage of the LC amount or a Flat amount.
Subsequently, specify the Amount or the Percentage (based on your selection).
Credit Days From
The Date from which the tenor of the draft begins.
6.2.2 Specifying Drawee Details
Specify the following details.
Drawee
Specify the party on whom the draft is drawn. You can select the drawee’s CIF from the adjoining list. This will contain a list of all the open and authorized CIF maintained in the Customer Directory. This information is captured from the BIC directory.
Address 1 to 3
Specify the address of the drawee.
6.2.3 Specifying Insurance Company Details
Specify the following details.
Company Name
Specify the Insurance Company to be associated with the LC.
Company Code
You can select the appropriate company code from the option list. The list will display all authorized and active company codes. If you have specified an open insurance policy in the ‘Insurance Policy Number’ field, the option list will display the company code associated with the chosen insurance policy number. Upon selection of the company code, the following details will be automatically displayed by the system:
- Company Name
- Address of the company
- Telephone Number
- Fax Number
- Policy Utilized Amount
- Cover Date
- Insurance Amount
- Telex Address
- Warehouse Address
Open Policy
Check this option to link an open insurance policy to the LC.
Insurance Policy Number
Specify the insurance policy number here. The adjoining option list displays all insurance policy codes maintained in the system. If you check the option ‘Open Policy’ the option list will display the open insurance policies maintained in the system. You can select the appropriate one.
If you have checked the ‘Open Policy’ option and the policy number is specified here is invalid (i.e. not maintained in the ‘Open Policy Maintenance’ screen) or blank, the system will display an error message.
Expiry Date
Enter the expiry date of the Policy.
6.2.4 Specifying Breakup Details
The breakup details of the draft will be displayed here as follows:
- Amount Name
- Amount
The draft amounts for the different components (Insurance, Interest, Invoice, Freight)
Note
You can also choose to associate an Insurance Company that is not maintained in the system. When you are specifying a company code that does not exist, the system will display an override (based on your requirement, you can configure the override to be a warning or an error message). On confirmation of the override, the company code will be automatically changed to ‘XXXXXXXXX’. Subsequently, you can specify any company name to be associated with the contract. The system will not perform any validations. The remaining fields in the screen will be disabled in this case.
6.3 Specifying Settlement Instructions
Through the settlement screens, you should specify the customer accounts to which entries for the commissions, charges, taxes and collateral should be posted.
Click ‘Settlement’ button in the Contract Main screen, for a display of the Settlements screen.

Besides the account details, you can specify:
- The currency in which the component is expressed
- The payment account and its currency
Note
If you have specified an account that uses an account class that is restricted for the product, an override is sought.
- The branch of your bank to which the account belongs
- The exchange rate (in the case of the component currency being different from the account currency)
- The ERI Currency
- The ERI Amount
Refer to the chapter titled ‘Making Availment’ in this user manual for details.
6.4 Event Details
This section contains the following details:
- Section 6.4.1, "Viewing Event Details"
- Section 6.4.2, "Viewing the Accounting Entries Passed for the LC"
- Section 6.4.3, "Viewing Advices Applicable to Contract"
6.4.1 Viewing Event Details
The event details screen of contract processing will show the details of the accounting entries generated for an LC. Click ‘Events’ in the LC Contract Detailed View screen to go to the LC Contract View Events screen.
The details of events that have already taken place on the contract will be displayed, along with the date on which the event took place.

Click ‘Accounting Entries’ to view the accounting entries for the event that is highlighted. Click ‘Message’ to view the messages applicable to the event. Click on ‘Exit’ or ‘Cancel’ to go back to the LC Contract Detailed View screen.
6.4.2 Viewing the Accounting Entries Passed for the LC
From ‘LC Contract - View Events’ screen, click ‘Accounting Entries’ to view the Accounting Entries for the event. The accounting entries that are passed depend on the type of LC that you are processing.

The following information is provided for each event:
- Branch
- Account
- Transaction Code
- Booking Date
- Value Date
- Dr/Cr indicator
- Currency
- CCY (Currency)
- Amount in contract CCY
- Amount in local currency
- All the overrides that were given for an event will also be displayed
Click ‘Exit’ or ‘Cancel’ to go back to the screen from where you invoked the Accounting Entries screen.
6.4.3 Viewing Advices Applicable to Contract
Click ‘Message’ from the View Events screen to view the list of advices applicable to a particular event in the lifecycle of the LC.

The following details of a message are displayed:
- The message type
- The Name and ID of the recipient of the message and
- The status of the message
To view the text of a message, highlight the message and click on the ‘Message’ button. Click ‘Exit’ or ‘Cancel’ to exit the screen.
6.5 Capturing MIS Details
Click ‘MIS’ button to invoke the following screen.

Refer the MIS User Manual for further details on capturing MIS details.
6.6 Defining Commission Details
Besides the LC amount, the other components of an LC include the commissions that you collect and the charges that you levy on the parties involved in an LC.

While defining Accounting Roles for a product you must specify the internal accounts that should be picked up when commissions are collected and when charges are levied.
For an LC having the operation code ‘Reimbursement’, you will not be able to save commission related details. While saving the contract, the system will display an error message if you enter details in the ‘ICCF screen’.
While creating or amending an authorized contract, you can modify the percentage of commission to be charged. Enter the rate and click ‘Re-compute’ button to recalculate the commission percentage to be charged.
The details of the commissions that can be collected and the procedure of making them applicable to the LC you are processing has been detailed in the chapter Processing Commissions in the Modularity User Manual.
6.7 Defining Charge Details
Click ‘Charges’ button to invoke the following screen.

Refer the Charges and Fees User Manual under Modularity for further details about this screen.
6.8 Specifying Tax Details
Click ‘Tax’ button to invoke the following screen.

Refer the Tax User Manual under Modularity for further details on tax processing.
6.9 Maintaining Collateral Details
LCs that are issued or confirmed is often processed with cash collateral. In cases like a in a Guarantee, you may even take a 100% cash collateral. This is when an applicant is not a customer of your bank and the credit worthiness of the applicant is not known. Details of such cash collateral can be maintained in the LC Contract - Collateral Details screen.
To invoke this screen, click ‘Collateral’ in the LC Contract Details screen. The LC Collateral Details screen is displayed.

The cash collateral percentage is defined for the product under which an LC is processed. This percentage is picked up by default for the LC being processed.
6.9.0.1 Specifying Value of the Cash Collateral
The value of collateral can be expressed either as an amount or as a percentage of the LC amount.
Collateral Currency
Specify the currency of the collateral.
Percentage
If you specify the cash that is to be collected as collateral as a percentage of the LC amount, the equivalent amount is displayed. This amount is taken to be in the currency, defined as the collateral currency.
Amount
You can specify the cash collateral as an amount. In this case you do not need to specify a percentage. However if you specified the collateral as a percentage of the LC amount, the actual amount is computed in the collateral currency by the system.
Exchange Rate
If the collateral currency and the currency in which the LC is issued are different, you should also specify an exchange rate to be used in the conversion. The value of the collateral is determined based on this exchange rate.
Description
Give a brief description of the collateral.
6.9.0.2 Specifying Adjustment Details for a Collateral
At any time during the lifecycle of an LC, you may want to increase or decrease the value of the cash, accepted as collateral on LC. This is done by way of an amendment to the LC. The cash collateral can be increased or decreased, without changing the LC amount. On the other hand, a change in the LC amount may necessitate a change to the collateral amount.
Type
If you wish to increase the collateral amount, indicate ‘Increase’ on this screen.
If you wish to decrease the collateral amount that you have collected while issuing an LC, indicate ‘Decrease’ on this screen.
Amount
Enter the amount by which you want to increase or decrease the cash accepted as collateral. The collateral deposit account will automatically increase or reduce based on the specifications you make.
Note
If at the time of Availment, you want to pay from the collateral account, you can include it in the accounting entries for the event, Availment.
6.10 Linking Contracts to Deposits and Accounts
You can link an LC contract to deposits and accounts.
Type of linkage |
Description |
Linking a deposit |
The entire LC amount, or
a portion of it, can be linked to a deposit. The outstanding amount in
the deposit should always be greater than or equal to the LC amount.
|
Linking an account |
You can link the entire contract amount or a portion of it, to a savings or current account that is maintained with you. The available balance in the account should always be equal to or greater than the contract amount that is outstanding. You can link any number of contracts to an account provided a balance greater than or equal to the total outstanding contract amount(s) is available in the account. |
The entire contract amount or a portion of it can be linked to any number of deposits or account or to both. From the LC Contract Details screen, you can invoke the ‘Linkages Details’ screen by clicking ‘Linkage Details’ button.
In this screen, you can specify any account/deposit with you, and indicate the funds that you would like to block.

Specify the following details.
Type
In the Contract Details screen, you can specify the type of linkage. The LC can be linked to a:
- deposit
- account
- LC
- EL
If you select the EL type, then LC reference number will be available in Linked to Reference Number option list. Only Export type of LC is displayed in option list. You can link Export type of LC, only for bill availing under reimbursement type of LC.
Linked To Reference Number/Account
If the LC is linked to a deposit, you should enter the Reference Number of the deposit. The deposit should be a valid contract in Oracle FLEXCUBE, with a Value Date that is earlier than or the same as the Value Date of the LC contract. The Maturity Date should be the same as, or later than that of the contract.
If the linkage is with an account, enter the account number to which you are linking the LC. The account you specify has to be a customer account (a Current account or a Savings Bank account).
If the linkage is with LC, linked reference number will be the reference number that you entered in the main page.
Currency
The currency of the linkage type to which the LC is linked is displayed once the linkage details are specified.
Available Amount
The system displays the amount available against the linked contract or account.
Exchange Rate
If the currency of the LC is different from the currency of the deposit or account to which it is being linked, the mid-rate for the day will be picked from the Exchange Rate table and displayed in the screen.
Converted Linked Amount
The system displays the converted linked amount.
Linked Amount
Indicate the contract amount that has to be linked to the deposit or account. This amount can be the entire amount of the LC or a portion of it. The amount available for linkage, in the specified deposit or account, is arrived at, by taking into account other linkages and the uncollected and unauthorised balance (in the case of an account).
Once the linked amount is specified, the system displays the following values.
Account/Deposit
The system displays the amount linked to each contract or account.
Uncovered Amount
The system displays the contract amount that has not been linked, in the case of a partial linkage.
6.11 Viewing Amended Details of Contract
You can view the changes made in a specific version of an LC contract. To do this, navigate to the version of the contract that you would like to view in the Contract Details screen. Click ‘Change Log’ in the vertical array of buttons on the Contract Details screen.
The fields that were modified in the version will be displayed along with the old (inherited) and the changed values.
6.12 Specifying Transfer Details
Click ‘Transfer Details’ button to invoke the following screen.
![]()
Specify the following details.
To Letter Of Credit reference
Specify the destination to which the goods transacted under the LC should be sent by selecting the appropriate option from the list of values.
Transfer Amount
Specify the amount that should be transferred from the original LC. You can only transfer an amount that is less than or equal to the amount available under the original LC.
Transfer Date
The system date is displayed as the date of the transfer. This cannot be modified.
Expiry Date
The expiry date is the date up to which the transferred LC is valid. The expiry date of the original LC is displayed here. You can modify this, provided that the expiry date is not earlier than the LC issue date or the system date.
Shipment Date
This is the latest date by which the shipment of the goods specified for the transferred LC can take place. The latest shipment date of the original LC is displayed here. You can modify this, provided that the date you enter is neither earlier than the Issue Date of the LC, nor later than the expiry date.
6.13 Capturing UDF Values
Click ‘Fields’ button to invoke the following screen.

The User Defined Fields (UDFs) maintained for the linked function id are displayed here. You can specify values for them.
Refer the User Manual titled ‘User Defined Field’ for details about defining UDFs.
6.14 Specifying Loan Preferences
Click ‘Loan Preferences’ button to invoke the following screen:

Specify the following details;
Contract Reference
The contract reference number is displayed here.
Latest Sequence Number
The system generates a sequence number and displays it here.
Product
The loan product is displayed here. However, you can change the loan product if required. Specify the loan product that should be used for loan contract creation. The adjoining option list gives a list of loan products maintained in the Consumer Lending module. Choose the appropriate one.
Counterparty
The system displays the customer ID (CIF) of the shipping guarantee.
Currency
Specify the currency in which the loan should be initiated. The adjoining option list gives a list of valid currency codes maintained in the system. Choose the appropriate one.
Tenor
Specify the loan tenor. By default the system displays the LC tenor. However, you can change it.
Units
Specify the units in which the tenor is specified.
Contract Reference Number
The contract reference number is displayed here.
Event Sequence Number
The system displays the event sequence number.
Bill Outstanding Amount
The bill outstanding amount is displayed here.
Rate
You can capture the exchange rate details here.
Middle Rate
Select the rate to be applied for conversion. The options available are Middle rate and Buy/Sell Rate.
Exchange Rate
For a customer availing any Relationship Pricing scheme, the customer specific exchange rate derived by adding the original exchange rate and the customer spread maintained for the relationship pricing scheme gets displayed here.
If Relationship Pricing is not applicable, Exchange Rate will be the same as the Original Exchange Rate.
For more details on customer specific exchange rates, refer the section titled ‘Specifying Pricing Benefit Details’ in Relationship Pricing user manual.
Rate type
Specify the rate type used for exchange rate. The adjoining list gives a list of rate types. Choose the appropriate one. The default rate type is Standard.
Original Exchange Rate
The base or the actual exchange rate between the contract currency and collateral currency gets displayed here.
Payment Mode
Specify the mode of payment.
Loan Value Date
The system displays the debit value date. However, you can change it.
Maturity Date
The system computes the maturity date based on loan tenor and displays it here. However, you can change it.
Credit Product Account
Specify the credit settlement account of the loan.
Debit Product Account
Specify the debit settlement account of the loan.
Debit Account Branch
Specify the branch where the debit settlement account used for the loan resides.
Credit Account Branch
Specify the branch where the credit settlement account used for the loan resides.
While creating a loan from a shipping guarantee, the system defaults the interest rate and exchange rate specific to the customer. These rates are taken from the section ‘Promotion Maintenance’ of the ‘Customer Maintenance’ screen. In case the default rates are not available, the system defaults the standard mid rate.
The system will calculate the penalty based on the loan creation date. That is, even if the value date is different from the loan creation date, the penalty will be calculated after the expiry of the penal start days counted from the date of creation of the loan. You can manually change the number of penal value days in order to start applying the penalty from a different date.
6.15 Split Settlement Screen
This section contains the following details:
- Section 6.15.1, "Split Settlement Screen"
- Section 6.15.2, "Specifying Settlement Split Master"
- Section 6.15.3, "Specifying Settlement Split Details"
6.15.1 Split Settlement Screen
Click ‘Split Settlement’ button to invoke the following screen.

Specify the following details.
6.15.2 Specifying Settlement Split Master
You can specify the details of the settlement split master in the following fields:
Basis Amount Tag
Specify the amount tag involved in the contract. The adjoining option list displays all valid amount tags maintained in the system. You can choose the appropriate one. For example, on booking a new contract, the only tag allowed is PRINCIPAL. This is referred to as the basis amount tag.
Currency
The system displays the currency associated with the amount tag.
Amount
The system displays the basis amount associated with the amount tag. For example, the amount involved in the contract would be displayed against the amount tag ‘PRINCIPAL’. The amount is in terms of the currency associated with the amount tag.
You can use ‘Get Exchange Rate’ button to get the original exchange rates defaulted in the screen.
6.15.3 Specifying Settlement Split Details
For each spilt amount tag, you need to specify the following details:
Amount
Specify the amount for the split amount tag. This amount should not be greater than the amount of the corresponding basis amount tag. The split amount is in the currency of the basis amount tag. This is a mandatory field and you will not be allowed to save the details if you do not specify the amount.
Loan Account
Check this box to indicate that the specified account should be the loan account.
Exchange Rate
Specify the exchange rate that should be used for the currency conversion.
Negotiated Cost Rate
Specify the negotiated cost rate that should be used for foreign currency transactions between the treasury and the branch. You need to specify the rate only when the currencies involved in the transaction are different. Otherwise, it will be a normal transaction.
The system will display an override message if the negotiated rate is not within the exchange rate variance maintained at the product.
Negotiated Reference Number
Specify the reference number that should be used for negotiation of cost rate, in foreign currency transaction. If you have specified the negotiated cost rate, then you need to specify the negotiated reference number also.
Note
Oracle FLEXCUBE books then online revaluation entries based on the difference in exchange rate between the negotiated cost rate and transaction rate.
6.16 Capturing Brokerage Details
You can capture the brokerage details for an LC contract and set your preferences for sharing the brokerage amount among multiple brokers using ‘Brokerage’ screen. To invoke the screen, click ‘Brokerage’ button on ‘Letters of Credit Contract Details’ screen.

You can capture the following details:
Contract Reference
The system displays the reference number of the contract.
Contract Currency
The system displays the currency of the bills contract. You cannot modify the contract currency.
Brokerage Percentage
Specify the percentage of the contract amount that should be paid as brokerage. Based on the percentage set here, the system calculates the brokerage amount. The brokerage amount calculation takes place at the Bills contract level.
In case of Bills contracts, you may directly enter the brokerage amount. However, if you specify the brokerage percentage as well as the amount, the system ignores the amount and calculates it afresh based on the percentage specified here.
Brokerage Amount
Specify the brokerage amount to be paid. However, if you have entered the brokerage percentage, the system ignores the amount mentioned here and calculates it afresh based on the brokerage percentage.
You can directly enter the contract amount for Bills contracts only. In case of LC contracts, the system displays the amount based on the brokerage percentage and contract amount. You cannot modify the brokerage amount in that case.
Brokerage Details
You can share the brokerage amount among multiple brokers. Click add button to add more brokers to the list.You can define the percentage of brokerage amount to be paid to each broker selected under this list
Broker
Specify the broker ID. The option list displays all valid broker IDs maintained in the system. Choose the appropriate one.
You can maintain multiple records for the same broker ID.
Broker Name
Based on the broker ID selected, the system displays the name of the broker.
Broker Account
Specify the broker account. The option list displays all valid accounts maintained for the selected broker along with the Nostro accounts and GLs for which posting is allowed. Choose the appropriate one.
Broker Currency
The system displays the currency of the selected broker account.
Percentage
Specify the percentage of total brokerage amount that should be paid to the selected broker. This will make the selected broker eligible for that percentage of the total brokerage amount shown above.
You can allot a specific percentage of the brokerage to each broker selected here. The system will verify whether the percentages allotted for all brokers together equals to 100 or not.
Amount in Account Currency
The system displays the portion of brokerage amount allotted to the selected broker in terms of local currency.
Exchange Rate
The system displays the exchange rate between the local currency and the account currency. This rate is used to convert the brokerage amount into the account currency. You can modify the exchange rate.
Amount in Contract Currency
The system calculates and displays the portion of brokerage amount allotted to the selected broker in terms of contract currency.
Original Exchange Rate
The system displays the actual exchange rate. This rate is inclusive of all available customer spreads.
Negotiated Rate
Specify the rate of exchange agreed upon after the negotiations with the broker.
The system will display an override message if the negotiated rate is not within the exchange rate variance maintained at the product.
Negotiation Reference Number
Specify the negotiation reference number.
Once you have captured the details, save the contract. The system allows modification of brokerage details until its liquidation.
The system will default the brokerage details to the bill contracts associated with this LC. You may modify the brokerage details at the bills contract level.
You can use ‘Exchange Rate’ button to get the exchange rates between the broker account currency and bill currency for all the brokers listed in the screen.
The system defaults the brokerage details in ‘Spilt Settlements’ screen. Those details are then used in settlements. You can enter the routing details for the messages in case the settlement takes place through Nostro account. If you modify the default brokerage details in ‘Split Settlements’ screen, the system displays an error message.
During liquidation of the brokerage, the system generates credit advices for each of the brokers involved.
6.17 Specifying Document Details
You can capture the customer related documents in central content management repository through the ‘Document Upload’ screen. Click ‘Documents’ button to invoke this screen.

Here, you need to specify the following details:
Document Category
Specify the category of the document to be uploaded.
Document Type
Specify the type of document that is to be uploaded.
Document Reference
The system generates and displays a unique identifier for the document.
Remarks
Specify the additional information, if any.
Upload
Click ‘Upload’ button to open the ‘Document Upload’ sub-screen. The ‘Document Upload’ sub-screen is displayed below:
In the ‘Document Upload’ sub-screen, specify the corresponding document path and click the ‘Submit’ button. Once the document is uploaded through the upload button, the system displays the document reference.
View
Click ‘View’ to view the document uploaded.
6.18 Viewing all Messages
Click ‘All Messages’ button to invoke the ‘View Message’ screen. This screen displays all the messages associated to the contract.
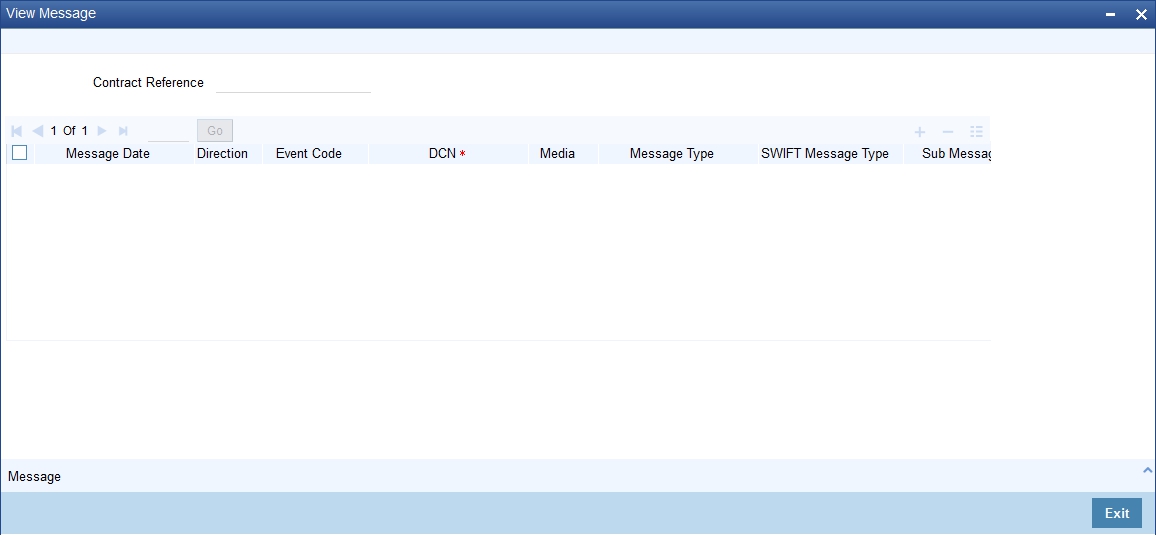
The following details are displayed:
Contract reference number – Displays Reference number of the contract, for which messages are generated.
Message Date – Displays the message generation date or received date
Direction – Displays whether the message is an incoming or outgoing message.
DCN – Displays document reference number of a contract.
Media – Displays whether the message is swift message or mail message.
Message Type – Displays the type of message
Swift Message Type – Displays the Swift MT number of the message sent or received.
Receiver/Sender – Displays Receiver or Sender ID.
Name – Displays the name of the Sender or Receiver.
Message Status – Displays current status of message.
Test Status – Displays the test status.
Authorized – System displays whether the status is authorized or unauthorized.
Acknowledgement Status – Displays the Ack/Nack Status of a message
PDE Flag – Displays the PDE flag.
6.19 Previewing Messages
You can preview the messages or advices that will be generated for the contract using ‘Message Preview’ screen. To invoke this screen, click ‘Message Preview’ button.
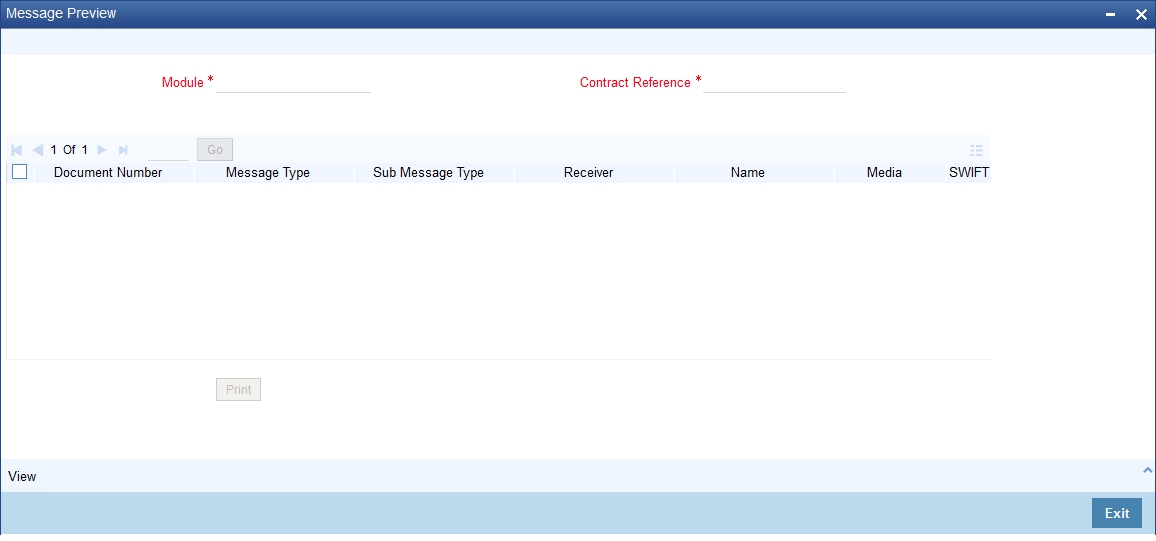
For the contract, you can view the following details of the messages:
- The document number generated for the message/advice
- Type of message generated for the event
- Customer ID of the receiver of the message/advice
- Name of the receiver of the message/advice
- Media of transmitting the message/advice (Mail/SWIFT)
- SWIFT message type of the message
- Status of the message/advice
You cannot preview the message after the authorization of the contract.
For preview of SWIFT MT700 and MT760 messages on hold, you need to view the Advices/ Settlement/Commission/Charges/Interest or Collateral sub-screen after contract input. The system performs the required validations and after that, you can keep the contract on hold and view the message in ‘Message Preview’ sub-screen.
Message preview functionality is available on save for all the LC module transactions and preview available for MT700 and MT 760 for hold transactions also. Along with the preview option, you will also be allowed to print the required message/advice from the preview screen.
6.19.1 Viewing Message/Advice
Select a message/ advice and click ‘View’ button to view the complete message/advice. The system will display the following details in a new window.

You can view the following details:
- Reference number of the message/advice
- Document number generated for the message/advice
- Version number of the message/advice
- Receiver/sender of the message
- Type of the message
- Type of the SWIFT message
- Complete text of the message/advice
- Remarks, if any
- Reject reason, if any
- Message trailer
6.19.2 Printing Message/Advices
From the ‘Message Preview’ screen, you can print a message/advice using the ‘Print’ button. Select the message/advice and click ‘Print’ button to print the message.
6.20 Utilizing Import Licenses
You can link the import license to an import LC contract and update the utilization amount or quantity for the linked import licenses. You can utilize multiple import licenses for an import LC. Click on ‘Import License’ to invoke the import license screen.
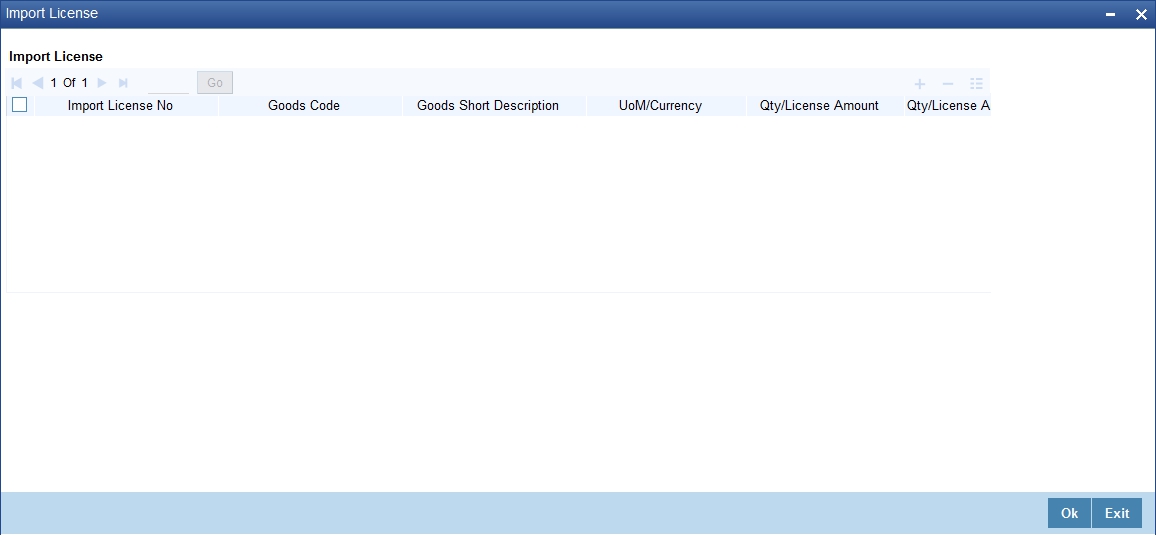
Import License No
Select the import license number from the adjoining option list.The import licenses maintained for the party type ‘Applicant’ in the Import License Maintenance screen is displayed in the option list.
Goods Code
Select the goods code from the adjoining option list.
Goods Short description
The system displays the goods short description maintained in the ‘Bills and Collections Commodity Code Maintenance’ screen.
UoM/Currency
The system displays the unit of measurement or currency captured for the goods code of import license.
Note
If the basis is ‘Quantity’, then the system displays the UoM maintained for the goods code.
If the basis is ‘Amount’, then the system displays the currency maintained for the import license.
Qty/License Amount
The system displays the Quantity or License Amount captured for the goods code of import license.
Qty/License Amt Already Utilized
The system displays the sum total of Quantity or License Amount already utilized for the goods code.
Qty/License Amt Already Reinstated
The system displays the sum total of Quantity or License Amount already reinstated for the goods code.
Available Qty/License Amt
The system displays either the Available Quantity or Available License Amount for the goods code.
Qty/License Amt Utilized
Specify the quantity or the license amount utilized.
Note
If the license utilization basis is Quantity, then the system defaults the License Amount Utilized as Quantity Utilized * Rate/Unit.
Qty/License Amt Reinstated
Specify the quantity or the license amount reinstated.
Note
- If the License Amount Utilized is maintained for an goods code of an import license, then the system allows reinstatement of the license amount.
- The ‘Qty/License Amt Reinstated’ should be less than or equal to the sum total of Qty/License Amount Utilized - Qty/License Amt Reinstated.
- You can enter either Qty/License Amount Utilized or Qty/License Amt Reinstated for a goods code.
After authorization, you cannot modify or delete import licenses linked to a LC contract.
The utilizations and re-instatements maintained for an import license in ‘Import License Utilization’ Screen and Import License sub-system will be differentiated by the system based on the ‘Transaction Reference Number’.
On authorization of reversal of a contract, the utilizations of all linked import licenses will also be reversed i.e. the value of Qty / License Amt Already Utilized - Qty / License Amt Already Reinstated will be posted as Qty / License Amt Reinstated for the respective goods codes and Available Qty / Available License Amt values will be re-computed.
If an import licenses linked to an Islamic import LC contract is not completely availed i.e. sum total of availments are less than the liability amount of Islamic import LC, then at the time of closure of Islamic LC contract, the system will give an alert to reinstate un-utilized quantity / license amount of linked import licenses. If auto closure is enabled for such Islamic import LC contracts, then system will not perform the auto-closure.
Note
If the good is classified either as Licensed or as Prohibited and the import licence details are not entered in the LC or BC contract screens, then the system displays an override message as “Import license details are not entered for the contract.”
For import LC contract, the effective date should be between the effective date and expiry date of the linked import license.
6.21 Remarks
Click Remarks button to view all the instructions captured on every transaction of the contract in ‘History of Remarks’ screen.
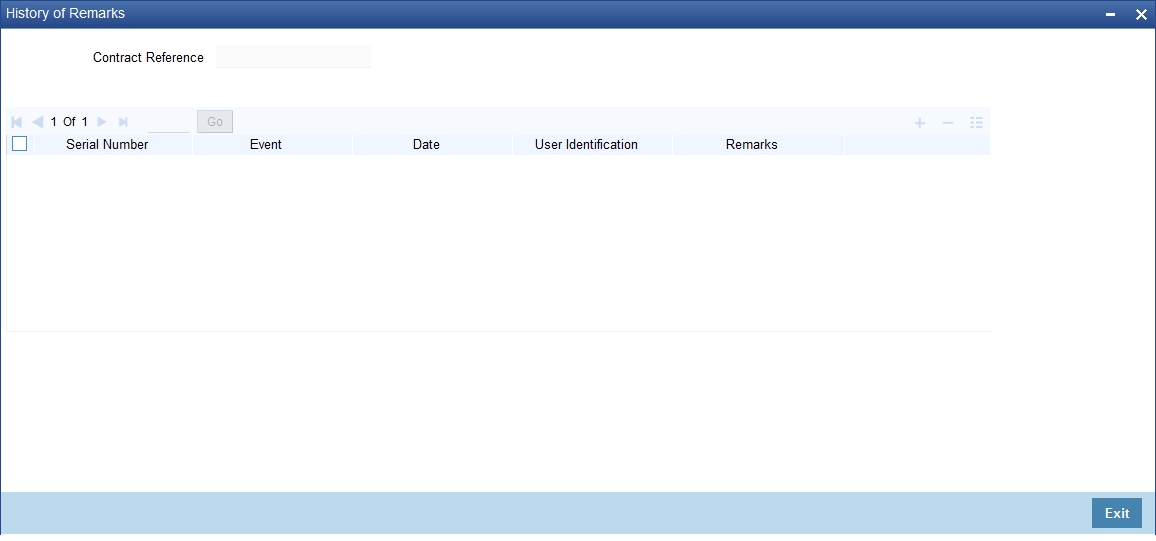
The system displays the following:
Contract Reference Number
The system displays the contract reference number
Serial Number
The system displays the serial number.
Event
The system displays the event code of the event.
Date
The system displays the date on which the instructions were captured.
User Identification
The system displays the user ID of the user who created the notes.
Remarks
The system displays the instructions that the user captures.
6.22 Common Group Message
This section contains the following details:
- Section 6.22.1, "Common Group Message Maintenance"
- Section 6.22.2, "MT759 - Ancillary Trade Structured Message – Common group Maintenance Screen (MSDCOMPM)"
6.22.1 Common Group Message Maintenance
You can enter details of common group messages using the Common Group Message screen. Click on ‘Common Group Message’ to open this screen..

For field descriptions of the above screen refer the section ‘Common Group Message Maintenance’ in chapter titled ‘Defining Free Format Messages’ in ‘Messaging System User Guide’.
You can enter the details of the message and the message is saved when the contract is saved.. The saved messages can be viewed in the message preview subsystem before authorization. On authorization of the contract, the message is generated. After authorization, the messages can be viewed from ‘All Messages’ subsystem and ‘Events’ subsystem. The messages are linked with the relevant event in which the common group message is generated.
The common group messages which are supported are listed below:
MT |
MT Name |
n90 |
Advice of Charges, Interest and OtherAdjustments |
n91 |
Request for Payment of Charges, Interest and Other Expenses |
n92 |
Request for Cancellation |
n95 |
Queries |
n96 |
Answers |
n98 |
Proprietary Message |
n99 |
Free Format |
6.22.2 MT759 - Ancillary Trade Structured Message – Common group Maintenance Screen (MSDCOMPM)
MT759 – Ancillary Trade Structured Message has been added to the existing list of SWIFT Message Types.
- Introduced fields to capture the Function of Message and Narrative details in Common Group Maintenance Screen.
- System has been enabled to generate MT759 message from Common group Message maintenance screen by providing the Message type (as MT759) and the mandatory values of the corresponding message as per the SR2018 standard.
Note:
Click on Common Group Message subsystem. Added 759 in Swift Message when selected with appropriate LOV, will display MT 759 fields.
6.22.2.1 MT759 - Ancillary Trade Structured Message – Common group Maintenance Subsystem (LCDTRONL/BCDTRONL)
You can enter details of ancillary trade structured message using the Common Group Maintenance LCDTRONL subsystem screen. Click on ‘Common Group Message’ to open this screen.
You can enter details of ancillary trade structured message using the Common Group Maintenance BCDTRONL subsystem screen. Click on ‘Common Group Message’ to open this screen.
MT759 – Ancillary Trade Structured Message has been added to the existing list of SWIFT Message Types.
- Introduced fields to capture the Function of Message and Narrative details in Common Group Maintenance Screen.
- System has been enabled to generate MT759 message from LCDTRONL/BCDTRONL subsystem Common group Message maintenance screen by providing the Message type (as MT759) and the mandatory values of the corresponding message as per the SR2018 standard.
- System is enhanced to enable the support of message MT759 - Ancillary Trade Structured Message from Common Group Message Maintenance and from Common Group Message of LC contract input screen.
- Multiple MT759’s (upto 8 messages) are supported.
- As per the existing system, generation of multiple MT759 is supported only from LC or BC contract input screen based on the flag ‘Ancillary Message’, whereas generation MT759 or Multiple MT759 from Common group Maintenance Screen and Common group Message subsystem of LC or BC contract input screen are not available.
- LCDTRONL: Introduced fields 23H – Function of Message and 45D Narrative as mandatory fields for generation of message MT759 as per SR2018 standard.
- 23H Function of Message specifies the type of request or function
of the message, list of possible function codes as per SR2018 standard
are,
- CLSVCLOS
- CLSVOPEN
- FRAUDMSG
- GENINFAD
- ISSAMEND
- ISSUANCE
- OTHERFNC
- REIMBURS
- REQAMEND
- REQFINAN
- REQISSUE
- TRANSFER
- 45D Narrative is a text box to capture narrative details corresponding to the message. Three fields has been introduced to capture the narrative details, in total the detail can be upto 72,800 characters(9600*8 – 9600 is number of character and 8 is a number of message)
- Multiple MT759 messages can be generated based on the provided ‘Narrative’ details, when narrative details exceeds 9600 characters (9600 characters and 150 considering as enter line – in total 9750 characters), the second MT759 will be generated. Similarly when the second message exceeds the allowed limit, third message will be generated and it continues upto 8 messages.
- System prompts few validations on save of MT759 as common group message:
- Narrative field 2 and 3 cannot hold the value when narrative1 is blank.
- Narrative 2 cannot hold the value when narrative 1 is blank.
- Maximum length of Narrative cannot exceed the maximum allowed limit of SR2018. (Maximum allowed limit of SR2018 is 9750 characters – System allows the user to enter maximum of 32,000 characters in each field and 72,800 characters in total, First 9600 characters will be part of message 1 considering 150 lines for enter character.)
- Tag 23X is not applicable from MSDCOMPM
- values of the corresponding message as per the SR2018 standard.
Note:
Provision to generate MT759 common group messages in LCDTRONL and BCDTRONL is enabled by enhancing Common Group Messages screen (MSCCOMPM)
LCDTRONL – Click on Common Group Message subsystem. Type LOV and few fields
are added to 759 in Swift Message
BCDTRONL – Click on Common Group Message subsystem. Type LOV and few fields are added to 759 in Swift Message
6.23 Specifying Import License Utilization
The transactions for licensed import goods can be executed from different banks. You can record the portion of import license utilized by other banks through ‘Import License Utilization’ screen. You can also reinstate the quantity or license amount marked as utilized for the physical import of goods.You can invoke this screen by typing ‘LCDILUTL’ in the field at the top right corner of the Application tool bar and clicking on the adjoining arrow button.

Specify the following here:
Import License No
Select the import license number for which utilization or reinstatement should be performed from the adjoining option list.
Transaction Reference No
The system displays the transaction reference number.
Utilization Sequence
The system displays the utilization sequence number.
Customer No
The system displays the customer id captured for the import license.
Customer Name
The system displays the name of the customer id.
Issue Date
The system displays the issue date recorded for the import license.
Effective Date
The system displays the effective date.
Expiry Date
The system displays the expiry date here.
Issuing Authority
The system displays the issuing authority of import license.
Currency
The system displays the currency of the sum total of the license amount.
Total License Amount
The system displays the total license amount.
Total License Amount Utilized
The system displays the sum total of licensed amount utilized for all goods code.
Total License Amount Reinstated
The system displays the sum total of license amount reinstated for all goods code.
Total License Amount Available
The system displays the sum total of available license amount of all goods.
License Utilization Basis
The system displays the utilization basis captured.
Transaction Reference No
The system displays unique transaction number for each utilization.
Transaction Date
The system defaults the current date.
Import License
You can capture multiple goods code, quantity or amount details here.
Goods Code
The system displays the goods code.
Goods Short Description
The system displays the short description captured for the goods code.
UoM/Currency
The system displays the unit of measurement or currency captured for the goods code of import license.
If the basis is ‘Quantity’, then the system displays UoM maintained for the goods code.
If the basis is ‘Amount’, then the system displays the currency maintained for the import license.
Qty/License Amt
The system displays the Quantity or License Amount captured for the goods code of import license.
Qty/License Amt Already Utilized
The system displays the sum total of Quantity or License Amount already utilized for the goods code.
Qty/License Amt Already Reinstated
The system displays the sum total of Quantity or License Amount already reinstated for the goods code.
Available Qty/ License Amt
The system displays either the Available Quantity or Available License Amount for the goods code.
Qty/License Amount Utilized
Specify the quantity or the license amount utilized.
If the license utilization basis is ‘Quantity’, then the system updates license amount utilized as (Quantity Utilized * Rate / Unit).
Qty/License Amount Reinstated
Specify the quantity or the license amount reinstated.
If utilization in Qty/License Amount is maintained for a goods code of an import license using Import License Utilization, then the system allows reinstatement of the same.
The value specified for Qty / License Amt Reinstated should be less than or equal to sum total of (Qty/License Amt Already Utilized - Qty/License Amt Already Reinstated) through ‘Import License Utilization’ screen.
Reinstatement is displayed on authorization of transaction. You can specify either Qty / License Amt Utilized or Qty/License Amt Reinstated for a goods code.
Internal Remarks
Specify remarks if any.
6.24 Viewing Import License Utilization Details
You can view the import license utilization details in Import License Utilization Summary Screen. You can invoke this screen by typing ‘LCSILUTL’ in the field at the top right corner of the Application tool bar and clicking on the adjoining arrow button.
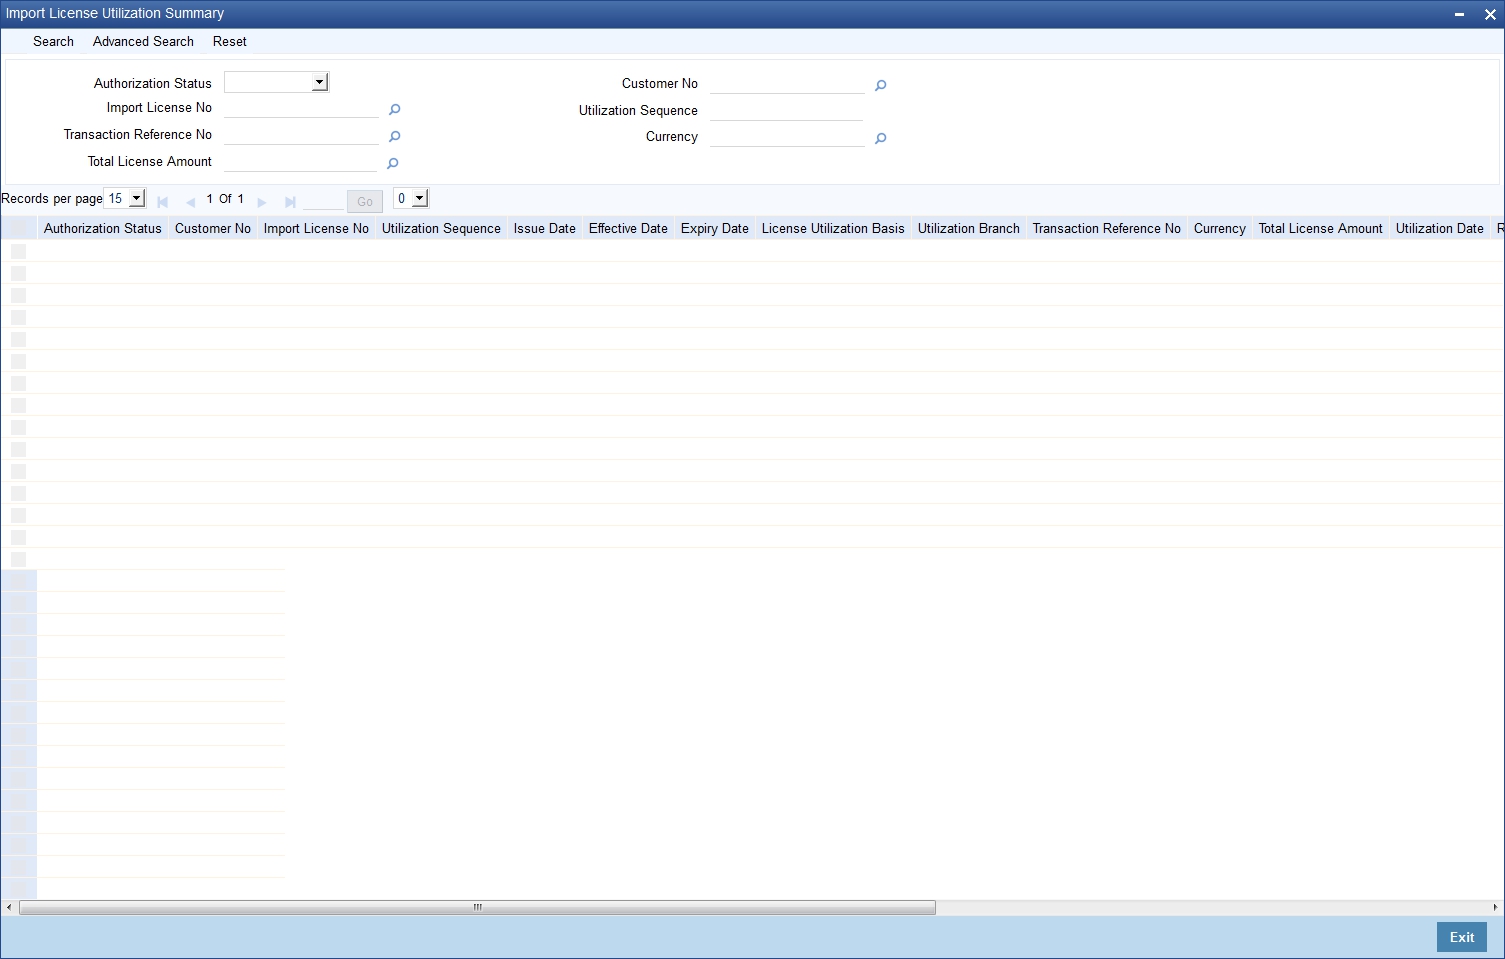
In the above screen, you can base your queries on any or all of the following parameters and fetch records:
- Authorization Status
- Customer No
- Import License No
- Utilization Sequence
- Transaction Reference Number
- Currency
- Total License Amount
Select any or all of the above parameters for a query and click ‘Search’ button. The records meeting the selected criteria are displayed.
If you are allowed to query import license utilization details, then system displays the following details pertaining to the fetched records:
- Authorization Status
- Customer Number
- Import License No.
- Utilization Sequence
- Issue Date
- Effective Date
- Expiry Date
- License Utilization Basis
- Utilization Branch
- Transaction Reference No.
- Currency
- Total License Amount
- Utilization Date
- Reinstatement Date
- Event Code
- Total License Amount Available
- Total License Amount Utilized
- Total License Amount Reinstated
6.24.1 Operations on Import License Utilization
On an Import License record, you can perform of the following operations (if any icon is disabled in the application toolbar, it means that the function is not allowed for the record):
- Amend the details of a record
- Authorize a record
- Copy the details of a commodity, on to a new record
- Close a record
- Print the details of a record
- Delete a record
Please refer to the manual on Common Procedures for details of these operations.