5. Account Creation
A contract is customer-specific. When you grant a lease to a customer, you enter into a contract.
Every time a lease is issued to a customer, it is not necessary to specify its general attributes, since a lease acquires the attributes defined, for the product it involves. You can change the general attributes for a lease at the time of processing a lease.
In addition to the general attributes, which a lease inherits from a product, there are the specific attributes, which have to be defined for it. They are:
- Customer details
- Lease Amount
- Lease Currency
- Repayment account for the lease
This chapter contains the following sections:
- Section 5.1, "Lease Account Details"
- Section 5.2, "Saving and Authorising Mortgage/Commitment Account"
- Section 5.3, "Multilevel Authorization of a Contract"
- Section 5.4, "Viewing Lease Account Summary Details"
- Section 5.5, "Maintaining Events Dairy"
5.1 Lease Account Details
This section contains the following topics:
- Section 5.1.1, "Maintaining Lease Account Details"
- Section 5.1.2, "Main Tab"
- Section 5.1.3, "Account Details Tab"
- Section 5.1.4, "Default Tab"
- Section 5.1.5, "Checklist Tab"
- Section 5.1.6, "Fields Tab"
- Section 5.1.7, "Components Tab"
- Section 5.1.8, "Charges Tab"
- Section 5.1.9, "Linkages Tab"
- Section 5.1.10, "Advices Tab"
- Section 5.1.11, "Credit Score Tab"
- Section 5.1.12, "Capturing Additional Details for Leasing"
5.1.1 Maintaining Lease Account Details
You can maintain the leasing account details using the ‘Leasing Account Details’ screen. You can invoke this screen by typing ‘LEDACCDT’ in the field at the top right corner of the Application tool bar and clicking the adjoining arrow button.

You can specify the following generic details in the Account Details screen:
Branch
The system displays the Branch Code of the branch into which the user has logged in, for which the UDE values are maintained.
Account Number
Based on the leasing parameters that setup at the branch level, the account number would be either auto generated or would have to be captured in this field.
Product Code
Specify the product code for the lease account from the option list. Double click on a Product Code to select a particular code. The product codes are maintained in the Product Definition screen.
Click ‘P’ button to populate the Product Category, Value Date, Maturity Date based on the Product Code selected, the main screen will display all these values.
Alt Acc No
Specify the alternate account number in this field. It can be an account number in the existing system from which the account has migrated to Oracle FLEXCUBE.
User Defined Status
After you enter the account number, the system displays the status of the account in this field. This is based on the products status maintenance rules.
User Reference Number
A 16-digit User Reference Number is autogenerated and displayed here if the ‘Auto Generate User Ref No’ option is checked in the Branch Parameters. The format of the user reference number is BranchCode + ProductCode + Sequence number. You are allowed to modify the auto-generated User Ref No.
If the ‘Auto Generate User Ref No’ in Branch Parameters is not checked then the User Ref No will be blank by default and you have to specify it manually. Validations are done by the system not to save the account if an unsuppressed payment message is present which has the User Ref No as blank.
5.1.2 Main Tab
You can capture the main details of the leasing account in this tab.
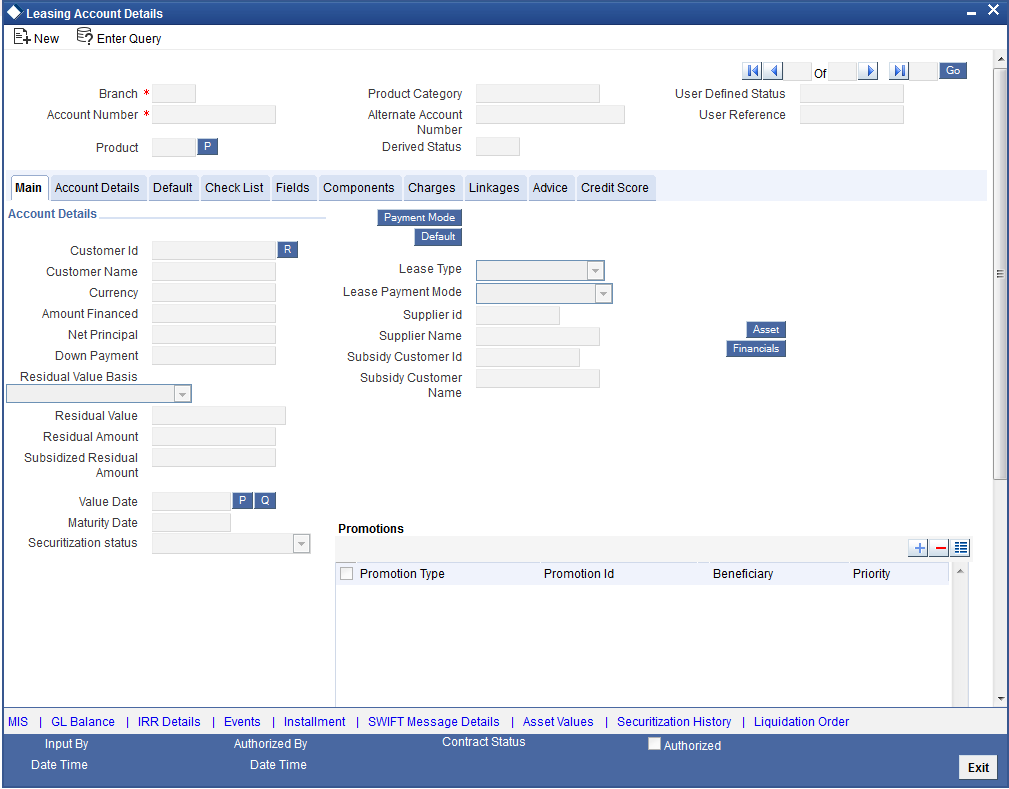
The following details regarding the leasing account are captured here:
Account Details
Amount Financed
Specify the total lease amount. On saving the transaction after entering all the required details in the system, the system validates the value of the transaction amount against the following:
- Product transaction limit
- User Input limit
If the transaction currency and the limit currency are different, then the system converts the amount financed to limit currency and checks if the same is in excess of the product transaction limit and user input limit. If this holds true, the system indicates the same with below override/error messages:
- Number of levels required for authorizing the transaction
- Transaction amount is in excess of the input limit of the user
Currency
Specify the currency of the lease.
Customer No
Specify the customer number.
Customer Name
The system displays the customer name.
Down Payment
Specify the total down payment for a lease account.
Note
The down payment should always be less then the amount financed.
Residual Value Basis
The system displays the residual value basis from the product code. The value computed by the system can be altered while account booking.
Residual Value
Specify the percentage of asset, percentage of lease or flat amount based on the residual value basis defined at the product.
Residual Amount
The system displays the residual amount after computing the percentage of asset or lease amount. In case of flat amount, residual value is copied to residual amount.
Note
Residual Amount should be less than the lease amount minus the down Payment.
Subsidy Customer Name
Specify the ID of the party who provides the subsidy for leasing.
Subsidy Customer Name
Specify the name of party who provides the subsidy for leasing. Based on this the system displays the settlement details for the subsidy components.
Value Date
Specify the value date for the lease account.
Maturity Date
Specify the maturity date for the lease account.
Securitization status
The system displays the securitization status. The status can be anyone of the following:
- Blank – Indicates account is not involved in securitization, that is it not part of the securitization pool
- Marked for securitized – Indicates loan account is part of securitization contract (on batch); however, the securitization batch is not executed yet.
- Securitized – Indicates the successful completion of batch process.
Lease Type
The system displays the type of lease.
Payment Mode
The system displays the mode of payment.
Account Statistics
The system displays the various balances for every component.
Supplier ID
Select the supplier or vendor ID from the option list.
Supplier Name
The system displays the name of the supplier. This name is based on the supplier ID selected.
Asset Reference Number
Specify the asset reference number. This field is enabled only if the ‘With Asset’ field is selected at the product level.
Asset Details
Insurance schedules are based on Asset value while contract booking, and subsequently change is based on written down value. You can capture the asset details by clicking ‘Asset Values’ button in ‘Account Details’ tab of the ‘Account Details’ screen.
5.1.2.1 Valuations Tab
You can capture valuation details of the asset in this tab.

Here, you can specify the following details related to your assets like vehicle, home, etc.
Assets
Select the type of asset from the drop-down list. The following values are provided for selection:
- Vehicle
- Home
- Others
Valuation Dt
Specify the valuation date for the selected asset, or select the date by clicking the ‘Calendar’ button.
Source
Specify the source associated with the asset selected.
Supplement
Specify the supplement of the valuation source used for the valuation.
Edition
Specify edition of the valuation source used for the valuation.
Wholesale
Specify the wholesale rate associated with the asset selected.
Retail
Specify the retail rate associated with the asset selected.
Usage
Specify usage level at the time of the valuation.
Usage Value +
Specify the initial usage value.
Total
Specify the total usage of the asset.
5.1.2.2 Vehicle Tab
You can capture details regarding the asset of type ‘Vehicle’ in this tab.

You can specify the following common details associated with asset of type vehicle:
Class
Select the class associated with the asset selected, from the option list. The following options are provided:
- New
- Used
Status
Select the status of the asset selected, from the option list. The following options are provided:
- Active
- Inactive
- Inventory
- Undefined
Type
Specify the type of the selected asset.
Sub Type
Specify the subtype associated with the asset, if any.
Year
Specify the year of association with the selected asset.
Make
Specify the make of the selected asset. For vehicle, you can specify the manufacturing company name and for home you can specify the name of the builder or developer.
Model
Specify the model of the selected asset.
Address
Specify the address associated with the asset.
You need to specify the following details additional related to vehicle type of asset:
Body
Specify the body number associated with the vehicle.
ID Number
Specify the unique identification number associated with the vehicle.
Reg. Number
Specify the registration number of the vehicle.
5.1.2.3 Home Tab
You can capture details regarding the asset of type Home in this tab.

You can specify the following additional details for home type of asset:
Occupancy
Specify the number of people occupying the house.
Width
Specify the width associated with the selected asset.
Length
Specify the length associated with the selected asset.
PO #
Specify the post office number of the location of the property.
GEO
Specify the property GEO code (Geospatial Entity Object Code) for the asset.
BNA
Specify the census tract/BNA code (Block Numbering Area) for the asset.
MSA
Specify the metropolitan statistical area (MSA) code for the asset.
Click ‘OK’ button to save the details.
Financial Details
You can capture the income or liability details of the customer in the ‘Financials’ screen. To invoke this screen, click on ‘Financials’ button in ‘Account Details’ tab of the Account Details screen.
5.1.2.4 Financials Tab
You can specify the following details related to the customer’s income here:

The following details are captured here:
Type
Select the type of the income from the option list provided.
Source
Specify the source of the income.
Currency
Select the currency associated with the income, from the option list provided.
Amount
Specify the amount associated with the income.
Comment
Specify any remarks or comments for the income.
5.1.2.5 Liability Tab
Here you can specify the following details related to the customer’s liability:

The following details are captured here:
Type
Select the type of the liability from the option list provided.
Account Type
Specify the account type associated with the liability.
Currency
Select the currency associated with the liability, from the option list provided.
Amount
Specify the amount associated with the liability.
Frequency
Select the frequency at which payments are made towards the liability from the drop-down list. Following are the options available in the drop-down list:
- Daily
- Weekly
- Monthly
- Quarterly
- Half Yearly
- Yearly
Balance
Specify the current amount outstanding.
Comment
Specify any remarks or comments to be associated with the liability.
5.1.2.6 Other Income Tab
You can also capture the details related to other sources of income, if exists.

The following details are captured here:
Seq No
Specify the sequence number here.
Type
Specify the type of income here. You can also select the income type from the adjoining option list.
Currency
Specify the currency of the income here. You can also select the currency from the adjoining option list.
Amount
Specify the amount of income here.
Frequency
Select the frequency of the income here from the drop-down list. Following are the options available in the drop-down list:
- Daily
- Weekly
- Monthly
- Quarterly
- Half Yearly
- Yearly
Click ‘OK’ button to save the details.
5.1.3 Account Details Tab
You can capture the account details of the leasing account in this tab.

The following details regarding the leasing account are captured here:
Amount
The system displays the amount details.
Maturity Date
The system displays the date of maturity.
Value Date
The system displays the value date.
Book Date
The system displays the booking date.
Down Payment
The system displays the down payment details.
Currency
The system displays the currency details.
Asset Reference No
The system displays the asset reference number.
Subsidized Residual Amount
Specify the subsidized residual amount. However, this can be changed during VAMI.
Note
If the Subsidy Residual Amount check box is checked in the product level and if the subsidized residual amount is not specified, then the system displays an override message.
Primary Applicant
You can maintain the following details of the Primary applicants:
Customer ID
Specify the customer ID.
Customer Name
Specify the customer name.
Other Applicants
The details of the liability parties to the account are maintained in this field. You can specify the following details of the Co-applicants:
Customer ID
Select the customer ID from the option list.
Customer Name
The system displays the name of the customer.
Responsibility
Select the details of the co-applicants and their responsibility as a Co-signer or as a guarantor from the option list.
Liabilities%
Specify the liability of the co-applicant. You can also specify the percentage of interest split among different co-applicants.
Liability Amount
The system calculates and displays the upper limit of the liability in terms of the amount in this field. You may override the computed value.
Effective Date
Specify the effective date.
Holiday Periods
You can specify the following detail here:
Period
Select the period for which repayment holiday is to be given to the customer. The holiday periods maintained in the system are displayed in the adjoining option list
Effective Date
You can specify the following detail here:
Effective Date
The effective date is used to pick the UDE value. The system displays this date from the General UDE maintenance screen.
UDE Values
The system displays the UDE values from that of the UDE values maintenance screen. These values can be overridden by providing account level UDE values. However, the value can be maintained only for those UDEs defined at the product level. No New UDEs can be introduced at the account level.
You can specify the following details for the UDE values:
UDE ID
Specify the UDE ID from the option list.
UDE Values
Specify the Actual Value for the UDE based on the effective date in this field. The value specified here should fall within the minimum and maximum limits maintained for the UDE linked to the underlying product.
Rate Code
Select the code for the Floating Rates if any and the spread on it applicable in this field by clicking the option list.
Code Usage
Select the Code usage which can be periodic or automatic.
Resolved Value
This denotes the final value of a UDE. Resolved value = Rate code value taken from Floating Rate Maintenance + the spread [UDE Value]
5.1.4 Default Tab
The defaults are maintained by the bank. Depending upon the combination of various preferences, the bank can have various account preferences. The defaults primarily are based on product definition and can be overridden.

Liquidation
You can maintain the following liquidation preferences:
Liquidation Mode
The system defaults the mode of liquidation from the product level. However you can modify the same to indicate the mode of liquidation that you are maintaining. You can select one of the following options:
- Manual
- Auto
- Component
Auto Liquidate Reversed Payment
If auto liquidation has been reversed in an account, it will be retried depending upon the status of this field. If this option is selected, then the auto liquidation is retried.
Partial Liquidation
If you select this option, system will perform partial auto liquidation.
Retries for Auto liquidation
When auto liquidation option is chosen and funds are not available, the number of times the system can retry auto liquidation is determined by this field.
If blank, the number of retries is infinite.
Retries Advice Days
Number of retries for an advice is defaulted here from the product maintenance level; however, you can modify if needed. The value should be less than the value maintained for ‘Retries Auto Liquidation Days’.
Track Receivable
If Track receivable option is checked for an account, it tracks the amount to be liquidated as a receivable if funds are not available. So upon any subsequent credit, the receivables are blocked and allocated to the pending liquidation.
Auto Liquidation
Select this option to indicate that the Track receivable option is for Auto Liquidations.
Note
This is defaulted from the product level.
On schedule liquidation if there are insufficient funds in the settlement account to satisfy the liquidation and if both the product and the account are marked for receivable tracking then system initiates tracking of receivable.
If the account is marked for Partial liquidation, then liquidation happens to the extent of available funds, and the remaining amount is tracked.
If the account is not marked for partial liquidation, and the amount available in the settlement account is less than the due amount, then system won’t do any liquidation and starts tracking the full due amount.
Whenever there is a credit to an account, the tracking process checks if the account has any receivable against it and if it does then the relevant amount is blocked as a receivable and the corresponding amount is marked to be used for settlement during subsequent ALIQ for the account. This process happens till the amount needed for liquidation is fully available.
The decision of allocating this credit will be based on the preference order of products that has been specified at an account class level. On the following EOD/BOD, batch liquidation tries to liquidate the schedule. The amount receivable is made available for the liquidation, and liquidation happens to the extent of receivable amount.
Manual Liquidation
Select this option to indicate that the Track receivable option is for Manual Liquidations.
Note
By default, the system selects this option.
Liquidate Back Value Schedules
On checking this field, the system liquidates the back value schedule in case of back value account.
Intermediary Details
You can capture the Intermediary Details at the account level to keep track of the accounts created through Intermediaries.
Intermediary Initiated
Check this box to indicate that the lease has been initiated by an intermediary.
Intermediary Code
If you have checked the box 'Intermediary Initiated', you need to specify the code of the intermediary who has initiated the lease. The adjoining option list displays all valid intermediary codes maintained in the system. You can select the appropriate one.
Note
Both the fields are disabled after the first authorization of the lease. They field cannot be modified during value-dated amendment and rollover operation.
Note that adjustment of commission and charge computed for the intermediary (in the past cycle) should be done manually in case of a reversal of any transaction done by the intermediary post the computation.
Loan Settlement Notice
The system displays the following loan settlement details based on the values specified at ‘Value Dated Amendments’ level:
- Loan Settlement Request
- Notice Date
- Expected Closure Date
5.1.5 Checklist Tab
The Check lists are maintained in the ‘Check List Maintenance’ screen and are linked to different events of the contract. The checklist maintained for the BOOK event is available in the Checklist tab at the time of account creation.

Check List
The following details are captured here:
Description
The system displays the description of the check list maintained for the BOOK event.
Verified
Check this box to indicate that the check list item has been verified
Remarks
Specify any additional remarks about the check list or the account in this free format text field
5.1.6 Fields Tab
The User Defined Fields are defined at the Product level. These fields are available in the Fields tab at the time of account creation.

The following details are displayed/ captured here:
UDF Description
The system displays all the UDF descriptions defined at the Product level.
UDF Value
Specify the UDF value in this field. This is applicable only if the user input or list of values is defined at the time of creation of the UDF.
5.1.7 Components Tab
Clicking against the ‘Components’ tab in the ‘Account Details’ screen invokes the following screen:

You can specify the following details for the components:
Description
After you specify the component Name, the system displays the description of the component.
Component Currency
The system displays the currency associated with the component. The value is defined at Product level.
Special Interest Amount
Specify the amount for the special interest.
Settlement Ccy
Select the settlement currency for the option list. The settlement currency is maintained as a default for both Credits and Debits.
Dr. Payment Mode
Select the debit payment mode from the drop-down list. Following are the options available in the drop-down list:
- CASA
- Credit Card
- Debit Card
- Clearing
- External Account
- Electronic Pay Order
- Internal Check
- Instrument
- GIRO
- Cash/Teller
Liquidation Mode
The system defaults the mode of liquidation from the product level. However you can modify the same to indicate the mode of liquidation of the component from the drop-down list. The following options are available for selection:
- Auto
- Manual
Note
This is applicable only if ‘Liquidation mode’ is selected as ‘Component’ at the account preference level.
Main component
The system selects the component of the lease designated as main component in the product level in this field.
Verify Fund
Select this option to indicate whether the system should verify the availability of sufficient funds in the customer account before doing auto liquidation of the component.
Capitalized
Select this option if the scheduled amounts are to be capitalized.
Waive
Select this option to waive the component for the account.
Penal basis Comp options
The system displays the penal basis for calculating penalty component.
Service Branch
Specify the branch that services the customer account.
Service Account
Specify the account in the service branch.
Note
All modes except CASA needs service account. Adjustments etc. are settled through this account.
Component Type
Specify the nature of the component. This is also known as the ‘Reporting Type’. It defines the manner in which the component should be classified for reporting/ accounting purposes. A component can be of one of the following types:
- Reimbursement: these are components which have both Dr and Cr mapped to settlement accounts
- Off-Balance Sheet (OBS): An OBS Component will have balances but these need not be zero when an account is closed
- Adhoc Charges
- Charge
- Tax
- Insurance
- Interest
- Provisioning
- Deposit
Cr. Payment Mode
Select the credit payment mode from the drop-down list. Following are the options available in the drop-down list:
- CASA
- Clearing
- External Account
- Instrument
- Cash/Teller
Special Interest
Select this option to denote if the component is a special interest type. This implies that the computed value of the component can be overridden with the entered value.
IRR Applicable
Check this option to indicate that the component is to be considered for IRR calculation for the account.
This field will not be available for input if ‘Accrual Required’ and ‘IRR Applicable’ are left unchecked at the product level.
Schedule
The schedules can be for two types, namely,
- Schedules for financial lease
- Schedules for operational lease
5.1.7.1 Schedules for Financial Lease
For Advance payment type and for complete disbursement during initiation, the payment schedules for principal and interest are populated with start date as value date, due date as schedule start date .The first EMI schedule will be liquidated during the initiation. Accounting entries are passed with DSBR event.
For Arrears payment type and for complete disbursement during initiation, the payment schedules for principal and interest are populated with start date as value date and due date as schedule end date. Schedules will be liquidated on due date.
For multiple disbursements (Lease advances), the EMI schedules will not be populated in this case. Pre- EMI interest is collected by defining interest schedules. This is applicable for both modes of payment.
Note
EMI schedules are populated once the total amount is disbursed (On SCHR event)
If a residual amount exists for the lease account, then the system will consider the residual amount as the last schedule of the contract with the due date as the maximum date supported (global maximum date) with the components as PRINCIPAL and INTEREST. The residual amount in case of payment in advance includes the interest.
Payment schedules are populated based on the frequency and frequency units maintained at product level; however this can be changed at account level.
5.1.7.2 Schedules for Operational Lease
For an operational lease, disbursement schedules are restricted. On value date of the lease account, along with INIT, DSBR will fire for down payment and first EMI will be liquidated if the payment mode is Advance. If the payment mode is Arrears, the schedule due date will be the schedule end date.
If a residual amount exists for the lease contract, then that would be the last schedule of the contract with the due date as the maximum date supported (global maximum date) and the component INTEREST. The residual amount in case of payment in advance includes the interest.
Note
The frequency and frequency units of multiple schedules should be the same.
Click ‘Edit’ button to make any change to the scheduling. The following details are captured here:
Type
Select the type of schedule from the option list. Schedule can be a payment, a disbursement or a rate revision schedule.
Schedule Flag
Select the Schedule flag from the option list.
Formula
Specify the formula used to compute the component for that schedule.
First Due Date
Specify the first due date for the schedule for the component. The first due date can be defined based on the value date for the lease or a calendar date.
Number
Specify the number of times the schedule is repeated for a chosen frequency for the schedule. If the Frequency is Monthly and Number is 1, it implies once a month.
Frequency
Specify the number of times the schedule will repeat for a Unit. If it is 2 and the Unit is Monthly, it implies twice a month.
Unit
Specify the installment unit for the component for the schedule.
Due Dates On
Specify to schedule an installment on a particular date of the month.
End Date
Specify the end date for the component for the schedule. This is computed from the start date, frequency, unit and number for the schedule.
Amount
The system displays the amount of payment done.
EMI Amount
The system displays the EMI that should be repaid in this schedule.
Note
EMI is computed based on the formula maintained. User defined EMI is supported, however the EMI and the frequency of schedules must be consistent (same) for the lease account.
Schedule Details
You can view the schedule details by clicking ‘Explode’ button. The system displays the following details:
- The sequential schedule number for installments
- The due date of the payments and disbursements
- The settlement amount for the schedule
- The amount due for the schedule
- The EMI that should be repaid in this schedule
- The principal that has to be amortized
- The amount accrued for the component for the schedule
5.1.7.3 Schedule- wise Split Settlement for Auto Disbursement
Oracle FLEXCUBE allows you to maintain split details for schedule-wise auto disbursement in a lease account, only if you have set the disbursement mode to ‘Auto’ in the Account Preferences tab of the Leasing Product screen (LEDPRMNT).
In the Leasing Account Details (LEDACCDT) screen, click ‘Product Default’ button after entering product code, customer ID, currency and the amount, to default the product level component and schedule details of the selected product in the component tab of the Account Details screen.
The schedule definition section in the component tab is disabled both on product defaulting and enriching. However you can modify the disbursal amount and the number of schedules for the disbursal by clicking ‘Edit Schedules’ button.
You can view the disbursement schedule and maintain the schedule- wise lease split details for auto disbursement in the Disbursal screen. To do this, first select the principal component in the component tab and then click on ‘Disbursals’ button. The screen is as shown below:

The system displays the list of Schedules for the disbursements and their corresponding Disbursement amounts.
Schedule Due Date
The system displays the due date of the schedule.
Total Disbursement Amt
The system displays the total disbursement amount for the specified lease account.
Amount to Disburse
The system displays the amount to be disbursed.
Already Disbursed Amt
The system displays the amount which has been disbursed.
Note
Oracle FLEXCUBE allows auto disbursal only for the principal component.
Split Details
You can maintain the following split details:
Percentage
Specify the split percentage of the disbursement amount.
Amount
Specify the split amount for the schedule. Split amount is calculated based on the percentage and the disbursal amount.
If you specify only the amount and not the percentage, the system calculates the percentage of the amount to be disbursed and displays it in the percentage field during save.
Note
- The system validates if the amount and percentage are not entered and if split for the same disbursement schedule is available
- If one disbursement schedule maintains one split with percentage and other split with amount, system maintains either amount or percentage for the disbursement schedule.
- If the total amount is less than the amount to disburse for the schedule, system adjusts the rest of the amount in last split of the particular schedule and percentage gets calculated based on the amount.
- The system displays an error, if you specify an amount greater than that of the disbursement schedule
- The system displays an error, if the total amount or total percentage maintained exceeds the amount to disburse or 100 percent.
Settlement Account Branch
Specify the branch of the customer account. The adjoining option list displays the list of valid open branches maintained in the system. You can choose the appropriate one.
Settlement Account Number
Specify the settlement account number. The adjoining option list displays the valid accounts maintained for the given branch. You can choose the appropriate one.
The system displays the following split details:
Split sequence number
The sequence number for each split is auto generated by the system on save.
Payment Mode
The system displays ‘ACC’ as the payment mode for disbursal.
Settlement Account Currency
Once you choose the account number, the currency of the settlement account gets defaulted.
Customer
Once you choose the account number, the customer id gets defaulted.
It is mandatory to re-enter the split settlement details during VAMI, if there is a change in the disbursement schedule. For the disbursed schedules, the split settlement amendment would be ignored during VAMI.
During BOD, the system checks the lease split settlement details before taking the Credit Settlement details of the principal component. The credit settlement details of the principal component /Service account would be considered only in the absence of split settlement details for that particular schedule.
Revisions
To view the details of the Rate revision schedule, click ‘Revisions’ button. This lists the details of the revisions done on the Components.

Schedule Due Date
The system displays the due date of the schedule.
Applied Flag
The system displays if the revision was applied or not.
5.1.8 Charges Tab
You can calculate and apply charges on an account by specifying the basis on which we would like to apply charges. For example, we may want to apply charges on the basis of the debit turnover in an account. When we define a Charge product, we have to specify the Charge basis.
When we apply the charge product on an account or an account class, charges for the account will be calculated on this basis.

The following details are captured:
Description
Specify the description for the component.
Component Type
Select the type of component from the drop-down list. Following are the options available in the drop-down list:
- Formula with schedule (Component Type - Interest)
- Formula without schedule (Charge)
- Penal Interest
- Prepayment Penalty
- Discount
- Schedule without formula (Principal)
- No schedule No formula (Ad Hoc Charges)
- Penalty Charges
Component Currency
The system displays the currency associated with the component. The component currency is defaulted from the Product level.
Settlement Currency
Select the settlement currency form the option list.
Dr Payment Mode
Select the debit payment mode from the drop-down list. Following are the options available in the drop-down list:
- CASA
- Credit Card
- Debit Card
- Clearing
- External Account
- Electronic Pay Order
- Internal Check
- Instrument
- Cash/Teller
Dr Prod Ac
Specify the Product/ Account to be used for Debit payments.
Dr Acc Brn
Select the details of the branch where the Dr account resides from the option list.
Cr Payment Mode
Select the credit payment mode from the drop-down list. Following are the options available in the drop-down list:
- CASA
- Clearing
- External Account
- Instrument
- Cash/Teller
Cr Prod Ac
Specify the details of the Product/ Account to be used for Credit payments.
Cr Acc Brn
Select the details of the branch where the Cr account resides from the option list.
Charge Appl Date
Specify the details of the date from which the charge is applicable.
Service Branch
Specify the branch that services the account.
Service Account
Specify the account in the service branch.
Due Date
Specify the date on which the charge was applied.
Amount Due
Specify the details of the amount due for repayment.
For each component, the following details are displayed:
- Event Code
- Component Name: A component will be of type ‘Charge’
- Amount Due: The amount due for repayment in this field
- Amount Settled: The settled amount in this field
- Schedule Due Date: The scheduled date for repayment in this field
- Waive: If this option is checked, the charge defined for event is waived off
Waiver Flag
Select this option to waive off the charges.
5.1.9 Linkages Tab
Clicking against the ‘Linkages’ tab in the ‘Account Details’ screen invokes the following screen:

Linkage Sequence Number
Specify the sequence number for the linkage.
Linkage Type
Select the type of linkage from the option list.
Linkage Branch
Select the branch of the linkage type
Customer ID
Specify the ID of the customer to be used for corresponding linkage type by clicking ‘C’ button.
Linkage Ref No
Specify the linkage reference number be used by clicking ‘L’ button.
Linkage Amount Click on ‘L’ button
Specify the linkage amount.
Linked Currency
Specify the linked currency.
Link%
Specify the linkage percentage.
Block Reference No
On save the system displays the block reference number.
Secured Portion
Specify the part of the principal that is backed by some asset.
On save:
- the system validates the linked amount with term deposit available balance. If the term deposit available balance is less than the linkage amount, then the system displays an error message.
- the system marks a lien on the term deposit by the linkage amount with 'Amount Block Type' as 'Loan' and 'Reference No' as Loan account number.
5.1.10 Advices Tab
Clicking against the ‘Advices’ tab in the ‘Account Details’ screen invokes the following screen:

You can specify the following Advice details:
Message Type
The system displays all the advices for all the events for the account. The list will include all the advices that are defined at the product level
Suppress
This field allows the user to suppress the generation of the advice for a particular event. The options are Yes or No.
Priority
Click the option list to select the priority of generation. A list of values is displayed. Double click on a value to select it.
The options are High, Medium or Low
5.1.10.1 Suppress Advices across the Account
The generation of an advice across the life of the account can be suppressed.
Message Type
Select the type of advice, the generation of which can be suppressed across the account from the option list.
You can suppress the Payment Message defaulted in case you do not need a credit through swift message.
The message is automatically suppressed if the Principal Credit Settlement account is changed to a GL or if the receiver in ‘Swift Msg Details’ screen is not valid to receive the message i.e, if the Customer Type of the Receiver party is not a Bank.
Also, if the settlement mode for PRINCIPAL component is anything other than CASA, the swift message is automatically suppressed.
If the Transfer Type is chosen as blank i.e, neither Customer Transfer nor Bank Transfer, then PAYMENT_MESSAGE will become CREDIT_ADVICE by Swift (MT910) if the Receiver is a bank and the credit settlement account is a current account.
5.1.11 Credit Score Tab
Click ‘Credit Score’ tab to specify the details for calculating the credit score.

You need to specify the following details here:
Rule Name
The system displays the rule associated with the leasing product. However you can amend this field.
User Input Score
Specify the credit score associated with the customer.
Automated Score
The system displays the credit score calculated based on the rules maintained at the product level.
Agency Code
Specify the code of the external agency, to be approached for calculating the score.
External Credit Score
The system displays the score as calculated by the external agency.
Click ‘Score’ button to auto-generate the credit score for the customer. Click ‘External Score’ button to auto-generate the credit score for the Bureau.
5.1.12 Capturing Additional Details for Leasing
The buttons on the ‘Account Details’ screen enable you to invoke a number of functions vital to the processing of a leasing account.
For more details on the field explanation of each links refer section ‘Creating a Commitment Account’ in the ‘Account Creation’ chapter of Retail Lending user manual.
5.2 Saving and Authorising Mortgage/Commitment Account
You have to save a contract after entering all the required details in the system. Click Save icon on the Toolbar to save an account. The system updates this as an unauthorised contract. To authorize an account, click ‘Authorize’ icon on the Application toolbar.
Note
You cannot authorise a contract from the ‘Leasing Account Details’ screen in the following cases:
- the contract has multilevel of authorization pending, the same will be done using the ‘Multilevel Authorization Detailed’ screen
- the level of authorization is greater than or equal to ‘N’
- the ‘Nth’ or the final level of the users authorisation limit is less than the difference between amount financed and sum of the limits of all the users involved in authorizing a transaction, this case holds good when the ‘Cumulative’ field is checked in the ‘Product Transaction Limits Maintenance’ screen
- the transaction amount is greater than the authoriser’s authorisation limit if the ‘Cumulative’ field is unchecked in the ‘Product Transaction Limits Maintenance’ screen
5.3 Multilevel Authorization of a Contract
High value contracts may require multilevel of authorization. The levels of authorizations are defined in the ‘Product Transaction Limits’ screen. You can use the ‘Multilevel Authorization Detailed’ screen for authoring a contract n-1 times. However, final authorization can take place only in the contract screen.
For more details, refer the ‘Multilevel Authorization of Contract/Loan Account’ section in the ‘Procedures’ User Manual.
5.4 Viewing Lease Account Summary Details
You can view details of lease account in the ‘Account Summary’ screen. You can invoke this screen by typing ‘LESACCDT’ in the field at the top right corner of the Application tool bar and clicking the adjoining arrow button.

You can query on records based on any or all of the following criteria:
- Account Number
- Branch
- Customer ID
- Product Code
- Value Date
- Maturity Date
- Amount financed
- Currency
- User Defined Status
- Alternate Account Number
- Account Status
- Auth Status
Click ‘Search’ button. The system identifies all records satisfying the specified criteria and displays the following details for each one of them:
- Account Number
- Branch
- Customer ID
- Product Code
- Value Date
- Maturity Date
- Amount financed
- Currency
- User Defined Status
- Alternate Account Number
- Account Status
- Auth Status
5.5 Maintaining Events Dairy
An ‘event’ may be defined as any action starting from application entry to collections. This module captures the details of events applicable to the account.
You can maintain events dairy using ‘Events Dairy’ screen. You can invoke this screen by typing ‘LEDEVDRY’ in the field at the top right corner of the Application tool bar and clicking on the adjoining arrow button.

The screen has a separate processed and unprocessed events under two different headings.
5.5.1 Processed Events
The processed events are all the events which have already taken place. This displays the details like the sequence number of the event. The date on which the event was processed, the value date, the event code, the cutoff status, and a brief description of the event. The screen also displays the details of the events according to the events selected.

The following details are displayed:
Events
The processed events are all the events which have already taken place. The following event details are displayed:
- Sequence Number
- Processed Date
- Execution Due Date
- Code
- Description
- Cutoff Status
Advices
The following advice details are displayed:
- DCN
- Message Type
- View Message
Entries
The following entry details are displayed:
- Debit/Credit
- Branch
- Account Number
- Account Currency
- Event Foreign Currency Amount
- Exchange Rate
- Event Local Currency Amount
- Value Date
- Transaction Date
- Amount Tag
- Log Foreign Currency Amount
- Log Local Currency Amount
- Transaction Code
- Event Sequence Number
- Event
5.5.2 Unprocessed Events
The Unprocessed event screen has all the details of the overdue and the Due events for the account.

The following details are displayed:
Overdue Events
An event which has crossed the due date becomes an overdue event. The number of days after the due date is used by the bank to calculate penalty for the event.
The following Overdue event details are displayed:
- Code: Unique event code
- Date: Date on which event occurred
- Description: Brief event description
Components
Component name: Name of the component affected by the event.
Events due
The date on which the event is supposed to take place is the due date of the event. In case of repayments, the customer is informed by the bank regarding the due date.
The following details are displayed:
- Code: Unique event code
- Date: Date on which event occurred
- Description: Brief event description
Components
Component name: Name of the component affected by the event.