3. Maintenance
3.1 Introduction
Before you begin using the Microfinance module, you must maintain the following information in the system:
- Branch Parameters
- Office Types
- Center Details
- Group Types
- Group Details
- Groups and Center Positions
- Meeting Phase
- Demographics
- Training Types
- Poverty Status
- Business Activities
- MF Activity Checklist
- Literacy Levels
- Training Details
- Products
- Loan Accounts
This chapter contains the following sections:
- Section 3.2, "Branch Parameters Maintenance"
- Section 3.3, "Office Types Maintenance"
- Section 3.4, "Capturing Center Details"
- Section 3.5, "Group Types Maintenance"
- Section 3.6, "Capturing Group Details"
- Section 3.7, "Defining Meeting Schedule"
- Section 3.8, "Demographic Maintenance"
- Section 3.9, "Type Codes Maintenance"
- Section 3.10, "Maintaining Checklists"
- Section 3.11, "Training Details Maintenance"
3.2 Branch Parameters Maintenance
This section contains the following topics:
- Section 3.2.1, "Maintaining Branch Parameters"
- Section 3.2.2, "Capturing User Defined Field Details"
3.2.1 Maintaining Branch Parameters
You can maintain branch parameters using the ‘MFI – Branch Parameters’ screen. You can invoke this screen by typing ‘MFDBRPMT’ in the field at the top right corner of the Application tool bar and clicking on the adjoining arrow button.

Branch parameters include the following:
Branch Details
Branch Code
Specify a valid code of the branch for which the parameters need to be maintained. The adjoining option list displays all valid branch codes maintained in the system. You can select the appropriate one.
Branch Name
The system displays the branch name corresponding to the Branch Code.
Processing
Process Till Next Working Day – 1
This specification will determine the day on which automatic events such accrual, liquidation etc. falling due on a holiday, should be processed. If you select this option, events scheduled for a holiday will be processed on the last working day before the holiday.
Example
Assume that the current system date is 15th May ’05. Further, 16th and 17th are holidays. If you select ‘Process Till Next Working Day – 1’, when you execute the batch program during EOD of 15th May, the events due on 16th and 17th will also be processed.
If you do not select this option, processing will be done upto the system date i.e. the current date. The automatic events due on a holiday will be processed as part of the batch program run at BOD on the next working day after the holiday.
Consider the example discussed above, if you do not check this option, the events due on 16th and 17th will be processed as part of BOD operations on 18th May ’05, which the next working day after the holidays.
Center Hierarchy
Check this box to indicate that the branch hierarchy belongs to the center.
Office Type
Specify a valid office type of the branch. The adjoining option list displays all valid office types maintained in the system. You can select the appropriate one.
Note that this field displays office types maintained in the system using the ‘Office Type Maintenance’ screen.
Bulk Savings Txn Code
Specify a valid transaction code to be used while processing accounting entries from the Bulk Savings Deposit / Withdrawal. The adjoining option list displays all valid bulk savings transaction codes maintained in the system. You can select the appropriate one.
Bulk Savings Offset GL
Specify a valid Offset GL to which the savings deposit / withdrawal entries should be offset.
Note that this GL should be the same GL that was used when the field officer was issued an advance to be disbursed to a group of members.
Netting
Specify the netting preference for posting entries during Accrual, Liquidation and Status Change.
If you opt to net, the system posts a single consolidated entry for a GL and Currency combination. If you do not select this option, entries are posted individually for each account.
The GL Netting Status Change option can also be used to indicate instalment level status change.
The Netting of Notices Across Accounts can be used to indicate that for or all accounts for which the payments falls due on a particular date, the requests for invoice generation should be consolidated.
The loan accounts for which the reminder or demand note should be sent is tracked based on the status of the account. The SDE ‘Next Schedule Date’ is set up to arrive at how many number of days in advance the payment notice should be generated. Based on the status of the loan account, the corresponding payment invoice format is set up.
The Auto Allocate Part Payment option can be used if you want to do a partial payment through auto allocation. For accounts which are marked for manual allocation of partial amount the payment can be done in bulk using the ‘Consumer Lending – Bulk Payments’ screen.
For more details on Bulk payments refer section ‘Bulk Payments’ in the ‘Operations’ chapter of Retail Lending module.
Statement
The settlement accounts for processing lending transactions need to be specified here. Specify the Bridge GL/Account to be used for the settlement of the debit and credit legs of transactions that would be processed at your branch. You can select the appropriate accounts from the adjoining option lists.
Intraday Jobs
Intraday Accrual
Check this box to indicate that intraday accrual is allowed.
Intraday Job Interval
Specify the intraday job interval number.
Num Parallel Jobs
Specify the number of parallel database jobs to be run as part of End of Day Batch.
Auto Generation
Account Auto Generated
You can select this option for automatic generation of account numbers. The system generates the account numbers automatically when you create customer accounts through the ‘Account Details’ screen. If this option is not checked, you have to capture the account number yourself.
Account Mask
Accounting Mask Required and Account Mask
To maintain uniformity in the account numbers generated/captured across a branch, you can specify a format/mask for account numbers. If you specify that account numbers should conform to a specific format, you must specify the mask in the ‘Account Mask’ field.
Example
You may want the account numbers of your branch to be a combination of:
- Branch Code (3 Characters)
- Product (4 Characters)
- Currency (3 Character currency code)
- 5 digit running sequence number
The account mask in this case would be: @ (BRN)@(PROD)@(CCY)@(SEQ:5)
An example of an account number conforming to the above mask would be DOC3ROLUSD60021.
If you opt for auto generation of account numbers but do not specify a mask, the generated number will, by default, conform to the following format:
- 3 character Branch Code
- 4 character Product Code
- Date in Julian format (YYDDD)
- 4 digit running sequence number
An example of an account conforming to the above format is ‘DOCVSIM040960021’ where:
- ‘DOC’ is the Branch Code
- ‘VSIM’ is the Product Code
- ‘04096’ is the date equivalent to 5th April 2004 (04 – Year and 096 is the number of days that have elapsed in the year).
- ‘0021’ is the running sequence number.
Also, if you maintain an account mask but do not opt to auto generate the account numbers, then, during account capture you have to conform to the account mask maintained for the branch. If the account is not as per the mask, the system displays an error message.
User Reference
User Reference number in Msgs
Check this box to indicate that the User Reference Number provided in the account screen has to be used in Tag 20 of MT103 and Tag 21 of MT202. If the box is unchecked, the loan account number will be used instead of the User Ref no.
Auto Gen User Reference
Check this box to indicate that system should auto generate user ref no during account creation.
3.2.2 Capturing User Defined Field Details
You can associate values to all the User Defined fields created and attached to the ‘MF – Branch Parameters’ screen. You can view a list of User Defined fields associated with it by clicking the ‘Fields’ button.
For more details on how to create user Defined fields, refer chapter ‘Creating custom fields in Oracle FLEXCUBE’ in the User Defined Fields User Manual under Modularity.
3.3 Office Types Maintenance
This section contains the following topics:
3.3.1 Maintaining Office Types
You can maintain different office types of a bank using the ‘Office Type Maintenance’ screen. You can invoke this screen by typing ‘MFDOFTYP’ in the field at the top right corner of the Application tool bar and clicking on the adjoining arrow button.

Here you can capture the following details:
Office Type
Specify the office type of the bank. Example: Head Office.
Office Description
Provide a brief description of the office type.
Level
Select the level of the office type from the adjoining drop-down list.
3.3.2 Viewing Office Type Summary
You can view a summary of all office types created using the ‘Office Types Summary’ screen. You can invoke this screen by typing ‘MFSOFTYP’ in the field at the top right corner of the Application tool bar and clicking the adjoining arrow button.

You can query on records based on any or all of the following criteria:
- Authorization Status
- Office Type
- Level
- Record Status
- Office Description
Click ‘Search’ button. The system identifies all records satisfying the specified criteria and displays the following details for each one of them:
- Authorization Status
- Record Status
- Office Type
- Office Description
- Level
3.4 Capturing Center Details
This section contains the following topics:
- Section 3.4.1, "Defining Center Details"
- Section 3.4.2, "Defining Center Office Bearers Details"
- Section 3.4.3, "Defining Comments Detail"
- Section 3.4.4, "Viewing the Center Change History"
- Section 3.4.5, "Viewing Meeting Details"
- Section 3.4.6, "Viewing Group"
- Section 3.4.7, "Viewing Center Definition Summary"
You can capture the details of the center using the ‘Microfinance Centre Definition’ screen. You can invoke this screen by typing ‘MFDCENTR’ in the field at the top right corner of the Application tool bar and clicking on the adjoining arrow button.

Here you need to specify the following details.
Center Code
The Center Code is automatically generated by the system.
User Defined Center Code
Specify a unique user defined center code.
Center Name
Specify the center name.
Center CIF ID
Specify the center CIF ID which is used for creation of accounts.
Account Officer
Specify the account officer who is responsible for managing center. The adjoining option list displays all valid account officers maintained in the system. You can choose the appropriate one.
Center Branch
Specify the code used to identify the center branch. The adjoining option list displays all valid center branches maintained in the system. You can choose the appropriate one.
Source Code
Specify the source code, which is used to transfer data from one system to another.
Source Reference
Specify the source reference which is used to link the old and new systems.
MF Joining Date
Specify the center creation date by using the adjoining calendar.
3.4.1 Defining Center Details
You can capture the following center details in this tab.
Center Formed By
Specify the account officer, who formed the center. The adjoining option list displays all valid account officers maintained in the system. You can choose the appropriate one.
Demographic Code
Specify the demographic code. The adjoining option list displays all valid demographic codes maintained in the system. You can choose the appropriate one.
Detail
Specify a brief description associated with the demographic code. You can specify the values, if it is not maintained in ‘Demographics Maintenance’ screen. You can also select the values from LOV, if the values for Demographic Code are maintained in ‘Demographics Maintenance’ screen.
Note
You can create only savings accounts for the center.
3.4.2 Defining Center Office Bearers Details
You can assign clients to center titles.

Here you need to specify the following details.
Position
Specify the position assigned to client for a center. The adjoining option list displays all valid positions maintained in the system. You can choose the appropriate one.
Position Name
The system displays the name of the position.
Customer No
Specify the Customer ID. The adjoining option list displays all valid customer IDs maintained in the system. You can choose the appropriate one.
Customer Name
The system displays the name of the customer.
3.4.3 Defining Comments Detail
You can define unique comments for a center.
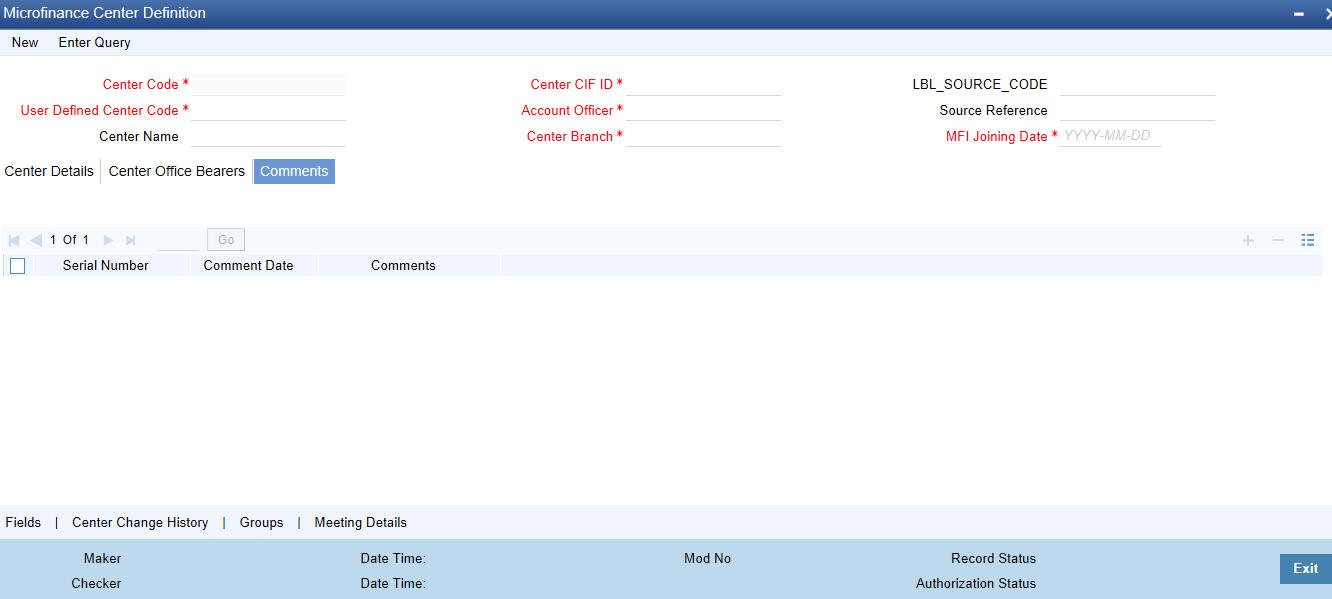
Here you need to specify the following details.
Comment Date
Specify the comment date by using the adjoining calendar.
Comments
Specify the comments against a specific group.
3.4.4 Viewing the Center Change History
Click ‘Center Change History’ button in the ‘Microfinance Center Definition’ screen to invoke the ‘Center Change History’ screen.
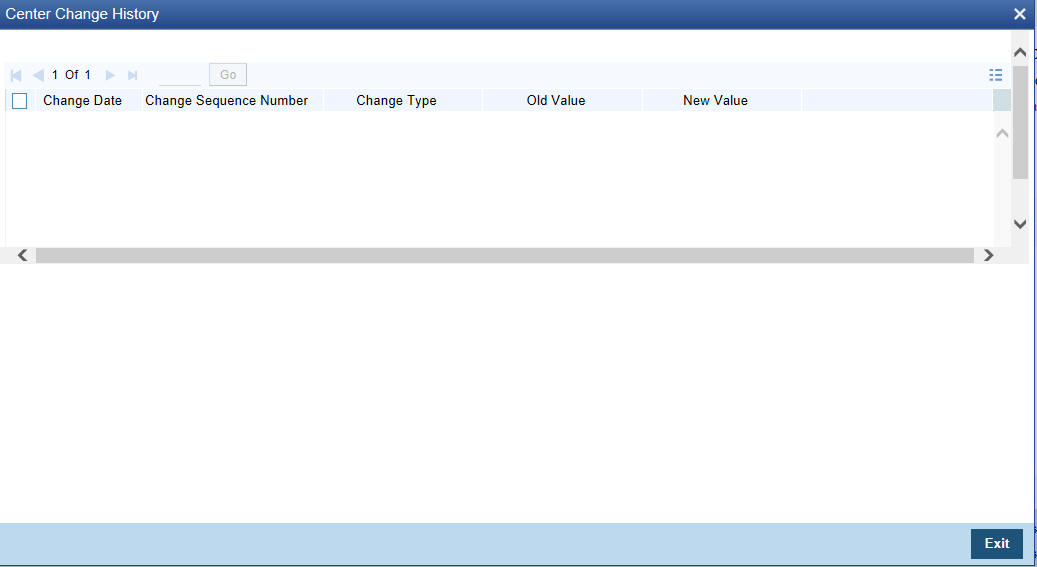
Here you can view the following details.
Change Date
The system displays the modification date of the center.
Change Sequence Number
The system displays the modification sequence number of the center.
Change Type
The system displays the changes made to the center.
Old Value
The system displays the value before modification.
New Value
The system displays the new modified value.
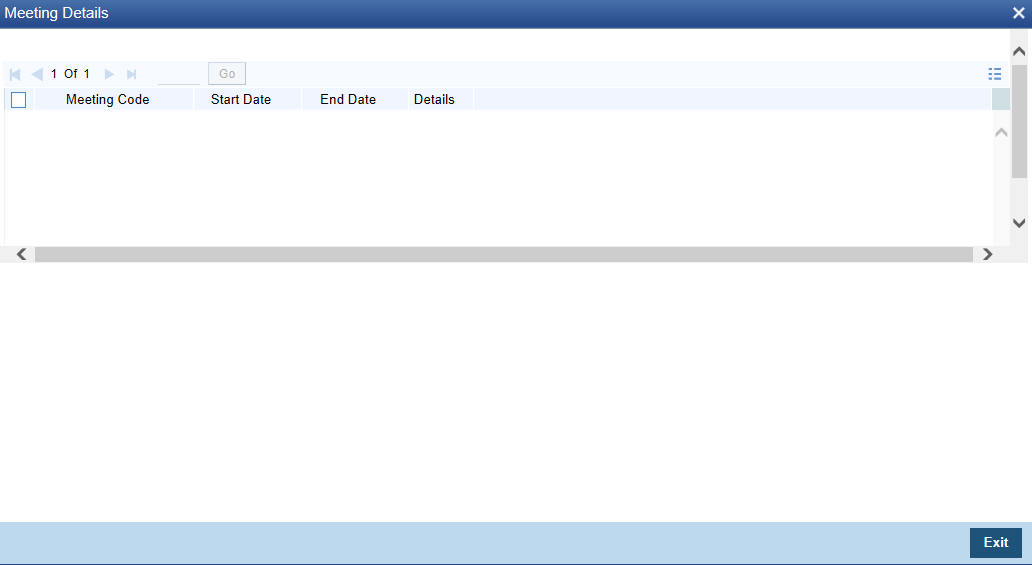
3.4.5 Viewing Meeting Details
Click ‘Meeting Details’ button in the ‘Microfinance Center Definition’ screen to invoke the ‘Meeting Details’ screen.

Here you can view the following details.
Meeting Code
The system displays a unique meeting code.
Start Date
The system displays the start date of the meeting.
End Date
The system displays the end date of the meeting.
Details
Click ‘Details’ button to view meeting details for center.
In the ‘Meeting Schedule Definition’ screen, specify the following information:
Meeting Code
The system generates the meeting code automatically when you create a new record with process code ‘MTSH’
Type
Select the type of meeting from the adjoining drop-down list. The options available are:
- Center
- Group
- Client
Meeting Of
Specify the meeting schedule based on the type selected viz Group, Center and Client from the option list.
Meeting Hours
Select the hours for the meeting for the adjoining drop-down list.
Meeting Minutes
Select the minutes for the meeting for the adjoining drop-down list.
Number of Schedules
Specify the number of meeting schedules.
Unit
Select the unit of the meeting from the adjoining drop-down list. The options available are:
- Daily
- Monthly
- Weekly
- Quarterly
- Half Yearly
- Yearly
Frequency
Specify the frequency of the meeting.
Due Date On
Specify the due date of the meeting. This option is enabled only if you maintain ‘Monthly’ in the ‘Unit’ field.
On Holiday
Select the day on which meeting can be scheduled from the adjoining drop-down list. The options available are:
- Same Day
- Next Working Day
Individual meeting schedule cannot be maintained for a client, which is a part of a group. The system will validate this before processing.
If the meeting schedule falls on a holiday, you can define whether to hold it on the same day or shift to the next working day. This applies to all holidays declared by the HO and other offices.
Location
Specify the location code of the meeting. The adjoining option list displays all valid location codes maintained in the system. You can choose the appropriate one.
Description
Specify a brief description associated with the location.
VAMI Action
Select the VAMI action on change in schedule from the adjoining drop-down list. The options available are:
- Change EMI
- Existing EMI
Start Date
Specify the date on which the meeting schedule should begin by using the adjoining calendar.
Last Meeting Date
The system displays the date based on the number of schedules and frequency selected.
Meeting Time
You can specify the meeting time details as follows:
Generated Date
The system displays the date based on the start date, number of schedules, and frequency selected.
Actual Meeting Date
Specify the latest meeting schedule date which is in effect by using the adjoining calendar.
Meeting Status
Select the current status of the meeting from the adjoining drop-down list. The options available are:
- Pending
- Processed
Meeting Phase
Specify the meeting phase. The adjoining option list displays all valid meeting phases maintained in the system. You can choose the appropriate one.
Comments
Specify the comments on the meeting.
Hours
Select the hour of the meeting from the adjoining drop-down list.
Minutes
Select the minutes of the meeting from the adjoining drop-down list.
Attendance Expected
Specify the expected attendance on meeting.
The system will default this value as Group Strength for the group. However, you may modify it at the group level.
Attendance
Specify the number of clients who attended the meeting.
3.4.6 Viewing Group
Click ‘Groups’ button in the ‘Microfinance Center Definition’ screen to invoke the ‘Groups’ screen. In this screen, you can view current and old groups attached to the center.
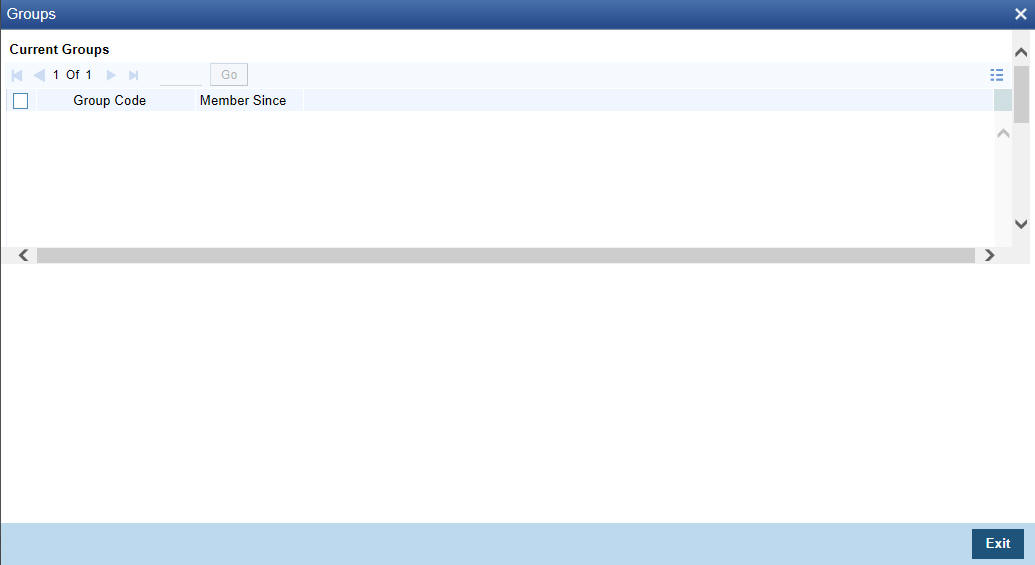
Here you can view the following details.
Current Groups
Group ID
The system displays the group ID associated with this center.
Member Since
The system displays the date, when the center was associated with this group.
Old Groups
Group ID
The system displays the group ID associated with this center.
Group Change Sequence Number
The system displays the group change sequence number.
Member Since
The system displays the date, when the group was associated with this center.
Member Till
The system displays the date, when the group was removed from the center.
3.4.7 Viewing Center Definition Summary
You can view a summary of all center definition using the ‘Center Definition Summary’ screen. You can invoke this screen by typing ‘MFSCENTR’ in the field at the top right corner of the Application tool bar and clicking the adjoining arrow button.
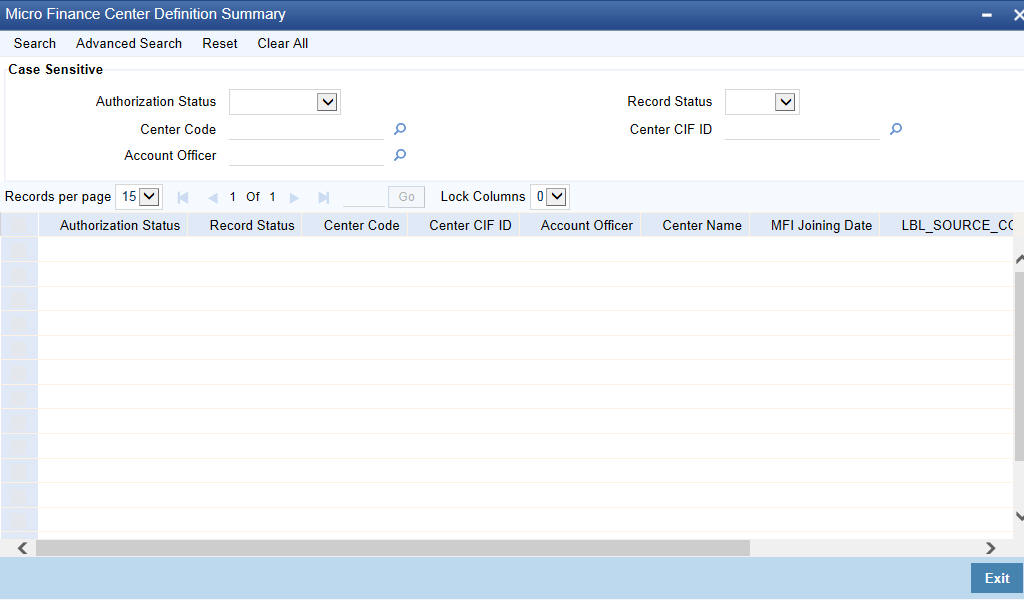
You can query on records based on any or all of the following criteria:
- Authorization Status
- Center Code
- Account Officer
- Record Status
- Center CIF ID
Click ‘Search’ button. The system identifies all records satisfying the specified criteria and displays the following details for each one of them:
- Authorization Status
- Record Status
- Center Code
- Center CIF ID
- Account Officer
- Center Name
- MFI Joining Date
- Source Code
- Source Reference
- Center Formed By
3.5 Group Types Maintenance
This section contains the following topics:
3.5.1 Maintaining Group Types
You can maintain group types using the ‘Group Type Maintenance’ screen. You can invoke this screen by typing ‘MFDGRTYP’ in the field at the top right corner of the Application tool bar and clicking on the adjoining arrow button.

Here you can capture the following details:
Group Type
Specify the group type being maintained in the system.
Group Description
Provide a brief description of the group.
Maximum Members Allowed
Specify the maximum number of members allowed in this group.
Minimum Members Required
Specify the minimum number of members required to form the group.
Group Category
Indicate the category of the group that your are maintaining. You can select one of the following options:
- Urban
- Rural
Gender Type
Indicate who can be group members with respect to gender. You can select one of the following options:
- Men
- Women
- Mixed
3.5.2 Viewing Group Type Summary
You can view a summary of all group types using the ‘Group Type Summary’ screen. You can invoke this screen by typing ‘MFSGRTYP’ in the field at the top right corner of the Application tool bar and clicking the adjoining arrow button.

You can query on records based on any or all of the following criteria:
- Authorization Status
- Group Type
- Gender Type
- Record Status
- Group Category
Click ‘Search’ button. The system identifies all records satisfying the specified criteria and displays the following details for each one of them:
- Authorization Status
- Record Status
- Group Type
- Group Category
- Group Type
- Maximum Members Allowed
- Minimum Members Required
3.6 Capturing Group Details
This section contains the following topics:
- Section 3.6.1, "Defining Group Details"
- Section 3.6.2, "Defining Group Members Details"
- Section 3.6.3, "Defining Comments Details"
- Section 3.6.4, "Viewing Meeting Details"
- Section 3.6.5, "Viewing Loans/Accounts"
- Section 3.6.6, "Viewing the Group Changes History"
- Section 3.6.7, "Viewing Group Definition Summary"
You can capture the details of the group using the ‘Microfinance Group Definition’ screen. You can invoke this screen by typing ‘MFDGROUP’ in the field at the top right corner of the Application tool bar and clicking on the adjoining arrow button.

Here you need to specify the following details.
Group Code
The group code is automatically generated by the system.
User Defined Group Code
Specify a unique user defined group code.
Account Officer
Specify the account officer who is responsible for managing group. The adjoining option list displays all valid account officers maintained in the system. You can choose the appropriate one.
Group Branch
Specify the code used to identify the group branch. The adjoining option list displays all valid group branches maintained in the system. You can choose the appropriate one.
Group Name
Specify the name of the group.
Center Code
Specify the center code. The adjoining option list displays all valid center codes maintained in the system. You can choose the appropriate one.
Group CIF ID
Specify the group CIF ID, which is used to identify the group as an individual and also to apply loans at group level.
Blacklisted
Check this box to indicate that the group is blacklisted.
Source Code
Specify the source code, which is used to transfer data from one system to another.
Source Reference
Specify the source reference which is used to link the old and new systems.
Group Narrative
Specify the remarks of the group.
Blacklisted Count
The system displays the number of times the group was blacklisted.
3.6.1 Defining Group Details
The following details need to be maintained for a Group.
Group Type
Specify the group type. The adjoining option list displays all valid group types maintained in the system. You can choose the appropriate one.
Group Formed By
Specify the account officer, who formed the group. The adjoining option list displays all valid account officers maintained in the system. You can choose the appropriate one.
Group Formed On
Specify the date on which the group was formed by using the adjoining calendar.
Number of Group Members
The system displays the number of group members.
Maximum Members Allowed
The system displays the maximum number of members allowed for a group.
Minimum Members Required
The system displays the minimum number of members required for a group.
Demographic Code
Specify the demographic code. The adjoining option list displays all valid demographic codes maintained in the system. You can choose the appropriate one.
Description
Specify a brief description associated with the demographic code. You can specify the values, if it is not maintained in ‘Demographics Maintenance’ screen. You can also select the values from LOV, if the values for Demographic Code are maintained in ‘Demographics Maintenance’ screen.
Training
The system displays the training code conducted for a group.
Trained On
The system displays the date on which the training was conducted.
3.6.2 Defining Group Members Details
You can assign group members to one or more positions.

Here you need to specify the following details.
Current Members
Customer Number
Specify the customer Number. The adjoining option list displays all valid customer numbers maintained in the system. You can choose the appropriate one.
Member Since
Specify the date when the member was created by using the adjoining calendar.
Position
Specify the position assigned for a group member. The adjoining option list displays all valid positions maintained in the system. You can choose the appropriate one.
Number of Loans
The system displays the number of total active loans available by a group member.
Total Loan Amount in LCY
The system displays the total active loan amount in local currency.
Total Due Amount in LCY
The system displays the total due loan amount in local currency.
Local Currency
The system displays the local currency.
Total Savings Balance in LCY
The system displays the total savings balance in local currency.
Total Deposit Balance in LCY
The system displays the total deposit balance in local currency.
Reason for Removal
Specify the reason for removal of members from the group.
Mark for Removal
Check this box to remove member from the group.
Old Members
Member Change Sequence Number
The system displays the sequence number of the member.
Client ID
The system displays the client ID.
Member Since
The system displays the date on which the member was created.
Member Till
The system displays the date on which the member was removed.
Reason for Removal
The system displays the reason for removal of members from the group.
3.6.3 Defining Comments Details
You can specify unique comments defined for a group.

Here you need to specify the following details.
Comment Date
Specify the comment date by using the adjoining calendar.
Comments
Specify the comments against a specific group.
3.6.4 Viewing Meeting Details
Click ‘Meeting Details’ button in the ‘Microfinance Group Definition’ screen to invoke the ‘Meeting Details’ screen.
Here you can view the following details.
Meeting Code
The system displays a unique meeting code.
Start Date
The system displays the start date of the meeting.
End Date
The system displays the end date of the meeting.
Details
Click ‘Details’ button to view meeting details for group. The ‘Meeting Schedule Definition’ screen is invoked.
3.6.5 Viewing Loans/Accounts
Click ‘Loans Accounts’ button in the ‘Microfinance Group Definition’ screen to invoke the ‘Loans Accounts’ screen. In this screen, you can view all the loans and accounts received by a group.

Here you can view the following details.
Loan Details
Loan Number
The system displays the loan reference number of the group.
Value Date
The system displays the date on which the loan was received.
Amount
The system displays the loan amount.
Currency
The system displays the loan amount currency.
Maturity
The system displays the date on which the loan matures.
Total Amount Due
The system displays the due loan amount.
Total Amount Paid Date
The system displays the date on which the total amount is paid.
Status
The system displays the status of the loan.
Account Details
Account
The system displays the account number of the group.
CIF ID
The system displays the CIF ID.
Balance
The system displays the account balance.
Currency
The system displays the account currency.
Opening Date
The system displays the date on which the account was opened.
Closed Date
The system displays the date on which the account was closed.
Status
The system displays the status of the account.
RD/TD
Account
The system displays the account number.
CIF ID
The system displays the CIF ID.
Balance
The system displays the account balance.
Currency
The system displays the account currency.
Opening Date
The system displays the date on which the account was opened.
Closed Date
The system displays the date on which the account was closed.
Status
The system displays the status of the account.
3.6.6 Viewing the Group Changes History
Click ‘Group Changes History’ button in the ‘Microfinance Group Definition’ screen to invoke the ‘Group Changes History’ screen.
Here you can view the following details.
Change Date
The system displays the modification date of the group.
Change Sequence Number
The system displays the modification sequence number of the group.
Change Type
The system displays the changes made to the group.
Old Value
The system displays the value before modification.
New Value
The system displays the new modified value.
3.6.7 Viewing Group Definition Summary
You can view a summary of all group definition using the ‘Group Definition Summary’ screen. You can invoke this screen by typing ‘MFSGROUP’ in the field at the top right corner of the Application tool bar and clicking the adjoining arrow button.
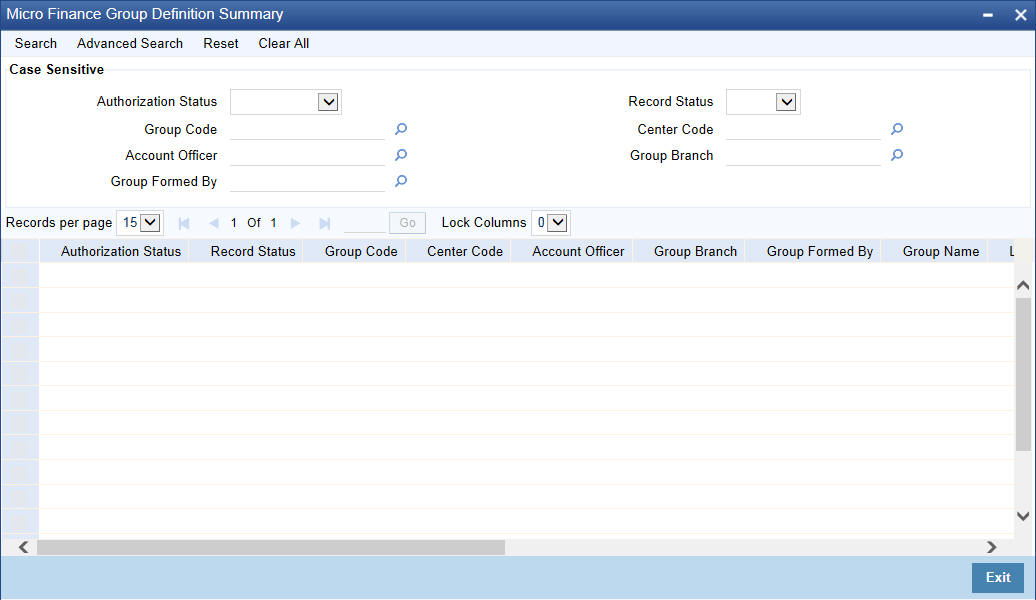
You can query on records based on any or all of the following criteria:
- Authorization Status
- Group Code
- Account Officer
- Group Formed By
- Record Status
- Center Code
- Group Branch
Click ‘Search’ button. The system identifies all records satisfying the specified criteria and displays the following details for each one of them:
- Authorization Status
- Record Status
- Group Code
- Center Code
- Account Officer
- Group Branch
- Group Formed By
- Group Name
- Source Code
- Source Reference
- Group CIF ID
- Number of Group Members
- Blacklisted
- Group Type
- Group Formed On
- Group Narrative
3.7 Defining Meeting Schedule
You can invoke the ‘Meeting Schedule Definition’ screen by typing ‘MFDMTSCH’ in the field at the top right corner of the Application tool bar and clicking on the adjoining arrow button.

Here you need to specify the following details.
Meeting Code
The system generates the meeting code automatically when you create a new record with process code ‘MTSH’.
Type
Select the type of meeting from the adjoining drop-down list. The options available are:
- Center
- Group
- Client
Meeting of
Specify the meeting schedule based on the type selected viz Group, Center and Client from the option list.
Cascade Changes to Loans and Deposit
Check this box to cascade meeting schedule to loans and deposits.
During End of Day (EOD), VAMI is triggered automatically only if Cascade Change to loans and deposits is enabled at ‘Meeting Schedule Definition’ screen and if Default from meeting schedule is enabled at product level.
Meeting Hours
Select the hours for the meeting for the adjoining drop-down list.
Meeting Minutes
Select the minutes for the meeting for the adjoining drop-down list.
Number of Schedules
Specify the number of meeting schedules.
Unit
Select the unit of the meeting from the adjoining drop-down list. The options available are:
- Daily
- Monthly
- Weekly
- Quarterly
- Half Yearly
- Yearly
Frequency
Specify the frequency of the meeting.
Due Date On
Specify the due date of the meeting. This option is enabled only if you maintain ‘Monthly’ in the ‘Unit’ field.
On Holiday
Select the day on which meeting can be scheduled from the adjoining drop-down list. The options available are:
- Same Day
- Next Working Day
Individual meeting schedule cannot be maintained for a client, which is a part of a group. The system will validate this before processing.
If the meeting schedule falls on a holiday, you can define whether to hold it on the same day or shift to the next working day. This applies to all holidays declared by the HO and other offices.
Location
Specify the location code of the meeting. The adjoining option list displays all valid location codes maintained in the system. You can choose the appropriate one.
Description
Specify a brief description associated with the location.
VAMI Action
Select the VAMI action on change in schedule from the adjoining drop-down list. The options available are:
- Change EMI
- Existing EMI
Start Date
Specify the date on which the meeting schedule should begin by using the adjoining calendar.
Last Meeting Date
The system displays the date based on the number of schedules and frequency selected.
Meeting Time
You can specify the meeting time details as follows:
Generated Date
The system displays the date based on the start date, number of schedules and frequency selected.
Actual Meeting Date
Specify the latest meeting schedule date which is in effect by using the adjoining calendar.
Meeting Status
Select the current status of the meeting from the adjoining drop-down list. The options available are:
- Pending
- Processed
Cascade Status
Select the cascade status from the adjoining drop-down list. The options available are:
- Processed
- Unprocessed
Meeting Phase
Specify the meeting phase. The adjoining option list displays all valid meeting phases maintained in the system. You can choose the appropriate one.
Comments
Specify the comments on the meeting.
Hours
Select the hour of the meeting from the adjoining drop-down list.
Minutes
Select the minutes of the meeting from the adjoining drop-down list.
Attendance Expected
Specify the expected attendance on meeting.
The system will default this value as Group Strength for the group. However, you may modify it at the group level.
Attendance
Specify the number of clients who attended the meeting.
3.8 Demographic Maintenance
This section contains the following sections:
3.8.1 Maintaining Demographics
You can maintain demographics using the ‘Demographics Maintenance’ screen. You can invoke this screen by typing ‘MFDDEMOG’ in the field at the top right corner of the Application tool bar and clicking on the adjoining arrow button.

Here you can capture the following details:
Demographic Code
Specify a code for the demography being maintained in the system. Example: State.
Demographic Description
Provide a brief description of the demography.
Applicable For
You can apply the demographic codes to microfinance group, center or both. Choose the appropriate value from the list:
- G - Group
- C - Center
- B - Both
Sequence
Specify the order in which the Demographic Code needs to appear on screen.
Allow Free Text
Check this box to indicate that no validation of values entered under ‘Values’ needs to be performed while saving the record.
Values
Specify the possible values for the Demographics. These values will be displayed in screens where Demographic Code would be used.
3.8.2 Viewing Demographics Summary
You can view a summary of all demographics maintained in the system using the ‘Group Type Summary’ screen. You can invoke this screen by typing ‘MFSDEMOG’ in the field at the top right corner of the Application tool bar and clicking the adjoining arrow button.
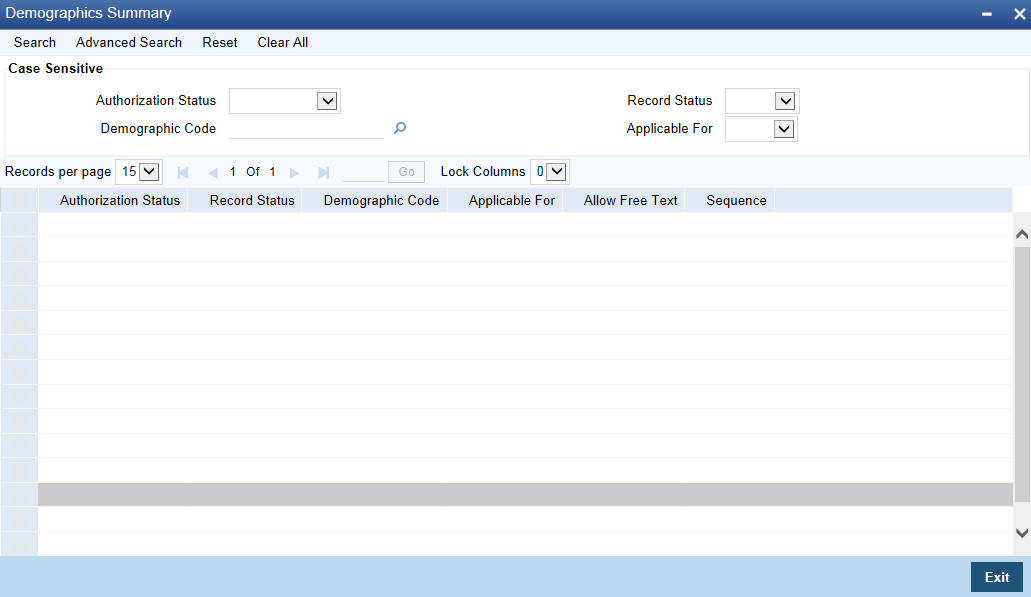
You can query on records based on any or all of the following criteria:
- Authorization Status
- Demographic Code
- Record Status
- Applicable For
Click ‘Search’ button. The system identifies all records satisfying the specified criteria and displays the following details for each one of them:
- Authorization Status
- Record Status
- Demographic Code
- Applicable For
- Allow Free Text
- Sequence
3.9 Type Codes Maintenance
This section contains the following topics:
3.9.1 Maintaining Type Codes
You can maintain different type codes using the ‘Type Code’ screen. You can invoke this screen by typing ‘MFDCOMMT’ in the field at the top right corner of the application tool bar and clicking on the adjoining arrow button.

Here you can capture the following details:
Type
Select a type from the drop down list. The following values are available in this field:
- Business Activity: Using this code you can maintain various business activities such as farmer, trader, craftsman, and so on.
- Document Type: You can maintain different document types (example Driving License) that serve as identity proofs of customers.
- Group/Center Position: You can maintain groups and center positions.
- Literacy of the Client: You can maintain different literacy levels such as illiterate, matriculation, graduation and so on.
- Meeting Phase: You can maintain the meeting phase to determine the purpose of the meeting like presentation meeting, information meeting, detailed discussion, understanding the business, loan disbursement and repayment meeting.
- Poverty Status: You can maintain poverty status of customers.
- Training Type: You can maintain training type.
Code
Specify a type code being maintained.
Description
Provide a brief description of the training type.
3.9.2 Viewing Type Code Summary
You can view a summary of type codes maintained in the system using the ‘Type Code Summary’ screen. You can invoke this screen by typing ‘MFSCOMMT’ in the field at the top right corner of the Application tool bar and clicking the adjoining arrow button.

You can query on records based on any or all of the following criteria:
- Authorization Status
- Type
- Record Status
Click ‘Search’ button. The system identifies all records satisfying the specified criteria and displays the following details for each one of them:
- Authorization Status
- Record Status
- Type
- Description
3.10 Maintaining Checklists
You can maintain a microfinance checklist to be verified during customer creation using the ‘Microfinance Checklist Maintenance’ screen. You can invoke this screen by typing ‘MFDACLMT’ in the field at the top right corner of the application tool bar and clicking on the adjoining arrow button.
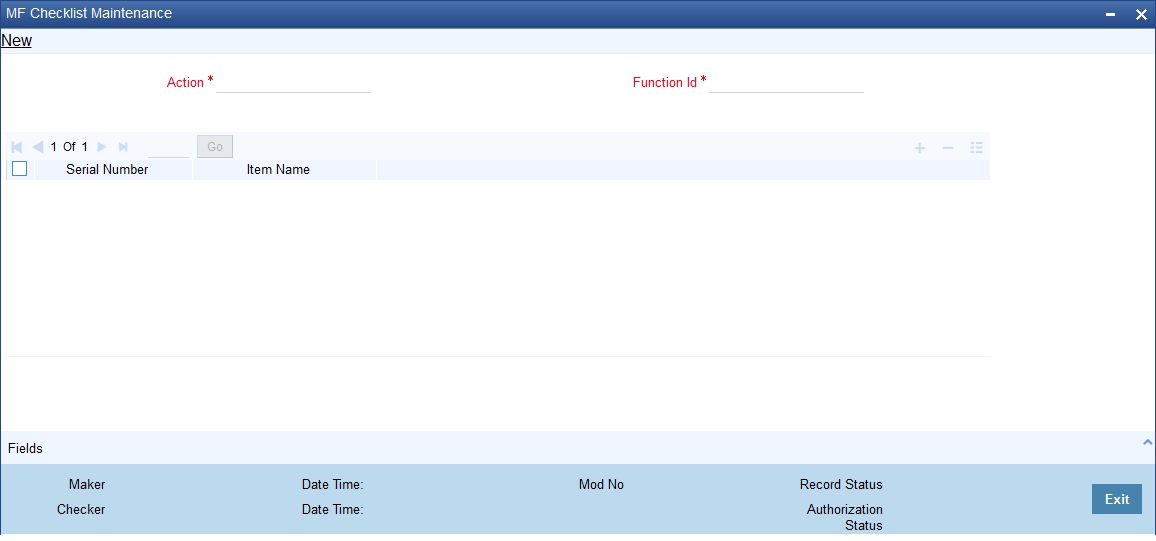
Here you can capture the following details:
Action
Specify a code for the activity for which a check list is being maintained in the system. Example: Pending Approval, Approval, etc.
Function ID
Specify a valid Function ID to which the checklist is applicable. The adjoining option list displays all valid Function IDs maintained in the system. You can select the appropriate one.
Checklist Items
Here you can define the checklist items.
Sl No
The system displays the serial number of the checklist items.
Item Name
Specify the checklist item name. Example: Proof of identity, address proof, etc.
3.11 Training Details Maintenance
This section contains the following topics:
3.11.1 Maintaining Training Details
You can maintain training details using the ‘Training Details Maintenance’ screen. You can invoke this screen by typing ‘MFDTRMNT’ in the field at the top right corner of the application tool bar and clicking on the adjoining arrow button.

Here you can capture the following details:
Training Code
Specify a code for the training type being maintained. The adjoining option list displays all valid training types maintained in the system. You can select the appropriate one.
Note that this field displays training types maintained in the system using the ‘Training Type Maintenance’ screen.
Date
Specify the date of training.
Entity Name
Select the type of entity to which the training would be imparted from the adjoining drop-down list. The available options are:
- Center
- Group
- Individual
Entity Code
Specify a valid code for the entity types ‘Center’ and ‘Group’. The adjoining option list displays all valid entity codes maintained in the system. You can select the appropriate one.
Note that for ‘Individual’ entity type, the system defaults the code as ‘CIF’.
Actual CIF Details
Here you can capture the CIF details.
Sl No
Specify the serial number. Example: 1, 2, 3, etc.
CIF IDs
Specify the IDs of the CIF members who attended the training.
3.11.2 Viewing Training Details Summary
You can view a summary of trainings using the ‘Training Details Summary’ screen. You can invoke this screen by typing ‘MFSTRMNT’ in the field at the top right corner of the Application tool bar and clicking the adjoining arrow button.

You can query on records based on any or all of the following criteria:
- Authorization Status
- Training Code
- Entity Name
- Record Status
- Date
- Entity Code
Click ‘Search’ button. The system identifies all records satisfying the specified criteria and displays the following details for each one of them: