6. Capturing Additional Details for a Mortgage
This chapter contains the following sections:
- Section 6.1, "Account Details"
- Section 6.2, "Events Diary Details"
- Section 6.3, "Inactive Mortgages"
- Section 6.4, "Mortgage Simulation"
6.1 Account Details
This section contains the following topics:
- Section 6.1.1, "Account Details Screen"
- Section 6.1.2, "Specifying Promotions"
- Section 6.1.3, "Viewing Internal Rate of Return Details"
- Section 6.1.4, "Viewing MIS Details of the Mortgage"
- Section 6.1.5, "Viewing Account GL Balance"
- Section 6.1.6, "Viewing Internal Rate of Return (IRR) Details"
- Section 6.1.7, "Capturing Swift Message Details"
- Section 6.1.8, "Viewing Installment Details"
- Section 6.1.9, "Maintaining Payment Mode Details"
- Section 6.1.10, "Capturing Financial Details"
- Section 6.1.11, "Viewing Account Status "
- Section 6.1.12, "Viewing Security History Details"
6.1.1 Account Details Screen
The buttons on the ‘Account Details’ screen enable you to invoke a number of functions vital to the processing of a Mortgage account.

These buttons have been briefly described below.
Buttons |
Description |
Promotions |
Click this button to capture promotion details |
Other Applicants |
Click this button to capture other applicants details |
Payment Mode Details |
Click this button to capture payment mode details |
Assets |
Click this button to capture asset details |
Financials |
Click this button to capture financial details |
MIS |
Click this button to define MIS details for the Mortgage. |
General Ledger Query |
Click this button to view the GL balances for the various components that are defined for an account. |
Internal Rate of Return Details |
Click this button to view the IRR value for the chosen component for different effective dates. |
Events |
Click this button to view the details of the events and accounting entries that a contract involves. |
Inventory |
Click this button to view installment details |
Swift Msg Details |
Click this button to view the swift message details pertaining to any transaction on the account |
Statistics |
Click this button to view account status details |
Security Details |
Click this button to view security details |
Enter valid inputs into all the mandatory fields or you will not be able to save the mortgage contract. After making the mandatory entries for the Mortgage account, save the account details by either clicking save icon in the toolbar or selecting Save from the Actions menu.
A contract that you have entered should be authorized by a user bearing a different Login ID, before the EOD is run.
Note
You have the option to amend all the unauthorized entries made for a Mortgage. However, after authorization, certain fields cannot be amended.
Click ‘Exit’ or ‘Cancel’ to go back to the Application Browser.
6.1.2 Specifying Promotions
Invoke the ‘Promotions’ screen by clicking the ‘Promotions’ button in the ‘Account Details’ screen.

The following details are captured here:
Promotion Type
The system displays the Promotion type to which the original loan is linked. It could be any of the following:
- CONVENIOS
- PROMOTION
- CORFO
- FOGAPE
Promotion ID
The system displays the promotion ID in this field
Beneficiary
The system displays the beneficiary CIF in this field
Priority
The system displays the priority assigned to the promotion.
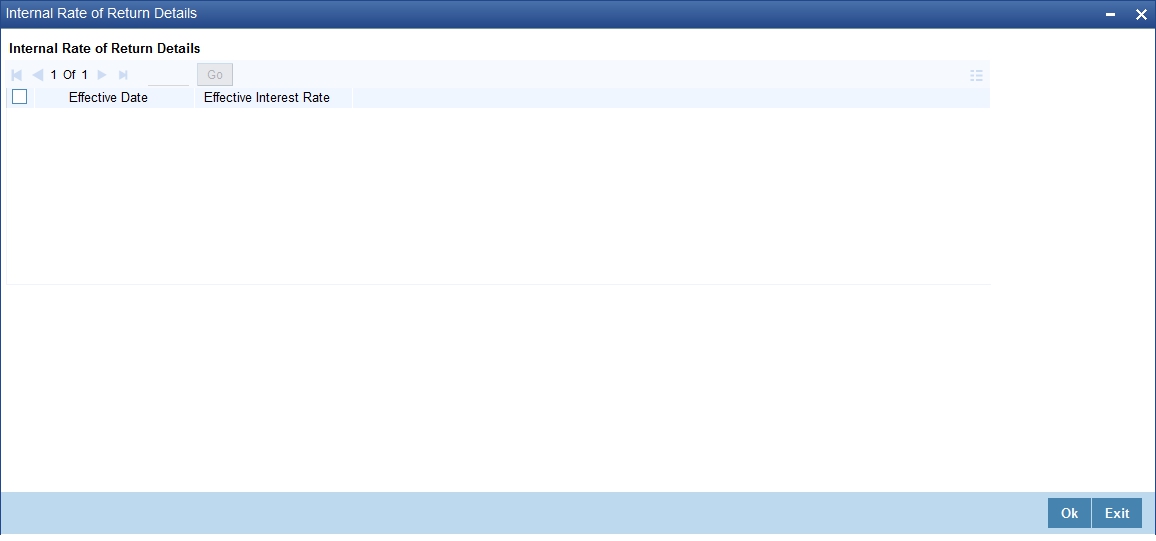
6.1.3 Viewing Internal Rate of Return Details
You can view the internal rate of return details in the ‘Internal Rate of Return Details’ screen. You can invoke this screen by clicking the ‘Internal Rate of Return Details’ button in the ‘Account Details’ screen.
6.1.4 Viewing MIS Details of the Mortgage
Click ‘MIS’ button to view the MIS details screen. This is a view only screen, which provides a MIS details for an account.

For more details on this screen refer section Defining MIS details for an account or contract’ in the chapter ‘Defining MIS Details for a Customer, Account Class, Account, Product, and Contract’ in the ‘Management Information System’ User Manual.
6.1.5 Viewing Account GL Balance
Click ‘General Ledger Query’ button to view the GL details screen. This is a view only screen, which provides a single snapshot of the latest GL balances for the various components that are defined for an account.
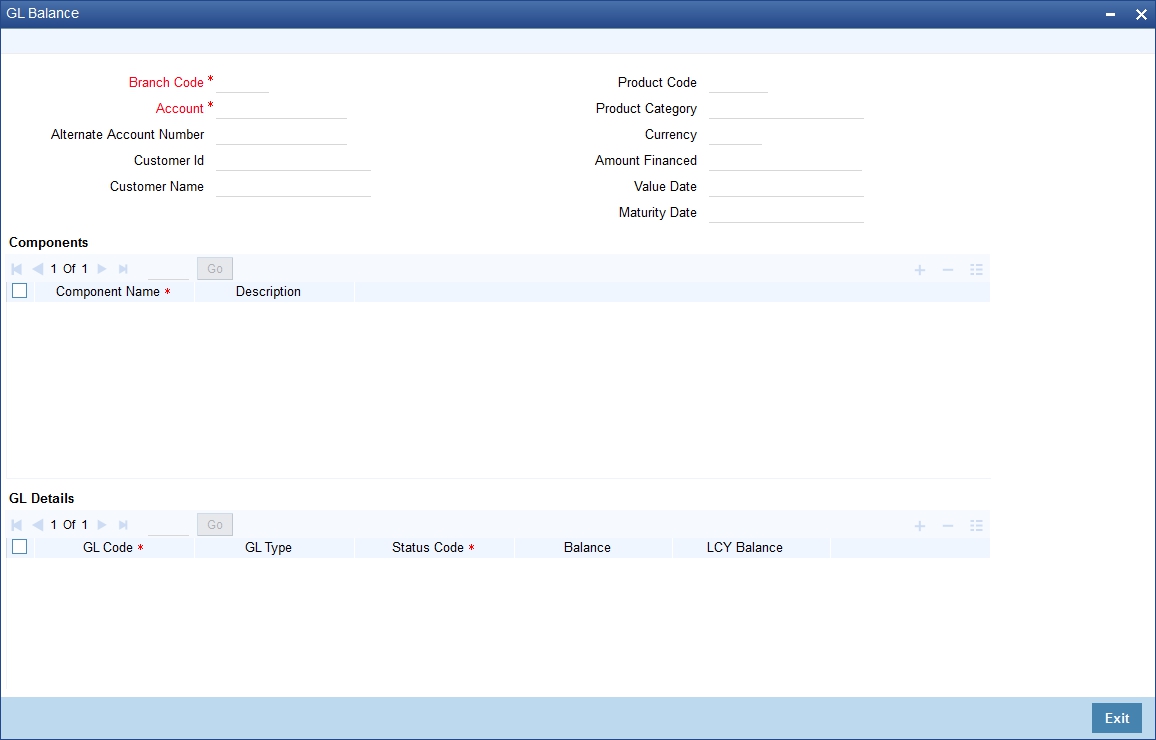
The information displayed includes:
Account Details
- Branch Code: The branch code of the account maintained in the valid tables of consumer lending.
- Account No: Applicant’s account number, which is auto generated if it is so maintained under the branch parameter.
- Alt Account No: Alternate account number of the applicant.
- Customer Id: Applicant’s customer Id
- Product Code: Product code of the product associated with the account, defaulted from Product definition.
- Product Category: The product category availed by the customer.
- Amount Financed: The total mortgage amount
- Currency: Currency in which the transaction will be conducted for the account.
- Value Date: value date for the account.
- Maturity Date: Maturity date for the mortgage account.
Components
- Component Name: Name of the component defined for the product to which the account is linked.
- Description: Component description as defined at the Product level.
GL Details
- GL Code: This is the account head to which the component will be dr / cr. This is defined at the product level.
- Type: GL category as defined in the GL chart of accounts
- Status: GL type as defined in the GL chart of accounts
- Balance: GL balance in terms of the account currency
- Lcy Balance: GL balance in terms of the local currency
6.1.6 Viewing Internal Rate of Return (IRR) Details
Click the ‘Internal Rate of Return Details’ button and invoke the ‘Internal Rate of Return Details’ screen. This screen displays the IRR value for the chosen component for different effective dates. The values are displayed in the descending order of the dates.

The following details are displayed here:
- Effective Date of the interest rate
- The interest rate
6.1.7 Capturing Swift Message Details
You can view the swift message details pertaining to any transaction on the account in the ‘Swift Msg Details’ button.

The following swift message related details can be viewed in the above screen:
- Branch Code
- Account Number
- Split Sequence Number
- Beneficiary Institution
- Sender to Receiver Info
- Message Details
- Payment Details
- Charge Details
- Ordering Institution
- Ordering customer
- Intermediary Reim Institution
- Ultimate Beneficiary
- Beneficiary Institution for Cover
- Receiver Correspondence
- Ace with Institution
- Intermediary
Swift messages are not generated in the following situations:
- Settlement Instructions are not maintained
- Settlement Instructions are maintained but ‘Payment By’ for ‘Pay leg’ is not ‘Message’.
- Settlement Instructions are maintained but the Receiver is not a Bank at the time of saving the account/manual disbursement.
- Settlement Details are changed during manual disbursement to have settlement mode other than CASA.
- The credit settlement account is a GL
- The message is manually suppressed
6.1.8 Viewing Installment Details
Click ‘Installment’ button to access the Installment query screen. The installment query screen displays the details of the installments for the account. The information displayed includes the account details, installment details and the installment summary.
You can invoke the ‘Installment Query’ screen by typing ‘CLDINSQY’ in the field at the top right corner of the Application tool bar and clicking the adjoining arrow button.

The following installment details are displayed:
Account Details
The following account details are displayed:
- Branch Code: The branch code of the account maintained in the valid tables of consumer lending.
- Customer Id: Applicant’s customer Id as maintained in the valid table.
- Account No: Applicant’s account number, which is auto generated if it is so maintained under the branch parameter.
- Alt Account No: Alternate account number of the applicant.
- Application No: The application number of the customer.
- Amount Financed: The total mortgage amount as maintained in the valid table.
- Currency: Currency in which the transaction will be conducted for the account.
- Product Code: Product code of the product associated with the account, defaulted from Product definition.
- Maturity Date: Maturity date for the mortgage account.
- Value Date: value date for the account.
- User Defined Status: the user defined status for the account.
Installment Summary
The following installment summary details are displayed:
- Schedule No: Schedule number of the installment.
- Due Date: Installment due date.
- Currency: currency for the installment.
- Total Amount Due: Total amount due for the installment.
Installment Detail
The following installment details are displayed:
- Component Name: Names of all the components that make up a particular installment.
- Amount Due: Amounts due for each of the components of a particular installment.
- Status: Installment status based on the status maintained at the installment level in the product.
6.1.9 Maintaining Payment Mode Details
The debit and credit settlement mode details for the account can be maintained in the ‘Settlement Details’ screen. You can invoke this screen by clicking the ‘Payment Mode’ button in the ‘Main’ tab.
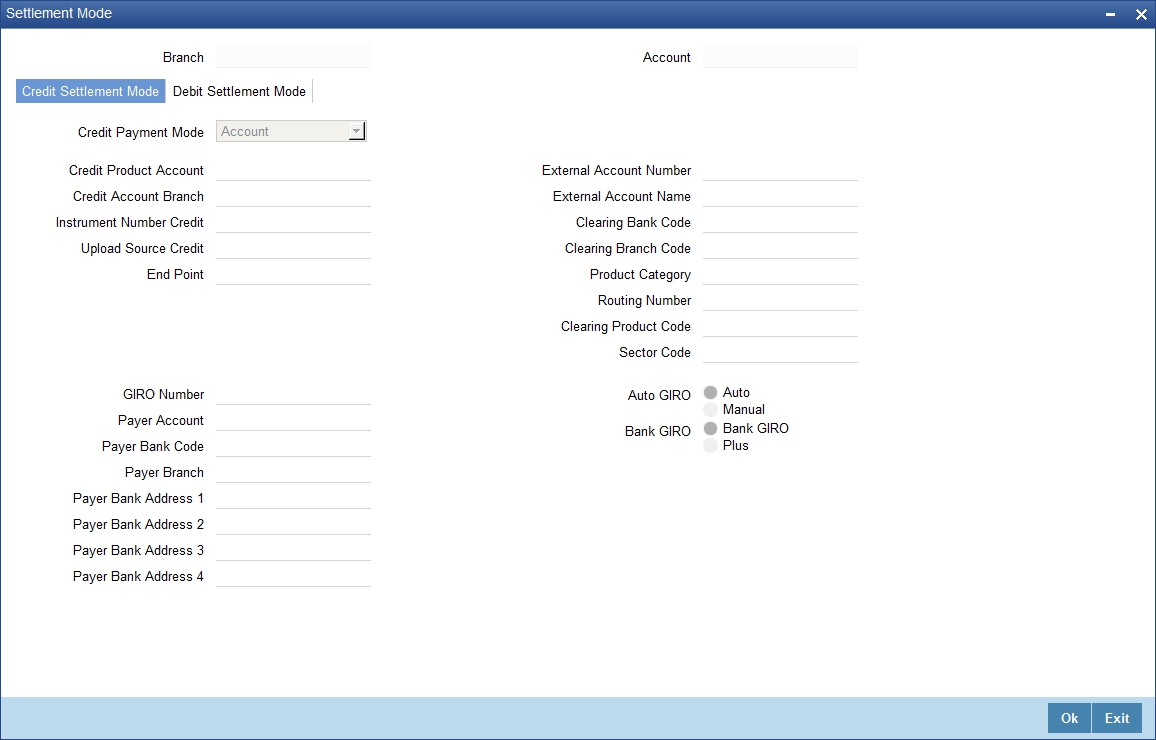
The options for debit mode are CASA, Credit Card, Debit Card, Clearing, External Account, Electronic Pay Order, Internal Check, Instrument, GIRO and Cash/Teller.
The options for credit mode are CASA, Clearing, External Account, Instrument, and Cash/Teller.
You can maintain the following details here:
- CASA:
- Branch: Click the option list to choose the branch in which the customer account resides. Double click on a branch to select it
- Account: Click the option list to choose the account in the branch
selected. Double click on an account to select it. Credit Card / Debit
Card
- Card Number: This field captures either the Credit No or the Debit No details based on the selection
The card must be a valid card whose number can be checked with a modulo logic or maintenance file
- Clearing Network
- Clearing Bank Code: Click the option list to select the bank code as per clearing maintenance. Double click on a bank code to select it
- Clearing Branch Code: Click the option list to select the clearing bank branch. Double click on a branch code to select it
- Instrument No: Enter the number on the instrument presented for clearing in this field. Double click on a value to select it
- Routing No: Enter the routing number of the branch selected for clearing in this field
- Clearing Product Code: Click the option list to choose a product code if the clearing is using an Oracle FLEXCUBE clearing product. Double click on a branch to select it
- End Point: This field picks up the end point maintained in the clearing system
- Sector Code: Click the option list to choose the clearing sector code. Double click on a sector code to select it
- External Account
- Clearing Bank Code: Click the option list to choose the external bank code as per clearing maintenance
- Clearing Branch Code: Click the option list to choose the external bank branch used for clearing
- Ext Acc No: Enter the external account number in this field
- Ext Acc Beneficiary Name: Enter the name of the beneficiary of the external account in this field
- GIRO
- Auto/Manual GIRO – Select Auto GIRO for automatic direct debit or else select Manual
- Bank/Plus GIRO – Select the GIRO clearing system used, which can be either Bank or Plus
- GIRO Number – This is applicable only for corporate customers and not for individual customers. You have to enter the GIRO number
- Payer Bank Name – Specify the name of the bank from which the amount is paid
- Payer Branch - Specify the branch from which the amount is paid
- Payer Account - Specify the account from which the amount is paid
- Payer Bank Address - Specify the address of the bank from which the amount is paid
- Instrument / Cash / Teller
- AC Branch: Click the option list to choose branch where the account is serviced. Double click on a branch to select it
- Product or Account: If the payment mode is Account, this field specifies the CASA / GL account to be debited. If the payment is through Instrument / Cash, it denotes the teller product to be used
6.1.10 Capturing Financial Details
You can capture the income or liability details of the customer in the ‘Financials’ screen. To invoke this screen, click ‘Financials’ in ‘Account Details’ tab of the Account Details screen.
6.1.10.1 Financials Tab
You can specify the following details related to the customer’s income here:

The following details are captured here:
Type
Select the type of the income from the option list provided
Source
Specify the source of the income
Currency
Select the currency associated with the income, from the option list provided
Amount
Specify the amount associated with the income
Comment
Specify any remarks or comments for the income
6.1.10.2 Liability Tab
Here you can specify the following details related to the customer’s liability:

The following details are captured here:
Type
Select the type of the liability from the option list provided
Account Type
Specify the account type associated with the liability
Currency
Select the currency associated with the liability, from the option list provided
Amount
Specify the amount associated with the liability
Frequency
Select the frequency at which payments are made towards the liability. The following options are possible:
- Daily
- Weekly
- Monthly
- Quarterly
- Half Yearly
- Yearly
Balance
Specify the current amount outstanding
Comment
Specify any remarks or comments to be associated with the liability
6.1.10.3 Other Income Tab
You can also capture the details related to other sources of income, if exists.

The following details are captured here:
Seq No
Specify the sequence number here
Type
Specify the type of income here. You can also select the income type from the adjoining option list
Currency
Specify the currency of the income here. You can also select the currency from the adjoining option list
Amount
Specify the amount of income here
Frequency
Select the frequency of the income here from the drop-down list
Click Ok to save the details
6.1.11 Viewing Account Status
You can view the current status of an account in the ‘Account Details’ screen. You can invoke this screen by clicking the ‘Statistics’ button in the ‘Account Details’ screen.
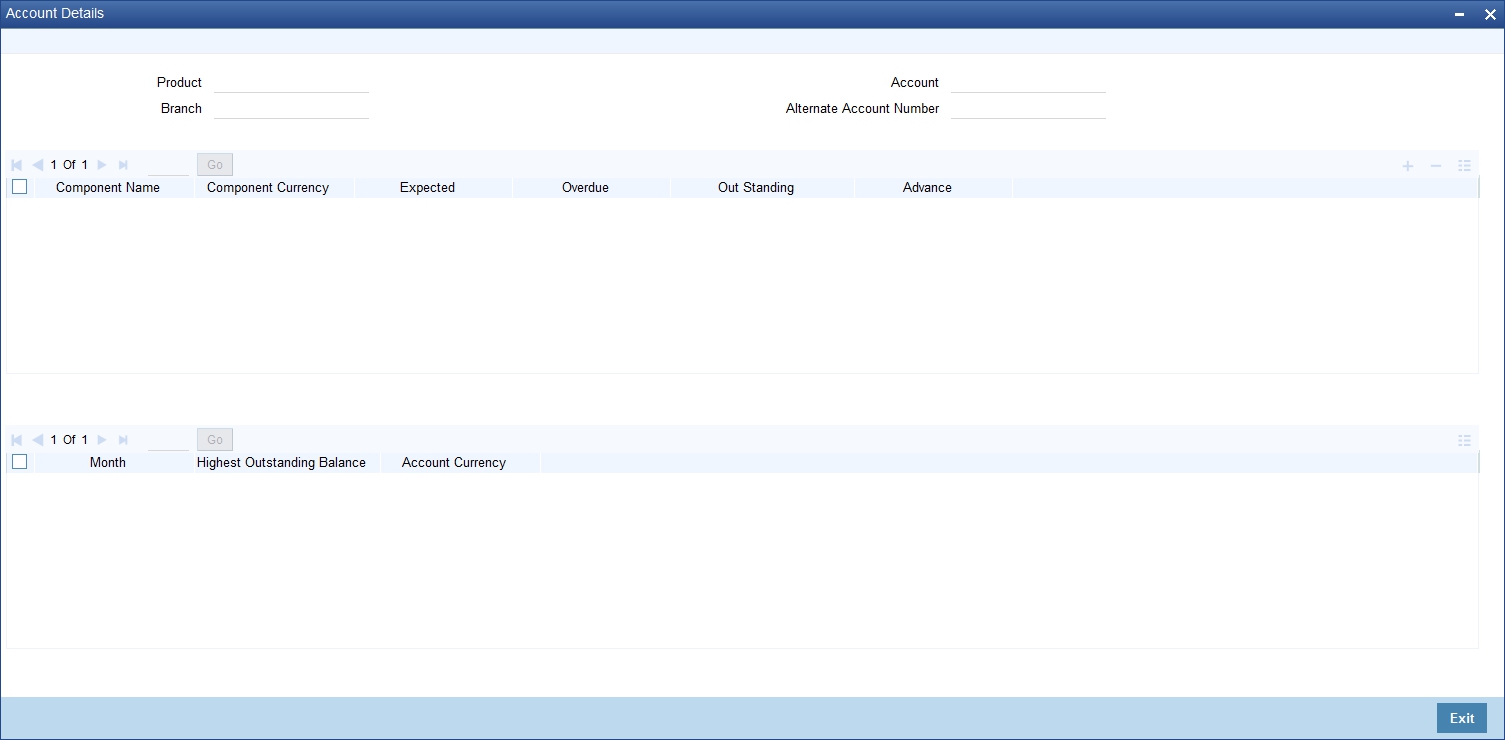
Once you select an Account Number, the system displays the following details pertaining to the current status of the account:
- Component Name
- Expected
- Overdue Amount
- Outstanding Principle
- Advance Amount
- Currency
The Account creation and any other change to an account is updated the audit trail of the record. In the audit trail, the Account status details are also displayed. An Account can be active or uninitiated. Once it is active, it can be reversed, deleted or liquidated based on the operations on it. This is displayed on the screen.
You can view the data collected for the last 12 months including the current month Highest Outstanding balance.
- Month
- Highest Outstanding Balance
- Account Currency
6.1.12 Viewing Security History Details
You can view the securitization details in the ‘Security History Details’ screen. You can invoke this screen by clicking ‘Security Details’ button in the ‘Account Details’ screen.

Here the system displays the securitization details such as Securitization Event, Status, Date and Security Reference Number on which the loan contract has been a part.
6.2 Events Diary Details
This section contains the following topics:
- Section 6.2.1, "Viewing Events Diary Details"
- Section 6.2.2, "Processed Tab"
- Section 6.2.3, "Unprocessed Tab"
- Section 6.2.4, "Querying Account Details"
6.2.1 Viewing Events Diary Details
An ‘event’ may be defined as any action starting from application entry to collections. The ‘Events Diary’ screen captures the details of events applicable to the account. The screen displays both processed and unprocessed events. You can invoke this screen by typing ‘CLDEVTQR’ in the field at the top right corner of the Application tool bar and clicking the adjoining arrow button.
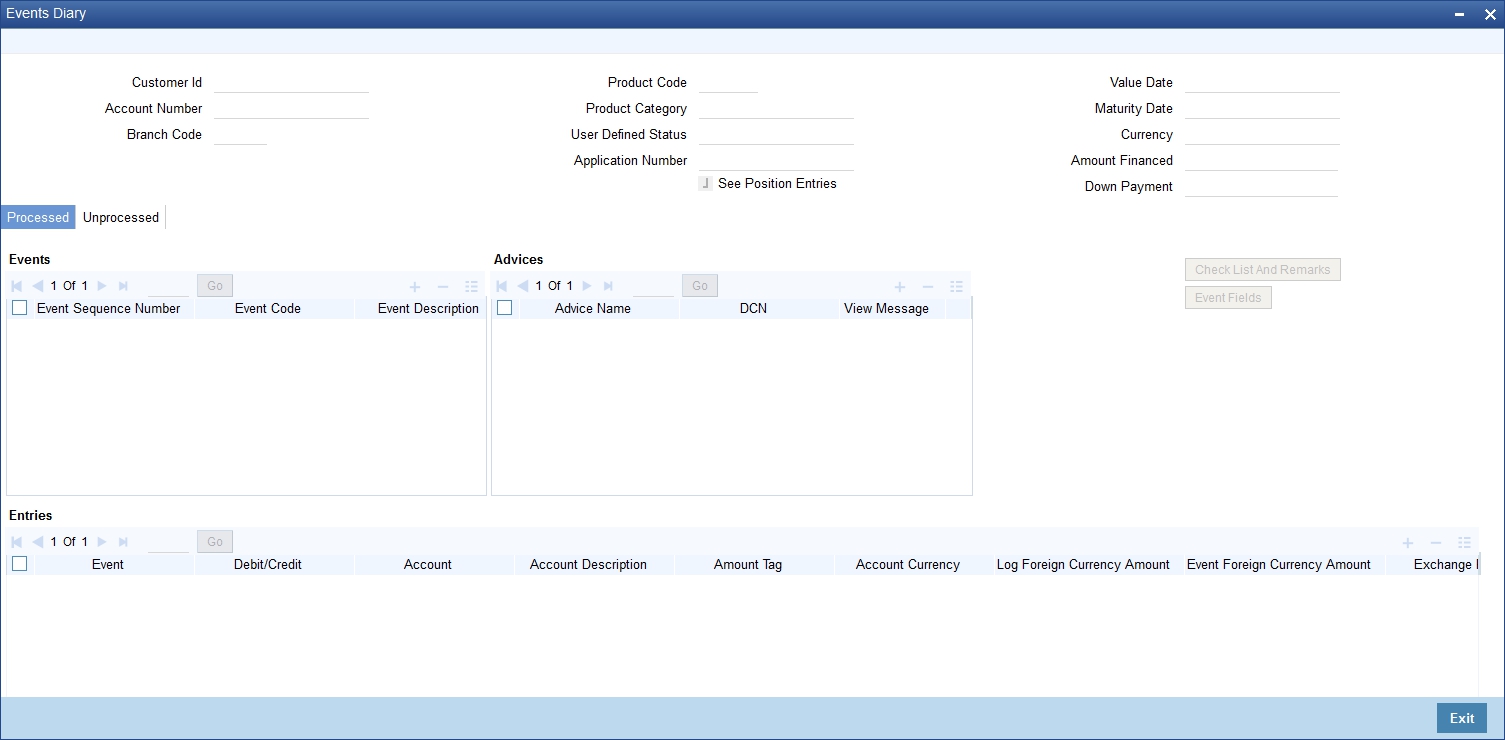
The following details are displayed here:
- Branch Code: The branch code of the account maintained in the valid tables of consumer lending.
- Account No: Applicant’s account number, which is auto generated if it is so maintained under the branch parameter.
- Alt Account No: Alternate account number of the applicant.
- Application Number: The application number captured at the time of mortgage initiation.
- Customer Id: Applicant’s customer Id.
- Product Code: Product code of the product associated with the account, defaulted from Product definition.
- Product Category: The product category availed by the customer.
- Amount Financed: The total mortgage amount.
- Currency: Currency in which the transaction will be conducted for the account.
- Down Payment Amount: The amount paid by the customer upfront. This is used for information only.
- Maturity Date: Maturity date for the mortgage account.
- Value Date: value date for the account.
- User defined status: The user defined status for the account.
6.2.2 Processed Tab
The processed events are all the events which have already taken place. This displays the details like the sequence number of the event. The date on which the event was processed, the value date, the event code, the cutoff status, and a brief description of the event. The screen also displays the details of the events according to the events selected.
The following details are displayed here:
Events
- Sequence No: The sequence number for the account.
- Processed Date: The date on which the event takes place. It is the same as system date.
- Value Date: The value date of the events as maintained in the valid table that is captured during application entry.
- Code: Event code.
- Description: Description for the event occurred.
Advices
- DCN: System generated number for reference.
- Message Type: Type of advice generated for the event. This is applicable only if maintained at the product level for the particular event.
Entries
- Dr/Cr: This field indicates if the event occurring is a Debit or Credit event.
- Branch: The branch in which the event occurred. This is defaulted from the Consumer Lending module.
- Account: The number of the account affected by the event as maintained in the valid table.
- Ccy: The currency involved in the event
- Event Fcy Amt: Foreign currency amount involved with the event, if any
- Exch Rate: Exchange rate associated with the account
- Event Lcy Amt: Local currency amount involved with the event, if any. These events are maintained in the Event entries table.
- Value Date: Value date for the event as maintained in the valid date captured during the application entry.
- Trn Date: Event transaction date. It is same as the system date.
- Entry Fcy Amt: Netted entry log for the foreign currency amount. These values are stored in the daily logs.
- Entry Lcy Amt: Netted entry log for the local currency amount. These values are stored in the daily logs.
- Trn Code: Transaction code
- Amount Tag: Amount tag for the transacted amount
- Event Seq Number: Event sequence number
- Event: Event name and identifier
- GAAP indicator: Generally Accepted Accounting Principles (GAAP) applicable for the accounting entry
The following details are displayed under “Accounting Under Process”:
- Event
- Branch
- Account
- Dr/Cr
- Amount Tag
- Account Ccy
- Foreign Currency Amount
- Rate
- Local Currency Amount
- Date
- Value Date
- Txn Code
6.2.2.1 Viewing Event Checklist
Event checklist is a list of items that pops up when an online function is triggered.

6.2.2.2 Archiving Processed Events
You can archive processed records from the events diary using the ‘Retail Lending - Bank Parameters’ screen.
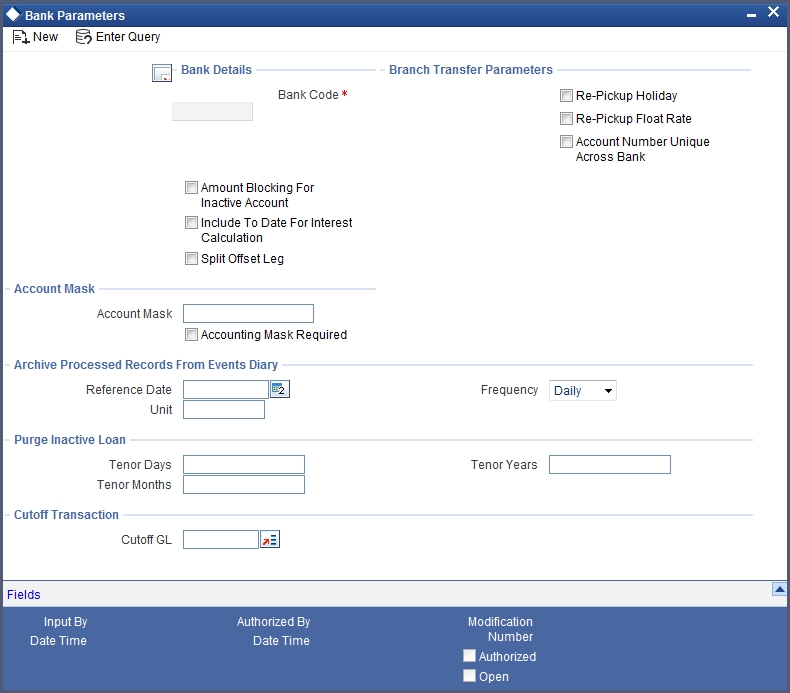
In this screen, you can specify the following parameters to archive processed events:
Reference Date
This is the first date on which the archival will be initiated. If this date is NULL, no archival will be done.
Frequency
This is the frequency for archival. The options in the drop down list are:
- Daily
- Monthly
- Yearly
Unit
This is a numeric value. Let us suppose you select the frequency as Daily and Unit as 5. In this case archival will be done every 5th day.
A batch process will execute the archival by end of day. However, if you do not specify the parameters, archival will not be executed.
Note
A batch process will execute the archival by end of day. However, if you do not specify the above parameters, archival will not be executed.
6.2.3 Unprocessed Tab
The Unprocessed event screen has all the details of the overdue and the Due events for the account.

The following details are displayed:
Overdue Events
An event which has crossed the due date becomes an overdue event. The number of days after the due date is used by the bank to calculate penalty for the event.
The following Overdue event details are displayed:
- Code: Unique event code
- Date: Date on which event occurred
- Description: Brief event description
Components
Component name: Name of the component affected by the event.
Due Events
The date on which the event is supposed to take place is the due date of the event. In case of repayments, the customer is informed by the bank regarding the due date.
The following details are displayed:
Due Events
- Code: Unique event code.
- Date: Date on which event occurred.
- Description: Brief event description.
Components
Component name: Name of the component affected by the event.
6.2.4 Querying Account Details
Oracle FLEXCUBE allows you to query the following account related details:
- A particular or all accounts of a customer – This is done using the ‘Customer Summary Query’ screen. The records are displayed product wise, module wise, accounting class wise and also based on external account types. You can narrow down the query by double clicking on a record and navigating to its account details.
- Accounting entries for a mortgage account – This is done using the ‘Customer Account Transaction Query’ screen.
- The liability details of a customer or an account or the details of a transaction involving a particular limit line – This is done using the ‘Liability Query’ screen.
6.3 Inactive Mortgages
This section contains the following topics:
- Section 6.3.1, "Processing Inactive Mortgages"
- Section 6.3.2, "Operations on Inactive Mortgages"
- Section 6.3.3, "Viewing Mortgage Inactive Accounts Summary"
6.3.1 Processing Inactive Mortgages
During Mortgage processing, it is required to capture mortgage details and not initiate till verification of documents, etc. This module creates a mortgage account in an inactive state. Inactive mortgages are input by a separate screen similar to the Accounts screen or by Uploads. After manual verification the account is entered as an inactive account. The account is activated once the requisite documents are received.
To invoke this screen, type ‘MODINADT’ in the field at the top right corner of the Application tool bar and click the adjoining arrow button.
The system captures the following details and generates an inactive account:
- Mortgage Reference Number
- Schedule Dates
- Charges
- Installment Amounts
Modifications are allowed on inactive mortgages even after authorisation and there are no restrictions on inactive mortgages modifications. Mortgage details are handed off to other systems. Messages such as Mortgage advice or Promissory Notes can also be generated.
6.3.2 Operations on Inactive Mortgages
It is possible to modify an inactive mortgage and save it even after authorisation. When the account is activated it will be an unauthorized account and behaves like an account directly created /uploaded into the system. It is possible to delete the same too. The user can change all mortgage account properties.
Click ‘Active Account’ button to activate the mortgage. This changes the funded status of the mortgage. Once activated, the account cannot be deleted after authorisation and cannot be unlocked after one save.
Accounting entries and limit updates are not called when the mortgage is inactive. Accounts queries do not display inactive accounts and Inactive accounts views do not show active accounts.
If an account is created after its value date, it behaves as a Back valued mortgage entry. If it is created after its maturity date, it behaves like an overdue account.
Inactive mortgages are created with a sequence that is different from the account mask maintained. Upon activation, the account mask is used to create a new account. Hence the account number of an activated account differs from its inactive version.
6.3.2.1 Activating Mortgages and Limit Earmarking
Inactive mortgages are activated by clicking on Activate Account button or through an upload. Upon mortgage activation, Limits Utilizations are updated. Accounting entries are passed for disbursement and for any upfront changes as defined in the product.
The earmarked amount field shows the total earmarking and an earmarking reference number is captured. Upon the actual mortgage initiation, utilization is made on the line and real entries passed.
6.3.2.2 Deleting Inactive Mortgage
Inactive mortgages can be deleted even after the authorisation of Inactive mortgage account. In Bank Parameters, Site specific parameters are provided to control the automatic deletion of Inactive mortgages. An Inactive Mortgage processing supports this deletion.
6.3.3 Viewing Mortgage Inactive Accounts Summary
You can view a summary of all Mortgage Inactive Accounts, through the ‘Mortgage Inactive Accounts Summary’ screen. You can invoke this screen by typing ‘MOSINADT’ in the field at the top right corner of the Application tool bar and clicking the adjoining arrow button.:

You can query based on all or any of the following criteria
- Account Number
- Customer Id
- Value Date
- Amount Financed
- User Defined Status
- Account Status
- Branch
- Product Code
- Maturity Date
- Currency
- Alternate Account Number
- Authorization Status
Click ‘Search’ button. The system identifies all records satisfying the specified criteria and displays the following details for each one of them:
- Account Number
- Branch
- Customer Id
- Product Code
- Value Date
- Maturity Date
- Amount Financed
- Currency
- User Defined Status
- Alternate Account
6.4 Mortgage Simulation
You can simulate mortgages to answer customer queries especially for new mortgages and pre-paid mortgages. The payment schedules of any type of Mortgage Products can be generated while negotiating with clients during the Presale stage.
This section contains the following topics:
6.4.1 Simulating a Mortgage
You can use the ‘Account Simulation’ screen to simulate a mortgage. This screen is similar to the Account Details screen. You can invoke this screen by typing ‘MODSIMDT’ in the field at the top right corner of the Application tool bar and clicking on the adjoining arrow button.
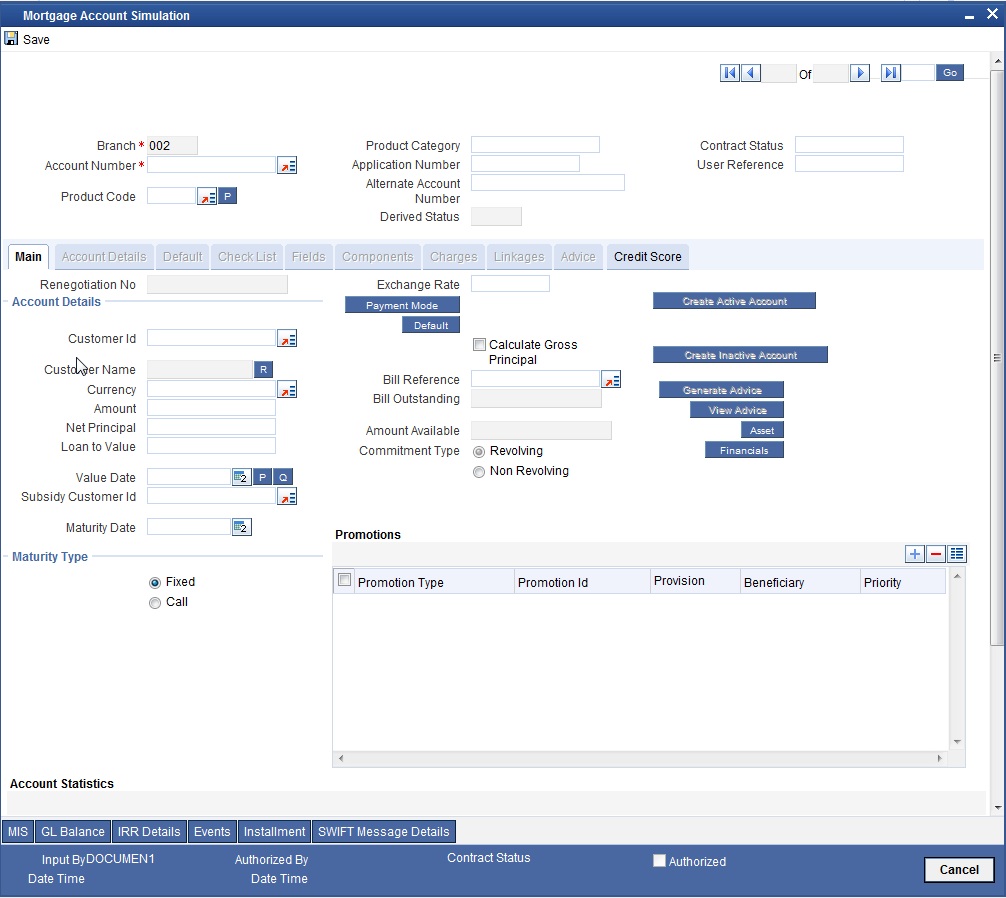
Simulation will function in exactly the same way as a regular mortgage input. All warnings and overrides associated with an actual contract save will come in a simulation. For example, if the mortgage results in the overdrawing of the customer’s mortgage line, then an Override is thrown up. However, no data will be stored in Oracle FLEXCUBE.
Click ‘Create Active Account’ button to create a mortgage directly from the simulator. Only users with rights to invoke Oracle FLEXCUBE mortgage creation function will be allowed to create mortgages from the simulation function. The sequence of the Mortgage account thus created is based on the branch level account mask maintained.
Similarly, click ‘Create Active Account’ button to actually create an inactive account based on the simulated data.
A separate Sequence number is provided to create reference numbers for Simulations. These are one time reference numbers for simulation purposes only and are not used for final mortgage. The User Defined Reference Number facility of Oracle FLEXCUBE is used to create Mortgage Simulation Sequences.
If the simulator is launched from Oracle FLEXCUBE, simulations can be run several times to examine the impact of different parameters on the mortgage. If the simulator is invoked from a channel, all parameters should be specified afresh for each invocation.
Mortgage advices can be printed from the screen based on the mortgage account simulated. This is allowed for mortgage accounts created in the system prior to their being initiated. Subsequently, advices configured through the events screen will be triggered.
6.4.2 Simulating a Commitment
You can use the ‘Commitment Simulation’ screen to simulate a Commitment. You can invoke this screen by typing ‘MODSCOMT’ in the field at the top right corner of the Application tool bar and clicking on the adjoining arrow button.

Note
Create Active account and Create Inactive account buttons are disabled for commitment simulation.
For field explanations on all tabs except Commitment tab refer section ‘Creating a Mortgage Account’ in this chapter.
For Commitment tab details refer section ‘Viewing Commitment Details’ in the ‘Account Creation’ chapter.