3. Maintaining Messaging Branch Preferences
The messaging preferences that you indicate for your branch will govern the workflow aspects of the messaging system module. You can specify messaging preferences for your branch in the ‘Messaging Branch Preferences’ screen. In this screen you can indicate:
- The number of days for which outgoing messages should be kept in the browser
- Whether a test word is required for telex messages
- The activities on a message that require authorization
- The PDE Functional Validation / archive period
- The Text for hold mail and duplicate check
Note
You can specify preferences only for the branch from which you logged onto Oracle FLEXCUBE.
This chapter contains the following sections:
- Section 3.1, "Messaging Branch Parameters Maintenance"
- Section 3.2, "Message Type Maintenance"
- Section 3.3, "Swift Tag Maintenance"
- Section 3.4, "Message Preview"
- Section 3.5, "PDE Validations on SWIFT Messages"
- Section 3.6, "Agreement with Sender/Receiver BIC"
3.1 Messaging Branch Parameters Maintenance
This section contains the following topic:
3.1.1 Invoking Messaging Branch Parameters Maintenance screen
To invoke the ‘Messaging Branch Parameters Maintenance’ screen, type ‘MSDPREF’ in the field at the top right corner of the Application tool bar and click the adjoining arrow button.
If you are maintaining preferences for a new branch of your bank, click the ‘New’ button on the Application toolbar. The ‘Messaging Branch Parameters Maintenance’ screen is displayed without any details.
If you are calling a branch preference record that has already been defined, double-click a record of your choice from the summary screen. In the ‘Summary’ screen, all the branch preference records that you have entered will be displayed in a tabular form.
The screen is shown below:

Branch Preference
In the ‘Messaging Branch Parameters Maintenance’ screen you can only maintain (create or modify) the preferences for the current logged in branch. However, you can view the preferences maintained for other branches.
Following are the details captured here:
Branch
Specify the branch for which you are maintaining the preferences.
Message Archive Period
Archival is the process of storing old messages for future retrieval. You can specify the number of days for which an outgoing message should be kept in the Outgoing Message Browser.
A message will be automatically archived after the number of days that you specify. You can un-archive the details of outgoing message that has been archived by invoking the ‘Message History Retrieval’ screen. After you un-archive an outgoing message you can process it just as you would any other outgoing message.
Note
It is recommended that you indicate a value of ‘one’ in this field. In this case, only those messages that have been triggered for generation today will be displayed in the Outgoing Message Browser.
PDE Archive Period
Specify the number of days for which messages should be kept in the queue for PDE Possible Duplicate Emission) identification. System does not consider messages for PDE identification post the PDE archive period maintained here.
Note
The PDE archive period should be less than or equal to message archival days.
Text for Duplicate
Every message is maintained in the Outgoing Browser, as an un-generated copy of the original. When the copy is generated, it will contain, along with the contents of the original message, any additional text that you have maintained in the Text for Duplicate field.
Hold Mail Text
All the mail advices generated for a customer for whom ‘Add Hold Mail Text’ is checked at the Customer Address Maintenance would have the hold mail text maintained in this field. This text will be displayed on top of the message.
Test Word Check
You can indicate whether a testword needs to be entered before a telex message is generated from and received at your branch. You can state your preference from the Yes/No option that is available.
PDE Functional Validation
Check this box to indicate that system should identify an outgoing message as PDE (Possible Duplicate Emission) using functional key or not.
The PDE validation is done either using the hash value of the SWIFT message or using the tag/field value of the message. If this option is checked, Oracle FLEXCUBE identifies duplicate messages by performing PDE functional validations also. Hash value based validation shall be done irrespective of this option being checked.
Indicating the activities that require authorization
You can perform several activities on a message that is to be generated from your branch and on those that have come in for your branch. For example, from the outgoing or incoming browser, you can change the address to which a message should be sent.
In the branch preferences screen, you can indicate the activities which when performed on an incoming or outgoing message, would require subsequent manual authorization for the message. Several activities have been listed in this screen. A message, on which an activity which has been selected in this screen is performed, would require subsequent manual authorization for the activity to take effect. A message, on which an activity not selected in this screen is performed, would be automatically authorized with the activity taking effect.
The activities that you can choose from are:
- Cancel
- Hold
- Change Node
- Testword
- Auth Repair Incoming
- Carry Forward
- Change Media
- Regenerate
- Regenerate
- Change Address
- Reinstate
- Release
- Carried Forward
- Branch Move
- Change Media
- Change Priority
- Testword Check
- Auth Repair Incoming
A message on which you perform an activity that requires authorization will be available for further processing only after it is authorized.
SK Arrangement
You can choose the action to be performed on the message based on the Swift Key arrangement with the receiver. The options available for choosing are:
- Validate – If you choose this option, the system validates if a SK arrangement exists between your bank and the receiver. If Yes, then the original SWIFT message is generated otherwise, the message will go to repair.
- Generate FFT- If you choose this option, the system validates if a SK arrangement exists between your bank and the receiver. If Yes, then the original SWIFT message is generated otherwise, MT 999 (Free Format Messages) will be generated instead of the SWIFT message.
- No Validation- If you choose this option, you are instructing the system not to Validate but send the original SWIFT message always.
Processing SWIFT Messages if SK arrangement is ‘Validate’ in the static messaging table:
- Oracle FLEXCUBE checks for the value in the branch’s SK arrangement Field
- If the field value is ‘No validate’, Oracle FLEXCUBE will generate messages the normal way.
- If the SWIFT keys have been exchanged then the swift message will be generated
- If SWIFT keys have not been exchanged with the receiver and the value of SK arrangement for the branch is ‘Validate’ then the following messages will go to repair: MT420, MT754 and MT756. For all other messages, the original SWIFT message gets generated whether swift key exists or not.
- If SWIFT keys have not been exchanged with the receiver and the value of SK arrangement for the branch is ‘Generate FFT’ then the message MT999 would be generated instead of original SWIFT message.
Duplicate Advice Tracker
Check this box to track the duplicate advices. When an advice is duplicated or regenerated,
the word ‘Reprint’ appears over the advice.Generation of MT999
- Message header is changed from the original header to MT999
- That portion of the message after tag 21 will be prefixed with tag 79 followed by the original SWIFT message
- The message will be populated with the same contents as the original SWIFT message with the respective SWIFT tags
- The system will generate MT999 even if the SWIFT Key Arrangement
does not exist with the receiver. MT999 will be generated for the following
SWIFT messages:
- MT750 – Advice of Discrepancy
- MT734 – Advice of Refusal
- MT752 – Authorization to pay, accept or Negotiate
Saving the record
After you have made the mandatory entries, save the record. This record should be authorized before the End of Day process (EOD) is run.
Click ‘Exit’ or ‘Cancel’ button to return to the Application Browser.
3.2 Message Type Maintenance
This section contains the following topic:
3.2.1 Maintaining Message Types
You can maintain message types in Oracle FLEXCUBE through the ‘Message Type Maintenance’ screen. To invoke ‘Message Type Maintenance’ screen, type ‘MSDMSTYM’ in the field at the top right corner of the Application tool bar and click the adjoining arrow button.

You will need to capture the following information in this screen:
Module
Specify the module for which you are maintaining message types. The adjoining option list displays all module codes available in Oracle FLEXCUBE. You can select the appropriate one.
Message Type
Specify the message type for which SWIFT codes can be maintained.
Description
Enter a brief description of the message type.
Priority
Specify the priority in which a message is to be sent is displayed. You have the option to change the priority. To change the priority specified for a message, click the button marked ‘Change Priority’. Thereafter, select an option from the option-list that is available for this field.
SWIFT Message Type
Indicate the SWIFT message type in which the free format message should expressed. For the following message types in BC module, you need to indicate the SWIFT message type as MT999:
- DISCREPANCY_REQ
- ACCEPT_REFUSAL
- DISCREPANCY_AUT
Generate at input
Check this box to indicate that this message is to be generated at the time of input of the contract, and not after authorization.
Show in product
Check this box to indicate that this message will be available in the product to be maintained against a particular event.
3.2.1.1 Viewing Message/Advice
Select a message/ advice and click ‘View’ button to view the complete message/advice. The system will display the following details in a new window..
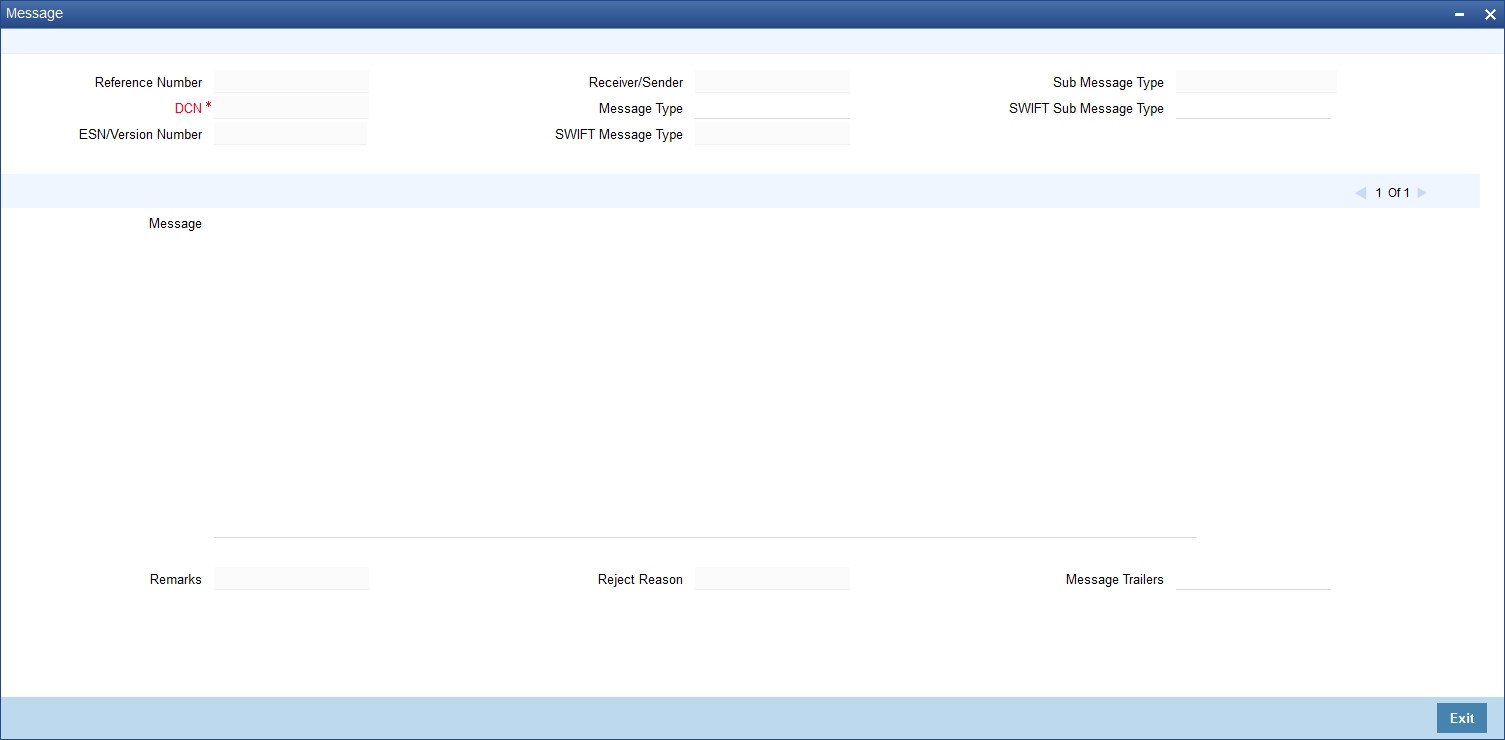
You can view the following details:
- Reference number of the message/advice
- Document number generated for the message/advice
- Version number of the message/advice
- Receiver/sender of the message
- Type of the message
- Type of the SWIFT message
- Complete text of the message/advice
- Remarks, if any
- Reject reason, if any
- Message trailer
3.3 Swift Tag Maintenance
This section contains the following topic:
3.3.1 Querying for SWIFT Message Tag Description
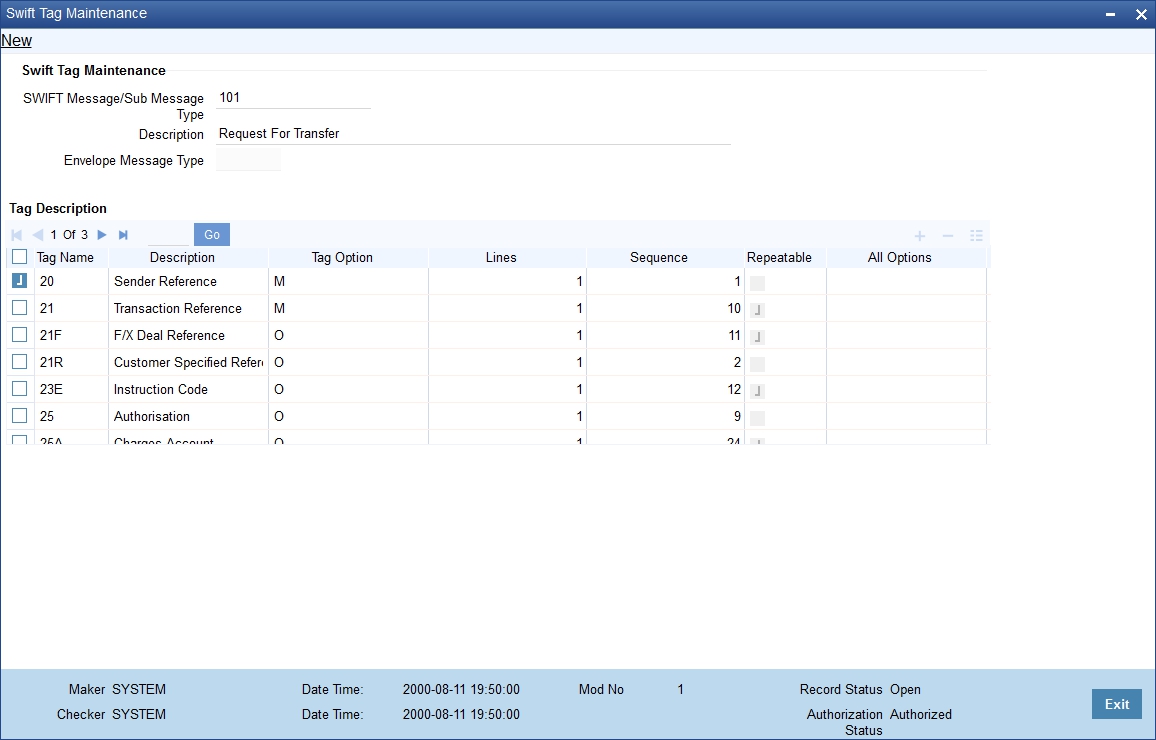
You can query for tag descriptions for SWIFT messages using the screen ‘Swift Tag Maintenance’ screen. You can invoke the screen by typing ‘MSDMSGTM’ in the field at the top right corner of the Application tool bar and click the adjoining arrow button.
The screen is as shown below:
Specify the following fields:
Swift Tag Maintenance
Swift Message/Sub Message Type
Specify the swift message/sub message type. The adjoining list displays a list of message types maintained in the system. Choose the appropriate one.
Description
The system displays the message description.
Envelope Message Type
The system displays envelope message type based on the message/sub-message type selected.
Tag Description
Tag Name
The system displays the tag name.
Description
The system displays the description.
Tag Option
Displays whether the tag is optional (O) or mandatory (M).
Lines
The system displays the number of lines required for the tag.
Sequence
The system displays the tag sequence number.
Repeatable
Indicates whether the tag is repeatable or not.
All Options
Indicates all options.
Sequence Name
Specify the sequence number.
Note
Swift message tag descriptions are factory shipped. However, it can also be maintained using this screen.
3.4 Message Preview
This section contains the following topics:
- Section 3.4.1, "Viewing SWIFT Message Tags"
- Section 3.4.2, "Print Button"
- Section 3.4.3, "Maintaining Message Type for Account Opening"
3.4.1 Viewing SWIFT Message Tags
You can view the SWIFT messages and tag descriptions using the ‘Message Preview Browser’ screen. You can invoke this screen by typing ‘MSDMSPRV’ in the field at the top right corner of the Application tool bar and click the adjoining arrow button.

You can search for the messages based on the following parameters:
Module
Specify the module. The adjoining list displays a list of module names maintained in the system. Choose the appropriate one. This is applicable only for the following modules:
- LC
- BC
- MS
- LI
- IB
Contract Reference
Specify the contract reference number. The adjoining list displays a list of reference numbers maintained in the system. Choose the appropriate one.
Once you have set the search parameters, click ‘Execute Query’ button. The system displays the messages that satisfy the search criteria.
When you click ‘Search’ button the records matching the specified search criteria are displayed. For each record fetched by the system based on your query criteria, the following details are displayed:
- Document Number
- Message Type
- Sub Message Type
- Receiver
- Name
- Media
- Sub Message Type
- SWIFT Sub Message Type
- Message Type
Note
Payment messages generated by External Payment system will not be shown in Message Preview Browser screen.
3.4.2 Print Button
From the ‘Message Preview’ screen, you can print a message/advice using the ‘Print’ button. Select the message/advice and click ‘Print’ button to print the message.
3.4.3 Maintaining Message Type for Account Opening
You can maintain a specific message type to be associated with account opening event class.
The Events Class Maintenance screen is as shown below:
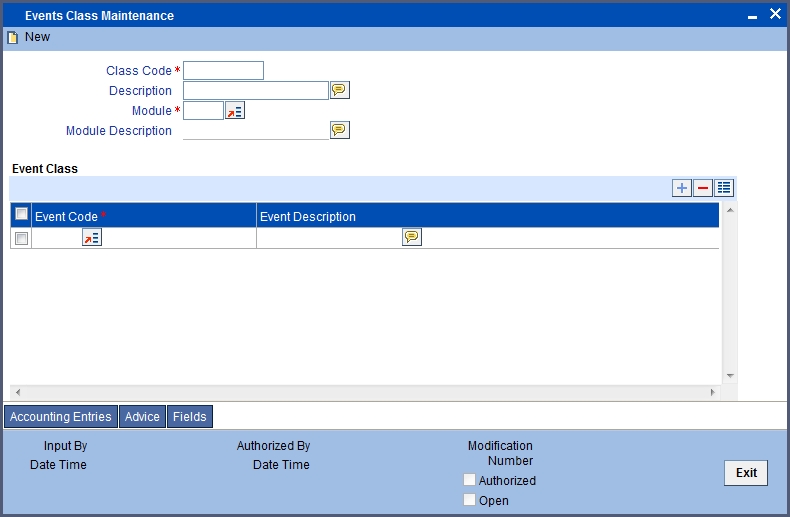
Specify the following details.
Module
Specify the module as ‘DE’.
Message Type
Specify as ‘ACC_OPADV’.
For further details, refer the section ‘Maintaining Message Types’ in this User Manual.
You can specify a format for this message using the ‘Advice Format Maintenance’ screen. Then you can associate this message to the event class maintained for account opening.
Refer the chapter Maintaining Advice Formats in this User Manual for details about format maintenance.
3.5 PDE Validations on SWIFT Messages
This section contains the following topics:
3.5.1 Processing PDE Messages
The system detects the messages (Incoming/Outgoing) as PDE messages by performing the validations discussed in the above section. The Incoming and Outgoing PDE messages are processed by the system in the following manner:
3.5.1.1 Incoming PDE Messages
In the case of incoming messages, EMS picks up the incoming messages and inserts it into a data store. If the incoming message has a PDE trailer (message contains the text ‘PDE:’} then the system will mark the process status as ‘Stopped due to PDE’. After due validations, you can release the message from the incoming PDE message queue. Once these messages are accepted it will continue to get uploaded as a normal message. If the PDE trailer is NOT present in the incoming message, then the message upload will continue as normal.
In the case of incoming messages with a PDE trailer, the ‘PDE Flag’ check box in the ‘Incoming Message Browser’ screen will be checked.
For more details on the PDE indication of an incoming message in the Incoming Message Browser, refer section ‘Viewing the details of an Incoming Message’ in ‘Processing Incoming Messages’ chapter of this User Manual.
3.5.1.2 Outgoing PDE Messages
In the case of outgoing messages you can decide to do any of the following if the system detects a message as a duplicate, based on the PDE validations:
- Auto release the message with the PDE trailer
- Release the message without the PDE trailer
- Reject the message
System displays an override when it finds a message to be a duplicate one. In this case the message is parked in the PDE queue and you can either opt to release the message without the PDE trailer or else release it with the PDE trailer. If you opt to release the message with the PDE trailer then the message is appended with PDE, else the message is released without PDE. You can also choose to reject the message. In this case the message status will be changed to ‘E’ (Exception) and this will not be picked up by EMS (Electronic Messaging System).
Due to message size restrictions in Oracle FLEXCUBE, sometimes a single message is physically split into multiple parts and each one is stored in a distinct record in the outgoing message data store. A message is marked as ‘PDE’ if ALL the split messages are found to be duplicates.
Note
All the messages in the PDE queue (Incoming and Outgoing) are completely processed by EMS prior to initiating EOD operations.
For more details on outgoing messages in PDE queue refer section ‘Processing Outgoing Messages with PDE Trailer’ in ‘Processing Outgoing Messages’ chapter of this User Manual.
3.6 Agreement with Sender/Receiver BIC
This section contains the following topic:
3.6.1 Maintaining Agreements with Sender/Receiver BIC
You can maintain agreement with the sender/receiver BIC through the ‘Agreements with Sender/Receiver BIC Maintenance’ screen. You can invoke the ‘Agreements with Sender/Receiver BIC Maintenance’ screen by typing ‘ISDCCYRS’ in the field at the top right corner of the Application tool bar and clicking the adjoining arrow button.

You need to capture the following information in this screen:
BIC Code
Specify the BIC code. The value entered here must be a valid BIC code in the system with the options Generate MT102, Generate MT102+ and Generate 101 selected.
Message Type
Select the message type from the option list.
- MT101
- MT102
- MT102+
Direction
Indicate whether the BIC-currencies amount maintenance is for incoming or outgoing or both type of messages. You have the following options here.
- Incoming
- Outgoing
- Both
Product for Consol Debt
Specify the product for consolidated debit entry to ordering customer. This can be specified for incoming MT101.
No. of Transactions per Message
Specify the total number of transactions for each message (MT101).
Cutoff Incoming
Specify the cutoff time in hours and minutes for the incoming messages.
Cutoff Outing
Specify the cutoff time in hours and minutes for the outgoing messages.
Transaction Currency Limit Details
The details displayed here depend on the direction specified. They are used for MT101, MT102 and MT102+.
- If the direction is Incoming, these fields indicate the transaction limit for individual transactions in the incoming message.
- If the direction is Outgoing, these fields indicate the transaction limit for individual transactions in the outgoing message.
- If the direction is Both, these fields indicate the transaction limit for individual transactions in the outgoing and incoming message.
Incoming MT101
If the message is an incoming MT101, on receiving the message the following checks will be made before uploading the transactions.
- If the Sender has an agreement for Incoming MT101.
- If the Cut-off time for Incoming MT101 for the receiver has not passed.
- Check for the Transaction currency & Transaction amount limit.
- Check for the debit authority of the Instructing party, in case the instructing party is different than the ordering customer
3.7 Lead Bank Maintenance
This section contains the following topics:
3.7.1 Maintaining Lead Bank Details
You can process messages from Lead Bank and send notifications messages to Lead Bank. Lead Bank can have multiple Corporate Customers linked.
You can invoke ‘Lead Bank Maintenance’ screen by typing ‘MSDLBKMT’ in the field at the top right corner of the application tool bar and clicking on the adjoining arrow button.You can capture the Lead Bank mapping for corporate customers in this screen.

Specify the following details in the screen:
Lead Bank BIC
This field displays the customer name from the BIC Directory.
Customer Number
The system displays the customer number.
Lead Bank Customer Mapping
Customer No
Select the corporate customer party ID from the list of variables provided.
Customer Name
The system displays the customer name.