2. Relationship Manager
Relationship Managers (RM) are contact points at the bank for the customers. They handle initial customer contacts and ensure that the appropriate suite of products and solutions are offered to the customers. Relationship managers also develop an understanding of customers’ day-to-day administrative and business activities and communicate the same to the front office and back office team.
Using Oracle FLEXCUBE, you can designate a customer or a group of customers to an RM. The RM will be responsible for helping the customers designated to him/her in need.
This chapter contains the following sections:
- Section 2.1, "User Maintenance"
- Section 2.2, "RM Hierarchy Mapping"
- Section 2.3, "RM Mass Amendment"
- Section 2.3.1, "Changing Relationship Managers in Bulk"
2.1 User Maintenance
This section contains the following topics:
2.1.1 Invoking User Maintenance Screen
Invoking User Maintenance Screen User Profile defines the activities that a user can carry out on the system. In Oracle FLEXCUBE, you can define user profiles with their role as ‘Relationship Manager’. This section explains the process of defining a user profile with RM role.
To invoke the ‘User Maintenance’ screen, type ‘SMDUSRDF’ in the field at the top right corner of the Application tool bar and click the adjoining arrow button.

For more information on maintaining user profiles in Oracle FLEXCUBE, refer to the section ‘Defining a User Profile’ in Security Management System user manual.
User Identification
Specify the user ID. This ID identifies the user whose profile you are defining. In a user ID, you can use alphabets in upper or lower case, numbers 0 to 9 and _ (underscore).
The number of characters in a User ID should be greater than or equal to six and less than 12.
Name
Specify the name of the user.
Supervisor Identification
Specify the ID of the supervisor of the user. The option list displays all valid supervisor identifications maintained in the system. Choose the appropriate one.
In case of relationship managers, you can also use this field to define the RM hierarchy. For defining RM hierarchy in this method, you need to select the RM user who is one level up in the hierarchical order as the supervisor.
If the user is the superior in the RM hierarchical order, you can specify his/her own user ID as supervisor ID. The supervisor ID option list also shows the user ID of the user being maintained. This means, you can define an RM user as his/her own supervisor.
Note
The RM hierarchy defined in this method is considered only if the checkbox ‘RM Hierarchy Setup Required’ is not checked in ‘Bank Parameters Maintenance’ screen.
Supervisor Name
Based on the supervisor ID selected, the system displays the name of the supervisor.
Other RM Customer Access Restricted
You can restrict the users’ access to the transactions of the customers who are assigned to a different relationship manager. Check this box to restrict the user from viewing, creating, authorizing or amending the transactions of the customers assigned to a different relationship manager.
If you do not check this box, the user can view, create, authorize and amend the transactions of the customers assigned to other relationship managers.
The customers not assigned to the RM include the customers assigned to other relationship managers as well as those who are not assigned to any relationship manager.
This is applicable to the users created with their role as ‘Relationship Manager’.
2.1.2 Roles Button
A user role is associated to a user for a specific Branch in Oracle FLEXCUBE. The User at such a branch directly inherits the values set at the Role level. You can also define a user as a relationship manager by assigning the RM role.
To attach the user profile you are defining to a role, you must use the ‘Roles’ screen. Click ‘Roles’ button on ‘User Maintenance’ screen.
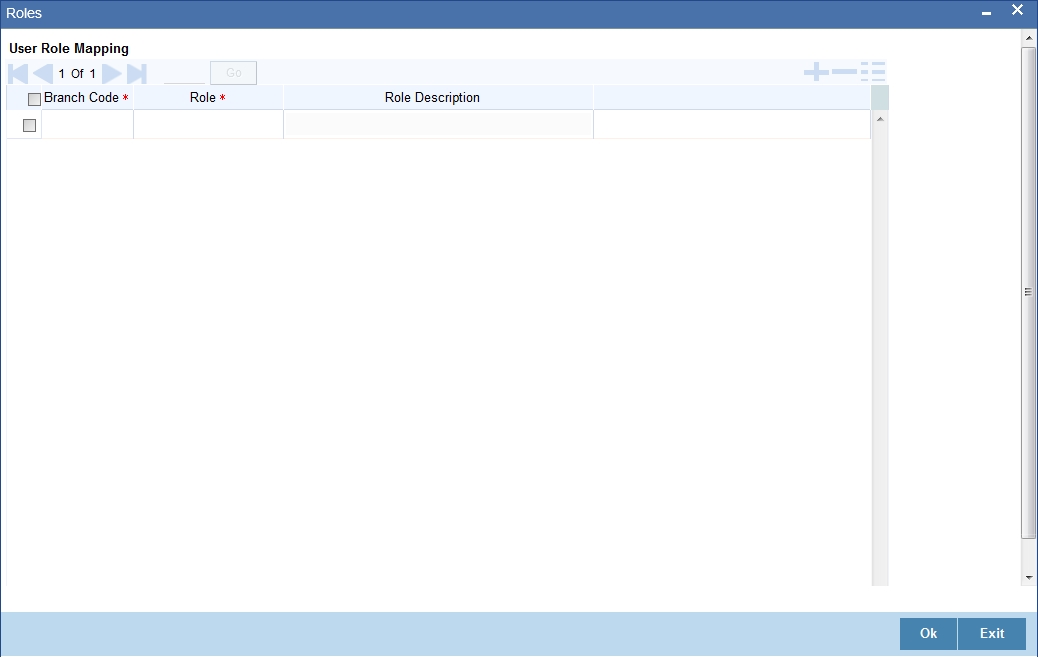
Specify the following details:
Branch Code
Specify the branch code assigned to the user role. The option list displays all the valid branch codes maintained in the system. You can choose the appropriate one.
Role
Specify the role assigned to the user for the selected branch. The option list displays all valid roles maintained in the system. Choose the appropriate one.
Note
You can assign the role of Relationship Manager to a user by selecting ‘RM-ROLE’.
Role Description
Based on the role selected, the system displays the role description.
Click add icon to add a record under the ‘Roles’ list. Specify the above details to attach more roles to the user.
To delete a role attached to a user profile, check the box beside it and click delete icon.
2.2 RM Hierarchy Mapping
This section contains the following topics:
- Section 2.2.1, "Invoking RM Hierarchy Mapping Screen"
- Section 2.2.2, "Viewing RM Hierarchy Mapping Summary"
- Section 2.2.3, "Viewing RM Hierarchy Summary"
2.2.1 Invoking RM Hierarchy Mapping Screen
You can define the hierarchy for relationship managers at the bank. RM hierarchy can be defined in Oracle FLEXCUBE using two methods. One method is to select the RM user who is one level up in the hierarchical order as the supervisor of a RM user.
The other method is to define the hierarchical structure using ‘RM Hierarchy Mapping’ screen.
To invoke this screen, type ‘STDRMHR’ in the field at the top right corner of the Application toolbar and click the adjoining arrow button.
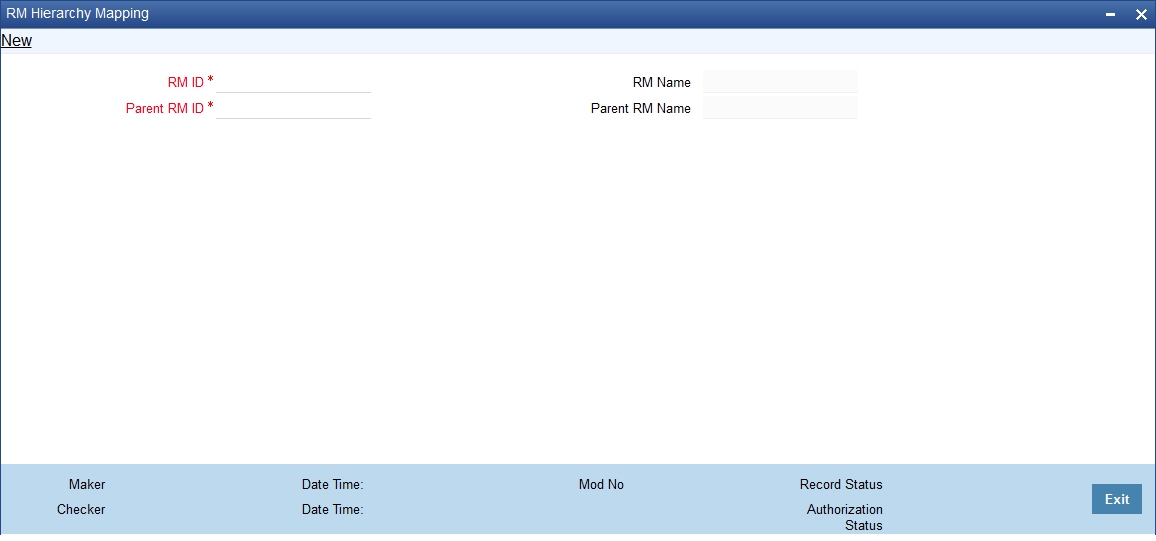
Specify the following details to define the RM hierarchy.
RM ID
Specify the relationship manager ID. The option list displays all valid RM user IDs maintained in the system. Choose the appropriate one.
Using this screen, you will assign a parent RM user to this user.
RM Name
Based on the RM ID, the system displays the name of the relationship manager.
Parent RM ID
Specify the parent RM ID. The option list displays all valid RM user IDs maintained in the system. Choose the appropriate one.
In the RM hierarchy, this RM user will be the parent user of the user selected above.
Parent RM Name
Based on the parent RM ID, the system displays the name of the parent relationship manager.
This method allows you to define the parent RM for all relationship managers, thus defining a RM hierarchy.
The RM hierarchy defined in this method is enabled only if the checkbox ‘RM Hierarchy Setup Required’ is checked in ‘Bank Parameters Maintenance’ screen.
2.2.2 Viewing RM Hierarchy Mapping Summary
You can view a summary of relationship managers hierarchy mapping using ‘RM Hierarchy Mapping Summary’ screen. To invoke the screen, type ‘STSRMHR’ in the field at the top right corner of the Application toolbar and click the adjoining arrow button.

You can search for RM hierarchy details based on one or more of the following parameters:
- Authorization status of the record
- Record status
- Relationship manager ID
- Parent relationship manager ID
Once you have set the search criteria, click ‘Search’ button. The system displays all RM hierarchy mapping records that match the search criteria. Double-click a record to view the detailed screen.
2.2.3 Viewing RM Hierarchy Summary
You can query for the hierarchy of relationship manager using ‘RM Hierarchy Summary’ screen. To invoke the screen, type ‘STDRMHRV’ in the field at the top right corner of the Application toolbar and click the adjoining arrow button.

You can query for the hierarchy details of a relationship manager.
Specify the following details:
RM ID
Specify the ID of the relationship manager whose hierarchy details you need to find. Choose the appropriate one from the option list.
Based on the RM ID selected, the system displays the relationship manager hierarchy details.
2.3 RM Mass Amendment
This section contains the following topics:
- Section 2.3.1, "Changing Relationship Managers in Bulk"
- Section 2.3.2, "Viewing RM Mass Amendment Summary"
2.3.1 Changing Relationship Managers in Bulk
Oracle FLEXCUBE allows you to change the some or all customers associated with one relationship manager to a different relationship manager. You can change the relationship manager for a number of customers at once using ‘RM Mass Amendment’ screen. To invoke the screen, type ‘STDRMAMD’ in the field at the top right corner of the application toolbar and click the adjoining arrow button.

Specify the following details:
Reference Number
The system generates and displays the reference number of the RM mass amendment operation.
From RM ID
Specify the ID of the relationship manager with whom the customers to be reassigned are associated with. The option list displays all valid RM IDs maintained in the system. Choose the appropriate one.
While processing the reassignment, the system assigns the selected customers associated with this RM to the RM specified in the field ‘To RM ID’.
From RM Name
Based on the RM ID, the system displays the name of the relationship manager.
To RM ID
Specify the ID of the relationship manager to whom the customers will be reassigned. The option list displays all valid RM IDs maintained in the system. Choose the appropriate one.
While processing the reassignment, the system reassigns the selected customers to this RM.
To RM Name
Based on the RM ID selected, the system displays the name of the relationship manager.
Status
The system displays the status of the mass RM amendment. The status can be one of the following:
- Not Started – indicates that the mass amendment record has just been created
- Completed – indicates that the customer has been moved under the new RM without any error, after the mass amendment effective date
- Failed – indicates that the movement of customer from one RM to another RM has failed for any reason such as closure of CIF or closure of RM
Effective Date
Specify the date from which the RM change will be effective. The system will process the request during the RM mass amendment batch on this date. The customers will be associated with the other RM from this date onwards.
Allowed Customers/Restrictive Customers/All Customers
Specify the type of customers to whom the RM change is applicable. You can choose one of the following:
- Allowed Customers – if you select this, the system will change the RM of all customers selected under the ‘Customers’ grid
- Restrictive Customers – if you select this, the system will change the RM of all customers other than the restricted customers listed
- All Customers – if you select this, the system will change the RM of all customers under the RM
Customers
Select the customers to whom the RM change is applicable. You need to specify the following details of the customer:
Customer Number
Specify the CIF of the customer who will be reassigned to a different RM. The option list displays all valid customer numbers assigned to the RM selected under ‘From RM ID’. Choose the appropriate one.
Customer Name
Based on the customer number, the system displays the name of the customer.
You can add more customers to the list by clicking the add button. In case you need to remove a customer from this list, check the adjoining checkbox and click delete button.
Once you have specified the above details, save the record.
The system processes the amendment during RM Mass Amendment batch at end of transactions input (EOTI) stage. This batch will reassign the customers from the current RM to the new RM specified here.
Once the customers are reassigned, the system updates the status as ‘Completed’. In case of any failure during the process, the system updates the status as Failed’ and logs the failure reason.
2.3.2 Viewing RM Mass Amendment Summary
You can view a summary of the RM mass amendments using ‘RM Mass Amendment Summary’ screen. To invoke this screen, type ‘STSRMAMD’ in the field at the top right corner of the Application toolbar and click the adjoining arrow button.

You can search the RM mass amendment summary based on one ore more of the following parameters:
- Authorization status of the amendment maintenance
- Record status
- Reference number
- RM ID from which the customers are reassigned (From RM ID)
- RM ID to which the customers are reassigned (To RM ID)
Once you have set the search criteria, click search button. The system displays the following details of the RM mass amendment records that match the criteria.
- Authorization status
- Record status
- Reference number
- From RM ID
- To RM ID
- Effective Date