2. Foreclosure of Retail Term Deposit Account
The process begins when bank receives a request from the customer for foreclosure of a term deposit. The bank retrieves the details of the term deposit and checks:
- Whether foreclosure is allowed as per the product terms and conditions
- If the signature / signatures on the request is/are made by the authorized signatories of the account
In case verification is not successful, the bank rejects the request made by the customer else, the bank checks if there is any lien to be released. In case lien has to be released the bank obtains necessary approvals for releasing the lien. The bank then books foreclosure of the term deposit in the relevant system and the proceeds are paid to the customer as per his/her instructions. Successful completion of all the steps required for foreclosure of a term deposit.
This chapter contains the following sections:
- Section 2.1, "Stages in Retail Term Deposit Creation"
- Section 2.2, "Process Flow Diagram"
- Section 2.3, "Receive and Verify"
- Section 2.4, "Dispatch/Handover the Advice of Rejection of Request "
- Section 2.5, "Verify Details of Foreclosure of Term Deposit"
- Section 2.6, "Modify Details of Foreclosure of Term Deposit"
- Section 2.7, "Book Foreclosure of a Term Deposit"
- Section 2.8, "Manual Foreclosure Retry"
- Section 2.9, "Generate Confirmation Advice for Foreclosure of a TD"
- Section 2.10, "Dispatch/Handover Confirmation Advise to Customer and Store Documents"
- Section 2.11, "Limit Validation for TD Closure"
2.1 Stages in Retail Term Deposit Creation
In Oracle FLEXCUBE, the process for closing a retail term deposit is governed by several user roles created to perform different tasks. At every stage, the users (with requisite rights) need to fetch the relevant transactions from their task lists and act upon them. Similarly, at different times, the system will make calls to certain web services to process the transaction.
The retail term deposit opening process comprises the following stages:
- Receive and verify the request for foreclosure of a term deposit
- Generate advice of rejection of foreclosure of term deposit
- Dispatch/handover the advice of rejection of request to the customer
- Verify details of foreclosure of term deposit
- Modify details of foreclosure of term deposit
- Book foreclosure of a term deposit
- Generate confirmation advice for foreclosure of a term deposit
- Dispatch/handover confirmation advise to customer and store documents
Only users who have procured the relevant access rights can perform activities under a stage.
2.2 Process Flow Diagram

2.3 Receive and Verify
This section contains the following topics:
- Section 2.3.1, "Receive and Verify TD Account Opening Form and Documents"
- Section 2.3.2, "Specifying Term Deposit Payout Details"
- Section 2.3.3, "Term Deposit Tab"
- Section 2.3.4, "Instrument Details Tab"
- Section 2.3.5, "Counterparty Details Tab"
- Section 2.3.6, "Specifying Interest Charges"
- Section 2.3.8, "Uploading Documents"
2.3.1 Receive and Verify TD Account Opening Form and Documents
In this stage, the bank receives request from the customer for foreclosure of a term deposit. The bank retrieves the details of the term deposit and checks:
- Whether foreclosure is allowed as per the product terms and conditions
- If the signature / signatures on the request is/are made by the authorized signatories of the account
- If any lien exists on the term deposit the bank captures the details of the foreclosure request and the request received from the customer is also uploaded as part of this activity.
Users belonging to the user role RCSEROLE (Retail Customer Service Executive) can perform these activities. The outcome of this stage can be ‘Accept’ or ‘Reject’. The function ID of this stage is ORDFCAPP.
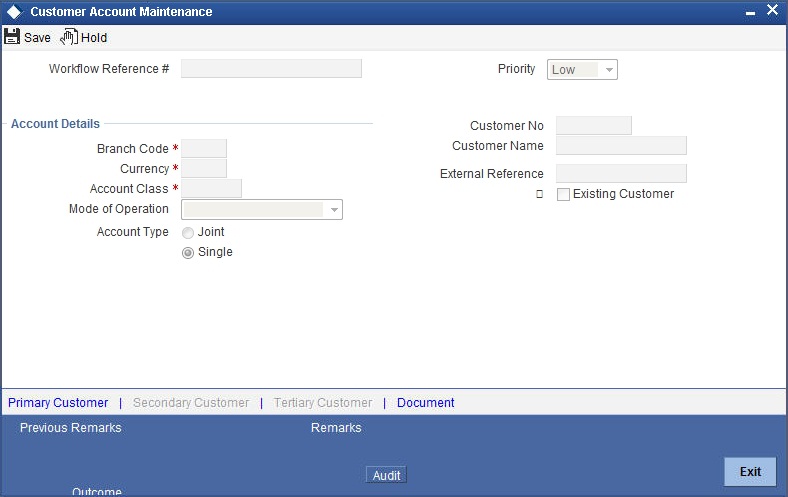
Specify the following basic details in this screen:
Application Number
System generates the application number.
Application Category
Specify the application category. The adjoining option list displays the list of all valid application categories maintained in the system. Select the appropriate one.
Application Date
System displays the date of application.
Application Branch
System displays the application branch.
Status
System displays the status of the application.
Priority
Select the priority for the creation of the term deposit account for a customer from the adjoining drop-down list. This list displays:
- Low
- Medium
- High
Account Details
Capture the basic account details of the customer here:
Branch Code
The current logged in branch is displayed here.
Term Deposit Account No
Specify the account number of the term deposit from the option list. The list displays all the valid TD account number maintained in the system.
Account Currency
The system displays the currency.
Account Description
System displays the account description.
Account Balance
System displays the account balance.
Existing Customer
Check this box to indicate that the applicant is an existing customer.
Waive Interest
Check this box to indicate that the interest is to be waived.
Principal and interest Details
Principal Amount
System displays the Principal Amount,
Interest Rate
System displays interest rate.
Maturity Amount
System displays the maturity date.
Lien to be Released
If there is a lien, select ‘Yes’ or ‘No’ to indicate whether it has to be released or not.
2.3.2 Specifying Term Deposit Payout Details
Click ‘TD Pay Out’ button to invoke the following screen.
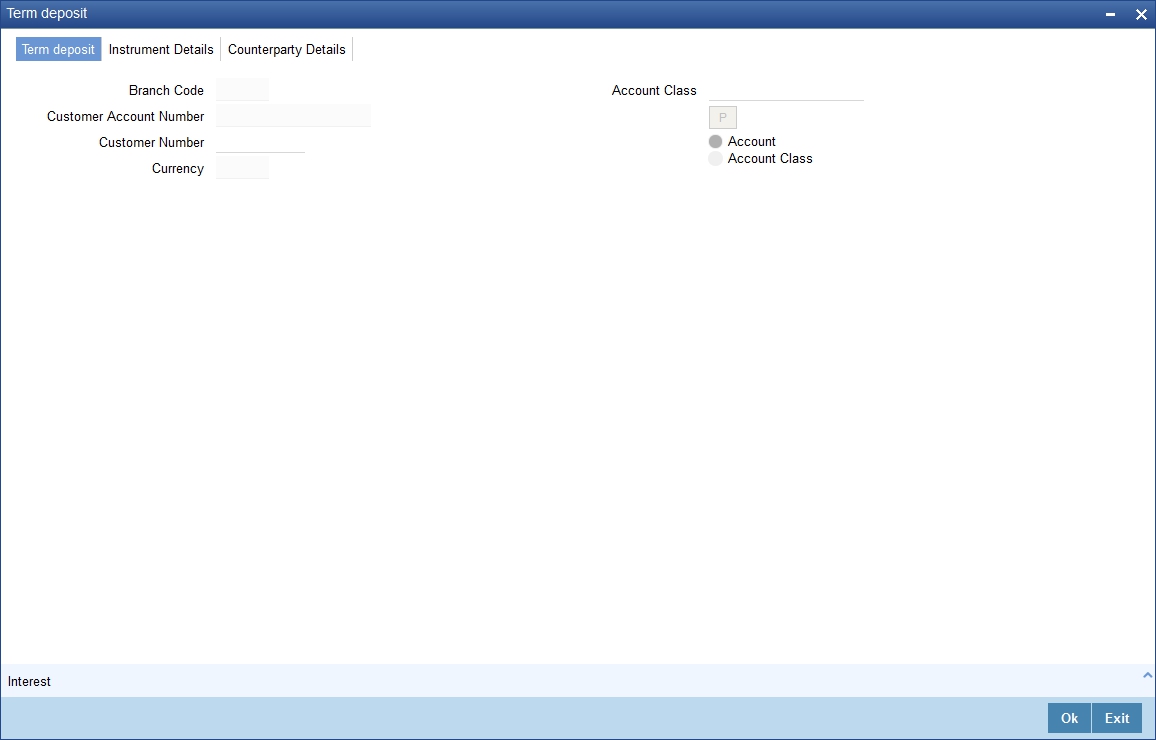
2.3.3 Term Deposit Tab
Here you can specify details of the child TD that should be created on maturity of the parent TD.
Branch Code
System displays the branch code.
Customer Account Number
System displays the customer account number.
Customer Number
The system displays the customer number. However, you can change it.
Currency
The system displays the TD currency.
Account Class
Specify the account class from which the interest and deposit should be picked up. If you have selected the ‘Account Class’ option, then you have to specify the Account Class. Else you can leave it blank.
Account/Account Class
Indicate whether the interest and deposit should be picked up from the parent account TD account or from the account class. The options available are:
Note
If you select the option ‘Account’, then on clicking ‘P’ button, the system will default the interest and deposit details from the parent TD account. If you select the ‘Account Class’ option, then on clicking ‘P’ button, the system will default the interest and deposit details from the account class selected.
2.3.4 Instrument Details Tab
Click on the ‘Instrument Details’ tab to specify the instrument details:
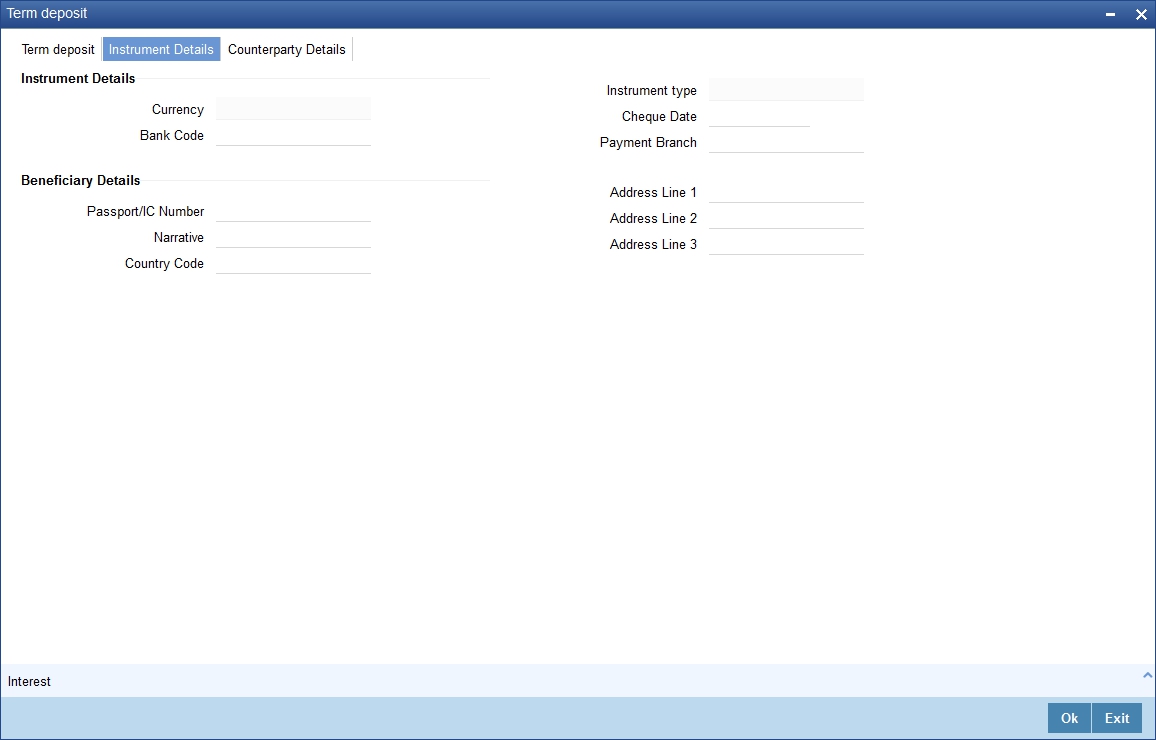
You can specify the following details here:
Instrument Details
Currency
System displays the currency here.
Bank Code
Specify the bank code. The adjoining option list displays all valid bank codes maintained in the system. Select the appropriate one.
Instrument Type
System displays the instrument type.
Cheque Date
Specify the cheque date from the adjoining calendar.
Payment Branch
Specify the payment branch code. The adjoining option list displays all valid branch codes maintained in the system. Select the appropriate one.
Beneficiary Details
Passport /IC Number
Specify the passport or IC number.
Narrative
Provide a brief description for the payout.
Country Code
Specify the country code. The adjoining option list displays all valid country codes maintained in the system. Select the appropriate one.
Address Line 1 to 3
Specify the address of the beneficiary for the payout.
2.3.5 Counterparty Details Tab
Click ‘Counter Party Details’ tab on the ‘Term Deposit’ screen and invoke the following screen. Here you can capture pay-out details for Local Payment transfer to another bank account. You need to maintain these details, if you have selected ‘Payout Option’ as ‘Payments’.
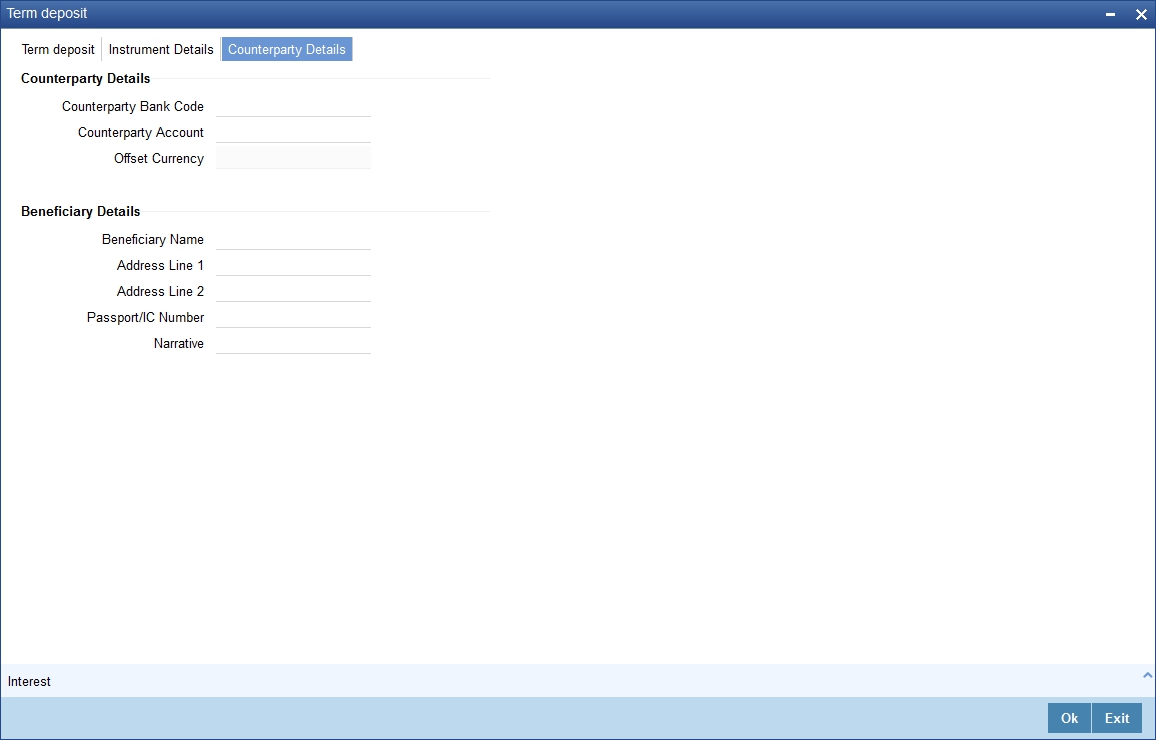
You can specify the following details here:
Counterparty Details
Counterparty Bank Code
Specify the bank code of the counter party.
Counterparty Account
Specify the counterparty account number from the adjoining option list.
Offset Currency
System displays the offset currency.
Beneficiary Details
Beneficiary Name
Specify the name of the beneficiary.
Address Line 1 to 2
Specify the address of the beneficiary.
Passport /IC Number
Specify the passport or IC number.
Narrative
Give a brief description for the payout.
2.3.6 Specifying Interest Charges
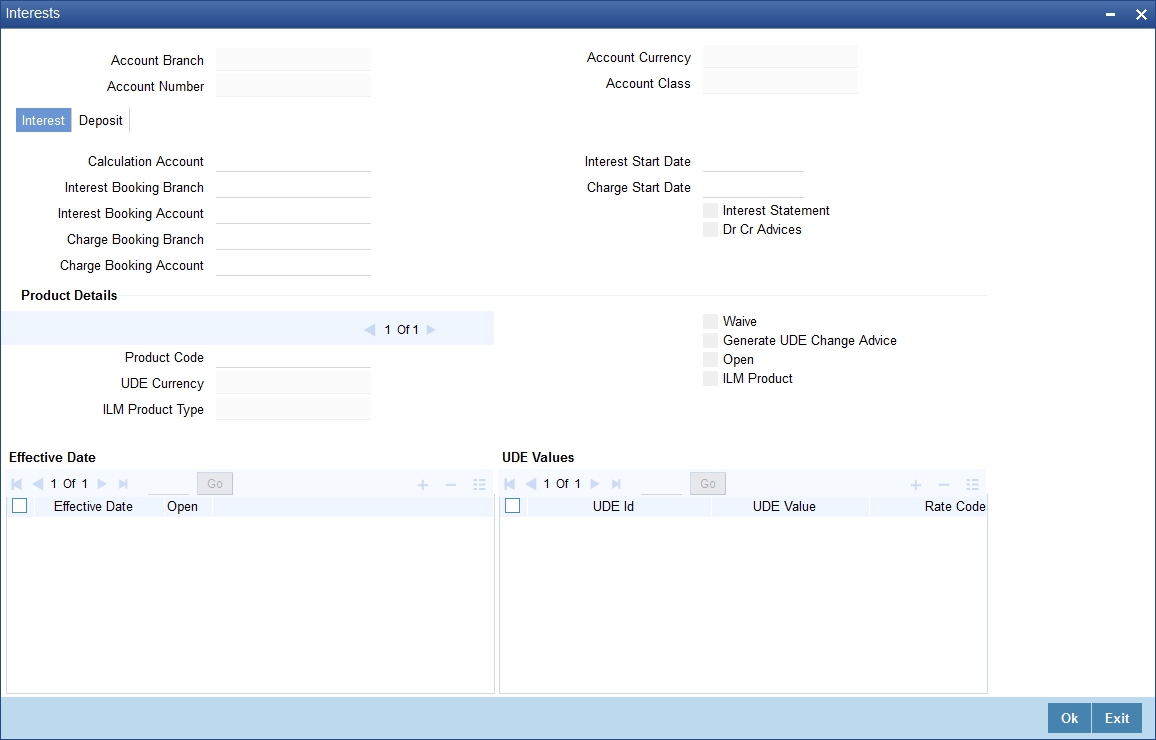
The Child TD parameters are similar to the Parent TD, except the child will not have the option to create a new TD as part of Pay-out. You can capture the details of child TD that is created by payout, by clicking on the ‘Interest’ button on the ‘Term Deposit’ screen.
2.3.6.1 Interest Tab
Calculation Account
Specify the calculation account of the child TD. The adjoining option list displays the CASA accounts and the current TD account for which child TD is to be created.
Interest Booking Account
Specify the account to which interest should be booked. You have an option of booking interest to a different account belonging to another branch. The accounts maintained in the selected booking branch are available in the option list provided. The system liquidates the interest into the selected account.
Interest Statement
Check this box to generate an interest statement for the account. The interest statement will furnish the values of the SDEs and UDEs and the interest rule that applies on the account.
Charge Booking Account
Specify the account to which charge should be booked. You have an option of booking charge to a different account belonging to another branch. The accounts maintained in the selected booking branch are available in the option list provided. The system liquidates the charge into the selected account.
Interest Start Date
Indicate the date from which interest calculation should start, using the adjoining calendar.
Interest Booking Branch
Specify the interest booking branch. The adjoining option list displays all valid branch codes available in the system. You can select the appropriate one.
Dr Cr Advices
Check this box to generate payment advices when interest liquidation happens on an account. The advices are generated in the existing SWIFT or/and MAIL format. No advices will be generated if you leave this box unchecked.
Charge Booking Branch
Specify the charge booking branch. The adjoining option list displays all valid branch codes available in the system. You can select the appropriate one.
Charge Start Date
Indicate the date from which charge calculation should start, using the adjoining calendar.
Product Code
Specify the interest/charge (IC) product code that should be linked to the account. The adjoining option list displays all valid IC products available in the system. You can select the appropriate one.
UDE Currency
Specify the UDE Currency defined for the product.
Interest Rate Based on Cumulative Amount
Check this box to indicate that the system should arrive at the interest rate of a new deposit using the cumulative amount of other active deposits, under the same account class and currency.
The cumulation of the amount for arriving at the interest rate is done at the account level during the save of the below events:
- Deposit account opening
- Any interest rate change to the deposit - floating rate deposits, rate change on interest liquidation, and rate change on rollover
Note
- When cumulating the amount of the deposits system considers the current deposit balance of all the deposits along with the new deposit amount.
- For backdated deposit opening, all the active deposits as of the current system date are considered to arrive at the cumulative amount, if the ‘Interest Rate Based on Cumulative Amount’ box is checked.
- The interest rate derived is applied only to the new deposit to be opened and there will be no changes done to the deposits which are used for arriving at the interest rate.
- If child TD account has to be considered for cumulation then this box needs to be selected. Cumulation is applicable only for rate chart allowed TDs.
Refer the section ‘Calculating Interest Rate Based on Base Amount’ in Terms and Deposits User Manual for details about arriving at interest rate based on cumulative amount.
Waive
Check this box to waive off an interest or a charge that has been specified.
Generate UDE Change Advice
Check this box to generate the UDE change advice.
Open
Check this box to make the product applicable again. More than one product may be applicable on an account class at the same time. You can temporarily stop applying a product on an account class by ‘closing’ it. You can achieve this by un-checking the box ‘Open’. The product will cease to be applied on the account class.
Effective Dates
Specify the following details:
Effective Date
Indicate the date from which a record takes effect, using the adjoining calendar.
Open
Check this box for records with different effective dates if the values of the UDEs vary within the same liquidation period.
Account UDE Value
Specify the following details:
User Defined Element ID
Specify the UDE ID for the account.
UDE Value
Specify the values for a UDE, for different effective dates, for an account. When interest is calculated on a particular day for an account with special conditions applicable, the value of the UDE corresponding to the date will be picked up.
Rate Code
Specify the rate code for the account.
Note
TD rate code is not supported for Child TD.
2.3.6.2 Deposit Tab
Click ‘Deposit tab’ in the ‘Interest Charges’ screen to capture deposit details.
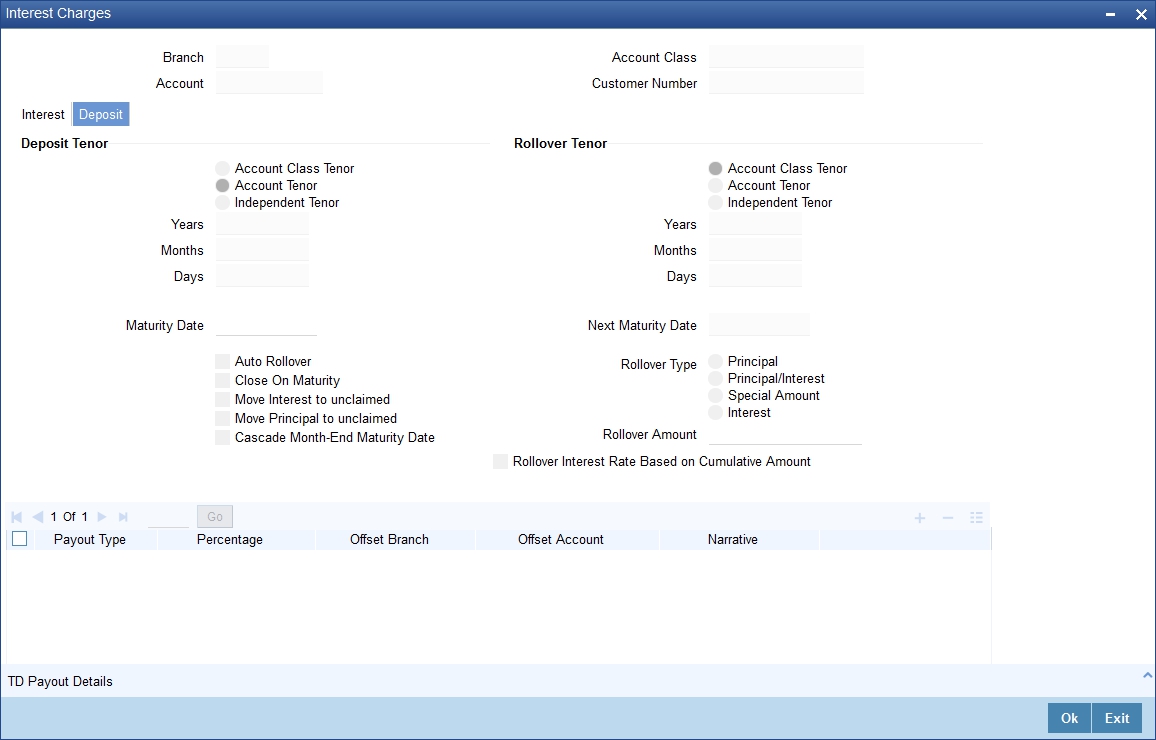
Specify the following details:
Deposit Tenor
The system calculates the tenor of the deposit account to the difference between Interest start date and Maturity date and displays it. In case of change in maturity date, the system changes the deposit tenor.
If you specify the tenor, the system computes the maturity date. Once the record is authorized, you cannot amend the tenor.
The deposit tenor is represented in terms of years, months and days. For example, if the deposit tenor is 185 days, it should be represented as 0 years, 6 months and 5 days. You need to specify the values in the appropriate fields.
The account tenor is defaulted as the deposit and rollover tenor for the child TD after the account class is populated.
Years
This indicates the number of years in the deposit tenor.
Months
This indicates the number of months in the deposit tenor.
Days
This indicates the number of days in the deposit tenor.
Maturity Date
The system picks up the maturity date from the default tenor from the linked account class and displays it here. However, you can modify this date.
The maturity date is displayed based on the deposit tenor selected.
Auto Rollover
Check this box to automatically rollover the deposit you are maintaining. You have to indicate ‘Rollover Type’ on selecting this option.
Close on Maturity
Check this box to close the term deposit account on maturity date and transfer the amount as per the pay-out details maintained for the TD.
Move Interest to Unclaimed
Check this field to move the interest amount to the unclaimed GL mapped at the IC product in the accounting role ‘INT_UNCLAIMED’ on grace period end date. If you select this option, you will need to check the box ‘Move Principal to Unclaimed’.
Move Principal to Unclaimed
Check this box to move the principal amount to the unclaimed GL mapped at the IC product in the accounting role ‘PRN_UNCLAIMED’ and liquidate the interest amount to the interest booking account on grace period end date. If you select this option then only principal amount will be moved to unclaimed GL; the interest will be settled as per TD pay-out details.
If you check both ‘Move Interest to Unclaimed’ and ‘Move Principle to Unclaimed’ then TD amount (i.e. Principal and interest) will be moved to the respective unclaimed GLs, irrespective of the TD pay-out details maintained.
Next Maturity Date
On selecting the ‘Auto Rollover’ box, the system displays the next maturity date based on the previous tenor of the deposit.
Rollover Type
Indicate the components that should be rolled over by choosing one of the following options:
- Principal - If you select this option, then the system will roll over the principal amount alone on EOD of TD maturity date or BOD after end of the grace period. If interest booking account is given as TD account, then on maturity date the interest amount will be first liquidated to the TD account and then settled as per the pay-out details maintained for the TD account.
- Principal + Interest - For you to choose this option, the interest booking account has to be the TD account. If you select this option, then the system will roll over the principal and interest amount on EOD of TD maturity date or BOD after end of the grace period.
- Special Amount – If you choose this option, the system will roll over the amount specified in ‘Rollover Amount’ field, irrespective of what the interest booking account is. Upon maturity of the rolled over TD, the system will roll over with the same amount special amount and settle the interest amount as per TD pay-out details maintained.
- Interest - For you to choose this option, the interest booking account has to be the TD account. If you select this option, then the system will roll over the interest amount on EOD of TD maturity date or BOD after end of the grace period. The principal will be settled as per the pay-out details maintained.
Rollover Amount
If a special amount is to be rolled over, you have to specify the amount (less than the original deposit amount).
TD Payout Details
Pay Out Type
Select the pay-out mode from the drop down list. The options available are:
- Bankers Cheque - BC
- Transfer to Other bank - PC
- Transfer to GL – GL
- Transfer to Savings Account – AC
Note
- This option will be available only when account number generation is ‘Auto’.
- For Dual Currency Deposits you are allowed to select only ‘GL’ and ‘Savings Account’ options as the pay-out mode. You can either select GL or Savings Account but not both. You can select only one GL or one Savings account and not multiple GLs or accounts in either case.
Percentage
Specify the amount of redemption in percentage.
Offset Branch
Specify the branch code of the account for redemption. The adjoining option list displays all valid branch codes available in the system. You can select the appropriate one.
Offset Account
Specify the account number/ GL for redemption. The adjoining option list displays all valid accounts and GLs available in the offset branch. You can select the appropriate one.
Narrative
Give a brief description for the redemption.
2.3.7 TD Payout Details
Click ‘Term Deposit Payout Out’ button in the ‘Interest Charges’ screen and invoke the following screen.
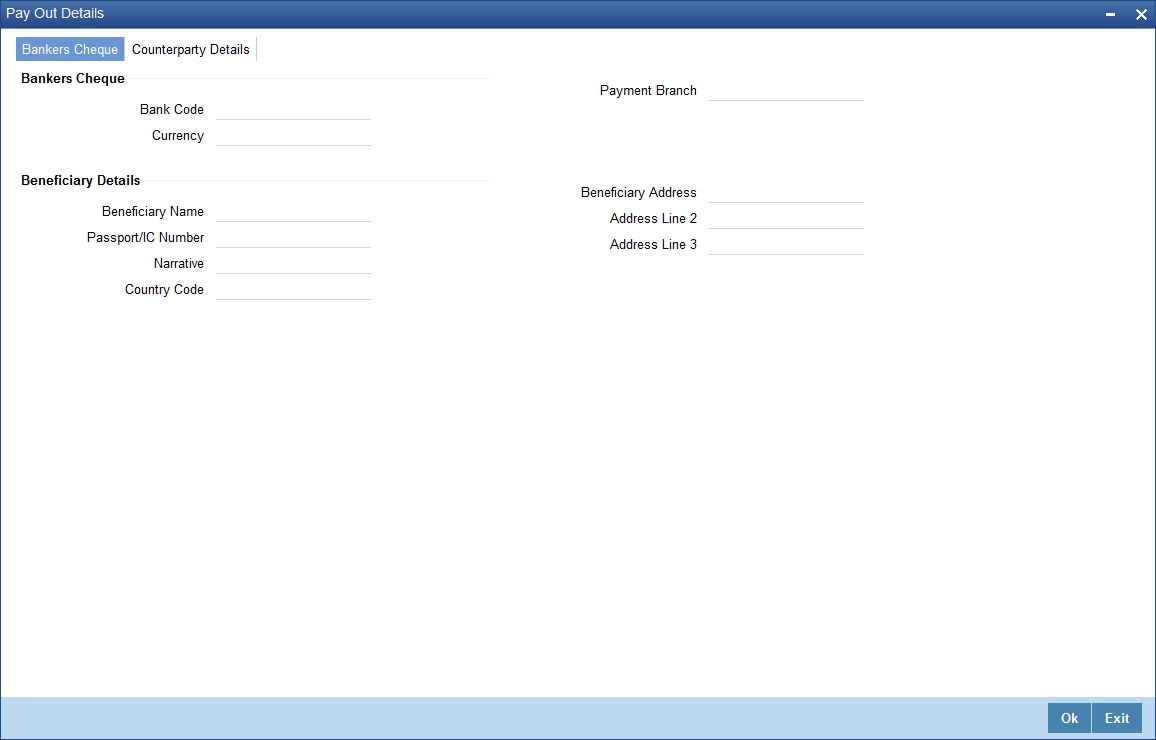
2.3.7.1 Banker’s Cheque Tab
The ‘Bank Cheque’ tab is displayed by default. You can capture the following details for pay-out using a banker’s cheque:
Banks Cheque
Specify the following cheque details.
Bank Code
Specify the bank code of the Bankers cheque.
Payable Branch
Specify the payable branch for the cheque. The adjoining option list displays all branch codes linked to the specified bank code. You can select the appropriate one.
Currency
The currency code is displayed here.
Beneficiary Details
Beneficiary Name
Specify the name of the beneficiary.
Passport /IC Number
Specify the passport or IC number.
Narrative
Give a brief description for the payout.
Country Code
Specify the country code for the payout address.
Beneficiary Address
Specify the address of the beneficiary for the payout.
Address Line 1 to 3
Specify the address of the beneficiary for the payout.
2.3.7.2 Counterparty Details Tab
Click ‘Counter Party Details’ tab on the ‘Term Deposit Payout Details’ screen and invoke the following screen. Here you can capture details for pay-out through Local Payment transfer to another bank account.
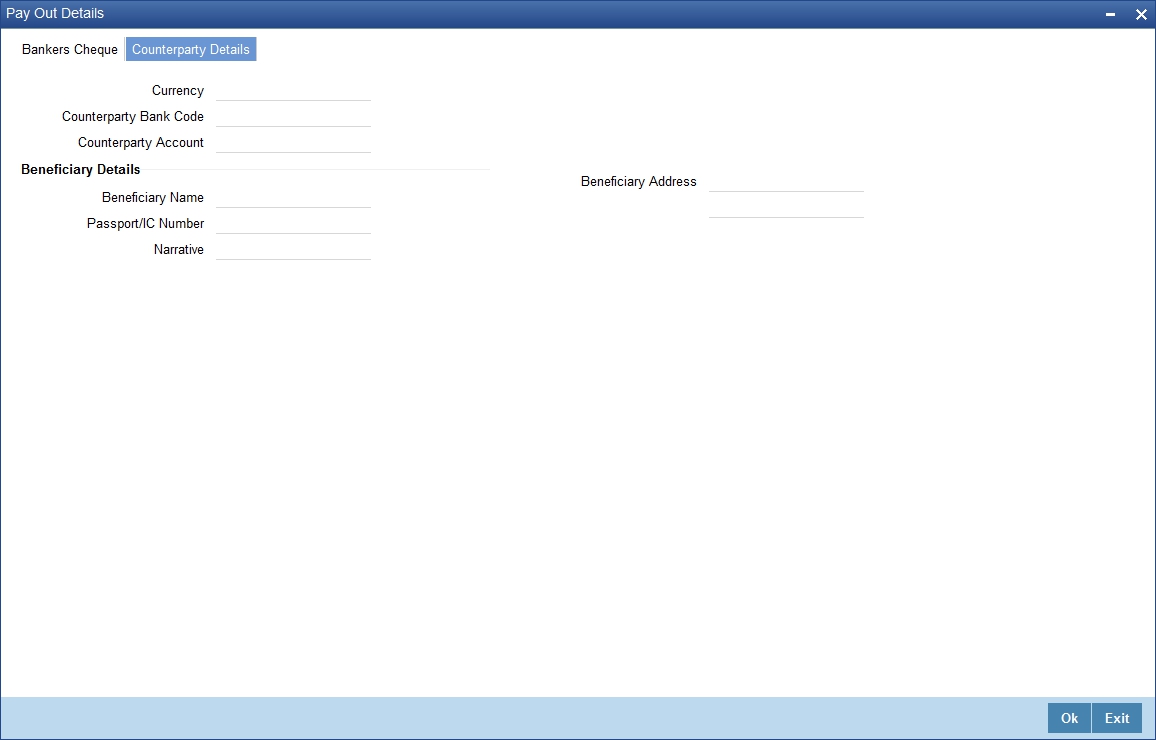
You can capture the following details:
Currency
Specify the TD currency.
Counter Party Bank Code
Specify the bank code of the counter party. The adjoining option list displays the list of all valid bank codes maintained in the system. Select the appropriate one.
Counterparty Account
Specify the account number of the counter party. The adjoining option list displays the list of all valid account numbers maintained in the system. Select the appropriate one.
Beneficiary Details
Beneficiary Name
Specify the name of the beneficiary.
Passport /IC Number
Specify the passport or IC number.
Narrative
Give a brief description for the payout.
Country Code
Specify the country code for the payout address.
Beneficiary Address
Specify the address of the beneficiary for the payout.
2.3.8 Uploading Documents
You can capture the customer related documents in central content management repository through the ‘Documents’ screen. Click ‘Documents’ button to invoke this screen.
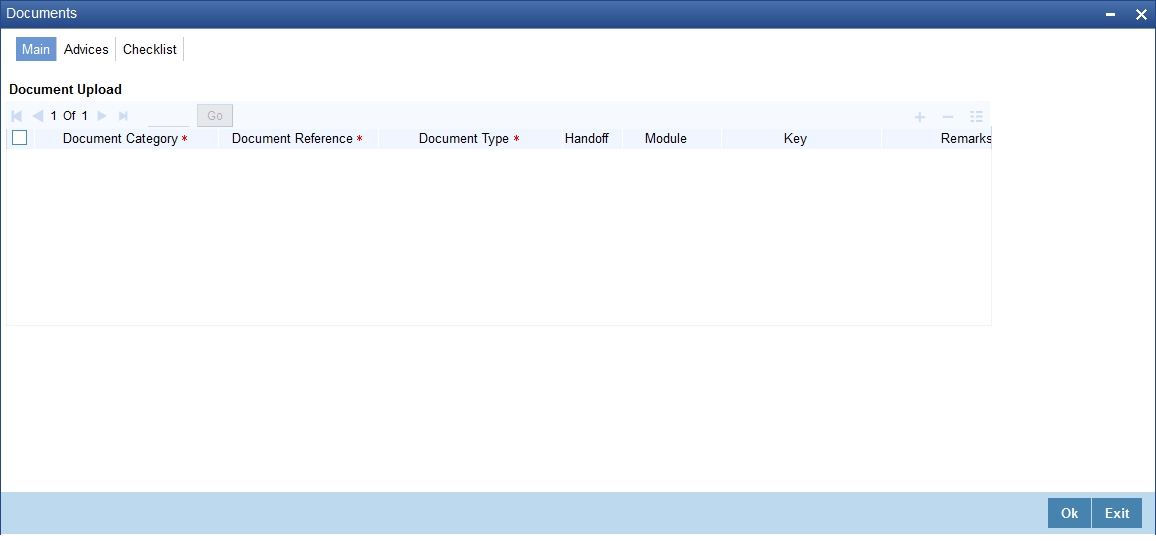
Here, you need to specify the following details:
Document Category
Specify the category of the document to be uploaded.
Document Reference
The system generates and displays a unique identifier for the document.
Document Type
Specify the type of document that is to be uploaded.
Upload
Click ‘Upload’ button to open the ‘Document Upload’ sub-screen. The ‘Document Upload’ sub-screen is displayed below:
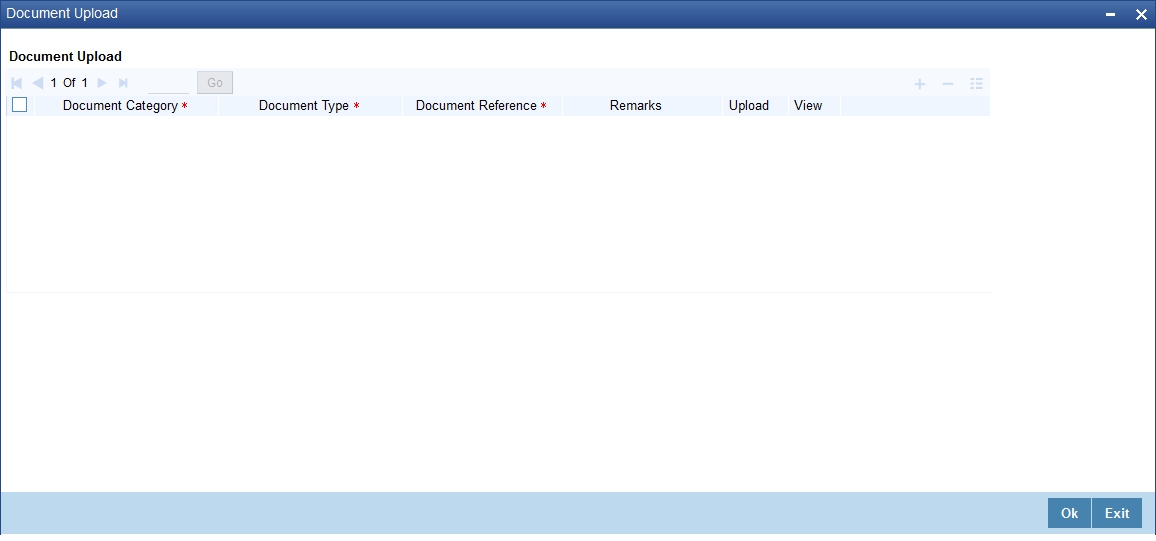
In the ‘Document Upload’ sub-screen, specify the corresponding document path and click the ‘Submit’ button. Once the document is uploaded through the upload button, the system displays the document reference number.
View
Click ‘View’ to view the document uploaded.
In ‘Foreclosure of a Retail Term Deposit’ process, ‘Document Upload’ feature is not available in all the stages. Its availability in this process 'is given below:
Stage Title |
Function ID |
Doc Callform Exists |
Upload(Available/Not Available) |
View(Available/Not Available) |
Receive and verify the request for foreclosure of a term deposit |
ORDFCAPP |
Available |
Available |
Available |
Generate advice of rejection of foreclosure of term deposit |
|
|
|
|
Dispatch/handover the advice of rejection of request to the customer |
ORDFCADV |
Available |
Available |
Available |
Verify details of foreclosure of term deposit |
ORDFCVER |
Available |
Available |
Available |
Modify details of foreclosure of term deposit |
ORDFCMFY |
Available |
Available |
Available |
Release lien on the term deposit |
|
|
|
|
Book foreclosure of a term deposit |
|
|
|
|
Manual foreclosure retry |
ORDFCRTY |
|
|
|
Generate confirmation advice for foreclosure of a term deposit |
|
|
|
|
Dispatch/handover confirmation advise to customer and store documents |
|
|
|
|
Step 3. Generate Advice of Rejection of Foreclosure of TD
In case the verification is not successful for some reason, the bank generates advice of rejection of the request for foreclosure of the term deposit along with the appropriate reasons for rejection.
While saving the transaction, if you had modified the interest rate at TD account level for TD booking or for creating Payout TD, the system displays configurable override messages.
These overrides are displayed during subsequent modifications of the interest rate. You can also configure overrides for Dual Authorization to be displayed at Contract and Maintenance level in the ‘Override Maintenance’ (CSDOVDME) screen.
For more information about configuring overrides, refer to the section ‘Override Maintenance’ in the chapter ‘Configuring Overrides’ in the Core Services User Manual.
2.4 Dispatch/Handover the Advice of Rejection of Request
The bank dispatches/ hands over to the customer, the advice of rejection of request for foreclosure of term deposit.
Users belonging to the user role RCSEROLE (Retail Customer Service Executive) can perform these activities.
Select the outcome as ‘PROCEED’ and save the record by clicking the save icon in the tool bar. The task moves to the next stage. The function ID of this stage is ORDFCADV.
2.5 Verify Details of Foreclosure of Term Deposit
The bank verifies the details of the foreclosure of term deposit.
Users belonging to the user role ROMROLE (Retail Operations Manager) can perform these activities. The function ID of this stage is ORDFCVER.
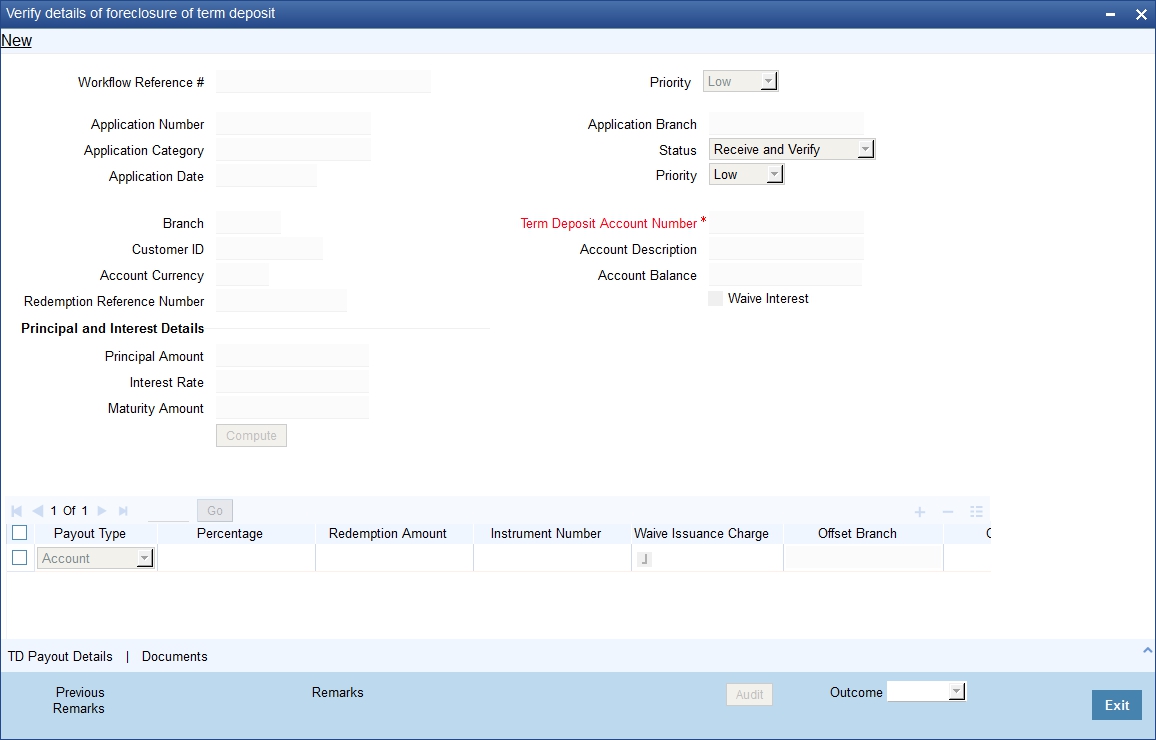
In this screen verification details are displayed. After the verifying the details, select the outcome as ‘ACCEPT’ and save the record by clicking the save icon in the tool bar. Then the task moves to the next stage. If you select the outcome as ‘REJECT’, system takes you to the previous stage.
2.6 Modify Details of Foreclosure of Term Deposit
In case verification fails due to incorrect details, the bank makes necessary modification in the details of foreclosure request.
Users belonging to the user role ROEROLE (Retail Operations Executive) can perform these activities. The function ID of this stage is ORDFCMFY

After the modifying the details, select the outcome as ‘ACCEPT’ and save the record by clicking the save icon in the tool bar then the task move to the next stage. If you select the outcome as ‘REJECT’, system takes you to the ‘Receive and Verify account Closure form’ screen.
2.7 Book Foreclosure of a Term Deposit
The bank books foreclosure of a term deposit and passes the necessary accounting entries. The process continues based on mode of payment. The closure proceeds are credited to the appropriate settlement account in case the mode of payment is by banker's cheque/ demand drafts. In case mode of payment is by credit to an existing account with the bank, the amount is credited to the customer's account.
2.8 Manual Foreclosure Retry
If the system encounters any error while passing the accounting entries and foreclosure booking is rejected, then the system allows you to manually retry the term deposit foreclosure.
Users belonging to the user role ROMROLE (Retail Operations Manager) can perform manual retry.
Select the outcome as ‘PROCEED’ and save the record by clicking the save icon in the tool bar. The task moves to the next stage.
2.9 Generate Confirmation Advice for Foreclosure of a TD
The bank generates confirmation advice to customer confirming the foreclosure of the term deposit.
2.10 Dispatch/Handover Confirmation Advise to Customer and Store Documents
The bank dispatches a confirmation advice to the customer. If payment is made by means of banker's cheque, the same is also dispatched as part of this activity. The bank stores all the documents pertaining to foreclosure of a term deposit.
Users belonging to the user role ROEROLE (Retail Operations Executive) can perform these activities.
You can store the current account opening form and other supporting documents are stored in a safe and accessible location. This deinformation can be recorded using ‘Store Documents’ screen. You can capture the storage details in this stage.
If you have requisite rights, double click on the task in your ‘Assigned’ task list and invoke the following screen.
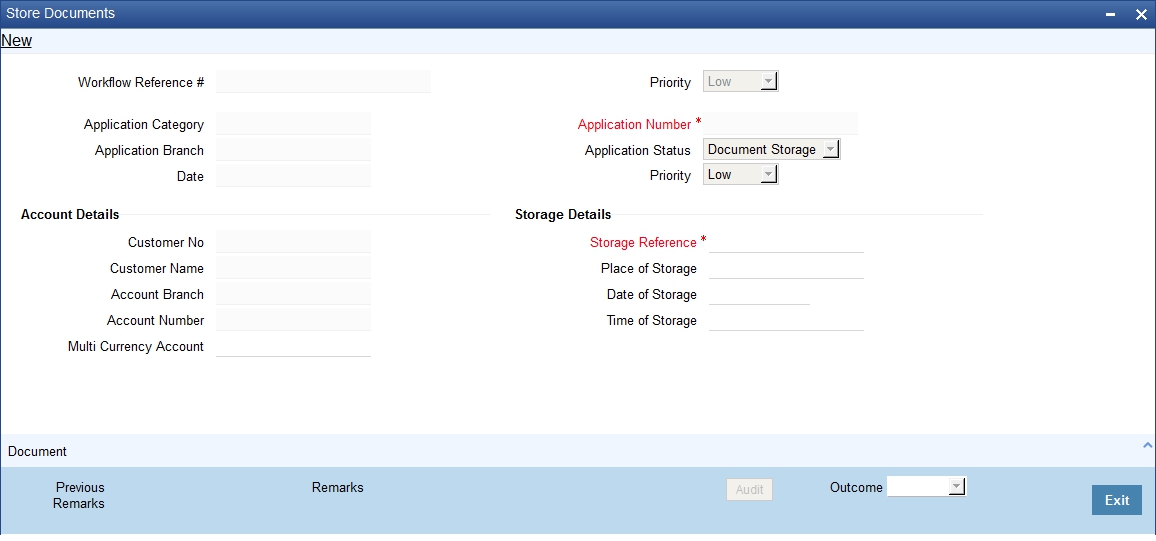
The system displays the application and customer details. You can specify the following details:
Storage Details
Capture the following storage details in this section:
Storage Reference
Specify the storage reference number.
Date of Storage
Capture the date of storing the documents.
Time of Storage
Specify the time of storing the documents of the current account.
Place of Storage
Specify the place where the document is stored.
Select the outcome as ‘PROCEED’ in the textbox adjoining the ‘Audit’ button in this screen and save the record by clicking the save icon in the tool bar.
The system displays the message ‘The task is completed successfully.
Click ‘Ok’ button.
2.11 Limit Validation for TD Closure
The Input and Authorization limit set up for a user for different currencies in “SMDRLMNE – Role Limits Maintenance” is validated for Term Deposit transactions made through the following fast paths.
- ORDFCAPP – Input/Authorization limit to be validated
At the time of input/authorization of a deposit transaction, if there is a breach of limit then system displays a configurable override message.