2. Creating Custom Fields in Oracle FLEXCUBE
2.1 Introduction
While working with Oracle FLEXCUBE Corporate, there are additional fields that you would like to use either for your convenience or to suit the requirements of your bank. Adding to its flexibility, Oracle FLEXCUBE now provides you the option to add fields based on your specifications to meet your needs.
This chapter contains the following sections:
- Section 2.2, "User Defined Field Maintenance"
- Section 2.3, "Scope of the Field"
- Section 2.4, "Numeric Field"
- Section 2.5, "Text Field"
- Section 2.6, "Date Field"
- Section 2.7, "Making a Field Applicable to a Product"
- Section 2.8, "UDF to a Function ID Linkage"
- Section 2.9, "Populating the Values of UDF"
- Section 2.10, "Uploading User Defined Fields"
- Section 2.11, "User Defined Fields for Account Statements"
2.2 User Defined Field Maintenance
This section contains the following topic:
2.2.1 Basic Details of User Defined Field Maintenance Screen
Field
Field Name and Description
You can identify a field that you create with a unique identifier, and a brief description.
Each field that you define in Oracle FLEXCUBE should be assigned a unique code. You can briefly describe the field in Description field. The description is for your information only. It will not be printed on any customer correspondence.
Field Type
The type of field that you can create in Oracle FLEXCUBE can be of the following formats:
- Number - Chose this option to create a Numeric field
- Text - Chose this option to create a Text field
- Date - Chose this option to create a Date field
- Cube Entity - Should you need to reuse any of the existing fields of Oracle FLEXCUBE, to enter additional details you can indicate the Field Type as Cube Entity. The Cube Entity can be any of the existing fields in Oracle FLEXCUBE like customer, currency, account, etc
Marking a Field as Mandatory
You can make entry to a field mandatory. To do so, check against the Mandatory option. A user of the field will be forced to make an entry to the field. Leave it unchecked to indicate that the field is not mandatory.
Note
When a UDF is created, you have to first map it to the corresponding function ID and then provide the validation rule for the UDF.
2.3 Scope of the Field
While defining a new user defined field, you need to specify whether the new field has to be used at the product or maintenance level. The scope or usage of the field that is being defined can be specified as ‘Usage Allowed’.
- If the new field that is being defined has to be used at the product level, select usage as ‘Product’
- If the new field is to be used in any of the maintenance screens (screens related to Core Maintenance like Currency Definition screen, Customer Accounts maintenance screen etc), select usage as ‘Function Id’.
Note
In Oracle FLEXCUBE, every screen has a unique function Id. However to differentiate between product and maintenance levels, the scope of a user defined has been classified as Product and Function Id.
If the new field that is being defined is for a maintenance screen (Usage Allowed is ‘Function Id’), you can specify the function Id of the screen in which the new field has to be used. This has to be indicated in the ‘Function Id’ field. Click on the option list positioned next to this field. The function Ids of all the maintenance screens will be displayed. Select the appropriate function Id.
For example, if you want to use the new field in the ‘Chart Of Accounts - Detailed’ screen, select the Function Id GLDCHACT, thus allowing the usage of the field in the Chart of accounts screen only.
Note
If you want the Field to be made available for all the Functions, you will have to leave it blank.
2.4 Numeric Field
To define a numeric field, choose the number option at the Field Type field. You can set up validation rules for a numeric field. The validation types applicable to a numeric field are:
- Range
- Length
- LOV
- None
You can indicate your preference at the Validation type field of this screen. Choose None to indicate that no validation should be performed on entries made to this field.
Validation Type — Range
You can specify the range validation type only for Numeric fields. In this case the entry to the field should be within a permissible range.
On choosing this validation type, you should indicate either the maximum or minimum values or both values allowed for the field. Any valid entry to the field should be within the range that you specify.
Validation Type — Length
For a numeric field you can indicate that the entry should be of a certain length. You have the option to indicate,
- a fixed length
- the maximum and minimum length for the field
Depending on the option you select, indicate the fixed field length or indicate the maximum and minimum length for valid entries to the field.
Validation Type — LOV (List of Values)
Choose LOV to indicate that the entry to this field can be chosen from a predefined list. On choosing this option you can define the items that should be displayed on this list.
Click ‘LOV’ button and define the list of values and their description. The items that you define for the list are displayed whenever the field is used in Oracle FLEXCUBE.
2.5 Text Field
This section contains the following topics:
- Section 2.5.1, "Specifying Text Fields"
- Section 2.5.2, "Validation Type — LOV (List of Values)"
- Section 2.5.3, "Derivation"
- Section 2.5.4, "Derivation Rule"
2.5.1 Specifying Text Fields
To define a text field, choose the text option at the Field Type field. A text field can contain alphabets of the English language or a combination of alphabets and numeric values.
You can specify validation rules for a text field. The validation types applicable to a text field include:
- Length
- Mask
- LOV
- None
You can indicate your preference at the Validation type field of this screen. Choose None to indicate that no validation should be performed on entries made to this field.
Validation Type — Length
For a text field you can indicate that a valid entry to the field should be of a certain length. You have the option to indicate,
- A fixed length
- The maximum and minimum length for the field
Depending on the option that you select, indicate the fixed field length or indicate the maximum and minimum length of entries made to the field.
Validation Type — Mask
To indicate a field as a masked field, choose Mask as the field type. This option allows you to define a broad field structure to which all entries to the field should conform.
The mask structure can consist solely of ‘a’ or ‘n’ or a combination of these. An ‘a’ would indicate an alphabet of the English language and ‘n’ a numeric value.
All entries made to the field will be validated against the format that you specify for the mask.
2.5.2 Validation Type — LOV (List of Values)
Choose LOV to indicate that the entry to this field can be chosen from a predefined list. On choosing this option you can define the items to be displayed on this list.
Click ‘LOV’ button and define the list of values and their description. The items that you define for the list are displayed whenever the field is used in Oracle FLEXCUBE.

2.5.3 Derivation
This indicates the procedure for populating the values of a field. When you are processing a transaction that would use the user defined field, the value of the UDF can be populated in the ‘User Defined Field/Field Name to Value Definition’ screen that is invoked from the Contract Input screen or the Function Id screen. The value for the field can be populated based on certain conditions, which can be defined as statements of code by the user. Check against ‘Derivation Allowed’ to specify that the value of a field has to be populated based on certain conditions.

2.5.4 Derivation Rule
Check against the option ‘Derivation Allowed’ if you want to the values of a UDF to be populated based on certain conditions. According to the requirements of the bank, the implementer of Oracle FLEXCUBE will write a PL/SQL code to populate the values of the user defined field. The values of the UDF will be displayed in the ‘User Defined Field/Field Name to Value Definition’ screens of Contract Input or Function Id screen.
Click ‘Derivation’ button to write the PL/SQL code.
After writing the PL/SQL code, click ‘X’ button to execute the code. The derivation code will be validated by the system. If any checks fail, you must alter the statement so that the validation can be made successfully. Click ‘E’ button to view the errors.
For example, the bank wants to have a new field to display the Euro equivalent of the contract amount in the ‘User Defined Field’ screen of Contract Input screen. To do this, you need to:
- Define a field of type ‘Number’,
- Specify ‘Usage Allowed’ as ‘Product’,
- Check against ‘Derivation Allowed’, and
- Write a code to display the Euro equivalent of the contract amount.
Subsequently, you will link the UDF to a product and process transactions under it. In the ‘User Defined Field’ screen of Contract Online screen, system will execute the derivation rule to convert the transaction amount to Euro equivalent and displays the Euro equivalent of the transaction amount.
After writing the PL/SQL code, click ‘X’ button to execute the code. The derivation code will be validated by the system. If any checks fail, you must alter the statement so that the validation can be made successfully. Click ‘E’ button to view the errors.
2.6 Date Field
This section contains the following topics:
- Section 2.6.1, "Validations that you can Specify for Date Fields"
- Section 2.6.2, "Marking the Field as Unique"
- Section 2.6.3, "Specifying the Default Value"
- Section 2.6.4, "Allowing the Modification of Values after Population"
- Section 2.6.5, "Factory Shipped Fields"
- Section 2.6.6, "Defining Additional Validation Rules"
- Section 2.6.7, "Validation Rule"
- Section 2.6.8, "Cube Entity"
- Section 2.6.9, "Enabling the Update Allowed Option for a UDF"
2.6.1 Validations that you can Specify for Date Fields
To define a date field, choose Date as the Field Type. For a date field, you can indicate validations like whether back and future dates can be entered into the field and the back or future period applicable to the field.
2.6.1.1 Indicating the Validation Type
You can specify the validation type for a date field. The validation types applicable to a date field include:
- LOV
- None
If you indicate LOV then an entry to the field can be made only from the predefined list that you maintain for the field. Choose None to indicate that no validation should be made for the field.
Back/Future Date Allowed
For a date field you can indicate whether back or future dates can be entered. Check against the relevant options to indicate your preference.
If you choose the back or future date options, you should also indicate a future or back period permissible for the field. The back or future period should be represented as a number.
For example, if you indicate ‘3’ as the back date period, the field will accept dates upto three days before the current system date as a valid entry.
Note
If you do not choose any of these options, the field will only accept the current system date as a valid entry.
2.6.2 Marking the Field as Unique
Check against ‘Unique’ if the field that is being defined has to be unique. Consequently,
- If the usage allowed for the field is ‘Product’, the new field will be unique across modules
- If the usage allowed is ‘Function Id’, it will be unique for the particular function id i.e., if you have specified a function ID, the new field can be used only in the specified Function ID screen).
2.6.3 Specifying the Default Value
You can specify a default value for a user-defined field. The option list positioned next to this field will be enabled only if the field is a cube entity. Else the option list will be disabled.
For example, assume that your bank wants to capture an additional currency field for processing certain transactions and the default value for this additional field has to be USD. Therefore, your selections will be as follows:
- Field Type –Cube Entity
- Cube Entity Type- Currency
The option list in the ‘Default Value’ field displays all the currencies maintained at your bank. Select USD. Consequently, in the UDF screen of the Contract Input or Function Id screen, USD will be displayed as the default currency.
Note
If you have specified a default value for a field and also the derivation rule, the value obtained from the derivation rule will take precedence over the default value at the Contract/Function Id level.
2.6.4 Allowing the Modification of Values after Population
You can modify the value of a field after it is populated in the ‘User Defined Field’/’Field Name to Value Definition’ screen of Contract Input or Function Id screen. To allow amendments to the values after they are populated, check against the field ‘Amendable’ at the time of defining a new field.
Note
You will not be allowed to change the values of those fields for which you have disallowed the amendment option (if the option ‘Amendable is unchecked at the time of defining an UDF) and derivation has been allowed (Derivation Allowed option has been checked).
2.6.5 Factory Shipped Fields
Apart from the fields that you have created, there are a set of fields that are sent by default as part of Oracle FLEXCUBE. These fields are referred to as factory shipped fields. You cannot define or change validations specified for factory shipped fields.
2.6.6 Defining Additional Validation Rules
Apart from specifying the validation type for a field, you can specify additional validation rules to meet the requirements of the bank.
To indicate that additional validations are required for a particular user defined field, check against ‘Validation Allowed’. This will allow you to write a code to validate the value in the new field. Click ‘Validation’ button to write the validation code.

2.6.7 Validation Rule
This is the PL/SQL validation code based on which the system will check the value of the new field and validates at the time of transaction processing. Entry to this field is mandatory if you have checked against ‘Validation Allowed’.
For example, at the time of processing a contract for a customer, the bank wants to add a new field to enter the first nominee that the customer has specified in his account. The names of the nominees of a customer are maintained in the ‘Customer Accounts Maintenance’ screen. The bank wants the system to check that the name of the nominee that is entered in the new field and the name of the first nominee that is maintained in the Customer Accounts Maintenance screen are same.
To do this, you need to:
- Create a new user defined field of type ‘Text’,
- Specify ‘Usage Allowed’ as ‘Product’,
- Check against ‘Validation Allowed’, and
- Write a code to validate the value entered in the new field. In the validation rule, you write a code to check that the value of the first nominee specified in the Customer Accounts Maintenance screen for the customer for whom you are processing a contract and the value entered at the time of processing a contract are same.
Syntax to be used in Derivation and Validation Rules
(@FIELD_VAL)
(@FIELD_VAL) holds the Value UDF. This is s mandatory for Derivation Logic and it can be used in Validation logic to get the value of the field.
For example,
(@FIELD_VAL): = ‘USD’;
Select ccy_code into (@FIELD_VAL) from
CYTMS_CCY_DEFN where country = ‘USA’;
(@RECORD_KEY)
(@RECORD_KEY) behaves differently for UDFs’ linked to Product and different for UDFs’ linked to Function ID.
(@RECORD_KEY) When UDF is linked to FUNCTION_ID
To use (@Record_key) in UDFs’ where Usage allowed is ‘Function_id’ you have to maintain Function Key Mapping, which will be used to determine the record key before you define the UDF.
Specifying the UD Function Key Mapping Details
Through the Function Key Mapping screen you can define the Record Key items that are used for the Function ID. This maintenance becomes mandatory if you have to use an UDF in all or any of the Functions.
You can invoke the ‘User Defined Fields Function Key Mapping Maintenance’ screen by typing ‘UDDFNMPT’ in the field at the top right corner of the Application tool bar and clicking on the adjoining arrow button.

In this screen, you must identify the function ID to which you need to link user-defined fields.
For example, the Function STDCIF is based on the STTM_CUSTOMER table. The primary key maintained for this table is CUSTOMER_NO. From the STDCIF.FMB, check the block name for the item and then enter the BLK Name (block name in the Form for the Item), ITM_NAME (Item name in the Form) and the Order Number in this screen (Order number cannot be Duplicated and Should be sequential).
After completing the Function Key maintenance you can continue defining the UDF for the Function ID.
You will be prompted to link the Function ID (e.g. STDCIF) to the Field at the Definition of the UDF.
(@RECORD_KEY) will hold the value of a combination of all item name values separated by ‘~’ that are mapped in the UD function key mapping screen in the same order of order_no. The Record key can be used only in the select statement.
For example, select country into (@FIELD_VAL) from
STTM_CUSTOMER WHERE(@RECORD_KEY) and default_media = ‘MAIL’;
(@RECORD_KEY) When UDF is linked to PRODUCT
(@RECORD_KEY) in product level takes the value of the Contract Reference Number (transaction reference number). You need not maintain the function key mapping. You can use the (@RECORD_KEY) in any statements in the Derivation rule and Validation Rule.
For example, select book_date into (@FIELD_VAL) from
CSTBS_CONTRACT WHERE CONTRACT_REF_NO = (@RECORD_KEY);
L_prod_code := substr((@RECORD_KEY),4,4);
(@FIELD_VAL) := substr((@RECORD_KEY),4,4);
(@RETURN_VAL)
This syntax can be used only in validation logic. You can Assign TRUE or FALSE Values to this parameter.
Example is given below.
(@RETURN_VAL) := TRUE;
if (@FIELD_VAL) = ‘USD’ then
(@RETURN_VAL) := TRUE;
else
(@RETURN_VAL) := FALSE;
err_code := ‘UD-UDF-01’;
err_param := (@FIELD_VAL);
end if;
The ‘err_code’ and ‘err_param’ parameters can also be assigned, and will be displayed if the validation fails in population of values.
(@UDF_field_name)
We can use another UDF that is already defined in the derivation logic of a UDF.
For example, we have another UDF DDD
(@FIELD_VAL): = (@UDF_DDD);
After writing the PL/SQL code, click ‘X’ button to execute the code. The derivation/validation code is validated by the system. If any checks fail, you must alter the statement so that the validation/derivation can be made successfully. Click ‘E’ button to view the errors.
Note
You are allowed to Use any syntax in the pl/sql code other than DML statements (INSERT, DELETE, UPDATE) and DBMS package. You will not be allowed to USE any package, function, and procedures other than GLOBAL, DEBUG and CSPKE_MISC.
2.6.8 Cube Entity
If the field that you are creating is of the type Cube Entity, indicate the entity that is applicable to the field. You can select a Cube Entity from the option list positioned next to this field. This contains the following Cube Entities:
- Currency
- GL
- Branch
- Customer
- Account
- Contract Ref No
- User Ref No
- Liability ID
For instance, you need to capture details of an additional customer for a transaction. You can choose the Cube Entity field type and select the Customer field. The list of customers maintained for your bank will be made available at the field as in any other Customer field in Oracle FLEXCUBE.
Method for Populating the Cube Entity Values
If the field type is ‘Cube Entity’, the values of a field can be selected from Oracle FLEXCUBE tables. If you select the field type as ‘Cube Entity’, the ‘Cube Entity’ screen will be displayed.

In the ‘Cube Entity’ screen, you need to specify the method by which the values have to be populated. The options available are:
- Static – If you choose this option, system will retrieve the values from a Oracle FLEXCUBE table. After specifying the cube entity, specify the table name, column name and where clause based on which the data will be retrieved from the table. If you have defined a cube entity once, you can reuse it. The adjoining option list displays all the cube entities, which you had used earlier displays. Select the appropriate cube entity. On selection of the reused cube entity, system will automatically display the table name, column name and where clause (if specified for the selected cube entity). You can however modify the condition in the where clause but not the table name and column name.
- Dynamic - If you choose this option, the values on the UDF will be populated based on the query written by the user
Note
At the time of installation, the implementer will write the PL/SQL code for the derivation rule, validation rule and also the query for fetching a cube entity according to the requirements of the bank.
Table
Depending on your selection in the ‘Cube Entity’ field, system displays the table name in which the selected cube entity is located. The value of the column (which is specified in the previous field) from this table will be picked up to populate the values of the new field.
Description
After you enter the cube entity, you may enter a brief description of the cube entity. This description will be used for information retrieval.
Where Clause
Enter the condition based on which the values from the specified column and table, the values of the new field should be picked up. Enter the condition in this field if you have indicated ‘Static’ method for populating the values of the cube entity.
Query
This is the code, based on which the values of the new field will be picked up.
The query has to be written if the option ‘Dynamic’ is selected.
2.6.9 Enabling the Update Allowed Option for a UDF
The Update Allowed option is used during Event Processing. You can assign values to a UDF when a UDE is processed. During event processing, the system assigns certain UDF parameters based on the Execution Query you have maintained in the Event Processing screen. You will be allowed to assign UDFs only for those UDFs for which the Update Allowed option has been enabled.
2.7 Making a Field Applicable to a Product
The fields that you define in the User Defined Fields screen can be made applicable to the products (and thereby to the contracts) that you create for the front-end modules of Oracle FLEXCUBE depending on your selection in the ‘Usage Allowed’ field.
For example, suppose you have defined a user-defined field DATE1 with ‘Usage Allowed’ as Product, the UDF will be displayed for association only in the Product Definition screen of a module.
At the time of creating a product click ‘Fields’ button from the ‘Product Definition’ screen. From this list of all the fields that you created, you can choose specific fields and make them applicable to the product.

In this screen, you can link the user-defined fields to the product that you are defining. Oracle FLEXCUBE allows you to link up to two hundred fields to a product.
To link a user-defined field, click add icon. A list of all the user-defined fields for which the Usage Allowed is ‘Product’ will be displayed. Select the fields that have to be included in the Contract Input screen for the contracts processed under the product that is being defined.
When a contract is processed under that product, the fields associated with the product will be available in the Contract Input screen.
2.8 UDF to a Function ID Linkage
This section contains the following topics:
2.8.1 Linking UDF to Function ID
You can link the user-defined fields (fields for which ‘Usage Allowed’ is Function Id) to a function Id in the ‘User Defined Fields Function Key Mapping Summary’ screen. You can invoke this screen by typing ‘UDSFNMPT’. in the field at the top right corner of the Application tool bar and clicking the adjoining arrow button.

Select the Function Id from the adjoining option list. For instance, if you want to include the user defined fields in the ‘Chart Of Accounts- Detailed’ screen, select the function Id GLDCHACT. After selecting the Function Id, click add icon to select the fields that have to be included in the selected Function Id screen. A list of all function Id ‘s for which the Usage Allowed is specified as ‘Function Id’ will be displayed. Select the appropriate fields that have to be included from the list. Oracle FLEXCUBE allows you to link up to two hundred fields to a Function ID.
After you save and authorize the record, the user defined fields will be included in the specified Function Id screen.
2.9 Populating the Values of UDF
This section contains the following topics:
- Section 2.9.1, "Population of UDF Values at the Contract Level"
- Section 2.9.2, "Creating a New User Defined Field – an Example"
- Section 2.9.3, "Indicating the Value of a User Defined Field for a Customer"
- Section 2.9.4, "Using the Value of the UDF for Creating a Customer Account"
2.9.1 Population of UDF Values at the Contract Level
The defaulted or derived values of the UDF linked at the product level will be populated in the Contract Input screen at the time of processing contracts under a particular product. Similarly, the values of the UDF’s linked to a function Id will be populated in the function Id screen.
The UDF’s linked to a particular product will be available when a contract is processed under that product. In the Contract Input screen, click ‘Fields’ button to invoke the ‘User Defined Fields’ screen.
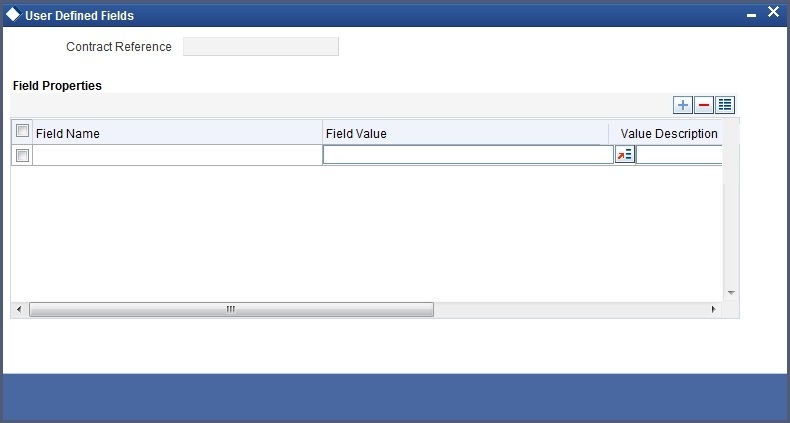
In this screen, all the user defined fields associated with the product under which you are processing the contract will be displayed.
According to your specifications at the time of defining the user defined fields, system may derive the values of the UDF from:
- Derivation Logic: When you click ‘Fields’ button, system derives and displays the values of the fields for which derivation rules are written. The value description is also displayed alongside.
- Static List of Values: If the validation type of the UDF that is associated with the contract is ‘List of Values’ (LoV), system will display the static values, along with the value description. If you have indicated a default value for the LoV, the default value and its description will be displayed. When a user selects the value from the LoV, the system displays the description on the screen.
- Method of derivation for cube entity fields: If a UDF is of type Cube Entity, system populates the values in a LoV. The values will be derived from the specified Oracle FLEXCUBE table (if the cube entity type is ‘Static’) or from the query written by the user (if the cube entity type is ‘Dynamic’)
You will not be allowed to change the values of the fields for which you have not allowed amendment (if the option ‘Amendable is unchecked at the time of defining an UDF) and derivation is allowed (Option ‘Derivation Allowed’ is checked).
Enter the values for the fields, for which the values are not derived by the system.
You can change the value of a UDF after the system has derived the value from the derivation logic. But it might so happen that the derivation logic of another UDF might use the value of the UDF that you have changed. Consequently, if you change the value of the UDF whose value is used in another UDF, the value of that UDF will also change.
For example, let us assume that you have defined a user defined field UDF1 to display the Euro equivalent of the contract currency.
The derivation logic of another user defined field (UDF2) utilizes the values of UDF1 to arrive at the value of UDF2. Assume that in the derivation logic written for UDF2, you have specified that the value of UDF2= 2 UDF1.
At the contract level, system converts the contract currency into Euro equivalent and displays the value of UDF1, as 220.00. According to this value of UDF2 will be 444.00. However, if you change the value of UDF1 to 250.00, it will effect on the value of UDF2 also (it becomes 500.00).
If the change in the UDF value has effected any other UDF, system will display an override informing you about the UDF whose value will be changed. Select ‘Ok’ button if you want the system to re-calculate the value of the UDF based on the modified UDF value.
2.9.2 Creating a New User Defined Field – an Example
To include the value of a user defined field (UDF) in the customer account number, you need to create a user defined field for the function Id STDCIF. Function Id STDCIF indicates the ‘Customer Information Maintenance’ screen. Since the value of the UDF will be included in an account number, it is mandatory for you enter the value of this UDF (value of the UDF is entered at the time of creating a customer. This is discussed in the subsequent sections of this chapter). Therefore, remember to check against ‘Mandatory’ while defining the user defined field. If you choose this option, system ensures that you enter a value for the UDF.

After creating the UDF, link it to the function Id STDCIF in the ‘User Defined Fields Function Key Mapping Summary’ screen.

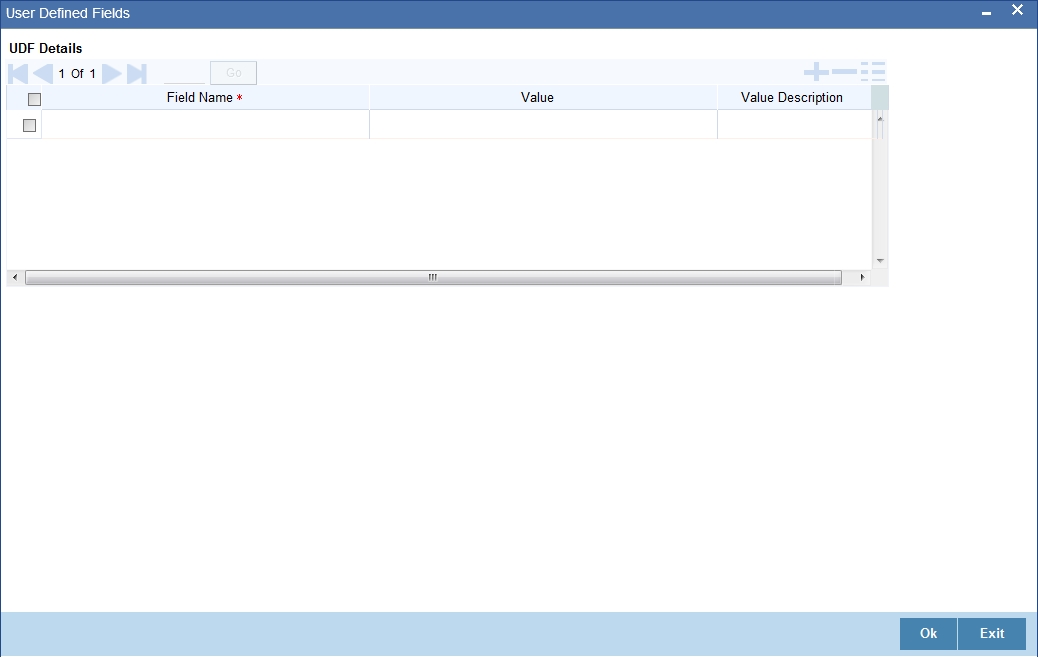
2.9.3 Indicating the Value of a User Defined Field for a Customer
At the time of creating a new customer in the ‘Customer Information Maintenance’ screen, click ‘UDF’ button to invoke the ‘User Defined Fields' screen. Enter the value for the user-defined field, which has to be included in the customer account (since it is mandatory). This value will be displayed at the time of defining a new customer account on selection of the customer.
2.9.4 Using the Value of the UDF for Creating a Customer Account
You might have linked several user defined fields to the customer. Out of these, you want the value of a particular UDF to be included in the account number. Therefore, your bank should inform the implementer of Oracle FLEXCUBE, the UDF whose value has to be picked up and included in the customer account number.
The implementer will indicate the UDF whose value has to be picked up and included in the account number at the back end. Consequently, at the time of creating new customer accounts, Oracle FLEXCUBE automatically picks up the value of that particular user defined field. This will be displayed on selection of the customer.
For example, let us assume that your bank wants to include the value of the UDF CUST_COUNTRY_CODE created to include the country code of the customers in customer account numbers. Therefore, your bank has to inform the implementer that the value of the UDF CUST_COUNTRY_CODE has to be included in the account number. The implementer will indicate at the back end that the value of the user defined field CUST_COUNTRY_CODE should be included in the customer account number.
Let us assume that you have entered the value IND for the UDF CUST_COUNTRY_CODE for the customer Ms.Tanya Agnihotri (CIF Id 000000013).
At the time of creating a new account for Ms.Tanya Agnihotri, system will automatically display the value IND on selection of CIF Id 000000013.
In Oracle FLEXCUBE, customer accounts are defined in the ‘Customer Accounts Maintenance’ screen. To create a new account for a customer, select ‘New’ from the Actions menu in the Application toolbar or click new icon. You will be prompted to select the account number according to the account mask.
If you have specified the account mask as CCCCCCCLLLLLUUU$$$d, system will allow you to select the customer, account class, currency. Select these parameters from the adjoining option list. When you select the customer, system automatically picks up and displays the value of the UDF maintained for that customer.
2.10 Uploading User Defined Fields
This section contains the following topics:
2.10.1 Contract Upload
Your bank may use Oracle FLEXCUBE to process certain transactions (say LD and FT transactions) and use another application to process other transactions (say MM and FX transactions).
At some point of time, your bank may want to use the values from the external system in Oracle FLEXCUBE. For this purpose, Oracle FLEXCUBE stores the values of the various fields from the external system (an application other than Oracle FLEXCUBE) in a database table. If your bank wants to use the value of the fields from the external system in Oracle FLEXCUBE, the values have to be brought into Oracle FLEXCUBE database. This is done through a process called ‘Upload’.
Let us assume that your bank is processing LD transactions in Oracle FLEXCUBE and MM transactions in an external system. For processing certain LD transactions, your bank wants to use the values from certain MM transactions. Therefore, you will have to put the value of the contract reference number along with the field name and value of the MM transactions, which you want to use in Oracle FLEXCUBE into a database Upload table with the status marked as ‘U’ (indicating that it has to be taken up for processing). This Upload table contains the values posted from the external system. Subsequently, you will have to bring the values of these fields into Oracle FLEXCUBE. This is done by running the contract upload program.
When you run this program, Oracle FLEXCUBE selects the fields for which the status is ‘P’. It will upload the values from the external system into Oracle FLEXCUBE database.
2.10.2 Function Upload
The values of the fields from external system used in the maintenance screens should be uploaded into Oracle FLEXCUBE database.
2.11 User Defined Fields for Account Statements
This section contains the following topics:
- Section 2.11.1, "Invoking Detailed Account Statement Fields Maintenance Screen"
- Section 2.11.2, "Defining User Defined Fields for Customers"
- Section 2.11.3, "Making the UDF part of the Customer Maintenance screen"
- Section 2.11.4, "Defining UDFs for SSIA"
- Section 2.11.5, "Maintaining UDF for the Cheque Book Details screen"
2.11.1 Invoking Detailed Account Statement Fields Maintenance Screen
The ‘Detailed Account Statement Fields Maintenance’ screen in Oracle FLEXCUBE allows you to define fields that you wish to appear in the account statements for all the modules. You can also define the list of values for the user defined fields that need to appear in the statements.

In the Detailed Account Statement Fields Maintenance screen, you can specify a list of user defined fields applicable for a product that you have created. Each list can be identified by an UDF name and description.
You can maintain as many UDF and product combination as you require.
In this screen, you have to maintain the following details:
Product Code
You can select the product for which the user defined field details are being maintained. The user defined field details will be validated only for transactions involving the product selected in this field. The description for the product code will be displayed on selection of the product code.
User Defined Field Name
You have to select the UDF name from the option list for which the account statement maintenance has been initiated.
User Defined Field Name
In addition to the UDF name, you can give a brief description to describe each UDF.
Statement User Defined Field Number
The system automatically displays the statement number sequentially for the user defined field you have selected.
In Oracle FLEXCUBE, when ever an Account Statement is generated for any of the modules, the following details is displayed in the User Defined Field Detailed section:
- A unique contract reference number
- A user reference number
- A brief description for the account number
- A brief description of the offset account number
- The bill number of the contract
- The issue date of the contract
- A brief narrative of the contract
- Identification of the institution
- The bill amount
- The currency of the bill
- Description of the charge 1
- Details of the charge 1
- Description of the charge 2
- Details of the charge 2
2.11.2 Defining User Defined Fields for Customers
On occasions, to know your customer better, you may need to capture additional information about the customer. This is in addition to the regular information that you would capture in the Customer Information Maintenance screen. You can do so by defining a set of UDFs and associating them with the function id ‘STDCIF’ (for Customer Information Maintenance screen). On association, the UDFs will be available in the screen and you can enter the values for the same. The values will be verified for adherence to the validation rules maintained for the UDFs.
For instance, you may want to capture the ‘Personal Identification Number’ for all individual customers of your bank. To achieve this, you need to define ‘Personal Identification Number’ as an UDF in the User Defined Fields screen. You can also write a code to validate the entry into this field.
For example, the bank wants to add a new field to capture the Tax Number of all its corporate customers. The bank wants to maintain a 10-digit tax number and further, wants to validate the 10th digit of this number based on the following rule.
Multiply the value of each position (1 to 9) with the weight for each position. Your bank will provide the weight for each position. For instance, assume that the tax number is 145736257.
The position-wise weight and tax number and the product (of weight and number) is as provided below:
Fields |
Positions |
||||||||
|
1 |
2 |
3 |
4 |
5 |
6 |
7 |
8 |
9 |
Weight (W) |
4 |
3 |
2 |
7 |
6 |
5 |
4 |
3 |
2 |
Number (N) |
1 |
4 |
5 |
7 |
3 |
6 |
2 |
5 |
7 |
Product (W * N) |
4 |
12 |
10 |
49 |
18 |
30 |
8 |
15 |
14 |
Sum of the product = 160.
Divide the value 160 by 11 to obtain the remainder.
Remainder = (160/11) = 6
Therefore, the 10th digit = (11 – Remainder) = 11 – 6 = 5
As per this algorithm, if the remainder is 1, then the value of the UDF (Tax Number) should be considered as an invalid number. If zero is the remainder, then zero should be taken as the 10th digit of the tax number entered.
To do this:
- You need to define the UDF ‘Tax Number’
- Specify Usage Allowed as ‘Function ID’.
- Write a rule to validate the 10th digit of the Tax Number as per the above specifications.
- Map the UDF ‘Tax Number’ with the Function Id ‘STDCIF’ (function id for Customer Maintenances screen) so as to make the field appear in the Customer Maintenance screen. You can then enter the value for the same.
The procedure for mapping the UDF with the function id ‘STDCIF’ is explained in the following sections.
2.11.3 Making the UDF part of the Customer Maintenance screen
You can make the UDFs defined for the function id ‘STDCIF’ as part of the Customer Maintenance screen. Oracle FLEXCUBE allows you to include a maximum of five UDFs in the screen.
The mapping is achieved through the ‘Embedded Field Maintenance’ screen invoked from the Application Browser. You can invoke this screen by typing ‘STDBSUDF’ in the field at the top right corner of the Application tool bar and clicking the adjoining arrow button.
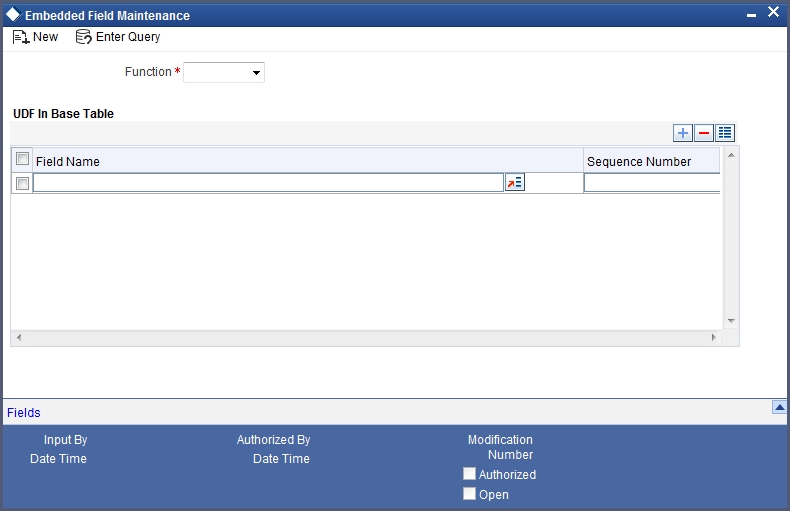
Select the function id ‘STDCIF’ from the option-list provided. All the UDFs maintained for the selected function Id would be available in the option-list for the ‘Field Name’. Select the UDFs you want to include in the ‘Customer Maintenance’ screen. You can select a maximum of five UDFs. Also, specify the sequence in which you would like the UDFs to appear in the screen. The selected UDFs will form a part of the Customer Maintenance screen and will be displayed in the sequence that you specify.
The value that you enter for the UDFs will be validated as per the validation rules maintained during the definition of the UDF.
2.11.4 Defining UDFs for SSIA
SSIA refers to a special type of savings account used for promoting savings by customers. Depending on the policies of your government, you can maintain a minimum and a maximum deposit amount for an SSIA. Further, you can also assign a fixed allowance rate on the deposited amount if the deposit is within the specified limits.
On maturity, you can send the details of the SSIA to the Revenue department to claim the allowance made to the customer.
Refer to the ‘Products’ chapter of the ‘Interest & Charges’ User Manual for details on SSIA processing.
You can maintain UDFs to communicate the information related to the SSIA to the Revenue department. The following UDFs need to be maintained:
For Usage in the Bank Parameters Screen
Name of the UDF |
Description |
Contact Person |
Name of the contact person in your bank for the SSIA account. |
Contact Number |
Telephone number of the contact person |
At the time of maintaining the above UDFs in the User Defined Fields’ screen, you need to associate them with the function id ‘STDBANKP’ for allowing them to appear in the Bank Parameters screen.
For Usage in the Customer Accounts Maintenance Screen
UDF Name |
Description |
Date of account Opening |
The date on which the SSIA account is opened. If the account is maintained in your bank, it will be the account open date as specified in the Customer Account Maintenance screen. For a transferred account, a different date will be captured. |
Date of account Maturity |
Maturity date of the SSIA account |
Total Subscription amount |
The total amount deposited until the transfer of the account from a different bank. |
Total Tax Credit |
Total tax credit on the lodgment amount by the exchequer until the transfer of the account from a different bank. |
Total Interest |
Total interest acquired on the account till the account is transferred. |
Amount Deposited into the SSIA on the transfer Month |
Amount deposited into the SSIA in the transfer month till the account is transferred. |
Termination Method |
The possible values are ‘Termination’ and ‘Closure’. The field value will be ‘Termination’ when the account is terminated and ‘Closure’ when the account is transferred to another bank. |
When defining the above UDFs, you have to associate them with the function id ‘STDCUSAC’ for allowing their usage in the Customer Accounts Maintenance screen.
These fields will be used only for information purposes. Oracle FLEXCUBE will validate all entries made to the field as per the validations defined, if any.
2.11.5 Maintaining UDF for the Cheque Book Details screen
For Cheque Book reordering, whether manual or automatic, you have to indicate the type of cheque to be reordered. For this, you can define an UDF ‘Cheque Type’ and associate it with the function id ‘CACHBOOK’ (for Cheque Book Details screen). You can maintain a list of values (LOV) and their descriptions when defining the UDF in the User Defined Fields screen.
The possible values and the descriptions for this UDF are as follows:
Value |
Description |
J |
20 page x 3.5’ Personal |
K |
40 page x 3.5’ Business |
P |
40 page x 3.5’ Business |
L |
40 page x 3.5’ (2 Part) |
R |
80 page x 3.5’ Business |
At the time of defining cheque book ordering details in the Cheque Book Details screen, invoke the ‘User Defined Fields’ screen. In this screen, the UDF ‘Cheque Type’ that you had linked to the function Id ‘CACHBOOK’ will be displayed along with the list of values. You can click on the option-list provided and select the value of your choice.
Refer to the ‘CASA’ User Manual for details on maintaining Cheque Book reordering parameters in the Cheque Book Details screen.