5. Processing an Expense Contract
You can capture the details of an expense contract in the ‘Expense Processing Contract Detailed’ screen. Before we proceed to discuss the details of the screen, we shall briefly recall the workflow in the XP module.
First of all, you maintained the Vendors you deal with and the Documents that should accompany an expense contract in the ‘Vendor Maintenance’ screen and the ‘Bills & Collections Document Code Maintenance’ screen, respectively. This information is used when defining an Expense Product.
Products help you group together or categorize expense contracts which share broad similarities. Under a product you have defined, you can enter specific expense contracts. By default, a contract inherits the attributes of the product to which it is associated. This means that you do not have to define the attributes that default from the product every time you input a contract involving the product.
You can capture the payments made against the different items of a contract in the XP Payments screen.
This chapter contains the following topics:
5.1 Expense Processing Contract
This section contains the following topics:
- Section 5.1.1, "Invoking the Contract Screen"
- Section 5.1.2, "Contracts Tab"
- Section 5.1.3, "Documents Tab"
- Section 5.1.4, "Advices Tab"
- Section 5.1.5, "Asset Details Button"
- Section 5.1.6, "Events Button"
- Section 5.1.7, "Refund Button"
5.1.1 Invoking the Contract Screen
You can invoke the ‘Expense Processing Contract Detailed’ screen from the Application Browser. To enter the details of a fresh contract, click on New from the Actions Menu, or ‘New’ icon in the toolbar. The XP contract screen with no values in the fields will be displayed.
If you are calling a contract that has already been created, click on ‘Summary’. The details of the contracts that you have entered will be displayed in a tabular form. From the summary screen, you can open an existing contract by double clicking on it.
You can invoke ‘Expense Processing Contract Detailed’ screen by typing ‘XPDTRONL’ in the field at the top right corner of the Application tool bar and clicking the adjoining arrow button.
The Contract Details screen is divided into three convenient sub-screens, each invoked by clicking on a tab. The sub-screens are:
- The Contract Main screen
- The Contract Document screen
- The Contract Advice screen
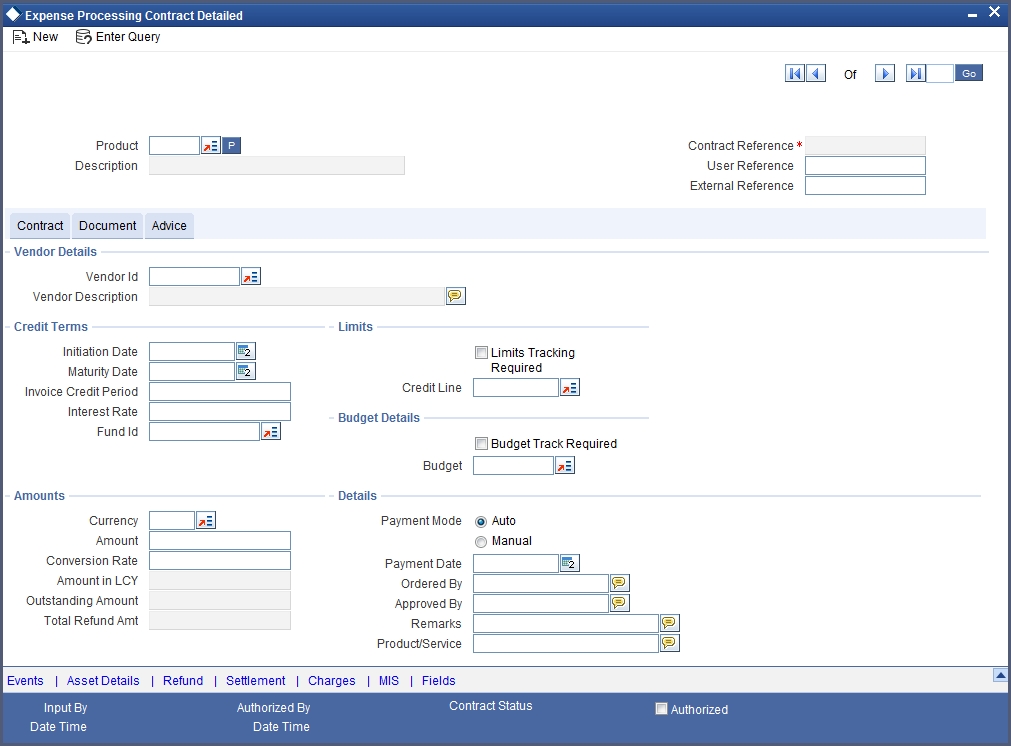
5.1.2 Contracts Tab
In the Contract Main screen, you can capture the basic details of the contract you are entering.
Specifying the Vendor
Vendor Id
You must, first of all, specify the vendor with whom you are entering into the expense contract. A list of vendors is maintained in the ‘Vendor Maintenance’ screen. You can only enter into contracts with vendors who are not blacklisted.
Vendor Description
A brief description of the vendor you specify, as entered in the ‘Vendor Maintenance’ screen, will be displayed for your reference.
Specifying the Credit Terms
Initiation Date
Specify the date on which the contract is initiated. Click the adjoining calendar button to specify the date.
Maturity Date
Specify the maturity date of the contract. Click the adjoining calendar button to specify the date.
Invoice Credit Period
Specify the Credit Period, as specified in the Invoice, if any.
Interest Rate
Enter the penalty Interest Rate that should be levied on the outstanding contract amount in case of default.
The specified penalty interest will be levied on completion of the Invoice Credit Period. The interest will be levied for the entire tenor of the contract.
Specifying the Limit Details
Limits Tracking Required
Check this option if you would like to track the expense contract you are capturing under a credit line.
Credit Line
If you opted to track the contract you are entering under a credit line, identify the Credit Line here. Choose the ID of the Credit Line from the option list.
Entering the Amount
Amount
Enter the total amount of the expense contract.
Currency
In case of a cross-currency contract, specify the currency of the contract.
Conversion Rate
In case of a cross-currency contract, specify the conversion rate that should be used.
Amount in LCY
Using the conversion rate specified, the amount in local currency will be displayed for your reference.
Outstanding Amount
The system also deducts all payments that you have made to the vendor towards delivery of different items on the contract, and displays the outstanding amount.
Total Refund Amt
The system will display the total of all the refunds made for a contract.
The other Details
In addition to these details, you can specify the following details:
Payment Mode
You have to indicate the mode of payment based on which the booking amount will be paid to the vendor. This specification will get defaulted from the product under which the contract is being booked. However, you have the option to change it at the contract level. The following payment options are available:
- Automatic - If the payment mode is automatic, the system will automatically trigger the payment on the payment date as specified at the time of capturing the contract details.
- Manual – In the manual mode, you have to make the payment manually using the ‘Payment’ screen.
Payment Date
If you have maintained the payment mode as ‘Automatic’, you have to maintain the payment date also. The system will automatically process the payment on the date that you specify here.
The payment date will undergo a holiday check as per the ‘Local Holiday Calendar’ maintained for your branch. If the payment date falls on a holiday, the system will generate an override message to indicate the same
Note
If the mode of payment is manual, you will not be allowed to capture the payment date at the contract level.
The system will process the payment based on the payment mode and the payment date.
For more details on payment processing, refer the Products chapter of the XP User Manual.
Ordered By
Specify the names of your officers who ordered the purchase of the goods/services respectively.
Approved By
Specify the names of your officers who authorized the purchase of the goods/services respectively.
Product/Service
Specify a brief description of the produce/service underlying the expense contract.
Specifying Budget Details
Budget Track Required
The system will track the budget for the booking amount only if you enable this option. This specification will be defaulted from the product under which the contract is booked. However, you can change it at the contract level.
Budget
You have to indicate the budget code under which the tracking should be done. This specification will also be defaulted from the product associated with the contract. However, you have the option to select a different budget code at the contract level. The budget codes defined through the Budget Code Maintenance screen will be available in the option-list provided. You can select the appropriate code from this list.
Note
This field will be enabled only if the ‘Budget Tracking Required’ option is selected.
Refer the Products chapter of the Expense Processing User Manual for information on maintaining budget codes and budget details.
Validations performed for budget tracking are given below:
- At the time of booking an expense contract, the system will check whether you have maintained the budget details for the associated budget code for the fiscal year of the transaction date. If the details are not maintained, the system will not allow you to book the contract.
- If the available balance under a budget code falls below the amount being disbursed or paid, the system will generate an appropriate override message to indicate the same.
- The system will track the budget for a contract against a single budget code that is initially associated with the contract throughout the life cycle of the contract, irrespective of the fiscal year during which the operation is performed. If the operation falls in a different fiscal year, the system will display a override message.
- An override message will be displayed if an operation leads to negative utilization or negative availability under a budget code.
Credit Terms
Fund Id
The fund Id will be visible only if the current branch is a fund branch. Select the Fund Id from the option list. The settlements processing is enabled only if ‘Allow Corporate Access’ is checked in the Branch Parameters – Detail View screen.
- If ‘Allow Corporate Access’ is not checked, then the settlement account would be the fund bank accounts linked to fund id.
- If ‘Allow Corporate Access’ is checked, then the settlement account is fetched from the settlement instruction maintenance for the counterparty.
5.1.3 Documents Tab
An expense contract is normally accompanied by certain standard documents of the following types:
- Transport
- Insurance
- Invoice
- Any other
You can capture the details of these documents in the XP Contract screen. Click ‘Document’ on the ‘Expense Processing Contract Detailed’ screen.

All the documents specified for the product to which the contract is linked will default to this screen. You can add to or delete documents to this default list. To add a document for the contract you are processing, click add row icon button,. Select the code of the appropriate document from the list of document codes maintained in the ‘Documents Maintenance’ screen. The description of the document will be displayed in the Description field.
To delete a document that is not required for the contract you are processing, highlight the document code and click delete row icon button.
For each document that you specify, you have to maintain the following details:
- The Document Reference and Date
- The Covering Letter Reference and Date
5.1.4 Advices Tab
The advices that can be generated for the different events in the lifecycle of a contract are defined for the product to which the contract is linked. For example, you may have specified the following advices for an XP product:
- Booking Advice
- Payment Advice
- Amendment Advice
These advices will default to contracts associated with the product.
From the ‘Expense Processing Contract Detailed’ screen, click ‘Advice’ tab. The advices screen is displayed. The advices that are defined for the product, for the event you are processing, will be displayed. You can choose to suppress any of these advices.
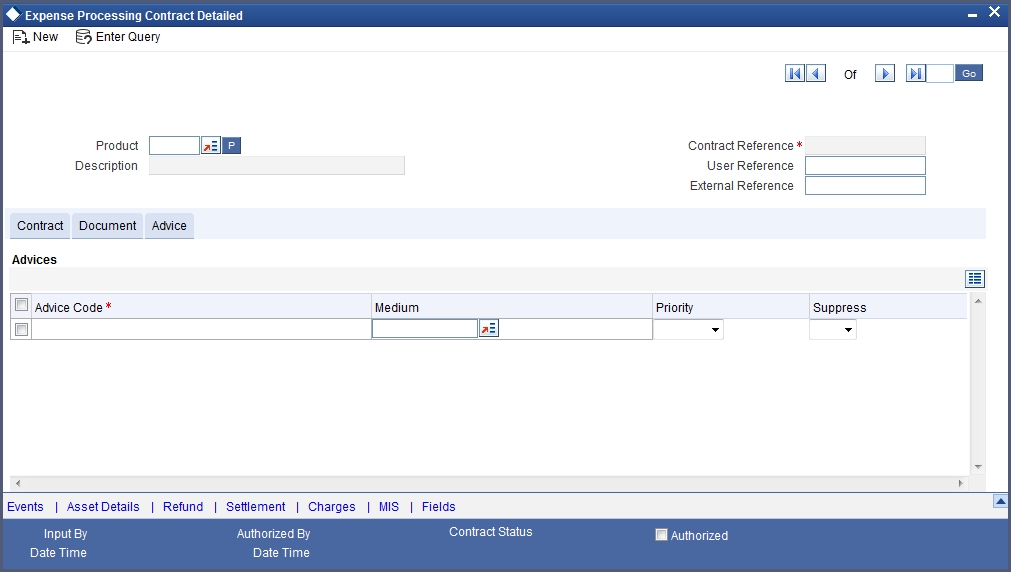
The address of the vendor to whom the advice is addressed to will be picked up by default, based on the media and address maintenance for the vendor. You can change this.
For a payment message by SWIFT, you can indicate a ‘priority’.
Medium
The medium by which an advice is transmitted and the corresponding address will be picked up based on the media and address maintained for the vendor.
You can, however, change either of these while processing the contract.
Priority
For a payment message by SWIFT, you can change the ‘priority’ of the message from ‘Normal’ to ‘Medium’ or ‘High’. By default, the priority of all advices is marked as ‘Normal’.
Suppress
By default, all the advices that have been defined for a product will be generated for the contracts involving it. If any of the advices is not applicable to the contract you are processing, you can suppress its generation by ticking the suppress field.
5.1.5 Asset Details Button
A contract can have several items towards which you would incur an expense. You can record the value of each item on a contract in the ‘Expense Processing Items’ screen. You can invoke this screen by clicking Asset Details button in the ‘Expense Processing Contract Detailed’ screen.
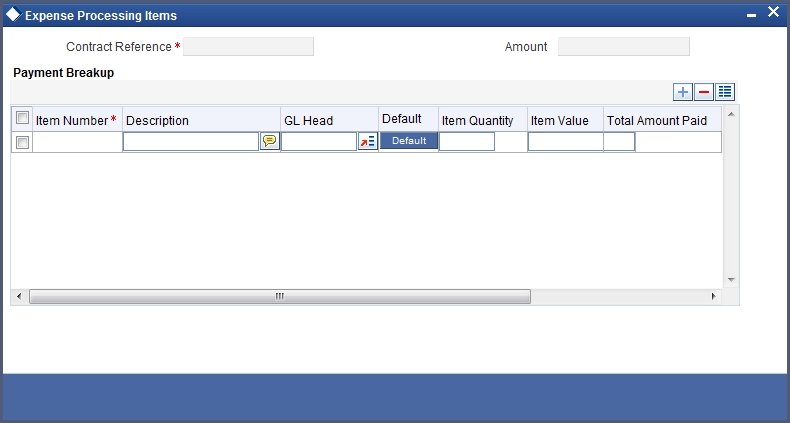
Individually, you can enter the following details for the different items on the contract:
- A Description of the item
- The Quantity of the item. In the case of services, this would contain
the value ‘1’.
- Specifying GL Heads. You have to enter the Expense GL’s for individual items / services GL Heads. GL Head input at contract level is mandatory if the Product level ‘Contract Level Expense GL’s option is set to Yes and if ‘Contract Level Expense GL’s’ option is set to No at Product level this field will be disabled in the Contract input
- Expense processing would be done using the GL’s specified in the contract.
- Default Product Level GLs
- The Total Value of the item. In the case of services, this would be the total value of the service. In the case of goods, the system checks that cumulative value of the items must not exceed the total contract amount mentioned in the XP Contract Details screen.
5.1.6 Events Button
The ‘Event Details’ screen of contract processing shows the details of the accounting entries generated for a contract. Click ‘Events’ in the ‘Expense Processing Contract Detailed’ screen.
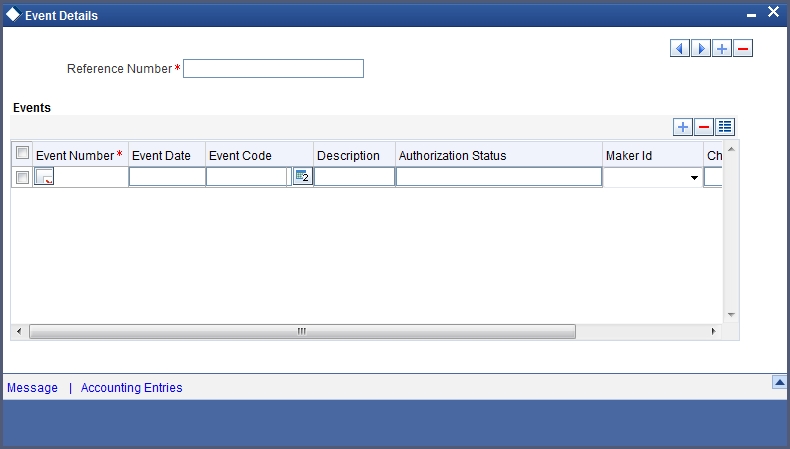
The details of events that have already taken place on the contract will be displayed, along with the date on which the event took place.
5.1.6.1 Accounting Entry Button
In this screen, you can view the accounting details for a specific event in the life cycle of an expense contract. To invoke the ‘Accounting Entries’ screen, click ‘Accounting Entries’ in the ‘Event Details’ screen.
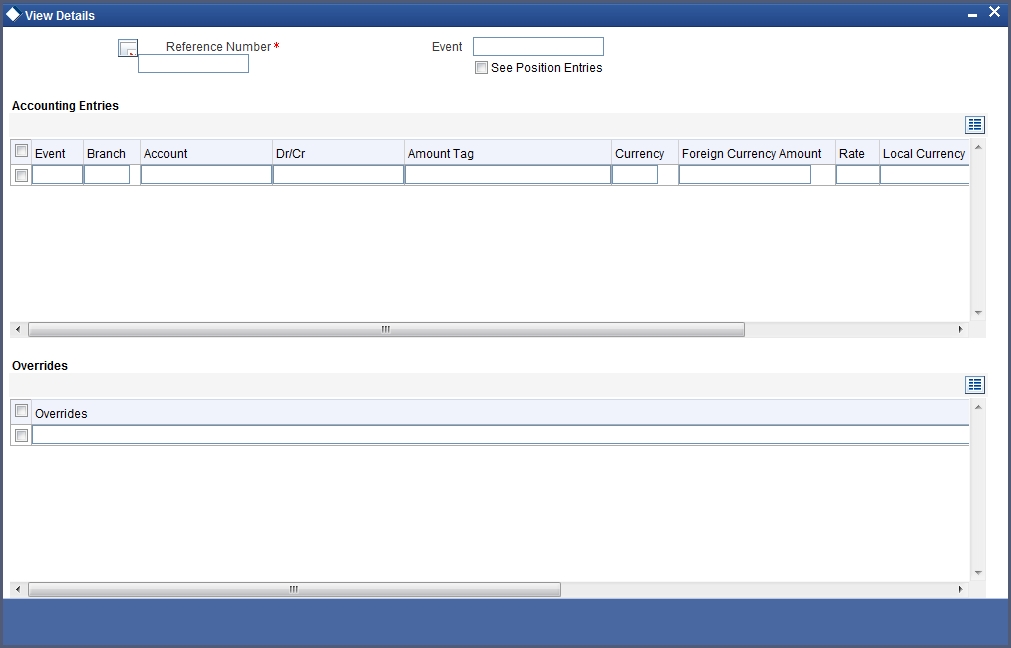
The following information is provided for each event:
- Branch
- Account
- Currency
- Amount Tag
- FCY Amount
- Rate
- LCY Amount
- Debit/Credit
- Transaction Date
- Value Date
- All the overrides that were given for the event.
Click Exit button to go back to the screen from where you invoked the Accounting Entries screen.
5.1.7 Refund Button
You can view the details of individual refunds processed for an expense contract. To invoke the ‘Refund Details’ screen, click ‘Refund’ button in the ‘Expense Processing Contract Details’ screen. The screen is displayed below:

For details relating to Charges and Settlements, please refer the Charges and Settlements user manuals.
5.2 Payments for an Expense Contract
This section contains the following topics:
- Section 5.2.1, "Maintaining Expense Processing Payment Details"
- Section 5.2.2, "Settlement Button"
- Section 5.2.3, "Deleting Payments"
- Section 5.2.4, "Authorizing Payments"
- Section 5.2.5, "Unlocking a Contract"
- Section 5.2.6, "Processing a Refund or Reversing of an Expense Contract"
5.2.1 Maintaining Expense Processing Payment Details
You can enter payments made towards an expense contract in the ‘Expense Processing Payment’ screen. You can invoke this screen by typing ‘XPDPMNT’ in the field at the top right corner of the Application tool bar and clicking the adjoining arrow button.
The following operations can be performed on a payment, through the Expense Processing Payments screen:
- Input of payments
- Deletion of payments
- Reversal of payments
Reference Number
You shall specify the reference number of the expense contract in respect of which you are entering payment.
On entering the reference number of the expense contract in the ‘Expense Processing Payments’ screen, the following details will be displayed on the screen:
- The vendor involved in the expense contract
- The currency of the expense contract
- The status of the contract
- The total outstanding amount as of the Value date (the date on which the payment is being made)
- The version of the contract (it is, the number of times the contract has been modified)
- The total outstanding retention amount in respect of the vendor, as on the date of payment
- If the contract involves an advance to the vendor for goods or services to be delivered, the total advance amount due is displayed.
- The net amount paid by the vendor
Entering Payment Details for the Contract
You must enter the following details for the payment:
- The total amount being paid to the vendor towards the dues in respect of the expense contract. This amount is apportioned to the items for which the expense was occurred, as applicable. When you specify the amount being paid, the amount liquidated towards each item is displayed in the Payment Breakup section.
- Part of the amount being paid can be retained, or treated as advance payment for items that are to be delivered. If so, you can record the ‘Retention Amount’ and the ‘Advance Amount’, if any, in the respective fields in this screen.
- The service (or product) in respect of which the expense was incurred, towards which the payment is being made
- The value date of the payment. The Value date here is the date on which the liquidation entries will be passed for the contract.
- The amount being paid to the vendor towards a penalty interest on the contract, if any
- If the contract involves an advance to the vendor for goods or services to be delivered, you can specify the advance amount being paid (Advance Amount)
- If you wish to retain any portion of the payment being made to the vendor, you can specify the retention amount (Retention Amount)
- The portion of the outstanding retention amount that is being paid to the vendor through the payment you are recording.
- The discount (flat amount) on the payment, if any, if allowed in the terms of the contract. This amount is deducted from the amount being paid to the vendor.
- If you are liquidating advance paid out to the vendor on receipt of goods or services, you can specify the paid advance amount that you are liquidating.
- Any appropriate remarks, if any
Contract Item Details Displayed by the System
The system also displays the items of the contract, towards which the expense has been incurred, along with the following details for each item:
- A description of the item
- The quantity of the item
- The total value of the item
- The total amount paid towards the item
- The current amount paid towards the item
- Delivery Status
5.2.2 Settlement Button
When the contract and the accounts for payment are in different currencies, you may enter the Foreign Exchange rate for conversion, in the Settlements screen. If the customer account was not defined at the time of contract input, you will have to specify an account, at the time of payment, through the Settlements screen.
The payment accounts can also be changed at the time of payment. The new payment accounts will only be used only for that particular session, of the payment function.
To invoke the Settlements service from the payments function, click ‘Settlement’ button in the ‘Expense Processing Payments’ screen.
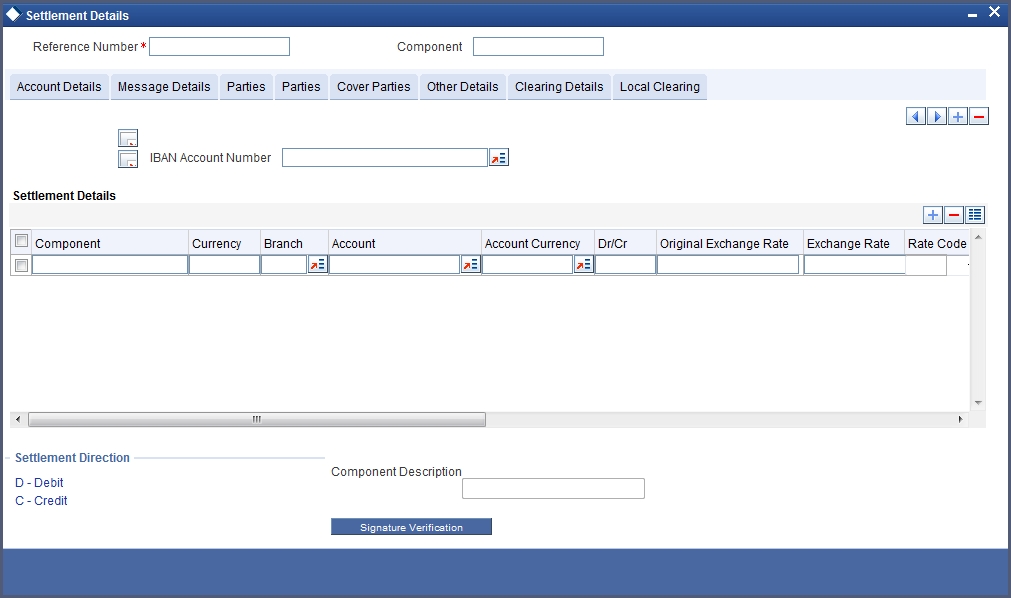
In this screen,
- The currency (of the contract components) and the branch will be displayed.
- You can change the payment account.
- You can specify the exchange rate, if the Settlement Account Currency is different from the contract currency.
For further details, refer ‘Settlements’ User Manual.
5.2.3 Deleting Payments
Payments made using the payments function, can be deleted before the payment is authorized.
All the entries passed during the payment will also be deleted. All the schedules will be restored to the original status. In short, the prepayment status of the contract will be restored.
From the Actions Menu, choose Delete or click delete icon in the toolbar. You will be prompted to confirm the deletion. Once you confirm it, all the entries that have been saved, but not authorized, will be deleted.
5.2.4 Authorizing Payments
You can invoke this function from the Application Browser. Enter the Reference number, the Value date of the payment and the amount paid (of those payments that you want to authorize). The payment details are displayed, along with the overrides and an authorization will be sought. If you choose not to authorize the payment, the authorization screen will be dismissed.
5.2.5 Unlocking a Contract
If you want to change the details of an authorized contract, you can unlock the contract by selecting the ‘Unlock’ option from the Actions Menu, or click unlock button in the toolbar. The ‘Amend’ screen will be displayed.
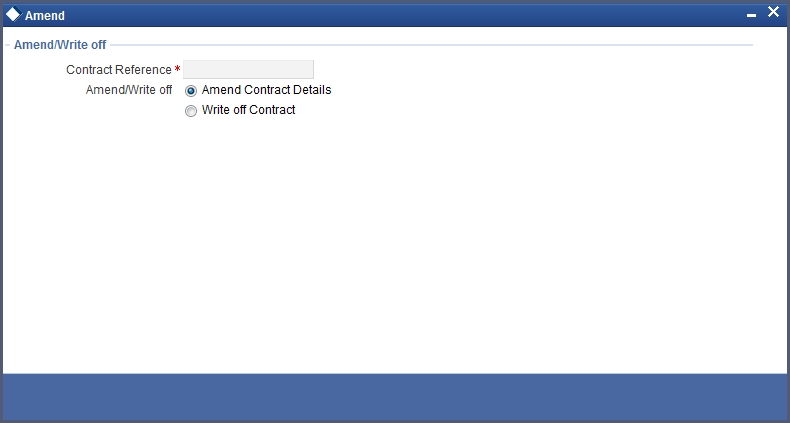
Using the above screen, you can either write-off or amend the contracts details.
For further details, refer ‘Common Operations’ chapter in the Procedures user manual.
5.2.6 Processing a Refund or Reversing of an Expense Contract
In Oracle FLEXCUBE, you can choose to process refunds for an expense contract. This would result in a decrease in the utilization of the budget. Consequently, the available balance will be incremented under the budget code that is associated with the contract. However, you are allowed to process refunds for liquidated expense contracts only.
Note
Only fully liquidated contracts are available for refund.
You can process a refund for a contract by using the ‘Reverse’ option from the Actions Menu, or click ‘Reverse’ icon in the toolbar. The ‘Reverse/Refund’ screen is displayed.

5.2.6.1 Refunding the Contract
For refunding the contract, select ‘Refund’ option and click ‘Ok’ button. The following screen will be displayed:
The system will display the following details in this screen:
- The reference number of the contract
- The currency of the contract
- The budget code associated with the contract
In addition to the above details, you have to indicate the following:
Refund Value Date
This is the date on which the refund will become effective in the system. Accordingly, on this date, there will be a decrease in the amount utilized under the budget code and an increase in the available balance.
Refund Amount
This is the amount to be refunded for an expense contract. The refund amount is expressed in the contract currency. Further, the System checks the refund amount against the total amount of the expense contract and the amount already refunded under the contract. The system displays an override message if the total of all the refunded amounts exceeds the contract amount.
If the contract currency is different from local currency of the branch, the System converts the refund amount to the local currency equivalent by using currency conversion rates maintained for the branch. The LCY equivalent will be used to decrease the utilization of the budget code and accordingly increase the available amount.
Note
The system will display an error message if you do not process a refund in the same financial year in which contract is booked.
Refund Exchange Rate
You can specify the exchange rate which is used to arrive at the LCY equivalent for budget tracking and accounting if the contract currency is different from the local currency of the branch.
5.2.6.2 Reversing Payments
You can reverse authorized payments on an expense. For reversing the contract, select ‘Reverse’ option in the ‘Reverse/Refund’ screen and click ‘Ok’ button. In the Expense Payment Processing screen, to reverse a payment, you must specify the Contract Reference Number. Enter the Amount Paid and then click on Reverse in the Processing sub-menu of the Actions Menu. The system reverses all the accounting entries passed during the payment that was processed earlier in respect of the contract, and updates the status of the payment as "Reversed".
The following details will be displayed in this screen:
- The date on which the refund details were maintained
- The date on which the refund became effective in the system
- The refund amount
5.2.6.3 Maintaining Accounting Entries for Refund Processing
The XRFD (Refund) event will be triggered when you process a refund in the system.
For details about the accounting entries associated with the XRFD event, refer the Appendix A - Accounting Entries and Advices for the Expense Processing module, in this user manual.
For a complete list of events, accounting roles, amount tags and event-level accounting entries applicable for an expense contract, refer the Appendix A - Accounting Entries and Advices for the Expense Processing module, in this user manual.