Welcome to Customer and Accounts User Guide
Essentially each virtual account is a dummy sub-account of the customer’s own physical account with the bank. They cannot exist outside of that immediate relationship, hence they are virtual. The serves to segregate any funds from any other funds in the same main account and yet is inextricably linked to that account. The key to a virtual account is thus the virtual account number/identifier.
This document is intended for Back Office Data Entry Clerk, Back Office Managers/Officers, Product Managers, End of Day Operators and Financial Controller users.
This section contains the following topics:
|
Account Facility
As part of on-boarding a customer for virtual account facility, you must enable virtual account facility for the customer. You can enable/disable virtual account facility for one or more accounts. The customer information is provided by the DDA system.
Account Facility Summary
The summary screen provides a list of enabled virtual account facility for a customer. You can enable virtual account facility using the Account Facility Maintenance.
How to reach here:
Virtual Account Management > Customer > Account Facility > View Account Facility
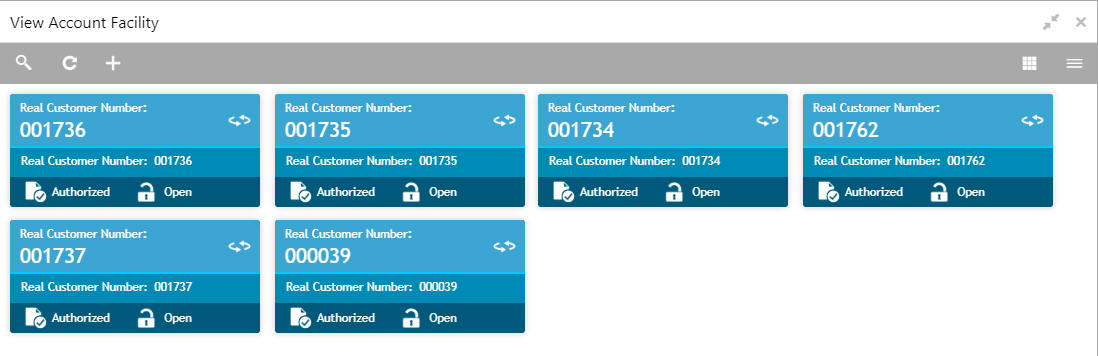
Field |
Description |
Real Customer Number |
Displays the number of the customer. |
Status |
Displays the status of the record. |
Account Facility Maintenance
The maintenance screen allows you to enable/disable virtual account facility for a customer.
How to reach here:
Virtual Account Management > Customer > Account Facility > Create Account Facility
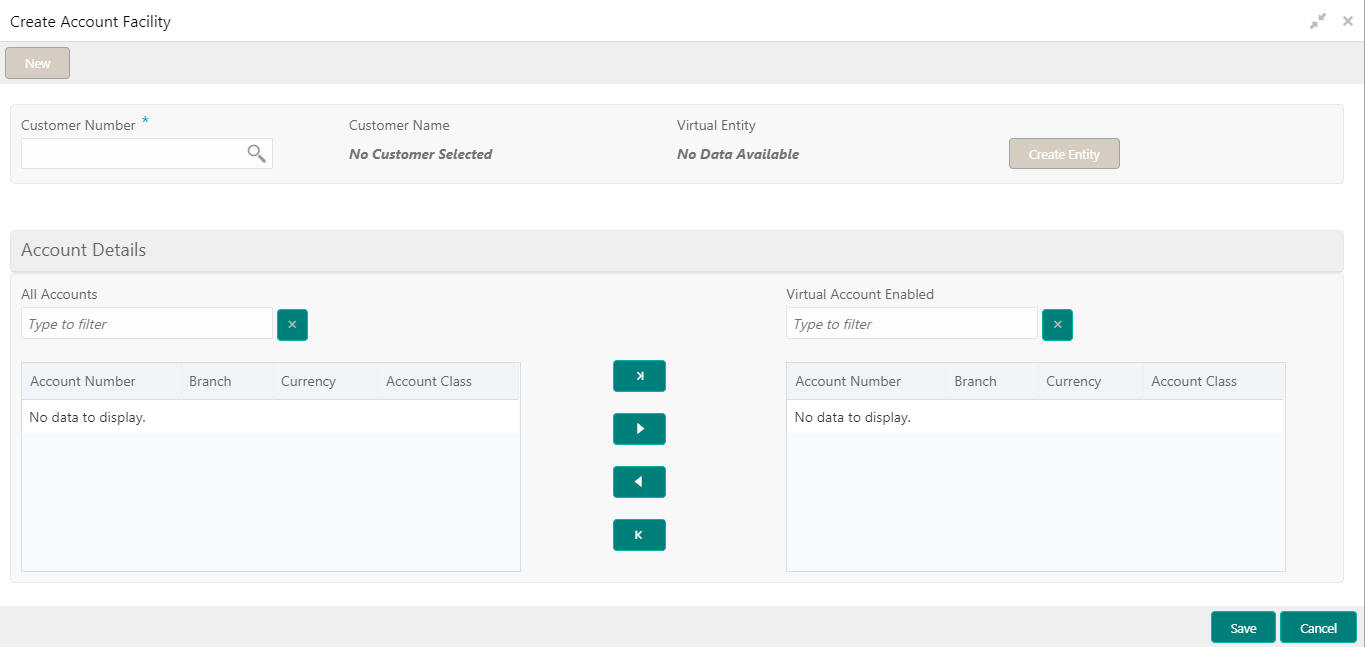
How to add an account facility:
- In the Create Account Facility screen, provide the required details:
- Customer Number: Click Search to view and select the required customer number.
The customer information is stored and used from the DDA system. - Customer Name: Based on the Customer Number selected, the information is auto-populated.
- Virtual Entity: After creating a default virtual entity, the virtual entity appears.
- Click Create Entity to create a default virtual entity. The Create Default Virtual Entity screen appears, you can refer to Virtual Entity Maintenance to complete the procedure.
Accounts Details
- All Accounts: Displays a list of all the account of the selected customers. Type the name of the account on the filter and/or select the required account to enable the virtual account facility that appears on the grid.
- Click > to move the selected account into the Virtual Account Enabled grid. The list of accounts displayed in the grid is enabled for virtual account facility.

Tips
You can use the respective options to move the records back and forth from one grid to another. You can also use the filter to select the required account and move the record.
- Click Save. You can view the enabled virtual account facility details in the Account Facility Summary.
After enabling an account for virtual account facility, you can either go ahead and create a virtual account and/or a virtual identifier.
Virtual Entity
You can create a virtual entity and use it to map the details with a virtual account. You can create multiple virtual entities for a real customer.
Virtual Entity Summary
The summary screen provides a list of virtual entity configured for a customer You can capture the virtual entity’s details and its preferences using the Virtual Entity Maintenance.
How to reach here:
Virtual Account Management > Customer > Virtual Entity > View Virtual Entity
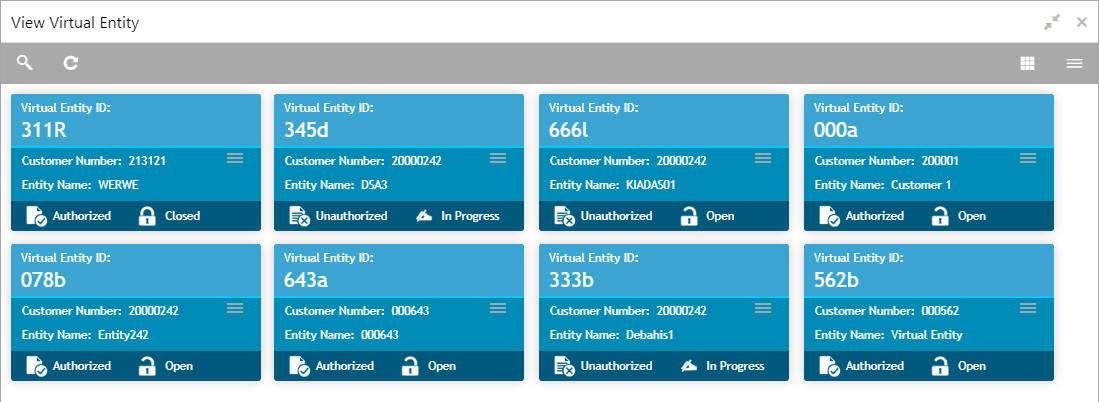
Field |
Description |
Virtual Entity ID |
Displays the unique ID of the virtual entity. |
Customer Number |
Displays the customer number. |
Entity Name |
Displays the name of the entity. |
Status |
Displays the status of the record. |
Virtual Entity Maintenance
The maintenance screen allows you to configure virtual entity and its preferences.
How to reach here:
Virtual Account Management > Customer > Virtual Entity > Create Virtual Entity

How to add a virtual entity:
- In the Create Virtual Entity screen, provide the required details:
- Customer Number: Click Search to view and select the required customer number.
- Customer Name: Based on the Customer Number selected, the information is auto-populated.
- Virtual Entity ID: This field is disabled. After you save the record, an Entity ID Generation popup screen appears, where you can provide the information.
- Entity Name: Enter a name for the entity.
- Entity Type: Select one of the following:
- Corporate: If selected, the record configured is for a corporate entity.
- Individual: If selected, the record configure is for an individual entity.

Note
Depending on the Entity Type selected, the Entity Information appears with different fields.
Entity Information
If Corporate is selected as the Entity Type, provide the required information:
- Entity Type: Enter an entity type.
- Country of Incorporation: Click Search to view and select the required country for which you want to incorporate the virtual entity.
- Date of Incorporation: Select a date of incorporation from the dropdown calendar.
- Unique ID: Enter an unique ID for the virtual entity.
- Email ID: Enter the customer's Email ID.
- Mobile: Enter the customer's contact number.
- Work Phone 1-2: Enter the customer's work contact number.
- Preferred Mode: Select one of the following:
- Mobile: If selected, mobile is the preferred mode to contact the customer.
- Email: If selected, Email is the preferred mode to contact the customer.
If Individual is selected as the Entity Type, provide the required information:
- First Name: Enter the first name of an individual.
- Middle Name: Enter the middle/maiden name of an individual.
- Last Name: Enter the last name/surname of an individual.
- Date of Birth: Select a DOB of the individual from the dropdown calendar.
- Gender: Select a gender from the dropdown list.
- Nationality: Click Search to view and select the required nationality.
- National ID: Enter a national ID.
- Home Phone: Enter the residential contact number of the individual.
- Work Phone: Enter the official contact number of the individual.
- Mobile: Enter contact number of the individual.
- Email ID: Enter Email ID of the individual.
- Preferred Mode: Select one of the following:
- Mobile: If selected, mobile is the preferred mode to contact the customer.
- Email: If selected, Email is the preferred mode to contact the customer.
Correspondence Address
- Address Line 1-4: Enter the address details.
- Country: Click Search to view and select the require country.
- Zip Code: Enter the zip code details of the address.
Registered Address
- Default from Correspondence Address: By default, it is disabled. If enabled, the Correspondence Address is updated as Registered Address. If disabled, you can enter the permanent address.
Other Details
- Identification Type: Select an identification type from the dropdown list.
- Identification Number: Enter an identification number.
- Tax Identification Number: Enter a tax identification number.
- KYC Status: Select a KYC status from the dropdown list.
- KYC Reference: Enter a KYC reference number.
- Last KYC Date: Select the last KYC performed from the dropdown calendar.
- Click Save. The Entity ID Generation popup screen appears.

- Enter the required entity ID in the format displayed.
To create a new entity ID format, refer to Entity Mask Configuration Maintenance in the Configuration User Guide. - Click OK to save the entity ID.
You can view the defined virtual entity in the Virtual Entity Summary.
Account Statement Preferences
You can configure an account statement preferences.
Account Statement Preferences Summary
The summary screen provides a list of configured preferences for account statements. You can configure an account statement preferences using the Account Statement Preferences Maintenance.
How to reach here:
Virtual Account Management > Customer > Account Statement Preferences > View Account Statement Preferences

Field |
Description |
Virtual Entity ID |
Displays the virtual entity ID. |
Status |
Displays the status of the record. |
Account Statement Preferences Maintenance
The maintenance screen allows you to configure an account statement preferences.
How to reach here:
Virtual Account Management > Customer > Account Statement Preferences > Create Account Statement Preferences
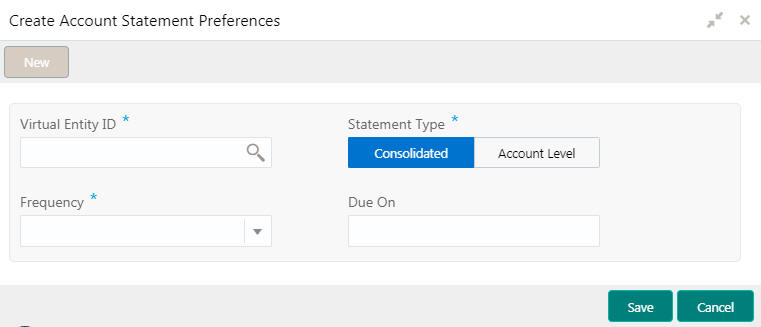
How to configure an account statement preferences:
- In the Create Account Statement Preferences screen, provide the required details:
- Virtual Entity ID: Click Search to view and select the required virtual entity ID.
- Statement Type: Select one of the options:
- Consolidated: If selected, a consolidated statement is generated.
- Account Level: If selected, an account level statement is generated.
- Frequency: Select a frequency from the dropdown list.
- Due On: Enter a due date in number of days.
- Click Save. You can view the defined account statement preferences in the Account Statement Preferences Summary.
Account Product
You can configure account product for a corporate.
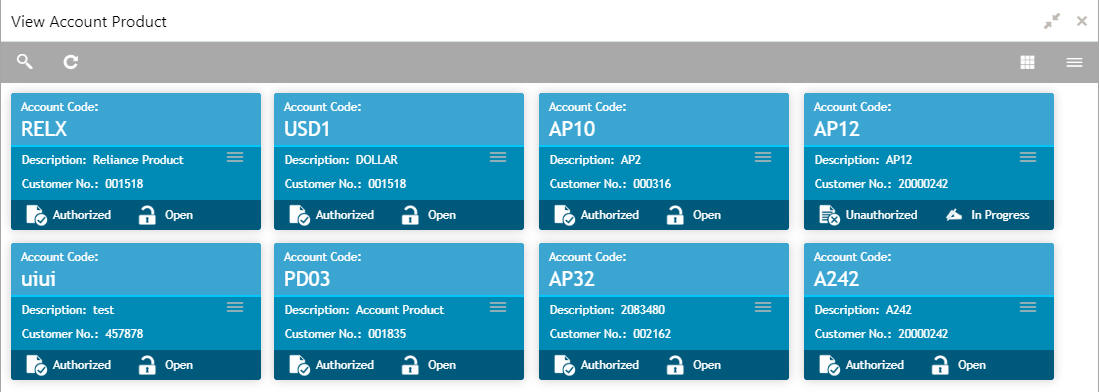
Account Product Summary
The summary screen provides a list of configured account product. You can configure an account product using the Account Product Maintenance.
How to reach here:
Virtual Account Management > Customer > Account Product > View Account Product
Field |
Description |
Account Code |
Displays the code of the account. |
Description |
Displays any additional information of the account. |
Customer Number |
Displays the customer number that is associated with the account code. |
Status |
Displays the status of the record. |
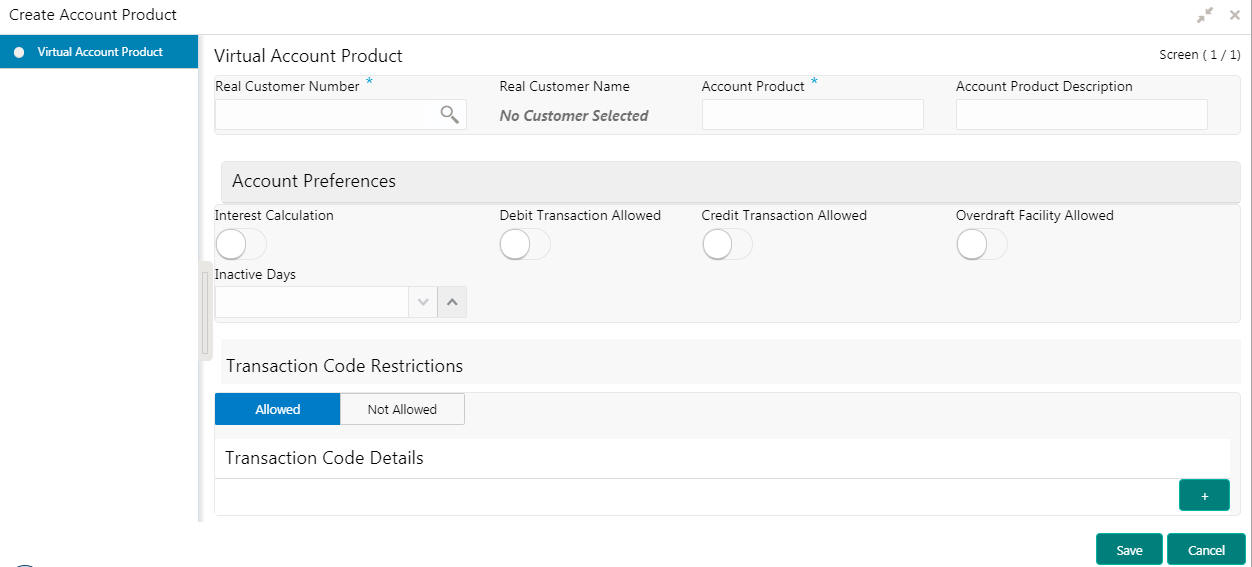
Account Product Maintenance
The maintenance screen allows you to configure account products for a corporate.
How to reach here:
Virtual Account Management > Customer > Account Product > Create Account Product
How to add an account product:
- In the Create Account Product screen, provide the required details:
- Real Customer Number: Click Search to view and select the required real customer number.
- Real Customer Name: Based on the Real Customer Number selected, the information is auto-populated.
- Account Product: Enter a name for the account product.
- Account Product Description: Enter additional information about the account product.
Account Preferences
- Interest Calculation: By default, this is disabled. If enabled, indicates if interest calculation is required for the virtual accounts created under this product.
- Debit Transaction Allowed: By default, this is disabled. If enabled, indicates if the debit transactions are allowed for the virtual accounts created under this product.
- Credit Transaction Allowed: By default, this is disabled. If enabled, indicates if the credit transactions are allowed for the virtual accounts created under this product.
- Overdraft Facility Allowed: By default, this is disabled. If enabled, indicates if the overdrafts are allowed for the virtual accounts created under this product.
- Inactive Days: Select the number of days to indicate after how many days of inactivity, the account must be marked inactive.
Transaction Code Restrictions
- Select one of the options. This is used for allowing or not allowing transaction codes for virtual accounts opened under this product.
Transaction Code Details
- Click + to add a row and provide the required details:
- Transaction Code: Click Search to view and select the required transaction code. To create a new transaction code, refer to Transaction Code Maintenance in the Common Core User Guide.
- Description: Based on the Transaction Code selected, the information is auto-populated.
- Click Save. You can view the configured account product details in the Account Product Summary.
Account Input
You can create a virtual account for a customer.
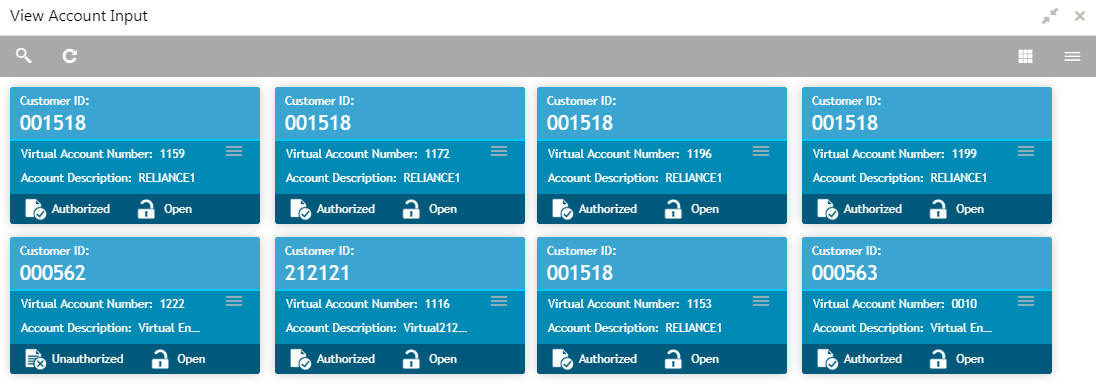
Account Input Summary
The summary screen provides a list of configured virtual account. You can configure a virtual account using the Account Input Maintenance.
How to reach here:
Virtual Account Management > Accounts > Account Input > View Account Input
Field |
Description |
Customer ID |
Displays the customer ID. |
Virtual Account Number |
Displays the number of the virtual account. |
Account Description |
Displays additional details of the virtual account. |
Status |
Displays the status of the record. |
Account Input Maintenance
The maintenance screen allows you to configure virtual account details.
How to reach here:
Virtual Account Management > Accounts > Account Input > Create Account Input

How to add an account input:
- In the Create Account Input screen, provide the required details:
- Customer Number: Click Search to view and select the required customer number.
- Customer Name: Based on the Customer Number selected, the information is auto-populated.
- Virtual Entity ID: Click Search to view and select the required virtual entity ID.
- Virtual Entity Name: Based on the Virtual Entity ID selected, the information is auto-populated.
- Account Currency: Click Search to view and select the required account currency.
- Account Product: Click Search to view and select the required account product.
- Branch Code: Click Search to view and select the required branch code.
- IBAN Required: By default, this is disabled. If enabled, indicates that an IBAN must be generated.
- Virtual Account Number: System generates the virtual account number based on account numbering mask.
- IBAN Account Number: System generates the IBAN based on IBAN numbering mask.
- View Balance: By default, this option is disabled and enables only after the record is configured. For more information, see Viewing Account Balance.
Correspondence Address
- Address Line 1-4: Enter the address details.
- Country: Click Search to view and select the required country.
- Postal Code: Enter the postal code.
Account Information
- Account Description: This is auto-populated as virtual entity name. You can modify the auto-populated details.
- Account Purpose: Enter the purpose of the virtual account.
- Balance Availability: Select one of the following options:
- Own Balance: This is the available balance of the virtual account including child contributions and internal limits if available.
- Pool Balance: The entire pool balance is available for this accounts irrespective of its own balance.
- Own Balance and Fixed Amount from Pool: Sum of own balance as mentioned above and a fixed amount from the pool balance. If Own Balance and Fixed Amount from Pool is selected, the Fixed Amount in Pool Currency field is available to provide the fixed amount.
- Fixed Amount in Pool Currency: Enter the fixed amount in the pool currency.
- Balance Check for Debits: This is defaulted from the account product used. The default value can be modified.
- Debit Transaction Allowed: This is defaulted from the account product used. You can disable this option, but you cannot enable it.
- Credit Transaction Allowed: This is defaulted from the account product used. You can disable this option, but you cannot enable it.
- Account Frozen: By default, this is disabled. If selected, indicates if the account is frozen.
- Overdraft Required: This is defaulted from the account product used. You can disable this option, but you cannot enable it.
- Overdraft Amount: Enter the fixed amount that can be overdrawn by the account. This is applicable if overdraft is allowed.
- Interest Calculation: This is defaulted from the account product used. You can disable this option, but you cannot enable it.
Account Linkage
- Real Account Linkage: Select one of the options:
- Structure Level: If selected, indicates that the real account for this virtual account is linked at the structure level.
- Account Level: If selected, indicates that the real account for this virtual account is linked at the account level.
- Real Account Number: Click Search to view and select the required real account number, if real account linkage is at the account level.
- Real Account Branch: Based on the Real Account Number selected, the information is auto-populated.
- Real Account Currency: Based on the Real Account Number selected, the information is auto-populated.
- Account Opening Date: Displays the account opening date for the virtual account.
- Account Closure Date: Displays the account opening date for the virtual account.
- Last Activity Date: Displays the last date on which a transaction was performed for the virtual account.
- Account Status: Displays the current account status for the virtual account.
- Click Save. You can view the configured account details in the Account Input Summary.
Viewing Account Balance
After saving a record, you can navigate to View Account Input screen and View Account Structure screen to view the account balance details.
- In the selected screen, select an account for which you want to view the account balance details. The respective screen opens with the configured details.
- Click View Balance/select a node, the Account Balance Details pop-up screen appears.
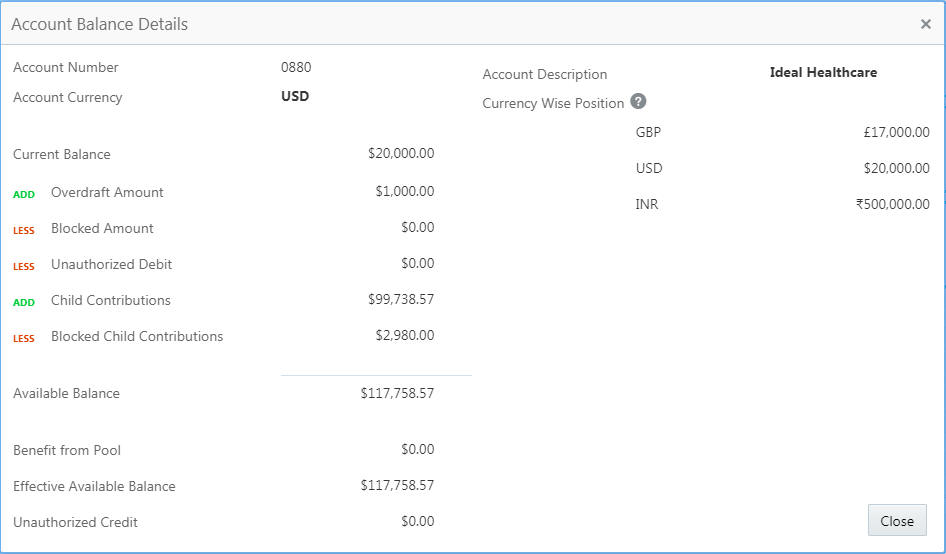
- Click Close to navigate back to the selected screen.
Account Structure
You can configure an account structure for a real account that belongs to any customer.
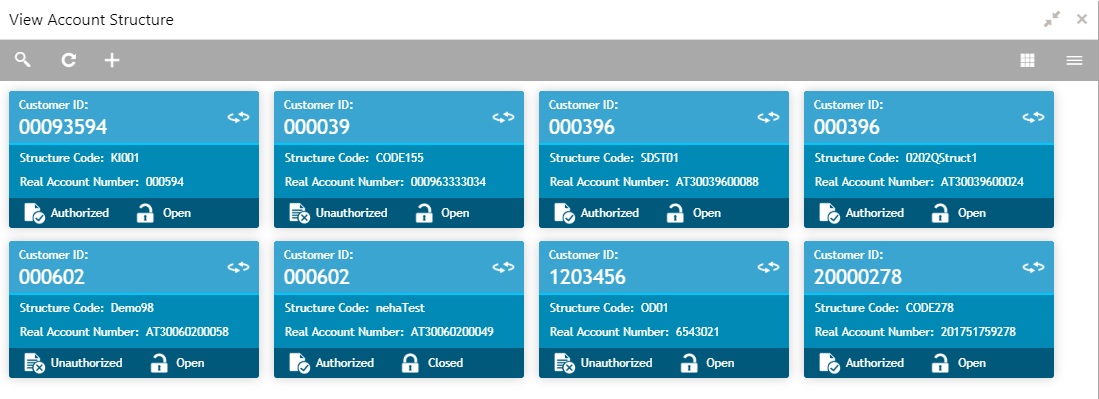
Account Structure Summary
The summary screen provides a list of configured account structures. You can configure an account structure using the Account Structure Maintenance.
How to reach here:
Virtual Account Management > Accounts > Account Structure > View Account Structure
Field |
Description |
Customer ID |
Displays the customer ID details. |
Structure Code |
Displays the structure code associated with the account structure. |
Real Account Number |
Displays the account number that is mapped to the structure. |
Status |
Displays the status of the record. |
Account Structure Maintenance
The maintenance screen allows you to configure an account structure for a customer.
How to reach here:
Virtual Account Management > Accounts > Account Structure > Create Account Structure
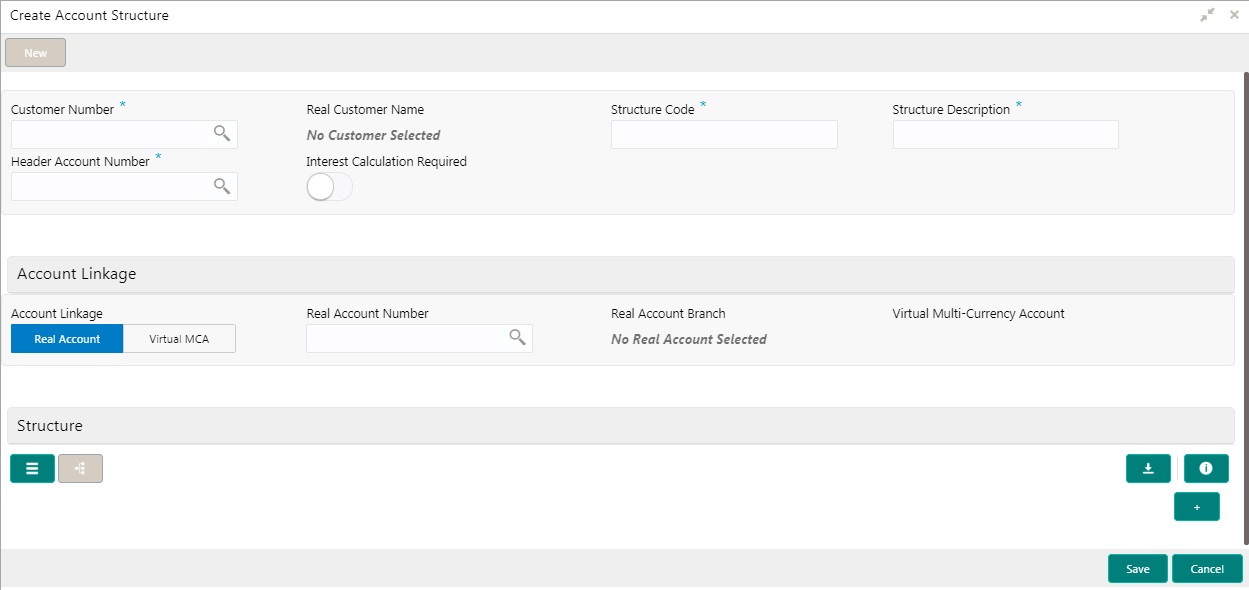
How to create an account structure:
- In the Create Account Structure screen, provide the required details:
- Customer Number: Click Search to view and select the required customer number.
- Real Customer Name: Based on the Customer Number selected, the information is auto-populated.
- Structure Code: Enter a code for the structure. You can enter a maximum length of eight alphanumeric characters.
- Structure Description: Enter additional information for the structure.
- Header Account Number: Click Search to view and select the required header account number. This will be the root node for the structure and is always a virtual account.
- Interest Calculation Required: If enabled, indicates the interest calculation required at the account structure level.
Account Linkage
- Account Linkage: Select one of the options:
- Real Account: If selected, you can configure an account structure for a real account. The Real Account Number field and the Real Account Branch field and enabled to select the account.
- Virtual MCA: If selected, you can configure an account structure for a virtual multi-currency account. The Virtual Multi-Currency Account field is enabled to select the account.
- Real Account Number: Click Search to view and select the required real account number.
- Real Account Branch: Based on the Real Account Number selected, the information is auto-populated.
- Virtual Multi-Currency Account: Click Search to view and select the required virtual multi-currency account.
Structure
- Define the account structure using the Detail View or the Diagram View:
Good to know information, while creating an account structure:
- Panning and zooming are enabled for the account structure.
- Pinching or using the mouse wheel zooms in/out of the account structure.
- Drag rows from the table and drop it on the adjacent section to create nodes for the account structure (only for diagram view).
- A link is created between two nodes when one node is dropped on an existing node.
- No empty fields must be present in the table.
Structure Actions
- Export: Click to download the account structure in a .csv format.
|
|
Note You can select a node and view the account balance details. For more information, see Viewing Account Balance. |
Note
The Account Structure appears in the Diagram View when all the available rows of the Detail View has relevant data.
- Click Save. You can view the configured account structure details in the Account Structure Summary.
Virtual Multi-Currency Account
You can create a group of multiple accounts with different currencies for a customer. You can manage account transactions with more than one currency for a customer.
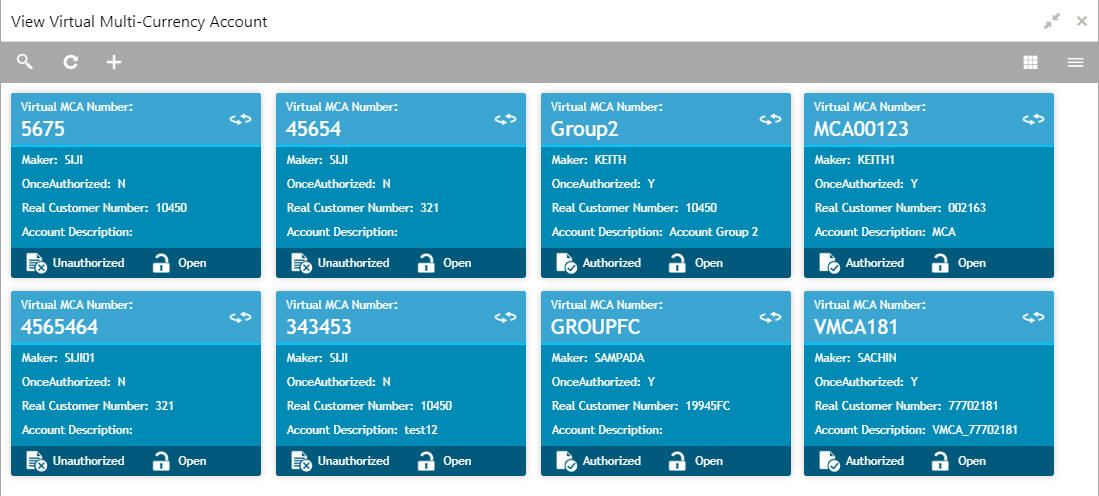
Virtual Multi-Currency Account Summary
The summary screen provides a list of configured virtual multi-currency account. You can configure a virtual multi-currency account using the Virtual Multi-Currency Account Maintenance.
How to reach here:
Virtual Account Management > Customer > Virtual Multi-Currency Account > View Virtual Multi-Currency Account
Field |
Description |
Virtual MCA Number |
Displays the virtual multi-currency account number. |
Maker |
Displays the name of the user who has configured the virtual multi-currency account details. |
Once Authorized |
Indicates if the record is authorized once or not. |
Real Customer Number |
Displays the real customer number. |
Account Description |
Displays the description of the virtual multi-currency account. |
Status |
Displays the status of the record. |
Virtual Multi-Currency Account Maintenance
The maintenance screen allows you to configure a virtual multi-currency account.
How to reach here:
Virtual Account Management > Customer > Virtual Multi-Currency Account > Create Virtual Multi-Currency Account
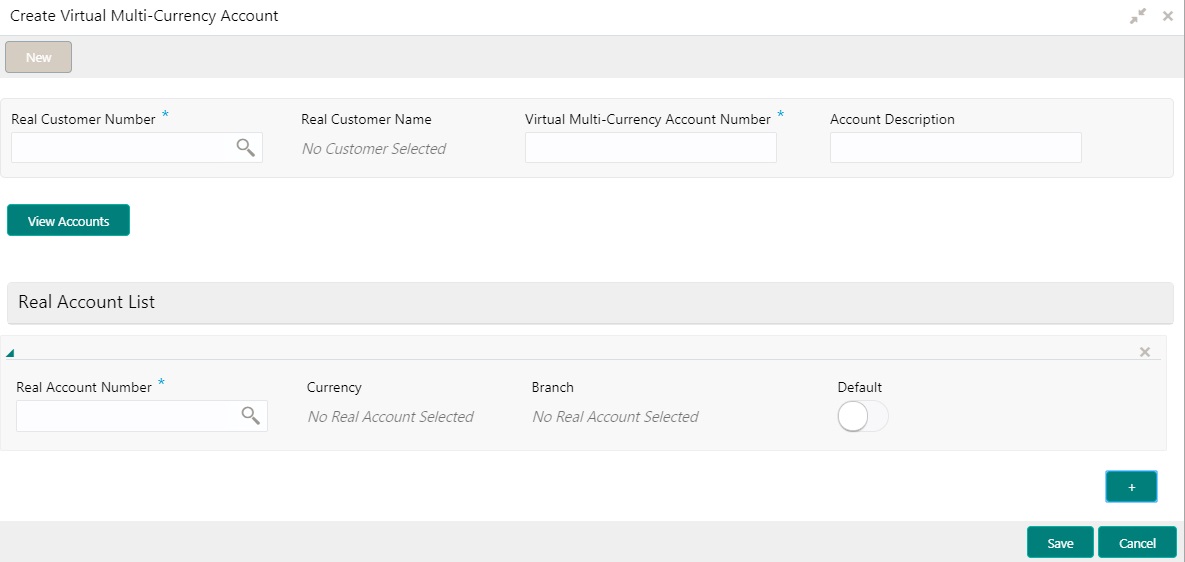
How to configure a virtual multi-currency account:
- In the Create Virtual Multi-Currency Account screen, provide the required details:
- Real Customer Number: Click Search to view and select the required real customer number.
- Real Customer Name: Based on the Real Customer Number selected, the information is auto-populated.
- Virtual Multi-Currency Account Number: Enter a virtual multi-currency account number.
- Account Description: Enter additional information of the account.
- Click View Account to view the list all real account that are associated with the real customer number.
Real Account List
- Click + to add a row and provide the required details:
- Real Account Number: Click Search to view and select the required action name.
- Currency: Based on the Real Account Number selected, the information is auto-populated.
- Branch: Based on the Real Account Number selected, the information is auto-populated.
- Default: If selected, indicates that the selected account’s currency is the default currency, if the transaction currency is not configured for a customer.
For example: If the virtual multi-currency account consists of USD, EURO, and Peso, the default account currency is configured as USD. Any transactions performed in INR on the virtual multi-currency account is performed in the USD (default) account.
- Click Save. You can view the configured virtual multi-currency account in the Virtual Multi-Currency Account Summary.
Internal Credit Line
You can configure internal credit line for a customer. The customer can offer the facility to its subsidiaries and the subsidiaries can use the credit line.
Internal Credit Line Summary
The summary screen provides a list of configured internal credit line. You can configure an internal credit line using the Internal Credit Line Maintenance.
How to reach here:
Virtual Account Management > Accounts > Internal Credit Line > View Internal Credit Line
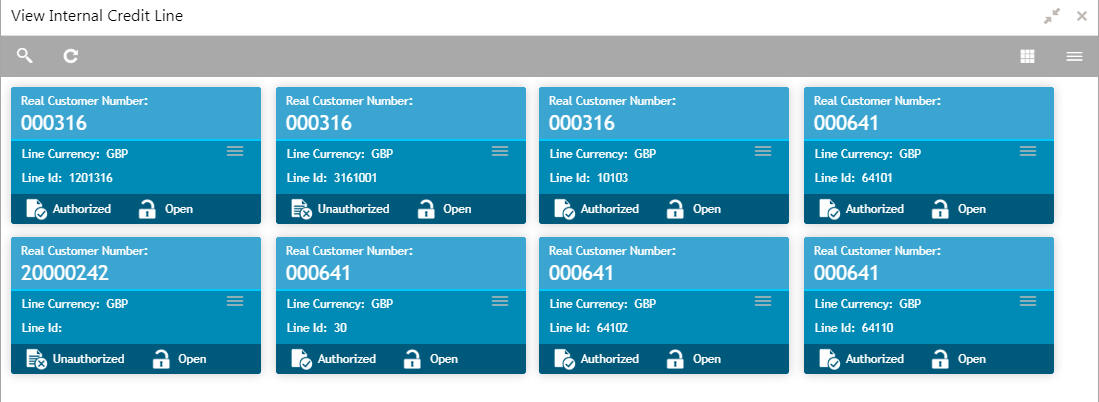
Field |
Description |
Real Customer Number |
Displays the customer number details. |
Line Currency |
Displays the line currency details. |
Line ID |
Displays the line ID. |
Status |
Displays the status of the record. |
Internal Credit Line Maintenance
The maintenance screen allows you to configure internal credit line.
How to reach here:
Virtual Account Management > Accounts > Internal Credit Line > Create Internal Credit Line
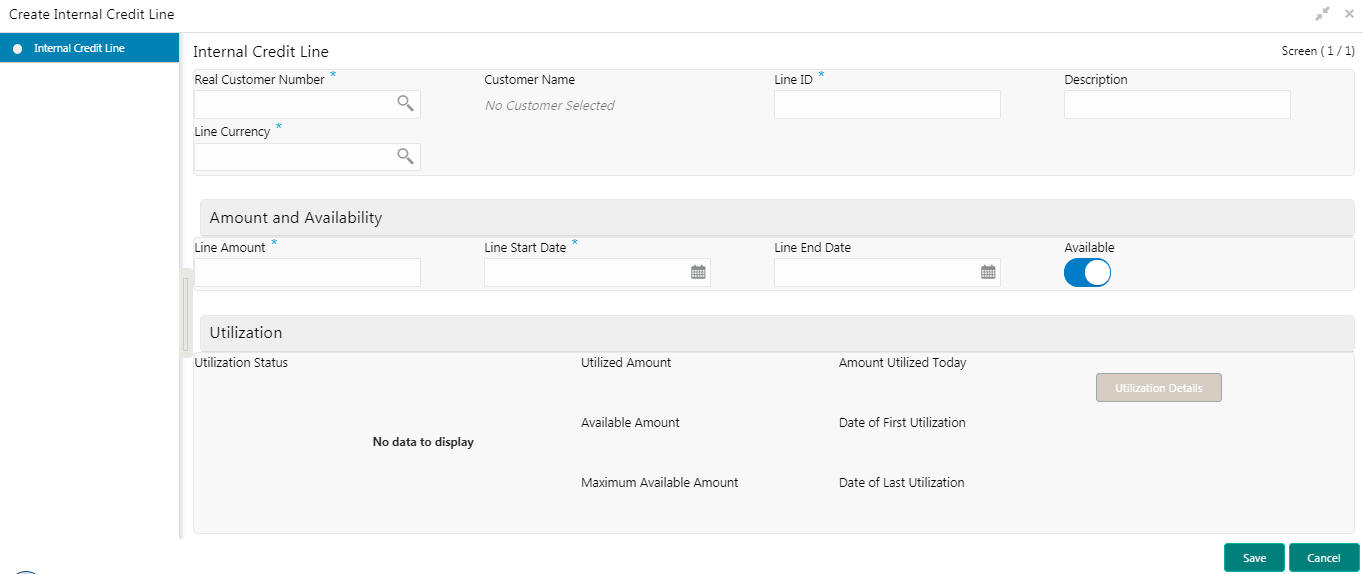
How to add an internal credit line:
- In the Create Internal Credit Line screen, provide the required details:
- Real Customer Number: Click Search to view and select the required customer number.
- Customer Name: Based on the Real Customer Number selected, the information is auto-populated.
- Line ID: Enter a line ID.
- Description: Enter additional information about the internal credit line.
- Line Currency: Click Search to view and select the required line currency.
Amount and Availability
- Line Amount: Enter the internal credit line amount.
- Line Start Date: Enter a start date for the line amount from the dropdown calendar.
- Line End Date: Enter an end date for the line amount from the dropdown calendar.
- Available: By default, this option is selected. If selected, indicates that the line amount is valid for the selected period.
Utilization
- Utilization Status: Displays a pie chart of the amount that is utilized.
- Utilized Amount: Displays the amount that is utilized.
- Amount Utilized Today: Displays the amount that is utilized today.
- Available Amount: Displays the amount that is available.
- Date of First Utilization: Displays the date from when the amount is utilized.
- Maximum Available Amount: Displays the maximum amount that is available.
- Date of Last Utilization: Displays the date until when the amount is utilized.
- Click Utilization Details to view all the utilization details of the internal credit line.
- Click Save. You can view the configured internal credit line in the Internal Credit Line Summary.
Line Account Linkage
You can configure the credit line of a customer to a virtual account for that customer. The virtual account that is linked must be either individual accounts or header accounts from account structure.
Line Account Linkage Summary
The summary screen provides a list of configured line account linkage. You can configure the line account linkage using the Line Account Linkage Maintenance.
How to reach here:
Virtual Account Management > Accounts > Line Account Linkage > View Line Account Linkage
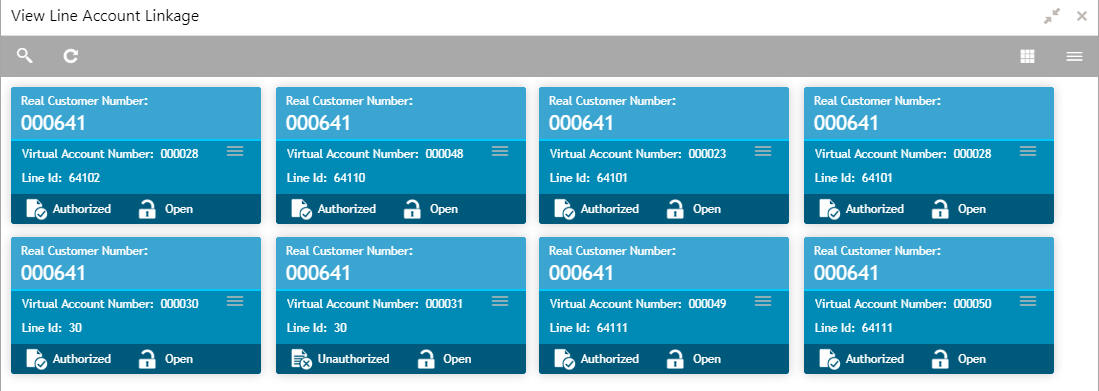
Field |
Description |
Real Customer Number |
Displays the real customer number details. |
Virtual Account Number |
Displays the virtual account number details. |
Line ID |
Displays the line ID details. |
Status |
Displays the status of the record. |
Line Account Linkage Maintenance
The maintenance screen allows you to configure line account linkage.
How to reach here:
Virtual Account Management > Accounts > Line Account Linkage > Create Line Account Linkage
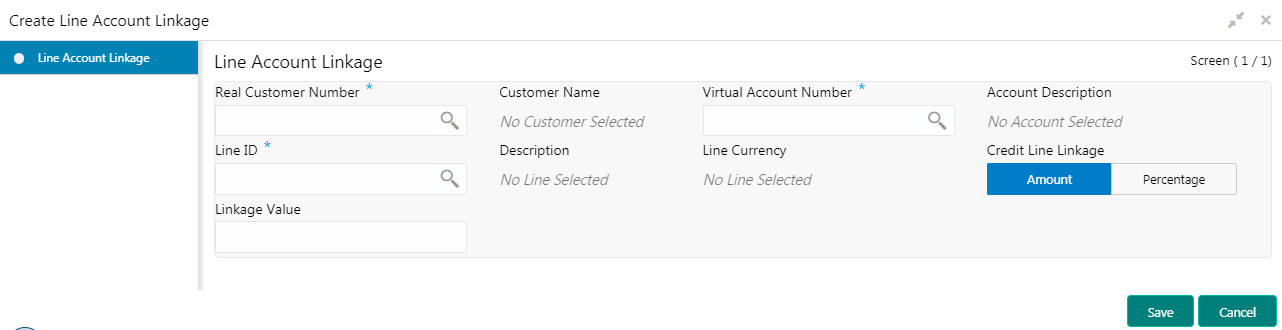
How to add a line account linkage:
- In the Create Line Account Linkage screen, provide the required details:
- Real Customer Number: Click Search to view and select the required customer number.
- Customer Name: Based on the Real Customer Number selected, the information is auto-populated.
- Virtual Account Number: Click Search to view and select the required virtual account number.
- Account Description: Enter additional information about the line account linkage.
- Line ID: Enter a line ID.
- Description: Enter additional information about the line ID.
- Line Currency: Click Search to view and select the required line currency.
- Credit Line Linkage: Select one of the following:
- Amount: If selected, displays the credit line in amounts.
- Percentage: If selected, displays the credit line in percentage.
- Linkage Value: Enter a linkage value.
- Click Save. You can view the configured line account linkage in the Line Account Linkage Summary.