Welcome to Identifier User Guide
The identifier based virtual accounts are used for one-time payments such as utility payments, payments of visa fees, application fees for schools and universities. The main purpose of such virtual accounts is an effective and automated reconciliation of such receivables by the receiving entities. Such accounts generally consist of two parts, they are Corporate Identifier and Remittance Identifier.
Corporate Identifiers are provided by the bank to their corporate customers to uniquely identify corporates. The corporates have the flexibility to add the second part of the account number that is, Remittance ID based on their requirement. Accounts formed in this manner can be used for receiving payments into the corporate account.
This document is intended for Back Office Data Entry Clerk, Back Office Managers/Officers, Product Managers, End of Day Operators and Financial Controller users.
This section contains the following topics:
Identifier Branch Parameters
You can configure a virtual identifier branch parameters.
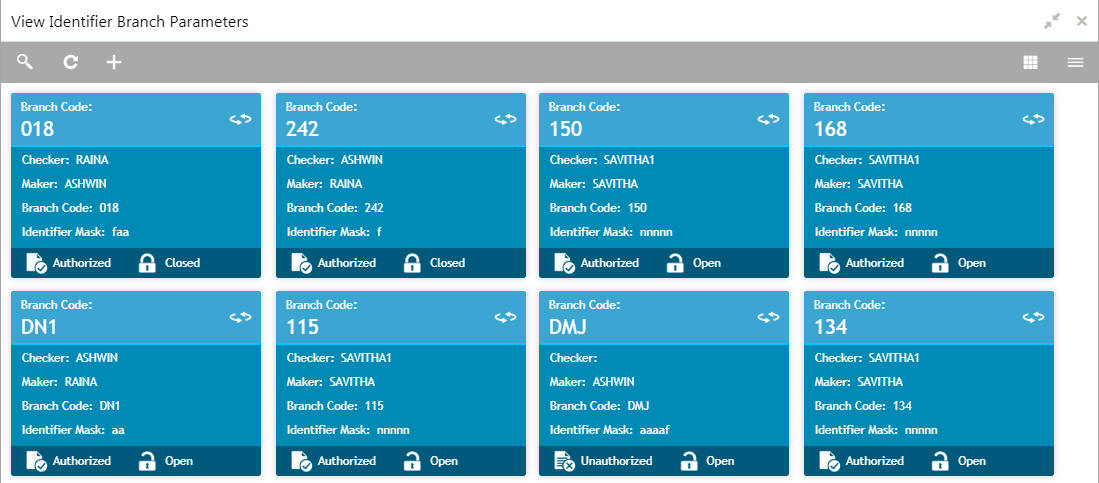
Identifier Branch Parameters Summary
The summary screen provides a list of configured identifier branch parameters. You can configure an identifier branch parameters using the Identifier Branch Parameters Maintenance.
How to reach here:
Virtual Account Management > Configuration > Identifier Branch Parameters > View Identifier Branch Parameters
Field |
Description |
Branch Code |
Displays the code of the branch. |
Checker |
Displays the user who has verified the record. |
Maker |
Displays the name of the user who created the record. |
Identifier Mask |
Displays the identifier mask details of the record. |
Status |
Displays the status of the record. |
Identifier Branch Parameters Maintenance
The maintenance screen allows you to configure identifier branch parameters.
How to reach here:
Virtual Account Management > Configuration > Identifier Branch Parameters > Create Identifier Branch Parameters
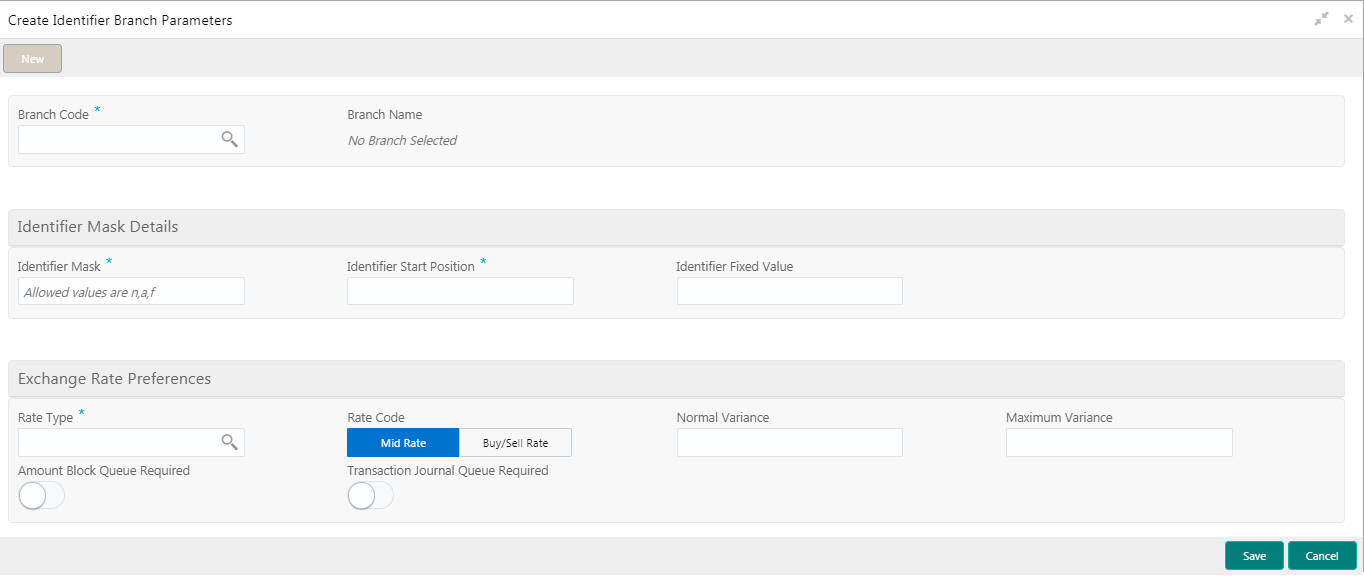
How to configure an identifier branch parameter:
- In the Create Identifier Branch Parameters screen, provide the required details:
- Branch Code: Click Search to view and select the required branch code.
- Branch Name: Based on the Branch Code selected, the information is auto-populated.
Identifier Mask Details
- Identifier Mask: Specify a virtual account short identifier mask. The identifier mask can be a combination of:
- n: User Input Number
- a: User Input Alphanumeric Char
- f: Fixed Number
- Identifier Start Position: Specify the start position of the identifier in account number. You can provide a maximum of two numeric character.
For example, if the identifier starts from the 1st character of the account number, the value will be 1. If the identifier starts from the 4th character of the account number, the value will be 4.

Note
After authorizing, you cannot modify the Identifier Mask and the Identifier Start Position.
- Identifier Fixed Value: Specify the fixed value character if virtual account mask contains character ‘f’. You can provide a maximum of one alphanumeric character.
Example: Let’s assume the following scenario:
- Identifier Mask: nnnnnnf
- Identifier Start Position: 1
- Identifier Fixed Value: 5
- Account Number: 12345655346555000
During creation of a corporate identifier, system validates if the issued identifier matches with the mask for the branch such as 1234565 is a valid corporate identifier.
If account number 12345655346555000 is received in a transaction, the identifier is derived as 1234565.
Exchange Rate Preferences
- Rate Type: Click Search to view and select the required rate type.
- Rate Code: Select one of the options:
- Mid Rate: If selected, indicates the rate code for exchange rate preferences is mid rate.
- Buy/Sell Rate: If selected, indicates the rate code for exchange rate preferences is buy/sell rate.
- Normal Variance: Enter a normal variance details.
- Maximum Variance: Enter a maximum variance details. Maximum variance can have a maximum value of 100.
- Amount Block Queue Required: By default, this is disabled. If enabled, indicates the amount block queue.
- Transaction Journal Queue Required: By default, this is disabled. If enabled, indicated the transaction journal queue.
- Click Save. You can view the configured identifier mask details in the Identifier Branch Parameters Summary.
After configuring the identifier mask details, you can map the identifier mask with the multi-currency identifier using the Multi-Currencies Identifier Mapping.
Remittance List
You can configure and maintain a list of all the remittance for a customer.
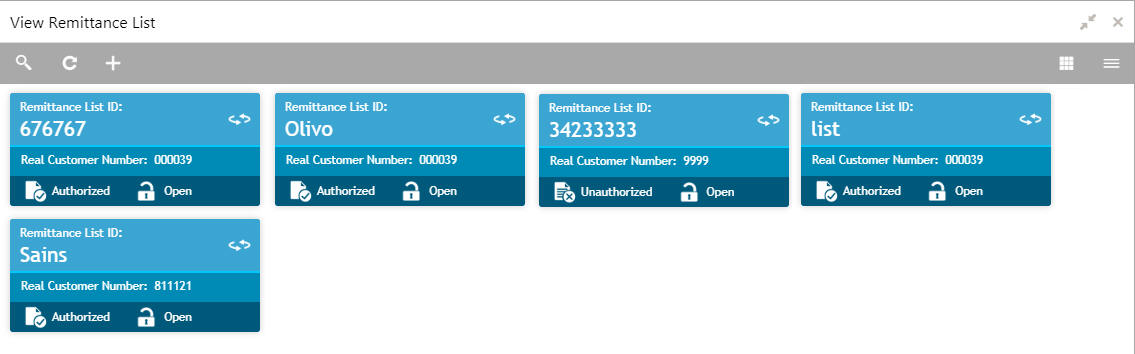
Remittance List Summary
The summary screen provides a list of configured remittance list. You can configure remittance list using the Remittance List Maintenance.
How to reach here:
Virtual Account Management > Identifier > Remittance List > View Remittance List
Field |
Description |
Remittance List ID |
Displays the remittance list ID. |
Real Customer Number |
Displays the customer number associated with the remittance list ID. |
Status |
Displays the status of the record. |
Remittance List Maintenance
The maintenance screen allows you to configure the remittance list.
How to reach here:
Virtual Account Management > Identifier > Remittance List > Create Remittance List
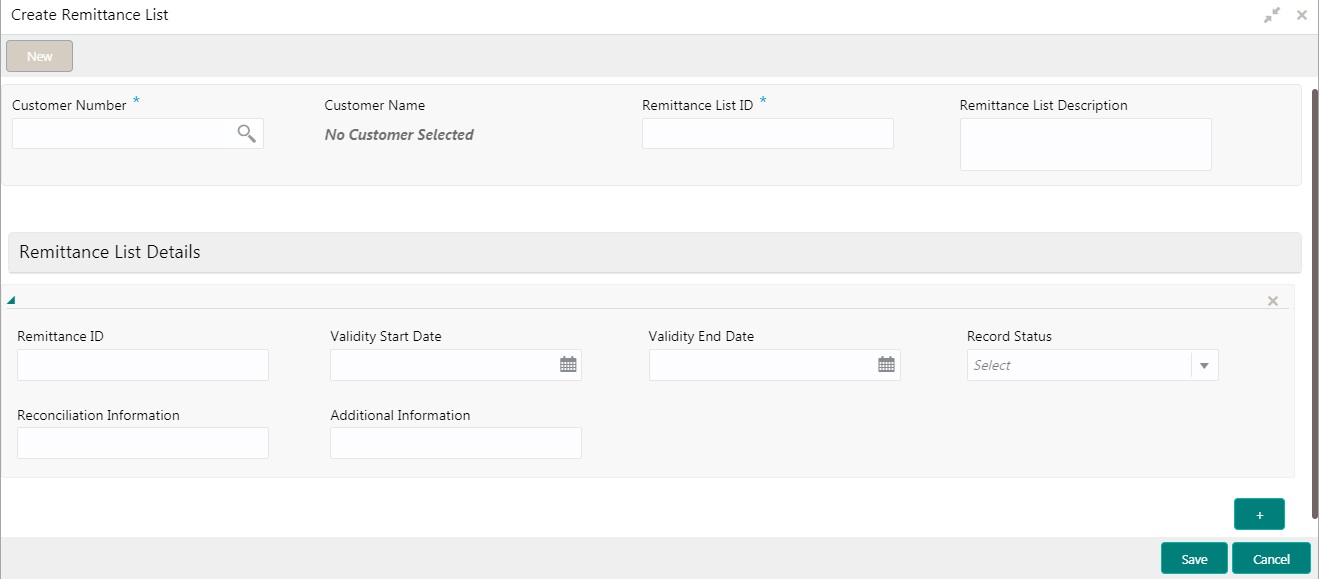
How to add a remittance list:
- In the Create Remittance List screen, provide the required details:
- Customer Number: Click Search to view and select the required real customer number.
- Customer Name: Based on the Real Customer Number selected, the information is auto-populated.
- Remittance List ID: Enter an ID to uniquely identify the remittance list.
- Remittance List Description: Enter additional information about the remittance list ID.
- Click + to add a row and provide the remittance list ID details. By default, the first row appears.
- Remittance ID: Enter a remittance ID.
- Validity Start Date: Select an active start date for the remittance list from the dropdown calendar.
- Validity End Date: Select an expiry date for the remittance list from the dropdown calendar.
- Record Status: Select the status for the record.
- Reconciliation Information: Enter information that can be used for reconciliation.
- Additional Information: Enter additional information about the remittance list ID.
- Click Save. You can view the configured remittance list ID details in the Remittance List Summary.
After configuring the remittance list ID, you can configure the rules for a customer using the Corporate Specific Rules.
Corporate Specific Rules
You can configure corporate specific rules to validate the virtual account and its transactions. This helps to validate the incoming virtual account and its transaction as per the corporate specific validation requirements.
Corporate Specific Rules Summary
The summary screen provides a list of configured corporate specific rules. You can configure corporate specific rules using the Corporate Specific Rules Maintenance.
How to reach here:
Virtual Account Management > Identifier > Corporate Specific Rules > View Corporate Specific Rules
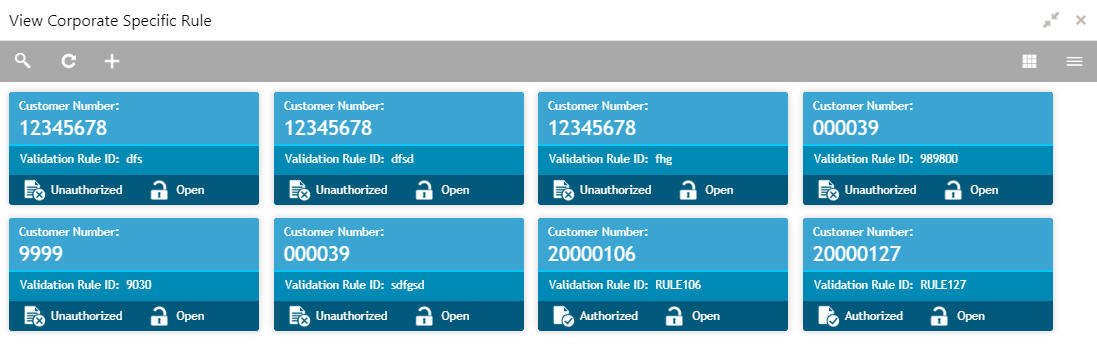
Field |
Description |
Customer Number |
Displays the customer number. |
Validation Rule ID |
Displays the unique ID of the validation rule. |
Status |
Displays the status of the record. |
Corporate Specific Rules Maintenance
The maintenance screen allows you to configure corporate specific rules to validate the virtual account and its transactions.
How to reach here:
Virtual Account Management > Identifier > Corporate Specific Rules > View Corporate Specific Rules
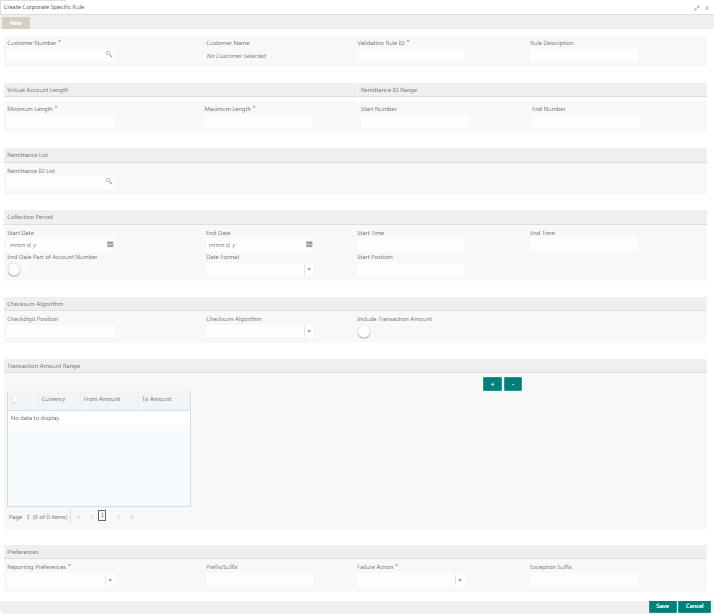
How to add a corporate specific rule:
- In the Create Corporate Specific Rule screen, provide the required details:
Main Details
- Customer Number: Click Search to view and select the required customer number.
- Customer Name: Based on the Customer Number selected, the information is auto-populated.
- Validation Rule ID: Click Search to view and select the required validation rule ID.
- Rule Description: Enter additional information about the corporate specific rule.
Virtual Account Length
- Minimum Length: Enter a minimum number of characters for the account number.
- Maximum Length: Enter a maximum number of characters for the account number.
Remittance ID Range
- Start Number: Enter a start number for the remittance ID range.
- End Number: Enter an end number for the remittance ID range.
Remittance List
- Remittance ID List: Click Search to view and select the required remittance list. You can configure the required remittance list ID using the Remittance List Maintenance.
Collection Period
- Start Date: Select a start date for the collections from the dropdown calendar.
- End Date: Select an end date for the collections from the dropdown calendar.
- Start Time: Enter a start time for the collection.
- End Time: Enter a stop time for the collection.
- End Date Part of Account Number: By default, it is disabled. If enabled, the collection end date is expected to be part of the account number. If disabled, the account number appears as it is.
- Date Format: Select a date format from the dropdown list, if the collection end date is part of the account number.
- Start Position: Select a start position of the date, if the collection end date is part of account number.
Checksum Algorithm
- Checkdigit Position: Enter a checkdigit position.
- Checksum Algorithm: Select one of the checksum algorithm from the dropdown list:
- Modulo 97: If selected, can have only numeric account mask.
- Modulo 10: If selected, can have mask of length 10.
- Modulo 11: If selected, can have either numeric or alphanumeric account mask. In case of numeric, D is appended to the account mask by the system and in case of alpha numeric, user must manually input D at the end of the mask.
- Modulo 11: With weights this can have mask with size not more than 13.
- Include Transaction Amount: By default, it is disabled. If enabled, the transaction amount must be included in the checksum calculation. If disabled, the transaction amount is not included and displays the amount as it is.
Transaction Amount Range
- Click + to add a row and provide the required details:
- Currency: Click Search to view and select the required currency.
- From Amount: Enter the start range for the transaction amount.
- To Amount: Enter the end range for the transaction amount.
Preferences
- Reporting Preferences: Select one of the following preferences for reporting from the dropdown list:
- Virtual Account Number: If selected, the virtual account number is reported with the transaction.
- Remitter ID: If selected, the remittance ID is reported with the transaction.
- Virtual Account No-Prefix: If selected, the virtual account number with a specified prefix is reported with the transaction.
- Virtual Account No-Suffix: If selected, the virtual account number with a specified suffix is reported with the transaction.
- Remitter ID - Prefix: If selected, the remittance ID with a specified prefix is reported with the transaction.
- Remitter ID - Suffix: If selected, the remittance ID with a specified suffix is reported with the transaction.

Tips
Depending on the options selected the options are enabled.
- Prefix/Suffix: Enter a prefix/suffix value, if the reporting preference contains a prefix/suffix.
- Failure Action: Select an action to be performed, if the corporate specific validation rule fails during the execution for a transaction. Based on the preferences, the transaction either proceeds or is rejected.
- Exception Suffix: Enter a suffix, if the validation fails the transaction proceeds based on the preference and is suffixed with the reporting value.
- Click Save. You can view the configure remittance list ID details in the Remittance List Summary.
After you configure the remittance list ID, you can map the details in the Multi-Currencies Identifier Mapping.
Multi-Currencies Identifier Mapping
You can map multi-currencies’ virtual identifiers for a customer and its accounts based on the transaction currency. This allows the corporate to assign/create virtual identifier based on account numbers. The same identifier can be used to make transactions in different currencies and based on the transaction currency the account can be derived.
For a combination of a virtual identifier and a transaction currency, a real customer account must be mapped. A default account must be configured, if the maintenance for the transaction currency is not found. You can also map corporate specific rules for a customer using a validation rule ID.
Multi-Currencies Identifier Mapping Summary
The summary screen provides a list of mapped multi-currencies identifier. You can map multi-currencies identifier using the Multi-Currencies Identifier Mapping Maintenance.
How to reach here:
Virtual Account Management > Identifier > Multi-Currencies Identifier Mapping > View Multi-Currencies Identifier Mapping
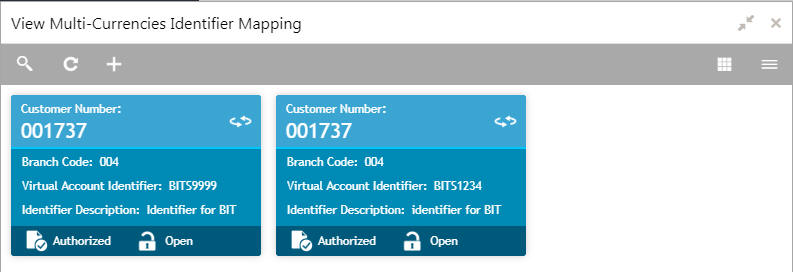
Field |
Description |
Customer Number |
Displays the real customer number for which the virtual identifier mapping is maintained. |
Branch Code |
Displays the branch code where virtual identifier mapping is maintained. |
Virtual Account Identifier |
Displays the virtual account identifier details. |
Identifier Description |
Displays additional information of the record. |
Status |
Displays the status of the record. |
Multi-Currencies Identifier Mapping Maintenance
The maintenance screen allows you to map multi-currencies virtual identifiers for a customer and its accounts based on the transaction currency.
How to reach here:
Virtual Account Management > Identifier > Multi-Currencies Identifier Mapping > View Multi-Currencies Identifier Mapping
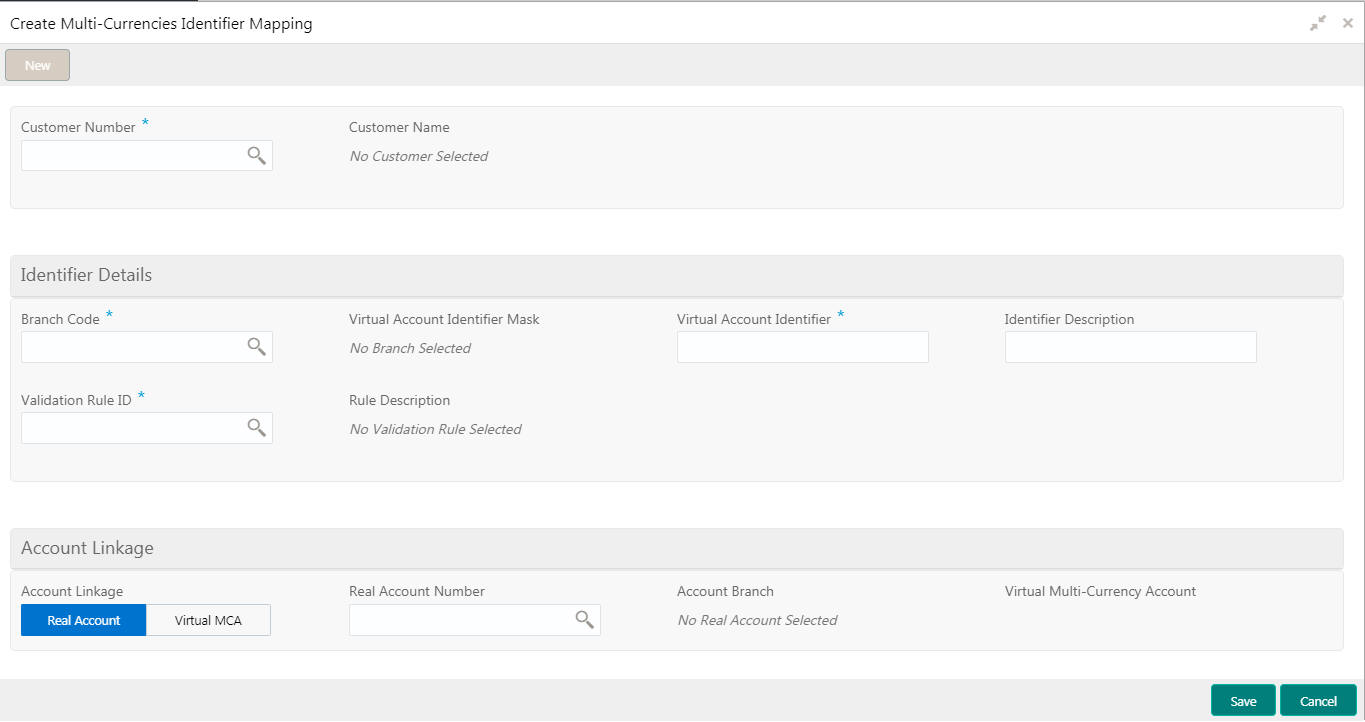
How to map multiple currency identifier:
- In the Create Multi-Currencies Identifier Mapping page, provide the required details:
- Customer Number: Click Search to view and select the required customer number.
- Customer Name: Based on the Customer Number selected, the information is auto-populated.
Identifier Details
- Branch Code: Click Search to view and select the required branch code.
- Virtual Account Identifier Mask: Based on the Branch Code selected, the information is auto-populated.
- Virtual Account Identifier: Enter a unique identifier for the customer which complies to the mask.
- Identifier Description: Enter additional information about the identifier.
- Validation Rule ID: Click Search to view and select the required validation rule ID.
- Rule Description: Based on the Validation Rule ID selected, the information is auto-populated.
Account Linkage
- Account Linkage: Select one of the options:
- Real Account: If selected, the Real Account Number field is enabled.
- Virtual MCA: If selected, the Virtual Multi-Currency Account field is enabled.
- Real Account Number: Click Search to view and select a real account number to associate the transaction currency.
- Account Branch: Based on the Real Account Number selected, the information is auto-populated.
- Virtual Multi-Currency Account: Click Search to view and select a virtual multi-currency account.
- Click Save. You can view the defined mapping details in the Multi-Currencies Identifier Mapping Summary.