Party Resource Access
Using this maintenance, the System/ Bank Administrator![]() Administrator is a set of individuals that administer the applicant/Affiliate entity. For example, Accountants, Authorized Signatories for organizations, Power of Attorney for individuals. can provide access to Virtual Account Management Resource ‘Remitter List’. The Party
Administrator is a set of individuals that administer the applicant/Affiliate entity. For example, Accountants, Authorized Signatories for organizations, Power of Attorney for individuals. can provide access to Virtual Account Management Resource ‘Remitter List’. The Party![]() A party is any individual or business entity having a banking relationship with the bank. Resource Access screen lists the remitter IDs for the selected Corporate.
A party is any individual or business entity having a banking relationship with the bank. Resource Access screen lists the remitter IDs for the selected Corporate.
The administrator can select a global check box of ‘Map All Remitter List ’ to enable all the existing remitter list under the party for channel banking. If specific remitters are required to be given access then the user needs to select the respective check boxes preceding the remitter ID.
Pre-Requisites
- Party preferences should be created for the party for which access is to be maintained
- Channel Access should be enabled for party for which resource access is to be maintained
- Transaction access is provided to Bank Administrator.
- Approval rule set up for Bank Administrator to perform the actions.
Workflow
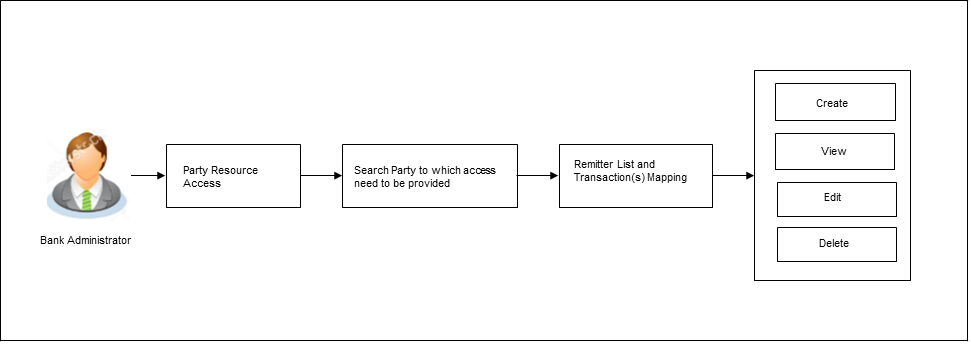
Features Supported In Application
The following options are available as part of this maintenance:
- Party Resource Access - Mapping
- Party Resource Access – View
- Party Resource Access - Edit
- Party Resource Access - Delete
![]() How to reach here:
How to reach here:
Bank Administrator Dashboard > Resource Access > Party Resource Access
OR
System/ Bank Administrator Dashboard > Toggle menu Access Management > Resource Access > Party Resource Access
Party Resource Access - Mapping (Create)
The Bank Administrator gets a request with the Virtual Account Management Remitter list for which access needs to be provided to the party.
To provide the party with remitters access:
- In the Party ID field, enter the party id of the user.
OR
In the Party Name field, enter the party name of the user. - Click . For a searched party, Remitter List Mapping Summary appears.
OR
Click to cancel the transaction.
OR
Click to clear the search parameters.
|
Field Name |
Description |
|---|---|
|
Party ID |
The party id searched by the bank administrator. |
|
Party Name |
The name of the party. |
|
Module Name |
The name of the module. Only Virtual Account Management (Remitter List) is supported. |
|
Remitter List Mapping Summary |
|
- If there is no mapping done for a party, there will be a message No Remitter List mapped with button.
- Click . The Party Resource Access - Create screen appears.
OR
Click to cancel the transaction.
OR
Click Back to navigate to the previous screen.
|
Field Name |
Description |
|---|---|
|
Party ID |
The party id searched by the bank administrator. |
|
Party Name |
The name of the party. |
|
Module Name |
The name of the module. |
|
Remitter List Mapping |
|
|
Map All Remitter List |
Mapping all the existing remitter list IDs to enable for channel banking. |
|
Remitter List ID |
List of remitter IDs present for the selected party. |
|
Remitter List Name |
Name of the remitter list available under the party. |
|
Status |
Status of the remitter list. |
|
New Remitter List Mapping |
Mapping of the remitters. The options can be:
|
- All the Remitter List IDs of the selected party as a relationship with the bank as available in the VAM mid-office system will be fetched and displayed.
- Select a global check box of Map All Remitter List to enable all the existing remitters for channel banking (on screen, it will serve as a Select All function).
OR
If specific remitter list IDs are required to be given access then the user needs to select the respective check boxes preceding the remitter ID. - To map the new remitters list, select appropriate option from New Remitter List Mapping field;
Select Auto if you wish to allow access to all future Remitter List.
OR
Select Manual if you wish to explicitly map new remitter list and transactions. - Click . The Party Resource Access - Create (Transaction Mapping) screen appears.
OR
Click to cancel the transaction.
OR
Click to navigate to the previous screen.
- To map the transactions to the remitter ID, click
 against the particular remitter list ID to view the transaction mapping.
 - Select the respective check boxes preceding the transaction to be mapped.
OR
Select Map All Transactions to All Remitter List, if you want to map all the transactions to all remitter lists. - Click to save the changes.
OR
Click to cancel the transaction.
OR
Click to navigate to the previous screen. - The Party Resource Access - Review screen appears. Verify the details, and click .
OR
Click to cancel the transaction.
OR
Click to navigate to the previous screen. - The screen with success message appears along with the reference number and status of the transaction. Click OK to complete the transaction.
Party Resource Access- View
The Bank Administrator can view the remitter lists and transactions under each remitter list ID for which access has been provided to the party.
|
Field Name |
Description |
|---|---|
|
Party ID |
Party Id of the corporate user. |
|
Party Name |
Party name of the corporate user. |
To view the remitter and transaction access:
- In the Party ID field, enter the party id of the user.
OR
In the Party Name field, enter the party name of the user. - Click . . For a searched party, Remitter List Mapping Summary appears that provides details of the Total no. of Remitter List IDs and the number of Remitter List IDs mapped.
OR
Click to cancel the transaction.
OR
Click to clear the search parameters.
Party Resource Access - Search Results
|
Field Name |
Description |
|---|---|
|
Party ID |
The party id searched by the bank administrator. |
|
Party Name |
The name of the party. |
|
Module Name |
The name of the module. |
|
Remitter List Mapping Summary Click on Resource Type to view the respective mapping details. |
|
|
Resource Type |
The resource types available under the party for the selected module. Resource type for Virtual Account Management module is Remitter List. |
|
Total Number of Remitter Lists |
Total number of remitter lists available under the party. |
|
Number of Remitter Lists Mapped |
Number of remitter lists mapped to the party. |
- Click the Remitter List link, which will navigate to the view page.
OR
Click to cancel the transaction and navigate back to ‘Dashboard’.
OR
Click to navigate to the previous screen.
Party Resource Access – View
|
Field Name |
Description |
|---|---|
|
Remitter List Mapping |
|
|
Map All Remitter List |
Mapping all the remitters of the VAM module to enable for channel banking. |
|
Remitter List ID |
List of remitter IDs present in a particular resource type. |
|
Remitter List Name |
Name of the remitter list available under the party. |
|
Status |
Status of the remitter list. |
|
New Remitter List Mapping |
Mapping of the remitters. The options can be:
|
- Click Next. The Party Resource Access- View screen to view the selected remitter lists and transactions enabled for the selected remitter lists appears.
OR
Click to modify the remitter list mapping.
OR
Click to delete the Party Resource Access setup.
OR
Click to cancel the transaction.
OR
Click to navigate to the previous screen.
- Click against the particular Remitter List to view the mapped transactions.
OR
Click to update transaction mapping.
OR
Click to cancel the transaction.
OR
Click to navigate to the previous screen.
Party Resource Access - Edit
The Bank Administrator gets a request with the list of remitter lists and transactions under each Remitter List for which access details needs to be edited for the party.
- In the Party ID field, enter the party id of the user.
OR
In the Party Name field, enter the party name of the user. - Click . For a searched party, Remitter List Mapping Summary appears.
OR
Click to cancel the transaction.
OR
Click to clear the search parameters. - If there is no mapping done for a party , the message No Resource mapped for the party with Map option appears.
- Click the Remitter Type link to view/ edit the details. The Party Resource Access- View screen appears.
- Click Edit. The Party Resource Access - Edit screen appears.
This enables the selection and de-selection option against the Remitter List IDs and allows changing the map remitters from Auto to Manual and vice-versa.
OR
Click to go to the next tab (Transaction Mapping).
OR
Click to delete the Party Resource Access setup.
OR
Click to cancel the transaction.
OR
Click to navigate to the previous screen.
- To map the new resources (remitter lists), select appropriate option from New Remitter List Mapping field;
Select Auto if you wish to allow access to all future remitter list.
OR
Select Manual if you wish to allow specific access to all future remitter list. - Select the respective check boxes preceding the Remitter List ID to be mapped.
OR
Select Map All Remitter List, if you want to map all the remitters. - Click . The Party Resource Access - Edit screen with mapped transaction - to the remitter appears.
OR
Click to cancel the transaction.
OR
Click to navigate to the previous screen.
- To map the transactions to the Remitter lists, click against the particular remitter list ID to view the transaction mapping.
- Select the respective check boxes preceding the transaction to be mapped.
OR
Select Map All Transactions, if you want to map all the transactions to all remitter list IDs.
- Click to save the changes.
OR
Click to cancel the transaction.
OR
Click to navigate to the previous screen. - The Party Resource Access - Review screen appears. Verify the details, and click .
OR
Click to cancel the transaction.
OR
Click to navigate to the previous screen. - The screen with success message appears along with the reference number and status of the transaction. Click OK to complete the transaction.
Party Resource Access - Delete
As part of this option, remitter list mapping and /transaction mapping can be deleted.
- In the Party ID field, enter the party id of the user.
OR
In the Party Name field, enter the party name of the user. - Click . For a searched party, Remitter List Mapping Summary section appears.
OR
Click to cancel the transaction.
OR
Click to clear the search parameters. - If there is no mapping done for a party (own/ linked), the message No Remitters mapped for the party with Map option appears.
- Click the Remitter List link to view/ delete the details. The Party Resource Access - View screen appears.
- Click Delete. The application prompt the administrator with a message 'Are you sure you want to delete Remitter List Mapping setup for Party ID – Party name' with an option of Yes / No.
- Click Yes to proceed with the deletion request.
It will navigate to confirmation page with a success message and the status.
OR
Click No if you do not wish to proceed with deletion. - The success message and the status appears.
Click OK to complete the transaction.