Party preferences
Party![]() A party is any individual or business entity having a banking relationship with the bank. Preference setup allows the administrator to onboard the party on OBDX along with definition of attributes like limits, Approval flow, grace period etc. This maintenance is done only for corporate type of parties and is not applicable for retail type of parties. Parameter values maintained against a corporate party defines the system behavior for the following:
A party is any individual or business entity having a banking relationship with the bank. Preference setup allows the administrator to onboard the party on OBDX along with definition of attributes like limits, Approval flow, grace period etc. This maintenance is done only for corporate type of parties and is not applicable for retail type of parties. Parameter values maintained against a corporate party defines the system behavior for the following:
- Cumulative daily limits per transaction for the corporate party
- Transaction limits for the users
- Type of approval flow applicable
- Channel access preferences
- Availability of corporate administrator facility
Pre-Requisites
- Transaction access is provided to Bank Administrator.
- Approval rule set up for Bank Administrator to perform the actions.
- Party for which preference needs to be set up is created in core banking application.
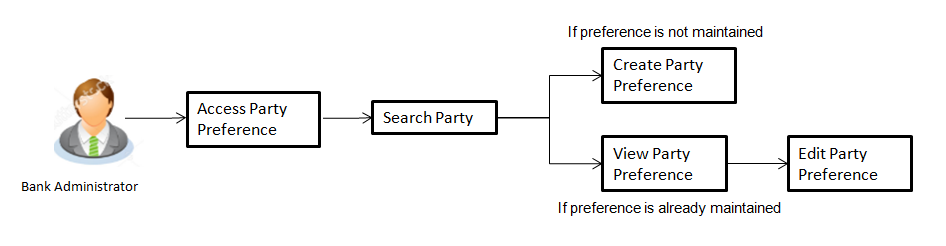
Workflow
Features Supported In Application
Party Preference maintenance available for bank administrator in the application includes:
![]() How to reach here:
How to reach here:
System/ Bank Administration Dashboard > Toggle Menu > OnBoarding > Party Preferences
OR
Bank Administration Dashboard > Onboarding > Party Preferences
Party Preferences- Search
Bank Administrator![]() Administrator is a set of individuals that administer the applicant/Affiliate entity. For example, Accountants, Authorized Signatories for organizations, Power of Attorney for individuals. logs into the system and navigates to the Party Preferences screen.
Administrator is a set of individuals that administer the applicant/Affiliate entity. For example, Accountants, Authorized Signatories for organizations, Power of Attorney for individuals. logs into the system and navigates to the Party Preferences screen.
System displays a screen to enter the party information (party ID or party name) and search party for which the preferences are to be maintained or viewed.
User can enter the party ID (if known) or the party name with a minimum of 5 characters. System matches the input provided by the user with the party name records and displays the matching party records.
In case of a party search by party ID, it is an exact match and system displays the party preference maintained if any, else displays an option to create party preference.
To search party preferences of party:
- In the Party ID field, enter the party ID whose party preferences you want to view.
OR
In the Party Name field, enter the name of the party whose party preferences you want to view. - Click Search.
If party preference is already maintained, user is directed to Party Preference – View screen.
If party preference is not maintained, user is directed to Party Preference – Create screen.
In case of invalid party, error message is shown on the screen.
OR
Click to reset the details.
OR
Click to cancel the transaction and navigate the user back to Dashboard.
In case of a party search by name, system displays the matching party records. The records have parties listed with both Party ID and Party Name information. User can select the record by clicking on the Party ID from the list.
|
Field Name |
Description |
|---|---|
|
Search |
|
|
Party ID |
Party ID for which the party preference to be maintained/ viewed. |
|
Party Name |
Party Name of a party for which the party preference to be maintained or viewed. |
- Click Edit to edit the party preferences.
OR
Click to cancel the transaction.
OR
Click to navigate to previous screen.
Party Preferences - Create
Using this option, Bank Administrator can configure party preferences for a specific party.
To create the party preferences:
- In the Party ID field, enter the party ID you want to view the party preferences you want to view.
Party ID entered by the user gets validated from the core banking application. After the core banking application validation is successful, a check is performed in application to verify if preferences are already maintained for a party.
If the preferences are already maintained then user is directed to Party Preference – View screen. - Click Search.
The party preference maintained for the party ID appears based on the entered search parameters.
OR
Click to reset the details.
OR
Click to cancel the transaction and navigate the user back to Dashboard. - Click the desired party ID link under the Party ID column.
The Party Preferences screen appears.
|
Field Name |
Description |
|---|---|
|
Search |
|
|
Party ID |
Party ID for which the party preference to be maintained or viewed |
|
Party Name |
Party Name of a party for which the party preference to be maintained/ viewed. |
- Click Create to create party preference.
The Create screen appears.
OR
Click to navigate to previous screen.
OR
Click to cancel the transaction.
|
Field Name |
Description |
|---|---|
|
Create |
|
|
Party ID |
Party ID for which the party preference to be maintained. |
|
Party Name |
Party Name of a party for which the party preference to be maintained. |
|
Grace Period |
Provision of time period is made to allow user to approve the transaction after the actual due date. Note: The tooltip with information will appear on dashboard in the Pending for Approvals section only when the user hovers on grace period. |
|
Approval Flow |
The approval type for the party. The options are:
|
|
Channel Access |
Whether users associated with a party can start transacting through the channel. The options are:
|
|
Forex Deal Creation |
Whether users associated with a party can create forex deals. The options are:
|
|
Corporate Administrator Facility |
This is to enable a corporate to have r corporate administrator facility. Only if this facility is enabled, a corporate administrator user can be created for that party. The options are:
|
|
Accessible roles |
This field lists the type of roles that will be available to the corporate administrator while on-boarding a user for the corporate party. The options are:
|
|
Cumulative Limit It allows Bank Administrator to map customer cumulative daily limits to the party. All the touch points and touch point groups maintained the system are listed on the screen. Administrator needs to ensure that the relevant packages are mapped to all the touch points/groups accessible by the party users. Also an option is provided to map the limit package at Global level (a group created with all internal and external touch points). All the touch points and touch point groups maintained in the system are listed under each entity. Packages can be mapped for each touch point and for a group |
|
|
Touch Points/ Group |
Name of touch points/ groups maintained under a specific entity for which the limit packages are to be mapped. |
|
Package |
List of the packages available for mapping to touch points/ group are listed here. Limit packages maintained for the selected touch point will get here. |
|
User Limits This field allows the Bank Administrator to map customer user level limits (CUL) to the party. All the touch points and touch point groups maintained the system are listed on the screen. Administrator needs to ensure that the relevant packages are mapped to all the touch points/ groups accessible by the selected party users. Also an option is provided to map the limit package at Global level (a group created with all internal and external touch points). |
|
|
Touch Points/ Group |
Name of touch points/group maintained under a specific entity for which the user limit packages are to be mapped. |
|
Package |
List of the packages available for mapping to an touch points/ group are listed. |
- In the File Encryption Key field, enter the unique File Encryption key provided to the corporate for encrypting/decrypting the bulk files that he is uploading.
- In the Approval Flow field, select the appropriate option.
- In the Channel Access field, select the appropriate option.
- In the Forex Deal Creation field, select the appropriate option.
- In the Corporate Administrator Facility field, select the appropriate option.
- From the Accessible Roles list, select the appropriate option.
- From the Cumulative Daily Limits list, select the appropriate option.
- From the User Limit list, select the appropriate option.
Note: Click  to refresh the option.
- Click
 to view the details of touch points group. The View Details popup window appears.
View Details - Touch Point Group
|
Field Name |
Description |
|---|---|
|
Group Code |
Group code defined for an touch point group. |
|
Group Description |
Group description defined for touch point groups. |
|
Touch Point / Group Type |
Type of touch point i.e. whether touch point is of type internal or external. |
|
Touch Points |
List of the internal or external touch points. |
- Click to save party preferences.
OR
Click to cancel the transaction.
OR
Click to navigate to previous screen.
- The Review screen appears. Verify the details, and click .
OR
Click to cancel the transaction
OR
Click to navigate to the previous screen. - The success message of party preference creation appears.
Click to complete the transaction.
Party Preferences- View
Administrator user is directed to Party Preference – View screen if preference for the party is already maintained. Preferences set for the party will be displayed on the screen.
To view party preferences of party:
- In the Party Id field, enter the party ID whose party preferences you want to view.
OR
In the Party Name field, enter the name of the party whose party preferences you want to view. - Click Search.
The party preference maintained for the party ID appears based on the entered search parameters.
OR
Click to reset the details.
OR
Click to cancel the transaction and navigate the user back to Dashboard. - Click the link under the Party ID column.
The search result according to the search criteria appears.
|
Field Name |
Description |
|---|---|
|
Party ID |
Party ID for which the party preference to be maintained. |
|
Party Name |
Party Name of a party for which the party preference to be maintained. |
|
Grace Period |
Provision of time period is made to allow user to approve the transaction after the actual due date. Note: The tooltip with information will appear on dashboard in the Pending for Approvals section only when the user hovers on grace period. |
|
Approval Flow |
The approval type for the party. The options are:
|
|
Channel Access |
Whether users associated with a party can start transacting through the channel. The options are:
|
|
Forex Deal Creation |
Whether users associated with a party can create forex deals. The options are:
|
|
Corporate Administrator Facility |
This is to enable a corporate to have r corporate administrator facility. Only if this facility is enabled, a corporate administrator user can be created for that party. The options are:
|
|
Accessible roles |
This field lists the type of roles that will be available to the corporate administrator while on-boarding a user for the corporate party. The options are:
|
|
Cumulative Daily Limit It allows Bank Administrator to map customer cumulative daily limits (CCL) to the party. All the touch points and touch point groups maintained the system are listed on the screen. Administrator needs to ensure that the relevant packages are mapped to all the touch points/groups accessible by the party users. Also an option is provided to map the limit package at Global level (a group created with all internal and external touch points). All the touch points and touch point groups maintained in the system are listed under each entity. Packages can be mapped for each touch point and for a group. |
|
|
Touch Points/ Group |
Name of touch points/ groups under a specific entity to whom the limit packages are to be mapped. |
|
Package |
List of the packages available for mapping to touch points/ group are listed here. Limit packages maintained for the selected touch point will get here. |
|
User Limit This field allows the Bank Administrator to map customer user level limits (CUL) to the party. All the touch points and touch point groups maintained the system are listed on the screen. Administrator needs to ensure that the relevant packages are mapped to all the touch points/groups accessible by the selected party users. Also an option is provided to map the limit package at Global level (a group created with all internal and external touch points). |
|
|
Touch Points/ Group |
Name of touch points/group maintained under a specific entity for which the user limit packages are to be mapped. |
|
Package |
List of the packages available for mapping to an touch points/ group are listed. |
- Click Edit to edit the party preferences.
OR
Click to cancel the transaction.
OR
Click to navigate to previous screen.
Party Preferences - Edit
Administrator can edit the party preferences maintained for a party.
To edit the customer preferences:
- In the Party Id field, enter the party ID whose party preferences you want to view.
OR
In the Party Name field, enter the name of the party whose party preferences you want to view. - Click Search.
The party preference maintained for the party ID appears based on the entered search parameters.
OR
Click to reset the details.
OR
Click to cancel the transaction and navigate the user back to Dashboard. - Click Edit to edit the party preferences.
The Details screen appears along with the party ID.
|
Field Name |
Description |
|---|---|
|
Edit |
|
|
Party ID |
Party ID for which the party preference to be edited will be displayed. |
|
Party Name |
Party Name of a party for which the party preference to be edited will be displayed. |
|
Details |
|
|
Grace Period |
Provision of certain period of time is made to allow user to approve the transaction after the actual due date. Note: The tooltip with information will appear on dashboard in the Pending for Approvals section only when the user hovers on grace period. |
|
File Encryption Key |
File Encryption key is the unique key provided to the corporate for encrypting/decrypting the bulk files that he is uploading. |
|
Approval Flow |
The approval type for the party. The options are:
|
|
Channel Access |
Whether users associated with a party can start transacting through internet and mobile banking. The options are:
|
|
Forex Deal Creation |
Whether users associated with a party can create forex deals. The options are:
|
|
Corporate Administrator Facility |
This is to enable a corporate to have their corporate administrator facility. Only if this facility is enabled, a corporate administrator type of user can be created under a party in editable form. The options are:
|
|
Accessible roles |
Field lists the type of roles that are available to the corporate administrator while on-boarding a user for the corporate party. The options are:
|
|
Cumulative Daily Limit Name of the limit package defined. It allows Bank Administrator to map cumulative level limits to the party. All the limit packages maintained are listed. The cumulative limit set for the touch point / group. In case of multi entity set up, limit packages needs to be mapped at each entity level. |
|
|
Touch Points/ Group |
Name of touch points/ groups under a specific entity to whom the limit packages are to be mapped. |
|
Package |
List of the packages which is to be mapped to an touch points/ groups. Only limit packages maintained for the selected touch point will get here. |
|
User Limits Name of the limit package. It allows mapping user level limits to the party. All the limit packages maintained are listed. The user limit set for the touch point / group. In case of multi entity set up, limit packages needs to be mapped at each entity level. |
|
|
Touch Points/ Group |
Name of touch points/ groups under a specific entity to whom the user limit packages are to be mapped. |
|
Package |
List of the packages which are to be mapped to an touch points/ groups. Only user limit packages maintained for the selected touch point will get here. |
- In the Grace Period field, enter the number of grace period.
- In the Approval Flow field, select the appropriate option.
- In the Channel Access field, select the appropriate option.
- In the Forex Deal Creation field, select the appropriate option.
- From the Enable for Corporate Administrator list, select the appropriate option.
- From the Cumulative Daily Limits list, select the appropriate option.
- From the User Limit list, select the appropriate option
Note: Click to refresh the option.
- Click to view the details of touch points group. The View Details popup window appears.
View Details - Touch Point Group
|
Field Name |
Description |
|---|---|
|
Group Code |
Group code defined for an touch point group. |
|
Group Description |
Group description defined for an touch point groups. |
|
Touch Point / Group Type |
Type of touch point i.e. whether touch point is of type internal or external. |
|
Touch Points |
List of the internal or external touch points. |
- Click to save Party Preference. User is directed to the Party Preference - Review page post necessary validations.
OR
Click to navigate to previous screen.
OR
Click to cancel the transaction and navigate back to Dashboard. - The Review screen appears. Verify the details, and click .
OR
Click to make the changes if any.
OR
Click to cancel the transaction and navigate back to Dashboard. - The success message of updation appears.
Click to complete the transaction.
FAQs
![]() What is sequential type of approval flow?
What is sequential type of approval flow?
![]() What is Parallel type of approval flow?
What is Parallel type of approval flow?
![]() What is cumulative daily limit package?
What is cumulative daily limit package?
![]() Can administrator delete Party Preference?
Can administrator delete Party Preference?
![]() Can I edit the limit packages? How does it impact the transactions?
Can I edit the limit packages? How does it impact the transactions?
![]() Is it mandatory to map packages for all the touch points and groups available under each entity?
Is it mandatory to map packages for all the touch points and groups available under each entity?