Product CONFIGURATION
Banks across different geographies can have varied requirements with regards to sequence of steps in originations for different products.
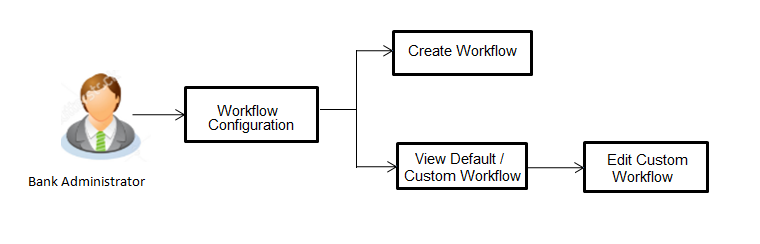
Workflow configuration is an administrative maintenance using which the bank administrator can define the sequence of the sections in application form for each of the products.
There will be a default workflow defined in the system as part of Day0 definition for each of the product along with identified set of steps.
Bank administrator will have an option to view the default workflow for each of the products. If the sequence defined for a product does not suit the bank requirements, the administrator can opt to create a custom workflow by re-arranging the steps.
Bank administrator also will have a choice to decide on the workflow to be applied for products i.e. default / custom.
Prerequisites
- Transaction access is provided to Bank Administrator
- Default Workflow with set of steps applicable for a product is defined in the system
Features supported in application
Workflow configuration allows Bank Administrator![]() Administrator is a set of individuals that administer the applicant/Affiliate entity. For example, Accountants, Authorized Signatories for organizations, Power of Attorney for individuals. to:
Administrator is a set of individuals that administer the applicant/Affiliate entity. For example, Accountants, Authorized Signatories for organizations, Power of Attorney for individuals. to:
![]() How to reach here:
How to reach here:
Bank Administrator Dashboard > Origination Administrator > Workflow Configuration
OR
System/ Bank Administrator Dashboard > Toggle Menu > Others > Workflow Configuration
|
Field Name |
Description |
|---|---|
|
Product Class |
Select the product class for which the workflow needs to be viewed or custom workflow is to be defined. |
- In the Product Class field, click the desired product. The Product Configuration screen with option to select the product appears.
OR
Click to navigate back to the previous screen.
|
Field Name |
Description |
|---|---|
|
Product Class |
The selected product class for which the workflow needs to be viewed or custom workflow is to be defined. |
|
Product Name |
Select the product name for which the workflow needs to be viewed or configured. The list will be populated based on the Day 0 configurations done in the application. The options are:
|
|
Flow Type |
The available flow types for the product are displayed. The options are:
|
|
Status |
Indicates the status against the flow type i.e. whether the default or the custom flow is active / inactive. At any point in time, either the default or the custom flow type for a product can remain in active state. |
|
Actions |
The available action buttons against each of the Flow Type is displayed. The action button can be:
|
- In the Actions column, click to view the default/ custom workflow definition for the selected product.
OR
Click to create a new workflow (Link is enabled only if no workflow is created for selected product).
OR
Click to navigate to the previous screen.
Product Configuration - View Default Workflow
Using this option Bank Administrator can view the workflow definition for the selected product.
To view the product configuration:
- From the Product Name list, select the appropriate product. The Flow Type, Status and Actions column appears.
- In the Action column against the default workflow, click . The Product Configuration - View screen appears.
|
Field Name |
Description |
|---|---|
|
Product Class |
Product |
|
Product |
Product name as selected in the previous screen is displayed. |
|
Flow Type |
The flow type for the product against which the action of view is selected is displayed. The options are:
|
|
Product Flow (Default) |
Default workflow defined for the selected product with the following steps is displayed:
|
- Click to navigate to the previous screen.
OR
Click to cancel the transaction and navigate to the ‘Dashboard’.
Product Configuration - Create Custom Flow
Using this option, bank administrator can create the workflow configuration.
To create the product configuration:
- In the Product Configuration screen, select the product class from Product Class field.
|
Field Name |
Description |
|---|---|
|
Product Class |
The selected product class for which the custom workflow is to be defined. |
|
Product Name |
Select the product name for which the workflow needs to be configured. The list will be populated based on the Day 0 configurations done in the application. The options are:
|
|
Flow Type |
The available flow types for the product are displayed. The options are:
|
|
Status |
Indicates the status against the flow type i.e. whether the default or the custom flow is active / inactive. At any point in time, either the default or the custom flow type for a product can remain in active state. |
|
Actions |
The available action buttons against each of the Flow Type is displayed. The action button can be:
|
- From the Product Name list, select the appropriate product.
- In the Action column, click . The Product Configuration - Create screen appears.
The steps as defined in the default workflow will be displayed with an option to move the steps in the order as required. -
At any point in time, the user will have an option to view the default workflow.
|
Field Name |
Description |
|---|---|
|
Product Class |
Product class as selected in the previous screen is displayed. |
|
Product |
Product name as selected in the previous screen is displayed. |
|
Flow Type |
The flow type for the product as selected in the previous screen is displayed. |
|
Product Flow |
Default workflow defined for the selected product with the following steps is displayed:
|
- Select the step to be moved.
- Click and drag the same in the area where it needs to be placed.
- Click to save the transaction.
OR
Click to cancel the transaction and navigate to the 'Dashboard'.
OR
Click to navigate to previous screen.
OR
Click to view the default workflow for the product. - The Product Configuration - Review screen appears. Verify the details, and click .
OR
Click to cancel the transaction.
OR
Click to make the changes if any. - The success message appears along with the transaction reference number and status of transaction.
Click to complete the transaction.
Product Configuration - View Custom Workflow
Using this option Bank Administrator can view the workflow definition created by them.
To view the custom workflow:
- From the Product list, select the appropriate product.
- In the Action column against the custom workflow, click . The Product Configuration - View screen appears.
|
Field Name |
Description |
|---|---|
|
Product Class |
Product class as selected in the previous screen is displayed. |
|
Product |
Product name as selected in the previous screen is displayed. |
|
Flow Type |
The flow type for the product as selected in the previous screen is displayed. |
|
Product Flow |
|
- Click to edit the workflow configuration. The Product Configuration - Edit screen appears.
OR
Click to view the default workflow for the product.
OR
Click to cancel the transaction and navigate to the ‘Dashboard’.
OR
Click to navigate to the previous screen.
Product Configuration - Edit
If the custom workflow defined for a product does not suit the business needs, then bank administrator can edit the defined custom workflow To edit custom workflow, bank administrator will need to follow the steps mentioned below.
To edit the product configuration:
- From the Product list, select the appropriate product.
- In the Action column, click against the Custom Workflow option. The Product Configuration - View screen appears.
- Click to edit the workflow configuration. The Product Configuration - Edit screen appears.
OR
Click to cancel the transaction and navigate to the ‘Dashboard’.
OR
Click to navigate to the previous screen.
|
Field Name |
Description |
|---|---|
|
Product Class |
Product class as selected in the previous screen is displayed. |
|
Product |
Product name as selected in the previous screen is displayed. |
|
Flow Type |
The flow type for the product as selected in the previous screen is displayed. |
|
Product Flow (Default) |
Default workflow defined for the selected product with the following steps is displayed:
|
|
Product Flow (Custom) |
Default workflow defined for the selected product with the following steps is displayed:
|
- Select the step to be moved.
- Click and drag the same in the area where it needs to be placed.
- Click to save the transaction.
OR
Click to cancel the transaction and navigate to the 'Dashboard'.
OR
Click to navigate to the previous screen.
OR
Click to view the default workflow for the product. - The Review screen appears. Verify the details, and click .
OR
Click to cancel the transaction.
OR
Click to make the changes if any. - The success message appears along with the transaction reference number and status of transaction.
Click to complete the transaction.