USER Group MANAGEMENT
User group is a set created with multiple users to perform certain tasks/actions.
Using this option, Corporate Administrator![]() Administrator is a set of individuals that administer the applicant/Affiliate entity. For example, Accountants, Authorized Signatories for organizations, Power of Attorney for individuals. can maintain the user groups. Only the users of party ID mapped to a Corporate Administrator can be clubbed together in the user group. User groups maintained by administrators are used while creating approval workflows and approval rules.
Administrator is a set of individuals that administer the applicant/Affiliate entity. For example, Accountants, Authorized Signatories for organizations, Power of Attorney for individuals. can maintain the user groups. Only the users of party ID mapped to a Corporate Administrator can be clubbed together in the user group. User groups maintained by administrators are used while creating approval workflows and approval rules.
Prerequisites:
- Party preference is maintained and is active
- Corporate Administrator is maintained for a party
- Transaction access is provided to Corporate Administrator
- Multiple corporate users are maintained under a party
- Approval rule set up for Corporate Administrator to perform the actions
Workflow
Features supported in application
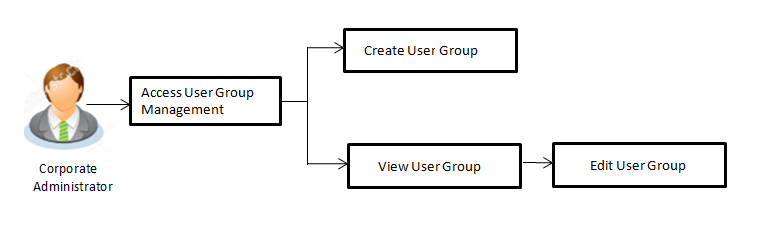
User Group Management allows Corporate Administrator to:
![]() How to reach here:
How to reach here:
Corporate Administrator Dashboard > Toggle menu > Others > User Groups Management
User Groups – Summary
Once the logged in Corporate Administrator navigates to User Group Management screen, user groups maintained (if any) under the party mapped to the user are displayed on the screen. User can opt to view the details of existing user groups or can create new user group using this screen.
|
Field Name |
Description |
|---|---|
|
Party ID |
Party |
|
Party Name |
Party name of Party ID mapped to the logged in Corporate Administrator. |
|
Group Code |
User group code. (This field will be displayed only if there are existing user groups available under a party). |
|
Group Description |
Description provided to the user group. (This field will be displayed only if there are existing user groups available under a party). |
|
Users |
Number of users available in each user group. (This field will be displayed only if there are existing user groups available under a party). |
- Click Create to create new User Group.
OR
Click Cancel to cancel the operation and navigate back to ‘Dashboard’.
OR
Click the Group Code link to view details of the selected User Group.
User Groups - Create
Corporate Administrator can create a new User Group for the mapped Party ID by using this option. Only the users of party ID mapped to a Corporate Administrator can be clubbed together in a User Group.
Administrator can create multiple user groups and one user can be part of multiple user groups, whereas creating a user group without any user is not allowed.
To create the user groups:
- Click Create.
The User Groups - Create screen appears.
|
Filed Name |
Description |
|---|---|
|
Party ID |
Party ID mapped to the logged in Corporate Administrator is displayed. |
|
Party Name |
Party name of Party ID mapped to the logged in Corporate Administrator is displayed. |
|
Group Code |
Specify User Group code. |
|
Group Description |
Specify User Group description. |
|
User Name |
User name list to select and add a user to the user group. Only the users belongs to the party will be listed. |
|
User ID |
User IDs of each user selected from user list are displayed. |
|
User to Add |
Select the users to add more users to the list. |
- In the Group Code field, enter the name of the group that is to be created.
- In the Group Description field, enter the user group description.
- From the User to Add list, select the appropriate user.
- Click to add the selected user in the User Group. A row displaying the details of the selected user appears in the User Name field.
Once added, the user name will be removed from the user drop-down to avoid duplication of users.
Click to remove a user from the User Group.
 - Click to save the User Group .The User Group-Create - Review screen post necessary validations appear.
OR
Click to navigate to previous screen.
OR
Click to cancel the operation and navigate back to ‘Dashboard’ - Verify the details, and click . The User Group-Create – Confirmation screen appears.
OR
Click Edit to modify the changes if any.
The User Group-Create screen with values in editable form appears.
OR
Click Cancel to cancel the operation and navigate back to ‘Dashboard’. - The success message of user group creation appears along with the transaction reference number.
Click to complete the transaction and navigate back to ‘User Groups’ screen.
User Groups - View
On accessing ‘User Group Management’ menu option, summarized view of all the user groups created (if any) for the Party mapped to the Corporate Administrator is displayed on the screen. Further drill down is given on the each user group to view the details of the users who are the part of user group.
To view the user groups:
- In the User Groups screen, click the Group Code link of the record whose details you want to view.
The User Groups - View screen appears.
|
Field Name |
Description |
|---|---|
|
Party ID |
Party ID mapped to the logged in corporate administrator is displayed. |
|
Party Name |
Party name of Party ID mapped to the logged in Corporate Administrator is displayed. |
|
Group Code |
User Group code is displayed. |
|
Group Description |
User Group description is displayed. |
|
Users Added |
|
|
User Name |
User names of the user who is a part of the user group are displayed. |
|
User ID |
User IDs of the user who is a part of the user group are displayed. |
- Click to edit the user group. The User Groups - Edit screen with values in editable form appears.
OR
Click to cancel the operation and navigate back to ‘Dashboard’.
OR
Click Back to go back to previous screen.
User Group - Edit
This function enables the Corporate Administrator to edit the description of existing user groups. Corporate Administrator can also add new users and remove existing users of the user group as part of this function.
A check is performed on minimum and maximum number of users allowed as a part of user group while adding or removing the users from the user group.
To edit or update a user group:
- In the User Groups screen, click the Group Code link of the record whose details you want to view.
The User Groups - View screen appears. - Click Edit.
The User Group - Edit screen appears.
|
Field Name |
Description |
|---|---|
|
Party ID |
Party ID mapped to the logged in Corporate Administrator is displayed. |
|
Party Name |
Party name of Party ID mapped to the logged in Corporate Administrator is displayed. |
|
Group Code |
User Group code is displayed. |
|
Group Description |
User Group description is displayed. |
|
User Name |
User names of the user who is a part of the user group are displayed. |
|
User ID |
User IDs of the user who is a part of the user group are displayed. |
|
User to Add |
Select the users to add more users to the list. |
- In the Group Description field, enter the user group description.
- From the User to Add list, select the appropriate user.
- Click to add the selected user in the User Group. A row displaying the details of the selected user appears in the User Name field.
Once added, the user name will be removed from the user drop-down to avoid duplication of users.
Click to remove a user from the User Group. - Click to save the User Group .The User Group - Edit - Review screen appears post necessary validations.
OR
Click to go back to previous screen.
OR
Click to cancel the operation and navigate back to ‘Dashboard’ - Verify the details, and click .
OR
Click to modify the details if any.
The User Group-Edit screen with values in editable form appears.
OR
Click to cancel the operation and navigate back to ‘Dashboard’. - The success message of user group creation appears along with the transaction reference number.
Click to complete the transaction and navigate back to ‘Dashboard’.