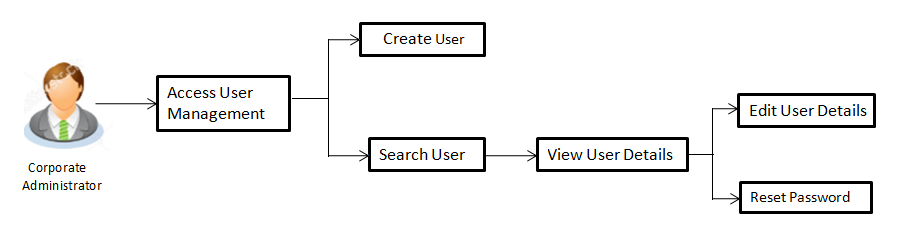
User Management
User Management function enables Corporate Administrator![]() Administrator is a set of individuals that administer the applicant/Affiliate entity. For example, Accountants, Authorized Signatories for organizations, Power of Attorney for individuals. to onboard and manages users along with their login credentials for channel banking access. This module facilitates channel banking access to corporate users of a party that the Corporate Administrator belongs to.
Administrator is a set of individuals that administer the applicant/Affiliate entity. For example, Accountants, Authorized Signatories for organizations, Power of Attorney for individuals. to onboard and manages users along with their login credentials for channel banking access. This module facilitates channel banking access to corporate users of a party that the Corporate Administrator belongs to.
This function also lets the Corporate Administrator to define the various touch points from which the user can access the channel banking and limit package applicable for the same.
Prerequisites:
- Application roles and child roles are maintained
- Transactions are associated with each Application role
- Corporate Administrator is maintained for a party.
- Transaction (User Management) access is provided to Corporate Administrator.
- Approval rule set up for Corporate Administrator to perform the actions.
- Party Preference is maintained for corporate user
Workflow
Features supported in application
The User Management module allows the corporate administrator to:
![]() How to reach here:
How to reach here:
Corporate Administrator Dashboard > Toggle menu > OnBoarding > User Management
OR
Corporate Administrator Dashboard > Quick Links > OnBoarding > User Management
User Management – Create User
Corporate Administrator logs into the system and navigates to the User Management screen. This function allows the administrator to create corporate type of user for a party ID mapped to administrator.
As a part of create user, administrator captures following details of user:
- Personal Information
- Contact Details
- Assign Transaction Limits
- Assign Child Roles
- Define User Status
Note: In case of multi entity implementation, if the corporate administrator has access to multiple entities, then the administrator can select the entity from the entity switcher on which the user needs to be on boarded. The selected entity of the user as part of onboarding will be the default/home entity of the user being created.
To create a new user:
- In the User Management screen, click Create. The User Management screen with mapped party appears.
User Management – Create New User
|
Field Name |
Description |
|---|---|
|
User Type |
User type is always defaulted to ‘Corporate User’. |
|
Party ID |
Party |
|
Party Name |
Party name of the party mapped to the logged in Corporate Administrator. |
- Click to create new corporate user. The Create New User screen appears.
OR
Click to cancel the operation and navigate back to ‘Dashboard’.
OR
Click to go back to previous screen.
User Management – Create New User
|
Field Name |
Description |
|---|---|
|
User Type |
User type is always defaulted to ‘Corporate User’. |
|
Party ID |
Party ID mapped to the logged in Corporate Administrator. |
|
Party Name |
Party Name of the party ID for which the user is to be created is displayed. Party name of Party ID mapped to the logged in corporate administrator. |
|
Personal Information |
|
|
User Name |
Define the name of the user (login ID) which is to be created. |
|
Title |
Title of the user. The options are:
|
|
First Name |
Specify first name of the user. |
|
Middle Name |
Specify middle name of the user. |
|
Last Name |
Specify last name/ surname of the user. |
|
Date of Birth |
Specify date of birth of the user. |
|
Contact Details |
|
|
Email ID |
Specify an email ID of the user. |
|
Contact Number (Mobile) |
Specify mobile number of the user. |
|
Contact Number (Land Line) |
Specify phone number (land line) number of the user. |
|
Address Line 1-4 |
Address of the user. |
|
Country |
Country of the user. |
|
City |
Specify city in which the user resides. |
|
Zip Code |
The postal code of the city in which the user resides. |
|
Limits & Roles |
|
|
Limits - Touch / Point Group If limit check is required, assign a limit package for applicable touch points. All the touch points and touch point groups maintained in the system are listed. Packages can be mapped for each touch point and for touch point group. Also an option is provided to map the limit package at Global level (a group created with all internal and external touch points). |
|
|
Touch Points/ Group |
Name of touch points/ groups under a specific entity to which the limit packages are to be mapped. Also an option is provided to map the limit package at Global level (a group created with all internal and external touch points). |
|
Package |
List of the packages which can be mapped to touch points/ groups. Only limit packages maintained for the selected touch point/group will get listed here. |
|
Roles |
Application roles like maker, checker etc. maintained under respective user segment are listed. Multiple application roles can be mapped to the user. |
|
Touch Points |
|
|
Select Touch Points |
The touch points (banking channels) allows a user to perform transactions using the touch points. The touch points could be:
|
- In the User Name field, enter the name of the user.
- Click to check the uniqueness of the user ID. If the user ID is already used.
- In the Personal Information section, enter the detailsrelevant information.
- In the Contact Details section, enter the relevant information.
- In the Limits section, select the limit packages to be mapped to touch points from the limit package list.
- Select the touch points to be mapped to the user.
- Select the roles to be mapped from the Roles check box.
- Click
 to view the details of touch points group. The View Details -Touch Point Group popup window appears.
Note: Click ![]() to reset the limit package assigned.
to reset the limit package assigned.
Touch Point Group - View Details
|
Field Name |
Description |
|---|---|
|
Group Code |
Group code defined for touch point group. |
|
Group Description |
Group description defined for touch point groups. |
|
Group Type |
Type of touch point i.e. whether touch point is of type internal or external. |
|
Touch Points |
List of the internal or external touch points. |
- To enable the various touch points (banking channels) to a user, select the Select Touch Points check box.
- Click to save the user details.
OR
Click to cancel the operation and navigate back to ‘Dashboard’.
OR
Click to go back to previous screen. - The Create New User - Review screen appears. Verify the details, and click .
OR
Click to cancel the operation and navigate back to ‘Dashboard’.
OR
Click to go back to previous screen. - The success message of user creation appears along with the transaction reference number.
Click to complete the transaction.
User Management – Search/ View User
Using this option, Corporate Administrators can search and view details of the existing users. Administrator can search only those users who are associated with the same party ID mapped to him.
Corporate administrators can also change the user status or the channel access permission for a user using this screen.
Default search is available with User Name, whereas user can be searched by provided other details also.
|
Field Name |
Description |
|---|---|
|
User Type |
User type is always defaulted to ‘Corporate User’. |
|
User Name |
Enter the user ID /User name. Partial search is allowed. |
To search and view details of the existing users
- Click the More Search Options link, screen will be displayed with additional user search criteria.
|
Field Name |
Description |
|---|---|
|
User Type |
User type is always defaulted to ‘Corporate User’. |
|
User Name |
To search the user with the user name/ user ID. Partial search is allowed. |
|
First Name |
Allows to search based on first name of the user. |
|
Last Name |
Allows to search based on last name of the user. |
|
|
Allows to search based on email id of the user. |
|
Mobile Number |
Allows to search based on mobile number of the user. |
- Enter the search criteria, click Search.
The search results appear on the User Management screen based on the search parameters.
OR
Click to cancel the operation and navigate back to ‘Dashboard’.
OR
Click to clear the input search parameters.
|
Field Name |
Description |
|---|---|
|
Search Results |
|
|
Full Name |
First name and last name of the user. |
|
User Name |
User Name of the user. |
|
Status |
Status of the user, Locked or Unlocked. |
|
Channel Access |
Indicates whether channel access is granted. Click Note: Channel access feature will only be available with DB authenticator as Identity Management System. |
If the search results are more than five, pagination will be enabled.
- Click the User Name link to view the user details.
To view the user details:
- In the User Management - Search Results section, click the User Name link of the record for which you want to view the details.
The User Management - View screen appears.
User Management - View
|
Field Name |
Description |
|---|---|
|
User Type |
User type is always defaulted to ‘Corporate User’. |
|
Party ID |
Party ID mapped to the user. Party ID is defaulted to the mapped Party ID of the Corporate Administrator. |
|
Party Name |
Party name of Party ID mapped to the user. Party name of Party ID mapped to the logged in Corporate Administrator. |
|
Personal Information |
|
|
User Name |
Name (login ID) of the user. |
|
Title |
Title of the user.
|
|
First Name |
First name of the user. |
|
Middle Name |
Middle name of the user. |
|
Last Name |
Last name/ surname of the user. |
|
Date of Birth |
Date of birth of the user. |
|
Contact Details |
|
|
Email ID |
Email ID of the user. |
|
Contact Number (Mobile) |
Mobile number of the user. |
|
Contact Number (Land Line) |
Phone number (land line) number of the user. |
|
Address Line 1-4 |
Address of the user. |
|
Country |
Country of the user. |
|
City |
City in which the user resides. |
|
Zip Code |
The postal code of the city in which the user resides. |
|
Limits & Roles |
|
|
Limits - Touch Point/ Group If limit check is required, assigned limit packages for applicable touch points get displayed here. |
|
|
Touch Points/ Group |
Name of touch points/ groups maintained for which the limit packages are mapped. |
|
Package |
Name of the limit package mapped against specific touch points /touch point groups. |
|
Roles |
Application roles mapped to the user. |
|
Touch Points |
|
|
Select Touch Points |
The touch points (banking channels) allows a user to perform transactions using the touch points. The touch points could be:
|
|
Device Registration |
|
|
Android Devices |
This option lets the administrator to deregister the android devices/s. Enabling of the device happens when the user installs and registers on the app on the android device. Administrator cannot manually enable the device. If the Administrator deregisters the device, the user gets logged out from all the android devices and his alternate login gets disabled from all the android devices on which the user has installed the application. |
|
iOS Devices |
This option lets the administrator to deregister the iOS devices/s. Enabling of the device happens when the user installs and registers on the app on the iOS device. Administrator cannot manually enable the device. If the Administrator deregisters the device, the user gets logged out from all the iOS devices and his alternate login gets disabled from all the iOS devices on which the user has installed the application. |
|
Push Notifications |
|
|
Android Devices |
This option lets the administrator disable push notifications for android devices. Enabling of the push notification is done by user himself and administrator cannot do the same. If the administrator disables this, the user will stop getting notifications as a pop-up message (push notification) on the user's registered mobile number. |
|
iOS Devices |
This option lets the administrator disable push notifications for iOS devices. Enabling of the push notification is done by user himself and administrator cannot do the same. If the administrator disables this, the user will stop getting notifications as a pop-up message (push notification) on the user's registered mobile number. Note: To receive push notifications (for both iOS and android) user will have to allow the same on the device settings. |
- Click to edit the user details. The User Management - Edit User screen appears.
OR
Click to reset user’s password. A warning message ‘Do you want to reset the password?’ appears on the screen.
If user clicks ‘Yes’, a reset password confirmation screen is displayed. New password gets communicated to the user on registered email address (if the alert for the same is maintained) and the record for that user gets available in the Print password screen, from where it can be printed.
If user clicks ‘No’, the action gets cancelled.
OR
Click to cancel the operation and navigate back to ‘Dashboard’.
OR
Click Back go back to the previous screen.
OR
Click to download the user details.
User Management - Change user status
This section allows you to lock and unlock a user.
To lock or unlock a user:
- Enter the search criteria, click Search.
The search results appear on the User Management screen based on the search parameters.
Lock / Unlock User
- Click
 in the Status column to lock / unlock a user.
The User Status Maintenance screen appears.
in the Status column to lock / unlock a user.
The User Status Maintenance screen appears.
- In the Lock Status field move the slider to lock / unlock a user.
- In the Reason field enter the appropriate description.
- Click to save.
OR
Click to close.
User Management - Channel Access Permission
This section allows the administrator to grant / revoke channel access for a user. In case administrator changes the channel access from grant to revoked; user will not be able to access his channel banking.
Note: Channel Access feature is only available and displayed if the Application is configured on DB Authenticator as Identity Management system.
To grant or revoke channel access:
- Enter the search criteria, click Search.
The search results appear on the User Management screen based on the search parameters.
Channel Access
- Click in the Channel Access column to grant / revoke channel access to a user. The User Channel Access screen appears.
- In the Channel Access field move the slider to grant / revoke channel access rights for a user.
- In the Reason field enter the appropriate description.
- Click to save.
OR
Click to close.
User Management - Edit User
This function enables Corporate Administrator to edit the existing user details.
To edit or update a user details:
- In the User Management - Search Results section, click the User Name link of the record for which you want to edit the details.
The User Management - View screen appears. - Click . The User Management - Edit User screen appears.
User Management - Edit User
|
Field Name |
Description |
|---|---|
|
User Type |
User type is always defaulted to ‘Corporate User’. |
|
Party ID |
Party ID mapped to the user. Party ID is defaulted to the logged in Corporate Administrator. This field is non-editable. |
|
Party Name |
Party name of Party ID mapped to the user. Party name of Party ID mapped to the logged in Corporate Administrator. This field is non-editable. |
|
Personal Information |
|
|
User Name |
Name (login ID) of the user. This field is non-editable. |
|
Title |
Title of the user.
|
|
First Name |
First name of the user. |
|
Middle Name |
Middle name of the user. |
|
Last Name |
Last name/ surname of the user. |
|
Date of Birth |
Date of birth of the user. |
|
Contact Details |
|
|
Email ID |
Email id of the user. |
|
Contact Number (Mobile) |
Mobile number of the user. |
|
Contact Number (Land Line) |
Phone number (land line) number of the user. |
|
Address Line 1-4 |
Address of the user. |
|
Country |
Country of the user. |
|
City |
City in which the user resides. |
|
Zip Code |
The postal code of the city in which the user resides. |
|
Limit & Roles If limit check is required, update a limit package for applicable touch points. All the touch points and touch point groups maintained in the system are listed. Packages can be mapped for each touch point and for touch point group. Also an option is provided to map the limit package at Global level (a system created group with all internal and external touch points). |
|
|
Touch Points/ Group |
Name of touch points/ groups under a specific entity to which the limit packages are to be mapped. |
|
Package |
List of the packages which is to be mapped to an touch points/ groups. Only limit packages maintained for the selected touch point will get here. |
|
Roles |
Application roles like maker, checker etc. maintained under respective user types are listed. Multiple Application roles can be mapped to the user. |
|
Touch Points |
|
|
Select Touch Points |
The touch points (banking channels) allows a user to perform transactions using the touch points. The touch points could be:
|
|
Device Registration This section does not appear if you select Administrator option from User Type list. |
|
|
Android Devices |
This option lets the administrator to deregister the android devices/s. Enabling of the device happens when the user installs and registers on the app on the android device. Administrator cannot manually enable the device. If the Administrator deregisters the device, the user gets logged out from all the android devices and his alternate login gets disabled from all the android devices on which the user has installed the application. |
|
iOS Devices |
This option lets the administrator to deregister the iOS devices/s. Enabling of the device happens when the user installs and registers on the app on the iOS device. Administrator cannot manually enable the device. If the Administrator deregisters the device, the user gets logged out from all the iOS devices and his alternate login gets disabled from all the iOS devices on which the user has installed the application. |
|
Push Notifications |
|
|
Android Devices |
This option lets the administrator disable push notifications for android devices. Enabling of the push notification is done by user himself and administrator cannot do the same. If the administrator disables this, the user will stop getting notifications as a pop-up message (push notification) on the user's registered mobile number. |
|
iOS Devices |
This option lets the administrator disable push notifications for iOS devices. Enabling of the push notification is done by user himself and administrator cannot do the same. If the administrator disables this, the user will stop getting notifications as a pop-up message (push notification) on the user's registered mobile number. Note: To receive push notification user will have to allow the same on the device settings |
- In the User Name filed, enter the required details. Click Check Availability to check the uniqueness of the user ID. If the user ID is already used.
- In the Personal Information section, enter the required details.
- In the Contact Details section, enter the required details.
- In the Limits section, select the limit packages to be mapped to touch points from the limit package list.
- Select the touch points to be mapped to user.
- Select the roles to be mapped from the Roles check box.
Note: Click ![]() to reset the limit package assigned.
to reset the limit package assigned.
- Click to view the details of touch points group. The View Details -Touch Point Group popup window appears.
Touch Point Group - View Details
|
Field Name |
Description |
|---|---|
|
Group Code |
Group code defined for touch point group. |
|
Group Description |
Group description defined for touch point groups. |
|
Group Type |
Type of touch point i.e. whether touch point is of type internal or external. |
|
Touch Points |
List of the internal or external touch points. |
- Click to update the changes.
OR
Click to cancel the transaction.
OR
Click to navigate to previous screen. - The Review User Details screen appears. Verify the details, and click .
OR
Click to cancel the transaction.
OR
Click to navigate to the previous screen. - The success message of updates appears.
Click to complete the transaction.
FAQs
![]() Can I edit the party id mapped to the user?
Can I edit the party id mapped to the user?
![]() When does the system update a user status as ‘locked’?
When does the system update a user status as ‘locked’?
![]() Can I set the user name which is already used in the application?
Can I set the user name which is already used in the application?
![]() Can one assign multiple Application roles to a user?
Can one assign multiple Application roles to a user?
![]() What are the different child roles available out of box?
What are the different child roles available out of box?
![]() If I update the child role associated to a user, what will happen to the in-flight transactions?
If I update the child role associated to a user, what will happen to the in-flight transactions?
![]() Can a corporate administrator create a corporate user and assign multiple entities?
Can a corporate administrator create a corporate user and assign multiple entities?