2 Create a Clearance Markdown
If you would like to create a new markdown for an item/location, you can do so by adding it to an existing group or creating a new group. Creating a new clearance group can be done by selecting the Create Clearance Group task from the Task List, or selecting the Create action from the Clearance Group Search screen. Either of these steps create a new Clearance Group into which markdown can be added.
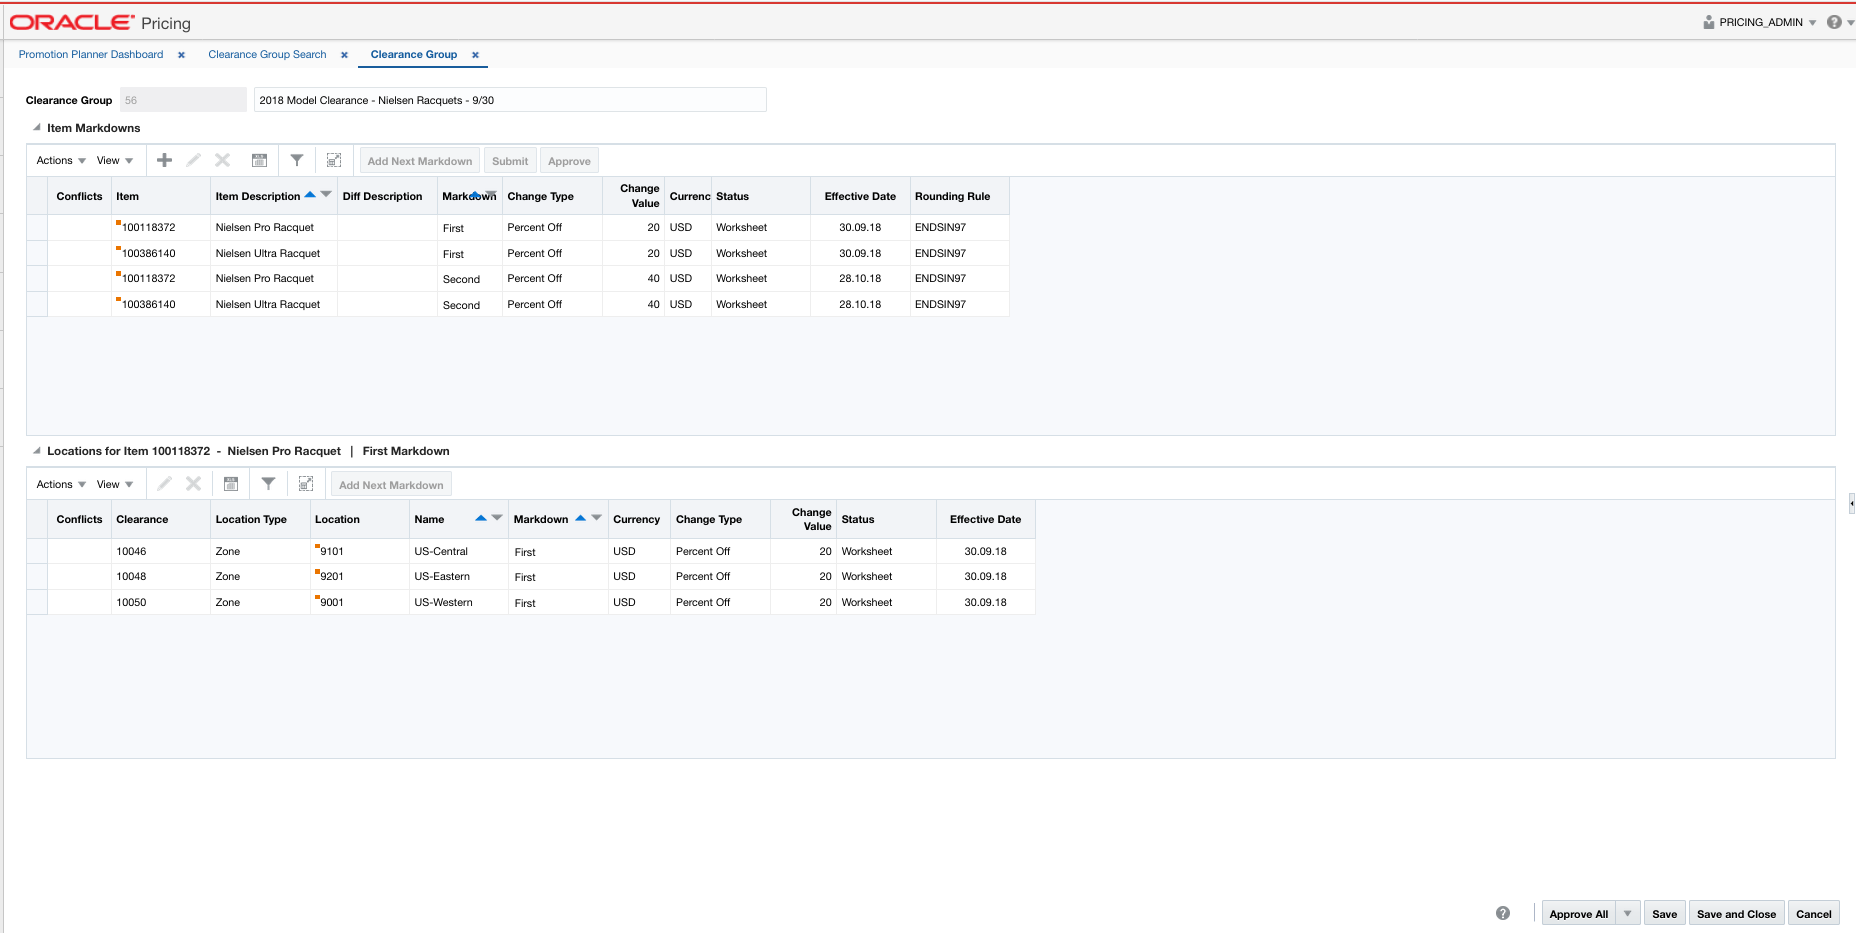
To add markdowns to an existing Clearance group, perform a search for the clearance group that you want to edit. See Search for a Clearance Group. From the search results pane of the Clearance Group Search page, highlight the clearance group to which you want to add a clearance markdown and select Edit from the Actions menu. The Clearance Group page appears.
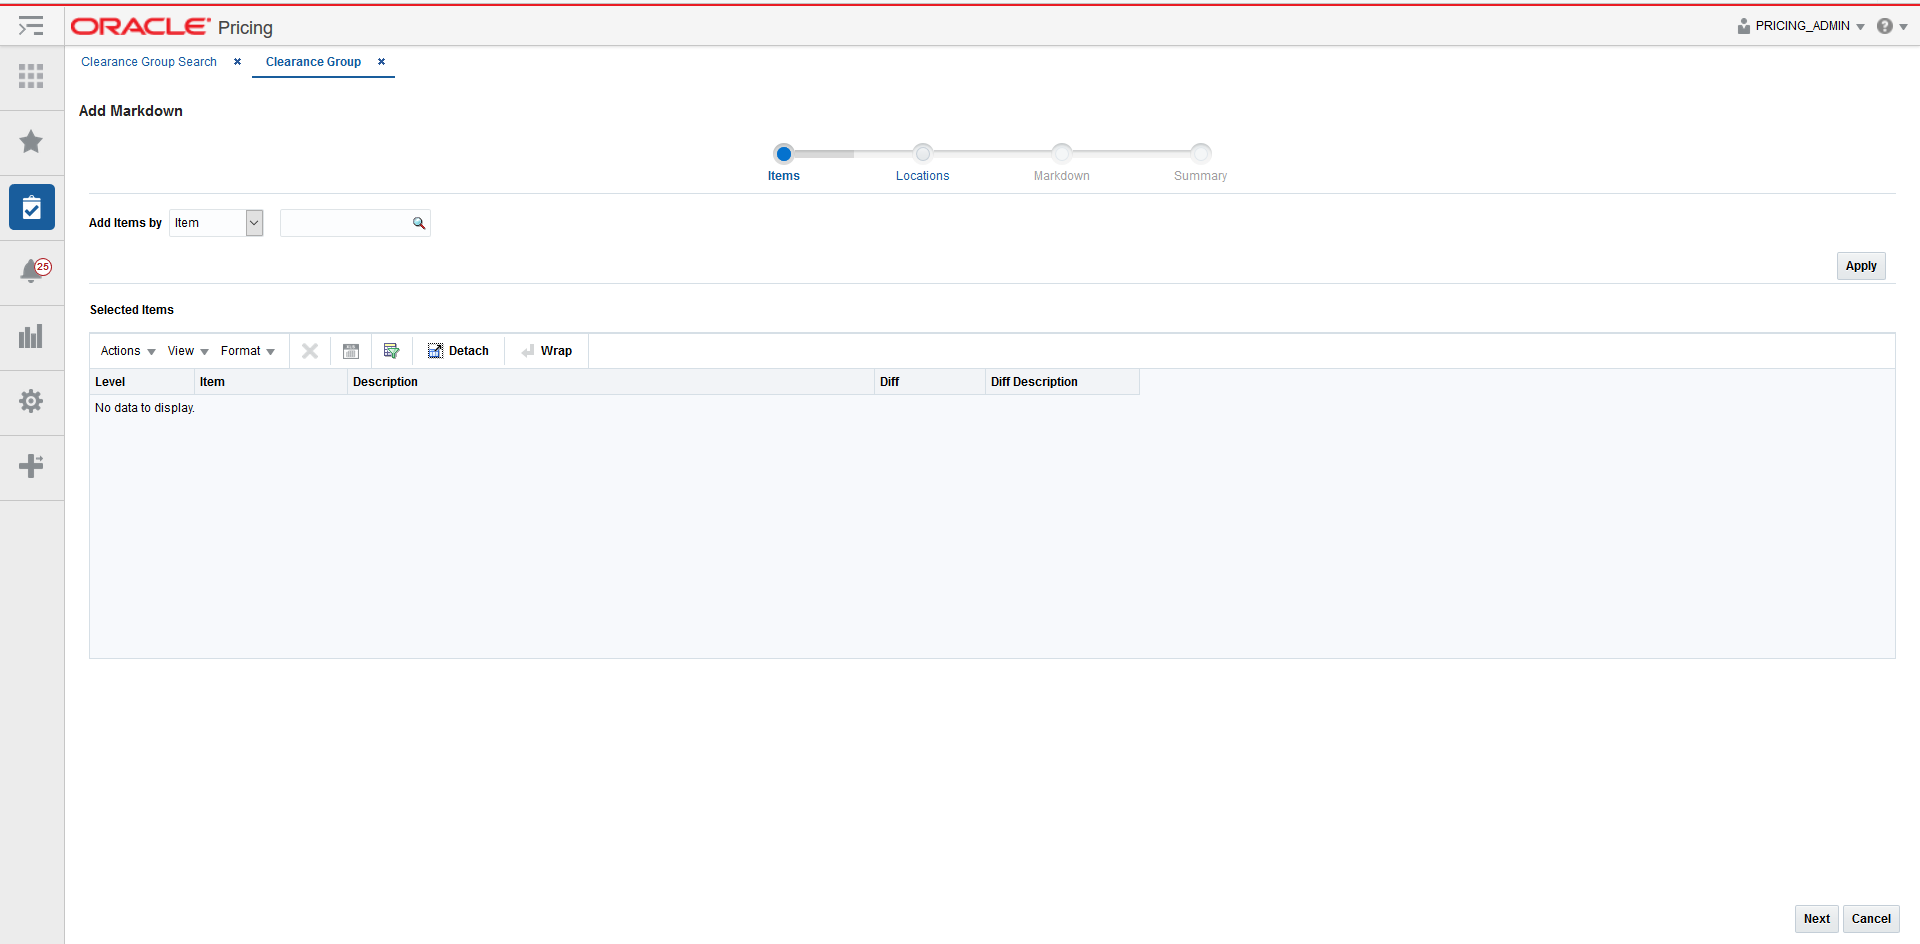
Add Items
The initial page in the Markdown Wizard allows you to select the items that you want to add to the markdown.
-
From the Item Markdowns table, select Add from the Actions menu
The Add Markdown Wizard launches.
-
From the Add Markdown Items page, enter the items to add to the new markdown using the following criteria:
Field Description Add Items by
The Add Items by field allows you to select a category by which you can narrow the list of things to add to the markdown. Options are:
-
Item
-
Parent/Diff
-
Item List
-
Upload List
Item
The Item field is active if you select Item in the Add Items by field. Click the magnifying glass to search for an item to add to the markdown.
Parent/Diff
When Parent/Diff is selected for 'Add Items by' the display of the screen changes, showing an item field and diff type field as the top row, with a Diffs table directly below. Entering an Item and Diff type will populate the diff table where diffs can then be selected. Combinations of the entered parent item and the selected diffs are added to the Selected Items table when the apply button is selected.
Diff Type
The Diff Type field is active if you select Parent/Diff in the Add Items by field.
Item List
The Item List field is active if you select Item List in the Add Items by field. Click the dropdown to select a defined list of items to add to the markdown.
Source File
Source File is active if you select Upload List in the Add Items by field. Click Browse to select the file to upload.
-
-
Once you have entered your criteria, click Apply to move entered or selected data for the item selection option to the Selected Items table. In the case of an Item List or Upload List, the items in the list are populated into the Selected Items table. Once all your items are added to the markdown, click Next. The Add Markdown Locations page appears. Continue with Add Locations.
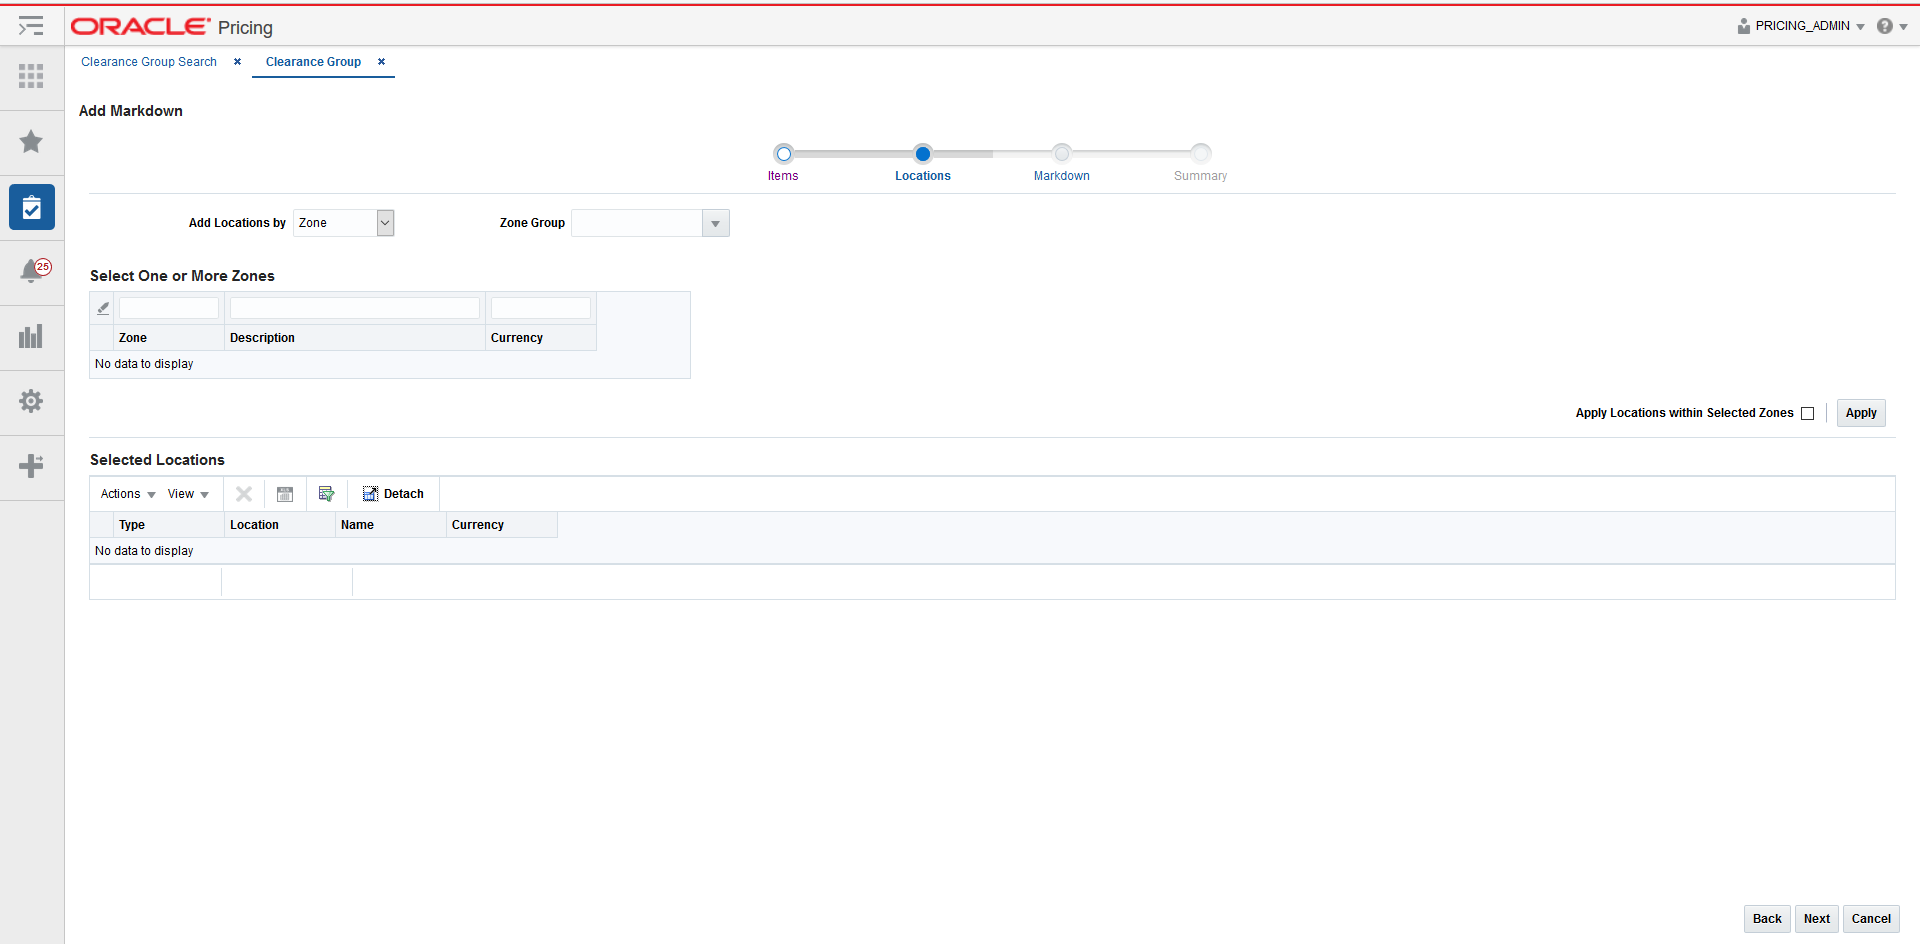
Add Locations
The Locations page of the Markdown Wizard allows you to define the locations associated with the markdown.
-
From the Add Markdown Location page, select the location type you want to use for adding locations using the following criteria:
Table 2-2 Locations Page Fields
Field Description Add Locations by
The Add Locations by field allows you to select a category by which you can narrow the list of locations to add to the markdown. Options are:
-
Zone
-
Location List
-
Store
-
Warehouse
Note: The Warehouse option is only displayed if the Recognize Warehouses as Locations system option is set to Yes.
Zone Group
The Zone Group field is active if you select Zone in the Add Locations by field.
Zone Table
The Zone Table is active if you select Zone in the Add Locations by field. When a zone group is entered, the Zone Table will be populated with the zones in the zone group.
Apply Locations within Selected Zones
The Apply Locations within Selected Zones check box is active if you select Zone in the Add Locations by field. This checkbox allows exploding the zone into stores and warehouses for populating the Selected Locations table. If you have access to one location in a zone, you can create events for the entire zone and markdowns can be created for all locations under the zone after exploding the zone.
Location List
The Location List dropdown list is active if you select Location List in the Add Locations by field. Click the dropdown to select from a defined list of locations to add to the markdown.
Store
The Store dropdown list is active if you select Store in the Add Locations by field. Click the dropdown to select from a defined list of stores to add to the markdown.
Warehouse
The Warehouse dropdown list is active if you select Warehouse in the Add Locations by field. Click the dropdown to select from a defined list of warehouses to add to the markdown.
-
-
From the search results pane, select the location(s) to add to the markdown and click Apply.
-
Once all your locations are added to the markdown, click Next. The Add Markdown page appears. Continue with Add Markdown.
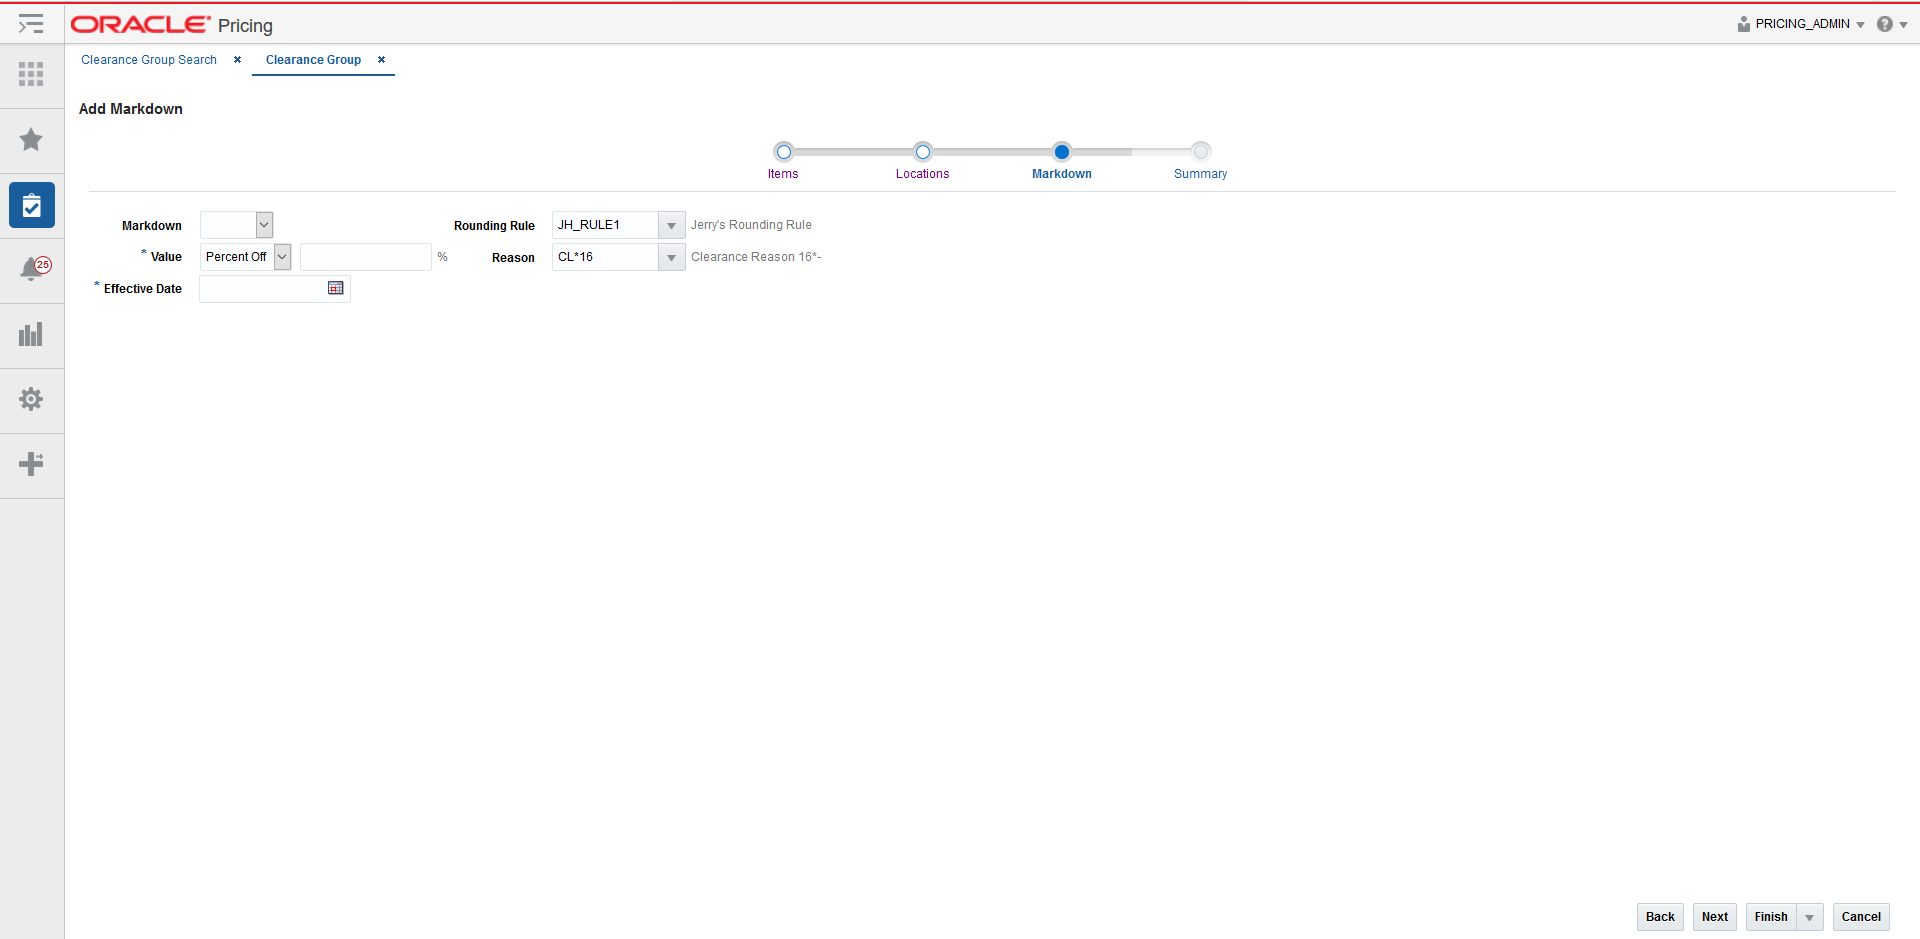
Add Markdown
The Add Markdown page of the Markdown Wizard allows you to define the markdown itself.
-
From the Add Markdown page, define the information for the markdown being added using the following criteria:
Table 2-3 Markdown Page Fields
Field Description Markdown
The Markdown field contains a predefined identifier for the Markdown to describe what the new markdown represents in the clearance lifecycle. For example, this could be first, second, final, and so on. This field can be left blank, if not required by a system option setting.
Value
The Value field provides the options that derive the new retail price. If a system option default has been defined, a value will be automatically added for your event. But this can be changed, if desired. Options are:
-
Percent Off: A percent is defined in the change value field that subtracts from the retail price to determine the new retail.
-
Amount Off: An amount is defined in the change value field that subtracts from the retail price to determine the new retail.
-
Fixed Price: The item is at a specified retail that is defined in the change value field.
Note: A rounding rule may impact entered retail.
After selecting the change type, you will enter the actual value for the change. This field is required entry for every change type. The field supports up to four decimal places for Percent Off value. For Amount Off and Fixed Price decimal placement is based on currency of selected locations.
Effective Date
The date on which the markdown is set to take effect. You have the option to key in a date or select one using the calendar widget.
Rounding Rule
The Rounding Rule field provides the ability to smooth retails for an item or location.
If a system option default has been defined, a value may be automatically added to your event. But, this can be changed or removed, if desired.
Reason
The Reason value defines the reason the markdown is being created.
If a system option default has been defined, a value may be automatically added to your event. But, this can be changed or removed, if desired.
-
-
Once all your markdown information is entered, click Next. The Add Markdown Summary page appears. Continue with Review, Submit and Approve.
If you want to skip the Summary Page, you can click on Finish or select Submit, or Approve options from the Finish drop down menu.
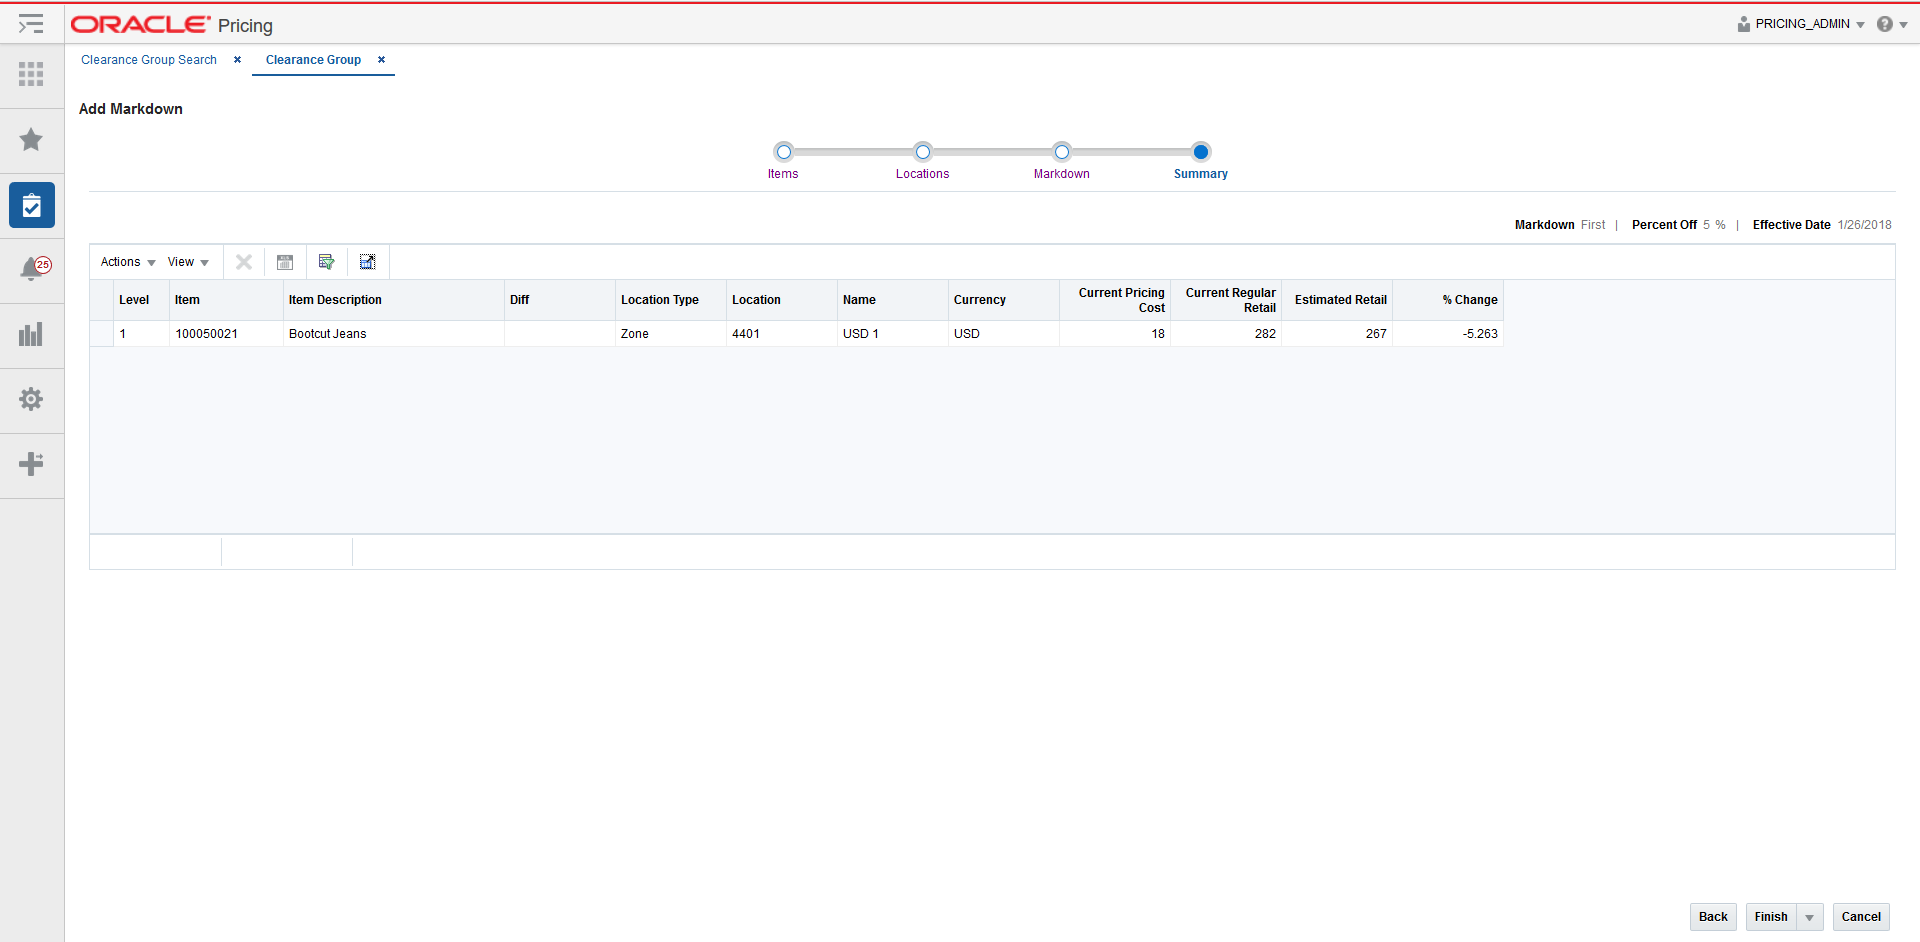
Review, Submit and Approve
The Summary page displays the details of the markdown before it is added to the Clearance Group.
-
Confirm the markdown settings and click on Finish or select Submit or Approve from the Finish drop down menu. You are returned to the Clearance Group screen. Your new markdown events are listed in the Item Markdowns table.
Note:
The Summary Page also allows individual markdowns to be removed before they are added to the Clearance Group.
Review and Resolve Conflicts
When you approve a clearance event, markdown, or reset, then before it can be approved, Pricing will validate that it doesn't conflict with any other price event — regular price change or clearance — that was previously created and approved. Conflict checks can also occur if you are making an update to an approved clearance, including moving it back to a worksheet status or, depending on your system configuration settings, when the price change is submitted or updates are made to a previously submitted clearance event.
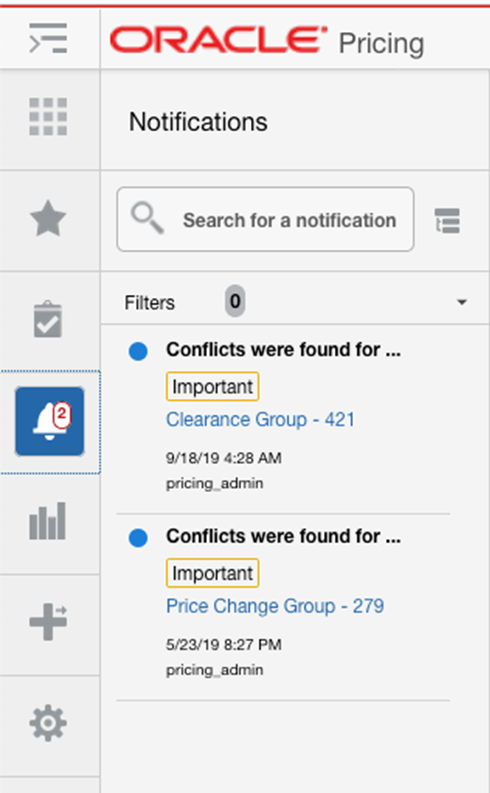
If you made the update that initiated the conflict checking, then you will see your event moved to a Pending or Processing status. This is an indication that conflict checking is happening in the background. After it completes, if there were no issues, then the updates will be saved. However, if there was an issue, you will receive a notification that a conflict exists. Click on the notification icon on the Pricing toolbar to see details on which group had the conflict. It will also provide a hyperlink to access the group to see the details.
In the Clearance Group page, the existence of a conflict is identified by an exclamation point icon ( ![]() ). The exclamation point can be next to the group description in the page heading, or in the conflicts column of the items table or locations table. To review a conflict, click the icon in the conflict column and the Conflicts page opens. If you click the icon in the header level of the Clearance Group page, then all conflicts for the group will be displayed in the Conflicts page. If you click the icon in the item table, then all conflicts for the item in that group will be displayed in the Conflicts page. If you click the icon in the Locations table, then only the conflict for that item/location in the group will be displayed in the Conflicts page.
). The exclamation point can be next to the group description in the page heading, or in the conflicts column of the items table or locations table. To review a conflict, click the icon in the conflict column and the Conflicts page opens. If you click the icon in the header level of the Clearance Group page, then all conflicts for the group will be displayed in the Conflicts page. If you click the icon in the item table, then all conflicts for the item in that group will be displayed in the Conflicts page. If you click the icon in the Locations table, then only the conflict for that item/location in the group will be displayed in the Conflicts page.
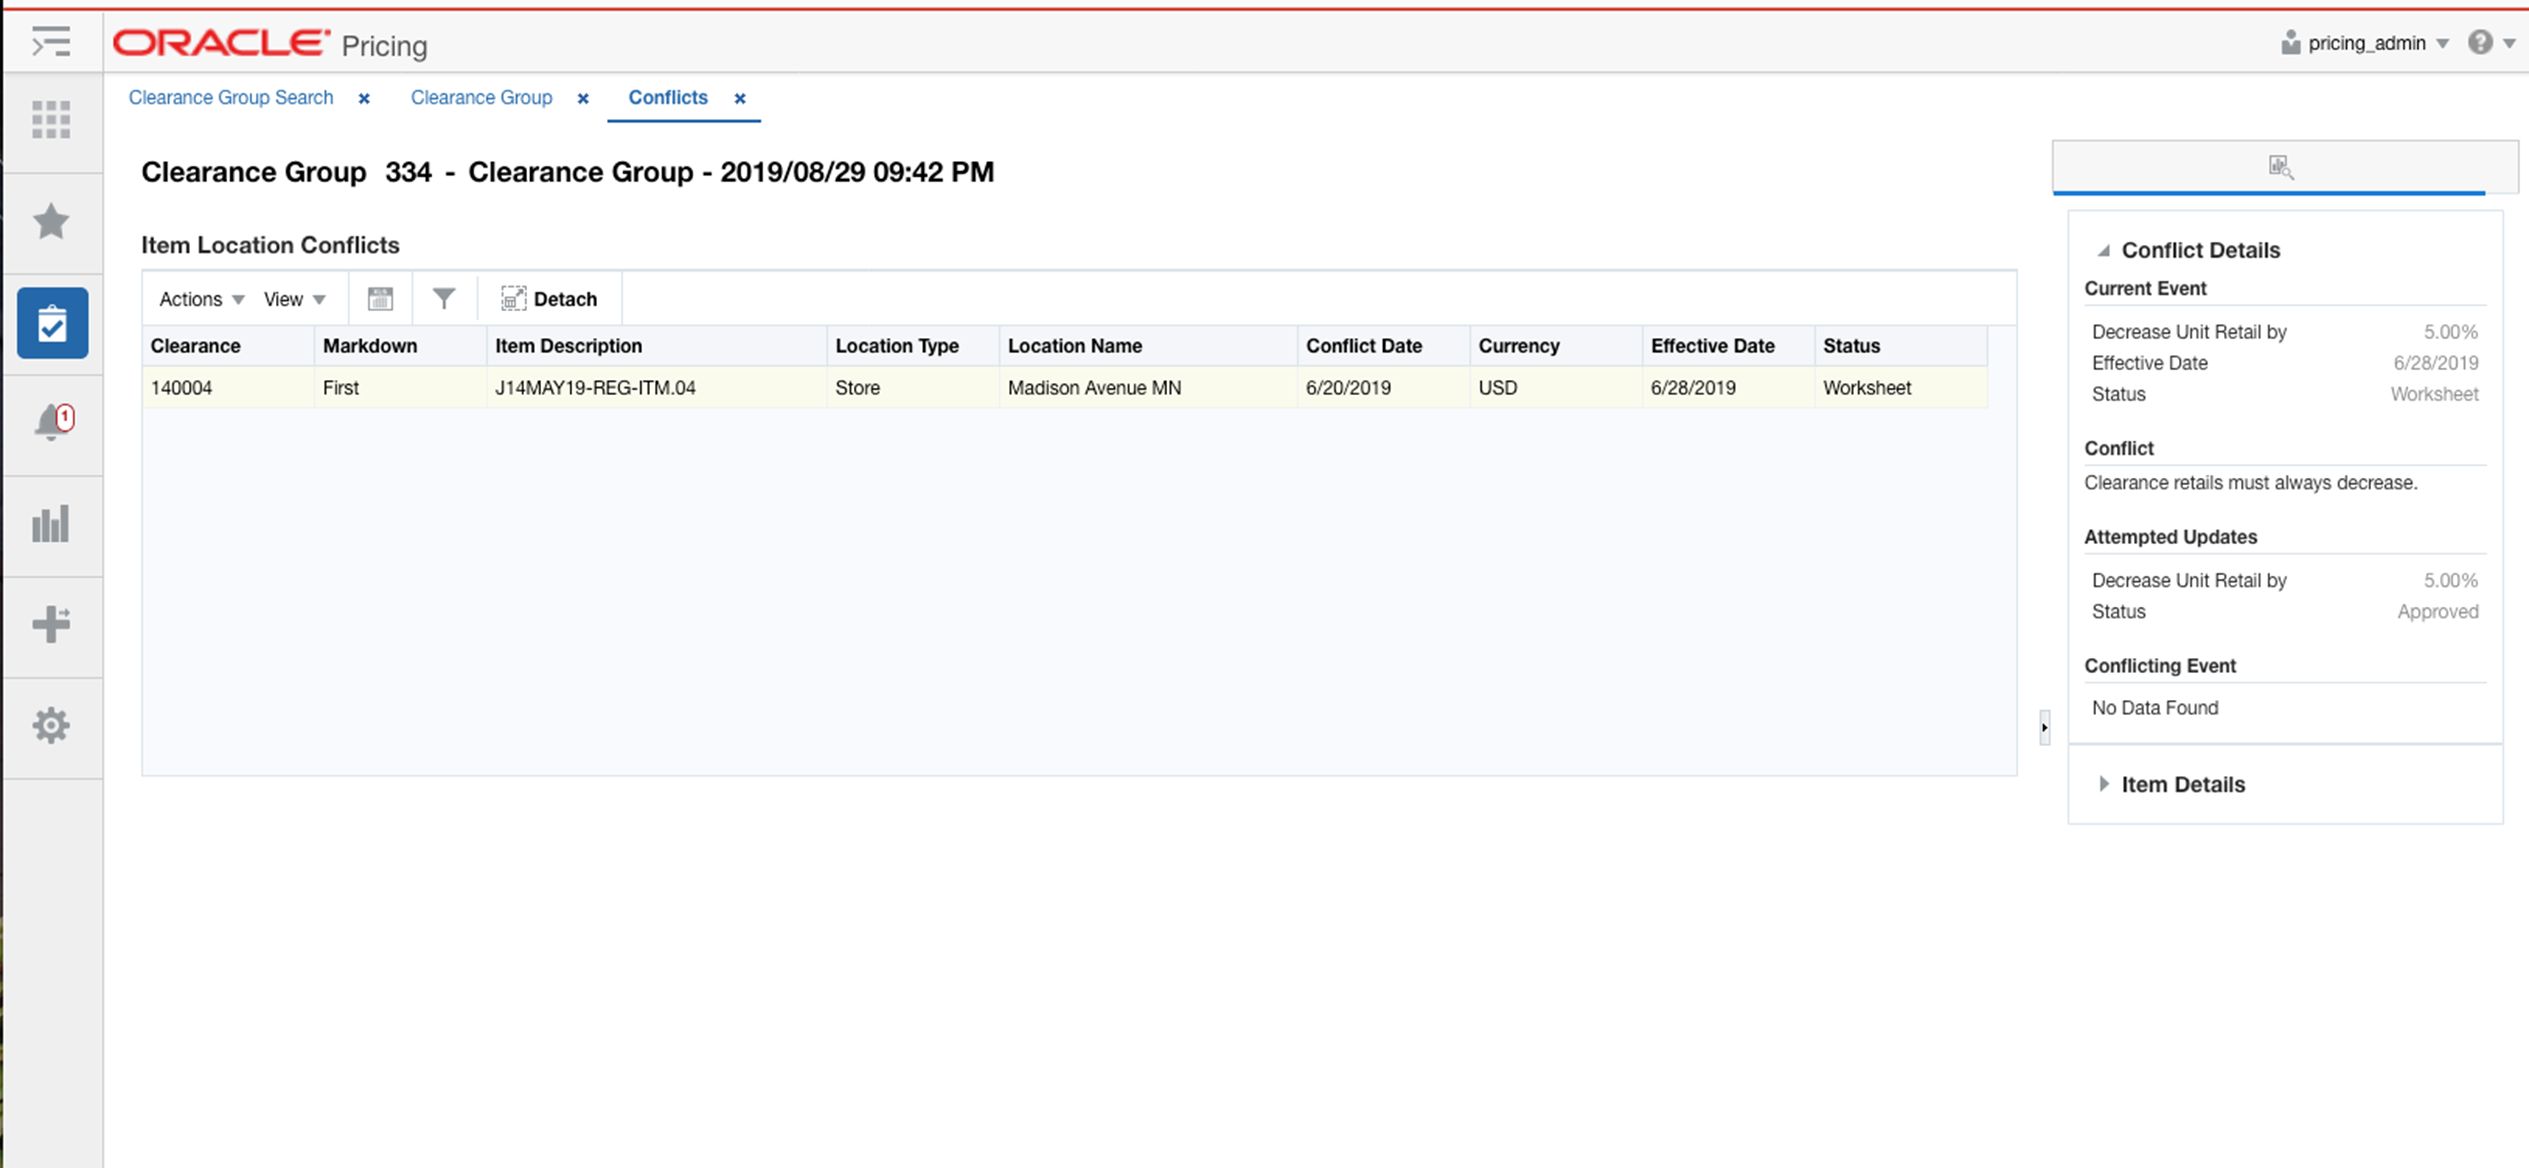
The conflicts table displays all the Clearance information associated with the event which failed conflict check validation. Highlight the clearance details of the event which failed conflict checking to display the Conflict Details contextual report. If the Conflict Details contextual report does not automatically display, click the collapsible arrow on the right side of the window. The Item Details contextual report is also available for the item in the highlighted row.
Conflict Details Contextual Report
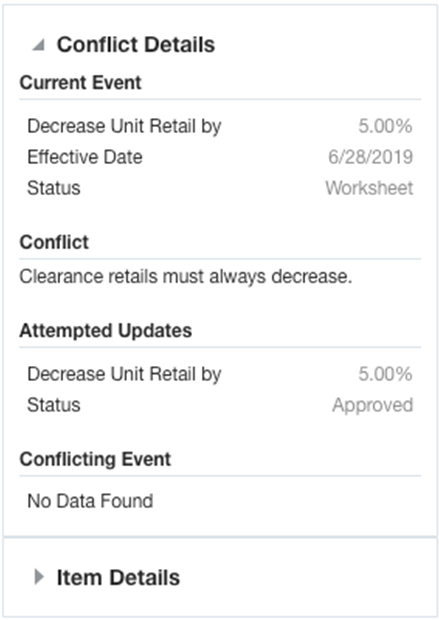
The Current Event section of the Conflict Details report includes details on the event prior to the update or status change that was attempted, including the change type and amount, effective date, and status.
The Conflict section provides a business description of the conflict to help provide guidance on how to resolve the issue.
The Attempted Updates section shows you what action was taken that initiated conflict checking and raised the errors. Usually, this will be changing the status of the clearance. However, if you were updating an already approved clearance, it could also show you the change value or effective date for the clearance, if those updates are what caused the issue. Only the information related to the error will be displayed. For example, there is an approved clearance and you have tried to change just the effective date, then the only data appearing in the Attempted Updates section would be the Effective Date.
The Conflicting Event section will show you the event that caused the conflict, which could be another clearance event or a regular price change. In some cases, a conflict can occur that doesn't involve another event. For example, if the initial price of an item is $5.00, then a clearance event for an amount off of $6.00 is attempted, a conflict will be raised as the resulting retail would be negative. But, as there isn't another event involved, No Data Found will appear in the Conflicting Event section.
Note:
If, later, you made updates to either the event with the conflict or the event that caused the conflict without re-running conflict checking, you may see that some of the values here have changed.Once you have reviewed the details of the conflict, you can take action by making the appropriate adjustments to the clearance event that has the conflict or conflicting event. Then, retry your update or status change to re-run conflict checking.
Add Additional Markdowns to an Item
Additional markdowns for items already on markdown can be added to a clearance group through the Clearance Group page. For example, you might do this in order to add subsequent markdown to item/location combinations such that you can see each markdown level (for example, first, second, and so on) in the same group.
Perform the following procedure to add a Markdown:
-
Perform a search for the clearance group that you want to update. See Search for a Clearance Group.
-
From the search results pane, select the clearance group for which you want to add a markdown. and select Edit from the Actions menu. The Clearance Group page appears.
-
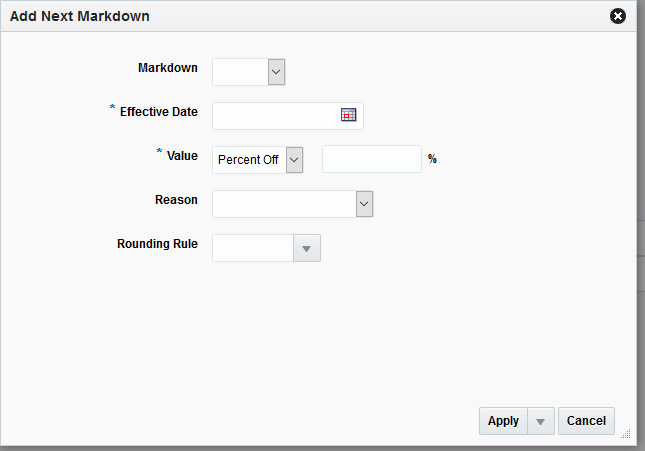
From the Clearance Group page, highlight the item markdown in the Item Markdowns table to which you want to add an additional markdown and select Add Next Markdown from the Action menu. The Add Next Markdown pop-up appears.
Field Description Markdown
The Markdown field contains a predefined identifier for the Markdown to describe what the new markdown represents in the clearance lifecycle. For example, this could be first, second, final, and so on. This field can be left blank, if not required by a system option setting.
Effective Date
The date on which the clearance is set to take effect. You have the option to key in a date or select one using the calendar widget.
Value
The Value field provides the options that derive the new retail price. If a system option default has been defined, a value will be automatically added for your event. But this can be changed, if desired. Options are:
-
Percent Off: A percent is defined in the change value field that subtracts from the retail price to determine the new retail.
-
Amount Off: An amount is defined in the change value field that subtracts from the retail price to determine the new retail.
-
Fixed Price: The item is at a specified retail that is defined in the change value field.
Note: A rounding rule may impact entered retail.
After selecting the change type, you will enter the actual value for the change. This field is required entry for every change type. The field supports up to four decimal places for Percent Off value. For Amount Off and Fixed Price decimal placement is based on currency of selected locations.
Reason
The date on which the markdown is set to take effect. You have the option to key in a date or select one using the calendar widget.
Rounding Rule
The Rounding Rule field provides the ability to smooth retails for an item or location.
If a system option default has been defined, a value may be automatically added to your event. But, this can be changed or removed, if desired.
-
-
Once values are specified, click Apply, Submit, or Approve. The Add Next Markdown pop-up closes and you are returned to the Clearance Group page.
Add Additional Markdowns to a Location
Additional markdowns for locations already on markdown can be added to a location through the Clearance Group page. For example, you might do this in order to add subsequent markdown to item/location combinations such that you can see each markdown level (for example, first, second, and so on) in the same group.
Perform the following procedure to add a Markdown:
-
Perform a search for the clearance group that you want to update. See Search for a Clearance Group.
-
From the search results pane, select the clearance group for which you want to add a markdown. and select Edit from the Actions menu. The Clearance Group page appears.
-
From the Clearance Group page, highlight the location markdown in the Locations for Item table to which you want to add an additional markdown and select Add Next Markdown from the Action menu. The Add Next Markdown pop-up appears.
Field Description Markdown
The Markdown field contains a predefined identifier for the Markdown to describe what the new markdown represents in the clearance lifecycle. For example, this could be first, second, final, and so on. This field can be left blank, if not required by a system option setting.
Effective Date
The date on which the clearance is set to take effect. You have the option to key in a date or select one using the calendar widget.
Value
The Value field provides the options that derive the new retail price. If a system option default has been defined, a value will be automatically added for your event. But this can be changed, if desired. Options are:
-
Percent Off: A percent is defined in the change value field that subtracts from the retail price to determine the new retail.
-
Amount Off: An amount is defined in the change value field that subtracts from the retail price to determine the new retail.
-
Fixed Price: The item is at a specified retail that is defined in the change value field.
Note: A rounding rule may impact entered retail.
After selecting the change type, you will enter the actual value for the change. This field is required entry for every change type. The field supports up to four decimal places for Percent Off value. For Amount Off and Fixed Price decimal placement is based on currency of selected locations.
Reason
The date on which the markdown is set to take effect. You have the option to key in a date or select one using the calendar widget.
Rounding Rule
The Rounding Rule field provides the ability to smooth retails for an item or location.
If a system option default has been defined, a value may be automatically added to your event. But, this can be changed or removed, if desired.
-
-
Once values are specified, click Apply, Submit, or Approve. The Add Next Markdown pop-up closes and you are returned to the Clearance Group page.
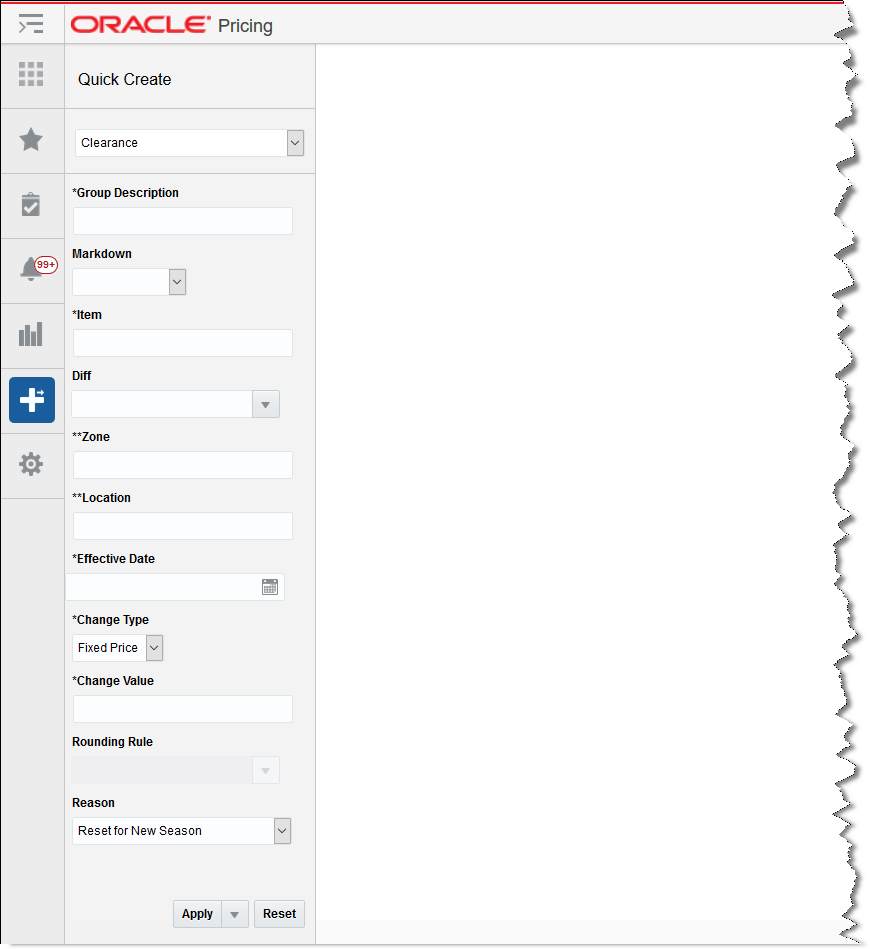
Use Quick Create
Quick Create provides an alternative method for creating a markdown. It is best suited for small sets of items and locations - such as a single item in one or two zones. Perform the following procedure to create a clearance using this function.
-
From the Pricing Tasks list, click the Quick Create icon.
The Quick Create pane appears.
-
From the Quick Create pane, select Clearance from the Quick Create drop down list.
-
Enter information for the following fields:
Note:
Fields marked with an Asterisk are required. Fields marked with a double asterisk means that one of the fields needs to be entered.Table 2-6 Clearance Quick Create Fields
Field Description Group Description
This field allows for entry of a description that will be used to create a new clearance group.
Markdown
The Markdown field contains a predefined identifier for the Markdown to describe what the new markdown represents in the clearance lifecycle. For example, this could be first, second, final, and so on. This field can be left blank, if not required by a system option setting.
Item
The Item field is active if you select Item in the Add Items by field. Click the magnifying glass to search for an item to add to the markdown.
Diff
The Diff field allows for entry or selection of a single Diff Value. You have the option to use the list of values to search on Diff Type to find the Diff value.
Zone
The Zone field allows for entry of a zone within a single zone group. You may enter a single zone or multiple zones. If multiple zones are entered a semicolon is used to separate values.
Note: Either a Zone(s) or Location(s) must be entered, but not both.
Location
The Location field allows for entry of a location. You may enter a single location or multiple locations. If multiple locations are entered a semicolon is used to separate values.
Note: Either a Zone(s) or Location(s) must be entered, but not both.
Effective Date
The date on which the clearance is set to take effect. You have the option to key in a date or select one using the calendar widget.
Change Type
The Change Type field provides the options that will derive the new retail price. There is a system option default that may display for the Change Type if it exists. The default value can be overridden. Change Type options are:
-
Percent Off: A percent is defined in the change value field that subtracts from the retail price to determine the new retail.
-
Amount Off: An amount is defined in the change value field that subtracts from the retail price to determine the new retail.
-
Fixed Price: The item is at a specified retail that is defined in the change value field.
Note: A rounding rule may impact entered retail.
Change Value
The Change Value field contains the change by percent, change by amount, or fixed price value depending on the change type selected.
Rounding Rule
The Rounding Rule field provides the ability to smooth retails for an item or location.
If a system option default has been defined, a value may be automatically added to your event. But, this can be changed or removed, if desired.
Reason
The Reason value defines the reason the markdown is being created.
If a system option default has been defined, a value may be automatically added to your event. But, this can be changed or removed, if desired.
-
-
Once you have entered all information for the newly created price change record, click Apply, Submit, or Approve. The new clearance is created.
If you select Apply, the Clearance Group will be opened so that you can review and approve the event from that page. Otherwise, the event is created and subjected to submit and approval validations in the background.