1 Create Documents
Create Merchandise Invoice
There are four ways invoices are loaded into the system: EDI, single invoice entry, group entry, and invoice induction. An invoice is the bill for goods or services received from a supplier or partner. A merchandise invoice is a document that a supplier sends to a retailer for merchandise items. A merchandise invoice can also contain additional non-merchandise costs. Because a merchandise invoice must involve items, only suppliers can send merchandise invoices.
In addition, deal bill backs will be available for automatic invoicing sent to the ReIM from the merchandising system. Any documents resulting from a deal will be created in Approved status.
Create Merchandise Invoice
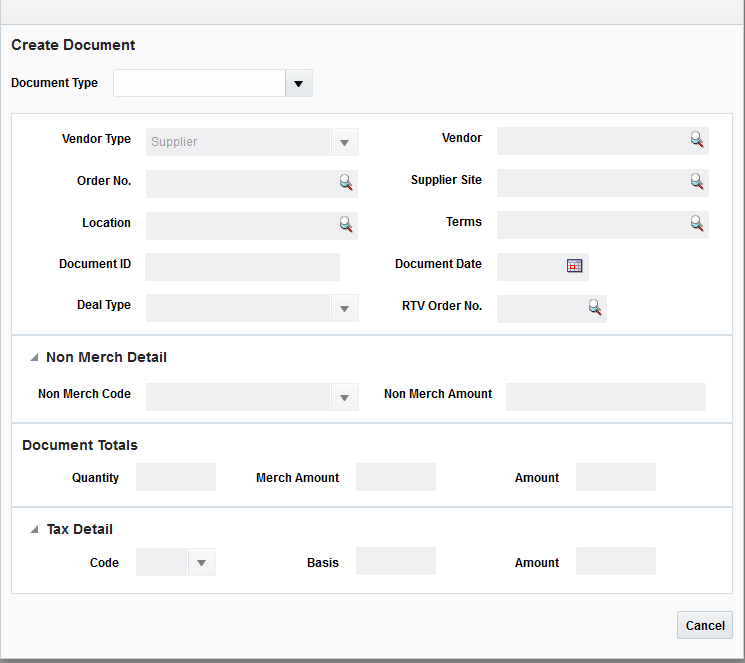
Navigate: From the Tasks menu, select Document Maintenance > Create Document. The Create Document dialog opens.
-
Open the Create Document screen. The Create Document screen is launched when the user chooses to create a Document through either of the one of the following:
-
Clicking the Create Document link under the Document Maintenance subgroup on the Global Navigation section
-
Select Create Document from the Actions menu on the Search Results Pane
-
-
In the Document Type field, select Merchandise Invoice. Once the Document Type is selected, the field is disabled and the Vendor Type is set to Supplier.
Header Information
-
In the Vendor field, select the Vendor against which the Document (or Invoice) is raised.
-
In the Order No. field, select the Purchase Order against which the Document (or Invoice) is raised.
Note:
If a Supplier is specified before specification of the Order No, the combo box list of values dropdown displays orders corresponding to all suppliers in the same supplier group as the supplier specified. -
In the Supplier Site field, select the Supplier Site against which the Document (or Invoice) is raised.
-
In the Location field, select the Invoicing (Billing) Location from the list of valid locations (stores and physical warehouses). These locations are defined in RMS.
Note:
The Location field value is defaulted if the Order No selected has a single Location to which it is associated.Note:
For import PO's the Import Location is used as the location in ReIM. -
The Terms field defaults to the term of the specified PO. The defaulted value can be modified on the invoice document.
-
In the Document field, enter the identifier for the Document in ReIM that is used in communication with the vendors and will be displayed to the end user. This must be unique by vendor, document type, and (optionally depending on system setting) by document date.
Note:
If the vendor created the document (for example, a merchandise invoice), this field will hold the vendor's id for the document. If the retailer created the document in response to a client document (for example, a credit note request), the document_id will be the document_id of the original document prefixed with the appropriate values from the im_system_options table (credit_note_req_prefix_cost, debit_memo_prefix_qty, credit_memo_suffix_dp). -
In the Document Date field, enter the date the invoice or document was created, or click the calendar button and select a date.
Non Merch Detail
The Non Merchandise Details section allows the addition of a single non merch code / amount to an invoice document as part of a quick entry flow. Additional codes and details can be entered using the Non Merch Details window available on the Document Maintenance screen.
-
In the Non Merch Code field, specify a single non merch code that is applicable to the document. Additional codes can be entered using the Non Merch Costs screen if needed.
-
In the Non Merch Amount field, specify the non merch amount corresponding to the Non Merch Code specified.
Document Totals
The Document Totals section allows the user to specify Total Merchandise Amount, Total Quantity, and Total Invoice Amount.
-
In the Quantity field, enter the total number of units on the document.
Note:
There is a supplier option which controls which can be used to make the quantity field required -
The Merch Amount field represents the Total Merchandise Value excluding tax.
Total Merch Amount = Total Amount - Non Merch Amount - Tax Amount
-
The Amount field represents the total value of the document. This field is automatically populated with the sum of the Non Merch Amount and Tax Amounts if not entered.
Tax Details
The Tax Detail section allows the addition of a single tax code, tax basis and amount to an invoice document as part of a quick entry flow. Additional codes and details may be entered using the Tax Breakdown window available on the Document Maintenance screen.
-
In the Code field, specify the tax code applicable on the document at a header level.
-
The basis field is automatically calculated when the tax code is entered if the merchandise amount is entered first. The calculated amount can be overwritten.
-
The Amount field is automatically populated. It is computed by applying the tax code on the taxable basis if the tax code and basis are added first. The Amount field can be overwritten by the user.
Save the Document
When all of the necessary information is added to your Merchandise Invoice, click Save. Clicking the arrow adjacent to the Save button provides the following options:
-
Save and Add Another – Allows you to save the current invoice and open an empty Create Document dialog.
-
Save and Continue – Allows you to save the current invoice and proceed to the Document Maintenance window.
Create Other Documents
There are several types of documents in ReIM that are not for invoicing merchandise:
Non-Merchandise Document
A non-merchandise invoice is a document for non-merchandise costs only. It can be created by a supplier or a partner. Non-merchandise invoices cannot contain a bill for merchandise items.
Create a Non-Merchandise Invoice
Navigate: From the Tasks menu, select Document Maintenance > Create Document. The Create Document dialog opens.
-
Open the Create Document screen. The Create Document screen is launched when the user chooses to create a Document through either of the one of the following:
-
Clicking the Create Document link under the Document Maintenance subgroup on the Global Navigation section
-
Select Create Document from the Actions menu on the Search Results Pane
-
-
In the Document Type field, select Non-Merchandise Invoice. Once the Document Type is selected, the field is disabled and the Vendor Type is set to Supplier by default, but it can be changed.
Header Information
-
In the Vendor field, select the Vendor against which the Document (or Invoice) is raised.
-
In the Order No. field, select the Purchase Order against which the Document (or Invoice) is raised.
Note:
If a Supplier is specified before specification of the Order No, the combo box list of values dropdown displays orders corresponding to all suppliers in the same supplier group as the supplier specified. -
In the Supplier Site field, select the Supplier Site against which the Document (or Invoice) is raised.
-
In the Location field, select the Invoicing (Billing) Location from the list of valid locations (stores and physical warehouses). These locations are defined in RMS.
Note:
The Location field value is defaulted if the Order No selected has a single Location to which it is associated. -
The Terms field defaults to the term of the specified PO. The defaulted value can be modified on the invoice document.
-
In the Document field, enter the identifier for the Document in ReIM that is used in communication with the vendors and will be displayed to the end user. This must be unique by vendor, document type, and (optionally depending on system setting) by document date.
Note:
If the vendor created the document (for example, a merchandise invoice), this field will hold the vendor's id for the document. If the retailer created the document in response to a client document (for example, a credit note request), the document_id will be the document_id of the original document prefixed or suffixed with the appropriate values from the im_system_options table (credit_note_req_prefix_cost, debit_memo_prefix_qty, credit_memo_suffix_dp). -
In the Document Date field, enter the date the invoice was created, or click the calendar button and select a date.
Non Merch Detail
The Non Merchandise Details section allows the addition of a single non merch code / amount to an invoice document as part of a quick entry flow. Additional codes and details can be entered using the Non Merch Details window available on the Document Maintenance screen.
-
In the Non Merch Code field, specify a single non merch code that is applicable to the document. Additional codes can be entered using the Non Merch Costs screen if needed.
-
In the Non Merch Amount field, specify the non merch amount corresponding to the Non Merch Code specified.
Document Totals
The Document Totals section allows the user to specify Total Merchandise Amount, Total Quantity, and Total Invoice Amount.
Note:
For a non-merchandise document, the quantity and merchandise amounts are null (or zero), and the Amount is non merchandise amount plus tax amount.-
The Amount field represents the total value of the document. This field is automatically populated with the sum of the Non Merch Amount and Tax Amounts if not entered. It can be overridden or entered by the user.
Tax Details
The Tax Detail section allows the addition of a single tax code, tax basis and amount to an invoice document as part of a quick entry flow. Additional codes and details may be entered using the Tax Breakdown window available on the Document Maintenance screen.
-
In the Code field, specify the tax code applicable on the document at a header level.
-
In the Basis field, enter the taxable basis on which the tax code should be applied. This is computed by dividing the tax amount by the tax rate if the tax code and tax amount are added first.
-
The Amount field is automatically populated. It is computed by applying the tax code on the taxable basis if the tax code and basis are added first. The Amount field can be overwritten by the user.
Save the Document
When all of the necessary information is added to your Non Merchandise Invoice, click Save. Clicking the arrow adjacent to the Save button provides the following options:
-
Save and Add Another – Allows you to save the current invoice and open an empty Create Document dialog.
-
Save and Continue – Allows you to save the current invoice and proceed to the Document Maintenance window.
Credit Memo or Debit Memo
Credit Memos increase the payment to the supplier, Debit Memos decrease payment to the supplier. Credit Notes Requests look identical to Debit Memos, except they do not have immediate financial implications. Instead, they are a document sent to the supplier to ask them to generate a Credit Note which has identical effect of Debit Memo (reducing payment to the supplier). Therefore, a Debit Memo is a reduction in the payment to supplier generated by the retailer, and a Credit Note is a reduction in the payment to the supplier generated by the supplier in answer the Credit Note Request.
Create a Credit Memo, Debit Memo, Credit Note or Credit Note Request
Navigate: From the Tasks menu, select Document Maintenance > Create Document. The Create Document dialog opens.
-
Open the Create Document screen. The Create Document screen is launched when the user chooses to create a Document through either of the one of the following:
-
Clicking the Create Document link under the Document Maintenance subgroup on the Global Navigation section.
-
Select Create Document from the Actions menu on the Search Results Pane.
-
-
In the Document Type field, select one of the following:
-
Credit Note
-
Credit Note Request - Cost
-
Credit Note Request - Quantity
-
Credit Note Request- Tax
-
Debit Memo - Cost
-
Debit Memo - Quantity
-
Debit Memo - Tax
-
Credit Memo - Cost
-
Credit Memo - Quantity
Once the Document Type is selected, the field is disabled and the Vendor Type is set to Supplier.
-
Header Information
-
In the Vendor field, select the Vendor against which the Document (or Invoice) is raised.
-
In the Order No. field, select the Purchase Order against which the Document (or Invoice) is raised. When Purchase Order is entered, the Vendor and Supplier site are populated with the supplier and supplier site (respectively) from the Purchase Order.
Note:
If a Supplier is specified before specification of the Order No, the combo box list of values dropdown displays orders corresponding to all suppliers in the same supplier group as the supplier specified. -
In the Supplier Site field, select the Supplier Site against which the Document (or Invoice) is raised.
-
In the Location field, select the Invoicing (Billing) Location from the list of valid locations (stores and physical warehouses). These locations are defined in RMS.
Note:
The Location field value is defaulted if the Order No selected has a single Location to which it is associated. -
The Terms field defaults to the term of the specified PO. The defaulted value can be modified on the invoice document.
-
In the Document field, enter the identifier for the Document in ReIM that is used in communication with the vendors and will be displayed to the end user. This must be unique by vendor, document type, and (optionally depending on system setting) by document date.
Note:
If the vendor created the document (for example, a merchandise invoice), this field will hold the vendor's id for the document. If the retailer created the document in response to a client document (for example, a credit note request), the document identifier will be the same as that of the original document prefixed with the appropriate values from the im_system_options table (credit_note_req_prefix_cost, debit_memo_prefix_qty, credit_memo_suffix_dp). -
In the Document Date field, enter the date the invoice was created, or click the calendar button and select a date.
-
The Deal Type field displays whether the document is associated with invoicing of a fixed deal or a complex deal and determines whether the Deal Billing details tab is enabled or not on the Document Maintenance window.
-
The RTV Order No field indicates whether the Document corresponds to a RTV Chargeback. RTV charge backs are intimations for financial recovery raised by the merchandising system for goods returned to the supplier. These documents do not require any additional processing in ReIM.
Use Group Entry
Group entry is an extension of the manual entry process with the addition of features such as control totals and defaulting common values to provide greater accuracy and efficiency when manually entering documents. The group entry feature allows the entry of header only documents. Merchandise invoices, non-merchandise invoices, and credit notes are the only document types allowed in the group entry function.
Group Entry of Header-Only Documents
The Group Entry window facilitates the quick entry of multiple header-only documents. Group entry is available for merchandise invoices, non-merchandise invoices, and credit notes. All other document types are available using the single document entry process. The group entry window uses defaults where feasible to facilitate quick entry of documents. Group entry accepts the minimum fields necessary to create a header-only invoice, so if the user needs to enter item details or other information such as reference fields they would need to use the single invoice entry process.
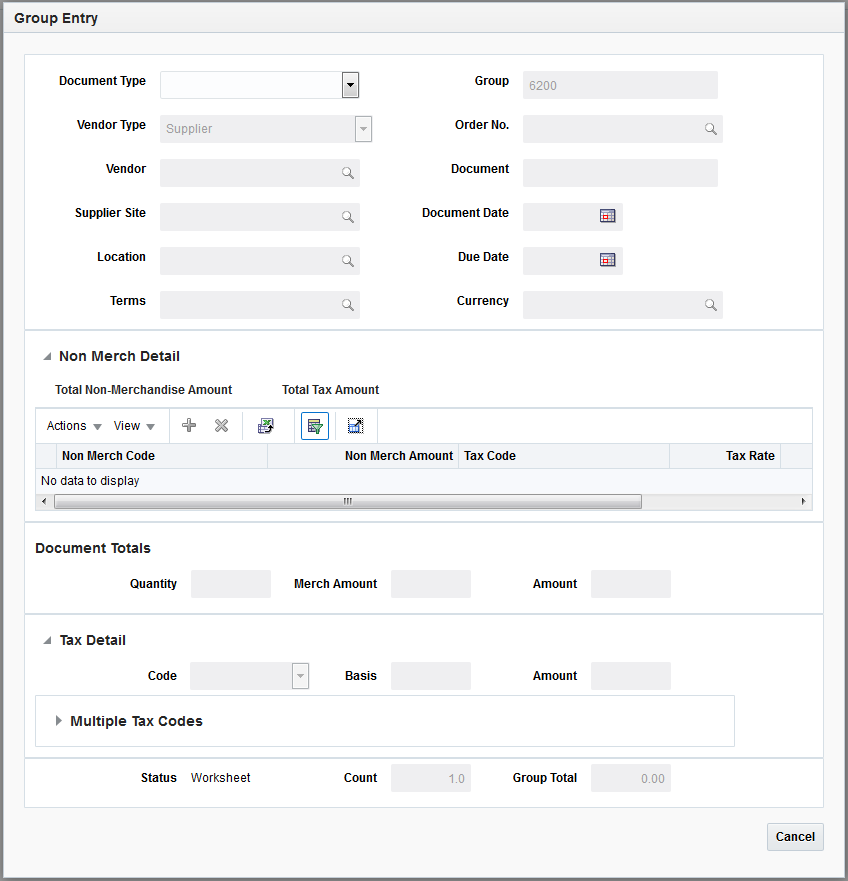
Navigate: From the Tasks menu, select Document Maintenance > Group Entry. The Group Entry window opens.
-
From the Group Entry window, select the Document Type. Options are:
-
Merchandise Invoice
-
Non Merchandise Invoice
-
Credit Note
-
-
Once a document type is selected, enter information for the following:
Field Description Group ID
The Group ID is automatically assigned as the next number in a sequence.
Vendor Type
This field represents the type of vendor on the document being referenced. Options are:
-
Agent
-
Applicant
-
Bank
-
Broker
-
Consignee
-
Consolidator
-
Escheat- Country
-
Escheat - State
-
Expense Vendor
-
External Finisher
-
Factory
-
Freight Forwarder
-
Import Authority
-
Importer
-
Supplier
Order No
This field allows for selection of the Purchase Order against which the Document (or Invoice) is raised. The field will be enabled for selection when the Document Type is Supplier.
Vendor
This field allows selection of the Vendor against whom the Document (or Invoice) is raised.
Supplier Site
This field is available if the Vendor Type is set to Supplier. This field allows selection of the Supplier Site against whom the Document (or Invoice) is raised.
Terms
This field allows specification of the Invoice Terms.
This field will default to the value specified below depending on the document being created.
-
Merch Invoice – Terms on the PO specified
-
Non Merch Invoice – Terms associated with the Vendor in RMS
-
Credit Note – Terms associated with the Vendor in RMS
The defaulted value can be modified on the invoice document.
Location
This field indicates the Invoicing (Billing) Location. The value is selectable from the list of valid locations (stores and physical warehouses) defined in RMS. This field is defaulted if the Order No selected has a single Location on it.
Document ID
Identifier for the Document in ReIM that is used in communication with the vendors and is displayed to the end user. This value must be unique by vendor, document type, and document date.
If the vendor created the document (i.e. merchandise invoice, etc), this field will hold the vendors id for the document.
Document Date
Specifies the document date. The document date is the date the document was created. When documents are created by an outside party, the document date can be different from the create date (i.e. the document date on a merchandise invoice from a supplier will be the date the supplier generates the invoice while the create date for this record will be the date the invoice was entered/uploaded into ReIM). Will require to be specified for manually entered records.
Due Date
Represents the Day the Invoice is due for Payment. Is computed based on the invoice creation date (or the last receipt date depending on supplier option) and the applicable Payment Terms. This is a view only field.
Currency
This column holds the currency associated with the document. Currency is display only on merchandise invoices.
-
-
If you are entering a Non-Merchandise document (or adding non-merchandise entry to a merchandise document), the following non-merchandise fields are available from the non-merchandise table:
Table 1-2 Non-Merchandise Document Fields
Field Description Non Merch Code
Available largely as a quick entry alternative. Allows specification of a single non merch code applicable to the document. Additional codes if required can be entered via the Non Merch Costs tab.
Non Merch Amount
Available largely as a quick entry alternative in case of single non merchandise cost scenarios. Represents the Non merch Amount corresponding to the Non Merch Code specified.
If multiple non-merch codes are entered, this field will display the accumulated total of the non-merch amounts.
Tax Code
Enter the tax code associated with the non merchandise entry.
Tax Rate
The tax rate associated with the non merch Tax code will display.
Tax Amount
The Tax Amount associated with the non merch tax code is calculated and displayed here.
-
In the Document Totals section, enter information for the following fields:
Table 1-3 Document Totals Fields
Field Description Total Quantity
This field represents the total number of units on the document.
If the Total Quantity Required indicator is set for this supplier site, then total quantity must be entered. If the indicator is not set, then quantity is optional.
Total Merch Amount
Represents the Total Merchandise Value excluding tax. Is computed based on the below formula
Total Merch Amount= Total Amount- Non Merch Amount- Tax Amount
Total Amount
Represents the total value of the Document. This field is automatically populated with the sum of the Non Merch Amount and Tax Amounts if not entered. It can be overridden or entered by the user.
-
In the Tax Totals section, enter information for the following fields:
Field Description Tax Code
Available largely as a quick entry alternative in single tax scenarios. Specifies the tax code applicable on the document at a header level. Additional codes if required can be entered via the Tax Breakdown detail tab
Taxable Basis
Available largely as a quick entry alternative in single tax scenarios. Specifies the taxable basis on which the tax code should be applied. Will be computed by dividing the tax amount by the tax rate if the tax code and tax amount are added first
Tax Amount
Available largely as a quick entry alternative in single tax scenarios. This amount is computed by applying the tax code on the taxable basis if the tax code and basis are added first. Can be overwritten by the user.
Note:
There is also a Tax Table to support entry of multiple taxes if necessary. -
In the Group Totals section, enter information for the following fields:
Field Description Document Status
This field displays the status of the document. This is a view only field.
Group Count
This should be a count of the number of invoices included in the group entry batch. The count includes the current invoice, so it is incremented after the document id and date are both provided.
Group Total Amount
This is an accumulated total amount of all the invoices included in the group entry batch. The total amount includes the current invoice, so the total amount is incremented whenever the total invoice amount is updated.
-
When all of the necessary information is added to your entry, click Save. Clicking the arrow adjacent to the Save button provides the following options:
-
Save and Add Another – This option performs validation on the document to ensure it can be added in 'approved' mode, though it will stay in 'Worksheet' status until an 'Approve' is performed. If it passes validation, the document is updated to the database and the screen is cleared awaiting the next entry.
-
Save and Close – This step performs the same validation and if it passes adds the document to the database just like the Save and Add Another, but then the UI is closed. Save and close will keep the documents in worksheet status. You must click Approve for the documents to be approved.
In addition to the options above, group entry has the following features:
-
You can save and close a group without approving, then later call the Group back up through Document maintenance. In Document Maintenance, you search for the group, then highlight any invoice in the group. With the invoice highlighted, choose the 'Group Entry' action from the Actions drop down menu.
-
There are also forward and backward navigation buttons in group entry which can be used to page through the invoices in the group to verify/correct the information.
-
Create Documents via Spreadsheet
Data Loading (also known as invoice induction) allows users to manage and upload groups of invoices via spreadsheets. This allows users to enter detailed invoice information, not available via the Group Entry screen. Data Loading supports entry of all types of documents handled by the single document entry process including debit memos, credit memos, credit note requests, credit notes, non-merchandise invoices, and merchandise invoices. It also supports RTV's, fixed deals, and complex deals in their various forms which could include debit memos, credit memos, credit note requests and credit notes.
Data Loading vs. EDI
When Retailers receive invoices via EDI, they must be treated as legal documents in the system. As a result, there are only a specific set of changes that can be made to the contents of the EDI file and the invoices it includes (see Manage EDI Documents for additional information). Invoices created via Data Loading are treated as if they were created manually using the ReIM user interface. In order to differentiate between the types of invoices, an indicator is inserted in the database to specify how an invoice is created (for example, via EDI, spreadsheet or via the ReIM UI).
Upload Data
Once users have added the documents to the spreadsheet, they will submit an upload request.
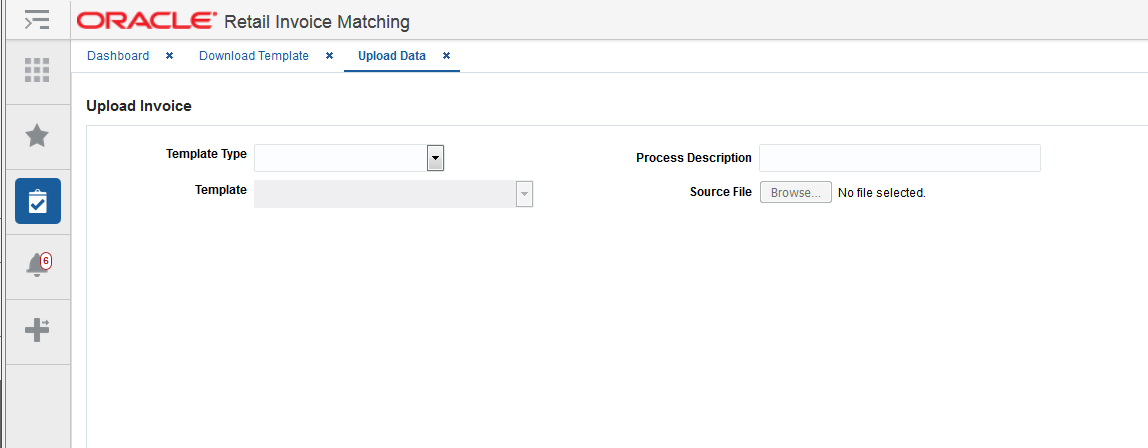
Navigate: From the Tasks menu, select Data Loading > Upload Data. The Upload Data window opens.
-
From the Upload Data window, select a template type in the Template Type field. The following template types are supported:
-
Merchandise Invoice
-
Non-merchandise Invoice
-
Credit Note
-
Debit Memo
-
Credit Memo
-
Credit Note Request
-
-
Select a template from the Template list. The list of values allows the selection of a template from all the templates defined in the system that are linked to the selected Template Type. It is mandatory to select a Template.
-
Enter a value in the Process Description field. The value specified in this field allows the user to more easily search for and find the process created for the upload in order to identify the status of the upload and view any errors that may have been identified. This is a mandatory field.
-
In the Source field, enter the directory and filename of your upload file. Alternatively, you can use the Browse button to browse to the upload file.
Click Upload to submit your upload for processing.
Reverse a Debit Memo
Navigate: From the Tasks menu, select Document Maintenance > Document Search. The Document Search window opens.
-
From the Document Search window, perform a search for debit memos. See Search for a Document for additional information.
-
In the Search Results pane, highlight the debit memo you want to reverse and select Reverse from the Action menu. The Reverse Debit Memo dialog is displayed.
-
From the Reverse Debit Memo dialog, select the items that need to be reversed and included on the Credit Memo.
-
Adjust the quantity or cost associated with those items, and select a Reason Code.
-
Click Submit, and the system creates a Credit Memo in Approved status for the selected line item quantities and costs.
Note:
The Reverse Debit Memo dialog also allows the ability to reverse a portion of the Debit Memo by selecting individual line items, or a portion of a line item.Note:
Credit Memos created via the reversal process can be deleted until they are in Posted status. If deleted, the remaining cost/quantities available for reversal on the debit memo will be updated.