1 Match Merchandise Invoices
Search for Documents
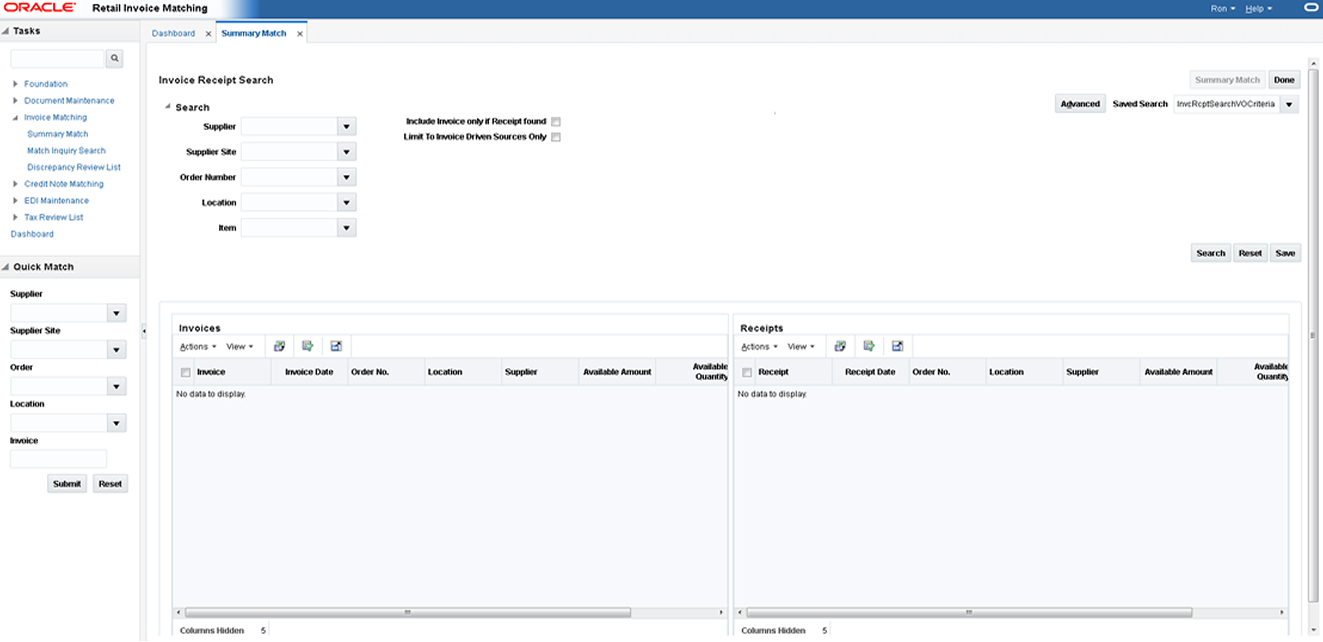
Navigate: From the Tasks menu, select Invoice Matching > Summary Match. The Summary Match Search window opens.
-
Enter criteria as desired to make the search more restrictive. You must enter at least one of the following search criteria: Supplier, Supplier Site, Order No., Location, and Item.
-
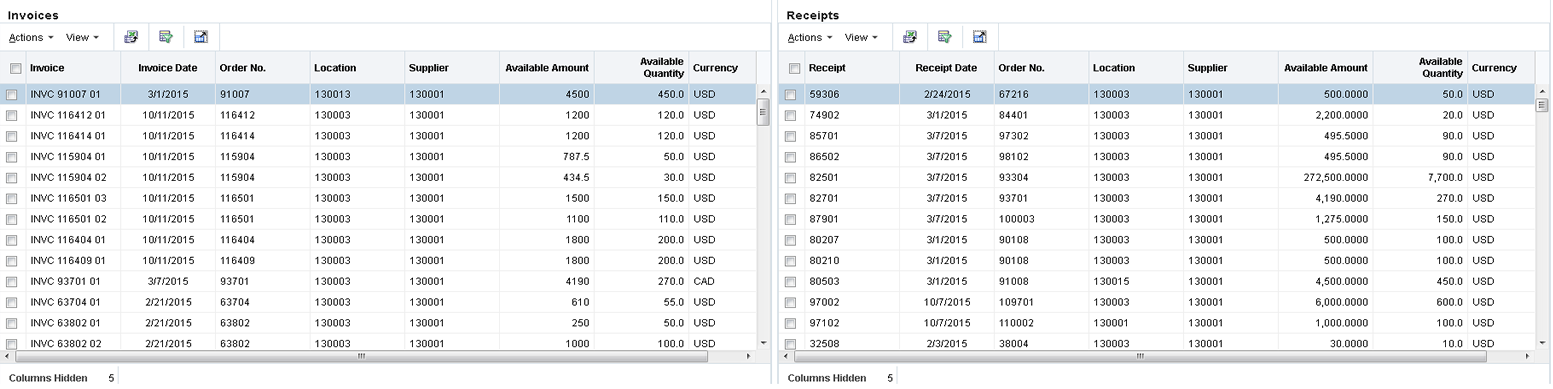
Click Search. The search results pane displays the invoices and receipts for each supplier that matches the search criteria.
-
Select the invoices and receipts you wish to bring to the Summary Match Screen. As long as one matchable invoice is selected, this will enable the 'Summary Match' button at the top right of the screen.
-
Click Summary Match to bring the selected documents to the Summary Match screen.
Match Manually
The online manual matching process allows users to combine documents, groups of invoices and receipts together, and match them. Matched invoices are then sent to the financial system for payment as part of the posting process.
The manual matching process can take many forms. Manual summary matching allows users to select one or more invoices and attempt to match them to against any number of receipts. The selection of various combinations are initiated by user interaction with the UI by selecting or deselecting invoices and/or receipts until the desired matched results are identified and executed.
In cases where the summary match is out of tolerance, the user has the option to attempt a detail (or line level) matching process. The Line Level matching process attempts to automatically match the invoice lines based on line level tolerances and then provide the user various options to manually match or resolve the items which did not automatically match.
Use Summary Match
The Summary Match screen allows for the manual matching of invoices which were not matched by the auto-match batch program. The screen displays invoices and receipts which meet user specified search criteria and allows the user to select any combination of invoices and receipts to attempt to bring the documents within a match tolerance. If matching at the summary level is not possible (or not desirable), the screen allows the user to navigate to a detail match screen where matching is performed against the items on the invoice(s) and receipt(s).
Use Suggested Match
Suggested Match is used to suggest which receipts might be a good match for the invoice or invoices that are selected.
Navigate: From the Tasks menu, select Invoice Matching > Summary Match. The Invoice Summary Match window opens.
-
Perform a search for invoices and receipts. See "Search for Documents" for additional details.
-
In the search results, select all invoices and receipts from your search results and click Summary Match. The Invoice Summary Match screen is displayed.
-
Select one or more invoices and verify that all receipts are unselected. Click Suggested Match.
The system evaluates various combinations of the receipts to determine the best match for the selected invoices. The combination of receipts which are considered the best match for the selected invoices are flagged as selected and the Summary Match table is updated to reflect the selected receipts.
Note:
The suggested match returns the best match it finds even if that match is outside of tolerance. -
If the suggested match is within tolerance, click Match to match the invoices to the receipts. If the suggested match is out of tolerance you can elect to make adjustments as necessary.

Add Documents to Summary Match
Navigate: From the Tasks menu, select Invoice Matching > Summary Match. The Invoice Summary Match Search window opens.
-
Perform a search for invoices and receipts. See "Search for Documents" for additional details.
-
In the search results, select the invoices and receipts you want to match from your search results and click Summary Match. The Invoice Summary Match Search screen is displayed.
-
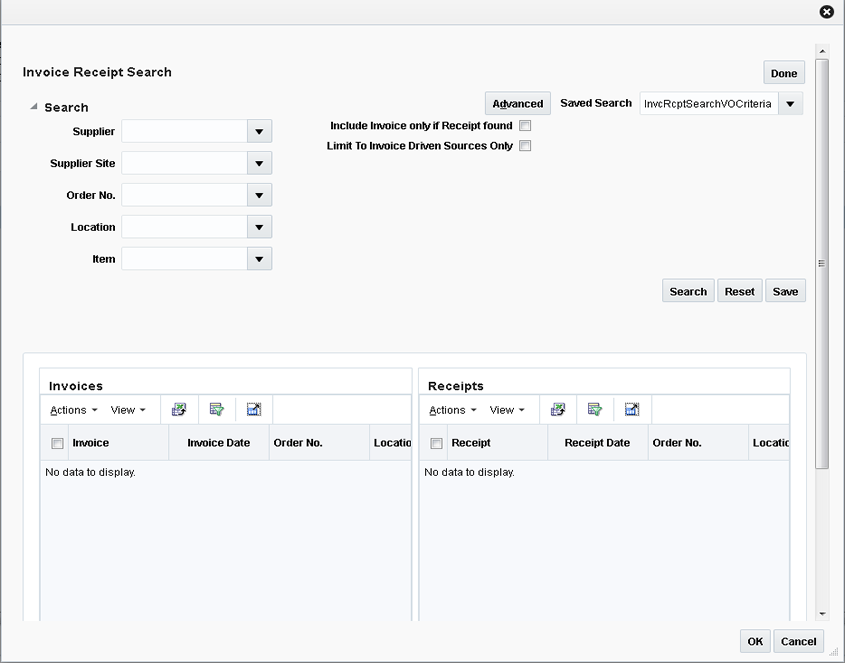
Determine whether an invoice or a receipt is needed to reach tolerance. From the Action menu of the invoice or receipt list, select Add. The Invoice Receipt Search dialog is displayed.
-
Enter your search criteria and click Search. A list of invoices and receipts is displayed based on your search criteria.
-
Check the invoice or receipt that you want to add to the summary match and click OK. You are returned to the Invoice Summary Match screen and the selected invoice or receipt is added to the respective list.
Use Detail Match
Detail Match enables the user to match the items on invoices to the items on receipts.
When navigating to the Detail Match screen invoices and receipts are grouped by item. All the items are in an unmatched status. Items which are within tolerance are flagged as selected.
The Detail Match screen shows two tables at the top section of the screen. On the left side is the Summary Match table. This is the same table that appears on the Summary Match screen, and it shows the matching status of the invoices and receipts which were brought to the Detail Match Screen. As items are matched or resolved, they are deducted from the Summary Match Totals table. As these deductions occur, if the match becomes within tolerance at the summary level, then the Summary Match button is enabled and the user has the option of summary matching the remainder of the invoice.
The Detail Match Totals table is in the upper right section of the screen. As items are selected from the detail match table below, the Detail Match Totals table is updated showing the totals for the items being considered for matching or resolution. When a match or resolution is executed, these totals are emptied as the action will consume everything that was currently selected.
The lower section of the screen shows the Detail Match table. The Detail Match table is a hierarchical table with three possible levels. The top level is a parent (or style) level. This level is optional, and only appears when a sku item has a parent. The parent level row is used for mass selection (or de-selection) of the child skus under the parent. The Parent level selection can be used for parent level matching if the supplier is configured for this feature.
The second level in the Detail Match table is the sku level. This is the main driver of the matching process. This row displays an accumulated total of all the invoices and receipts which are set to be included in a match for the item. The sku row also contains a check box to indicate that the user wishes to take an action on this item.
The third level in the Detail Match table is the invoices and receipts level. There are two types of rows at this level; the invoice row and the receipt row. The invoice row displays a document icon to distinguish it from the receipt row, and only the invoice columns are populated. The receipt row displays a truck icon to distinguish it from the invoice row and only the receipt column is populated.
There can be multiple invoice or receipt rows for the same item. The include check box is present on both invoice and receipt rows, and if checked, that row is included in the totals of the sku row. If the sku is selected, the row is also included in the action (matching or resolution). Rows that have the include check box unchecked are not included in the action.
Invoice/Item View
The Detail Match - Invoice/Item View is designed to facilitate the mass processing of simple resolutions. It does this by using the Query by Example (QBE) filtering feature of ADF which is available in this view since it is a single tiered table. Complicated resolutions should continue to be handled through the main detail match item view.
The Detail Match - Invoice/Item View screen displays the unmatched sku rows of the detail matched screen. All receipt rows included in the hierarchy under the sku are included in the sku totals on the Invoice/Item View regardless of the Include setting on individual rows. The Invoice/Item View is similar to the View on the Discrepancy Review List, except here the receipt total is based on the receipts under the item in the hierarchy table rather than based on the match key.
If there are two or more invoice rows under the sku row in the detail match item view, each invoice/item combination generates its own row in the alternative view. When the same sku appears multiple times in the alternative view, the receipt totals for the item are repeated on all the item/invoice rows in the alternative view. That is, the receipt information is repeated for each row for the sku.
Note:
Two or more rows with the same sku cannot be selected at the same time on the Invoice/Item view.Match Items within Tolerance
Navigate: From the Tasks menu, select Invoice Matching > Summary Match. The Invoice Summary Match window opens.
-
Perform a search for invoices and receipts. See "Search for Documents" for additional details.
-
In the search results, select the invoices and receipts you want to match from your search results and click Summary Match. The Invoice Summary Match screen is displayed.
-
Select the invoice and receipts that you want to evaluate at the line level and click the Detail Match button. The Detail Match screen is displayed.
-
On the detail match screen, items which are 'within tolerance' are flagged as selected, click Detail Match to execute the Detail Matching routine. The selected items are flagged as cost and quantity matched.
Note:
The Detail Match button is enabled if the variance on each selected item is within line level tolerances. If any one of the selected items is outside of the tolerance, the detail match button is disabled.
Resolve Discrepancies
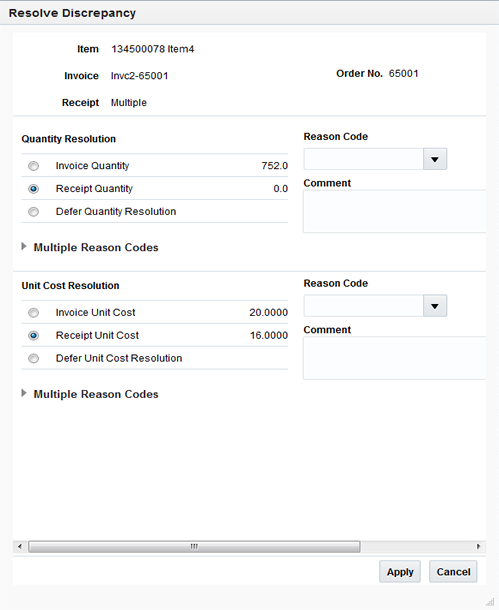
The Resolve button on the Invoice Matching Detail Match screen is enabled when there are one or more unmatched items selected which are valid to be resolved together. For example, if one sku is selected with a quantity overbill, and another sku is selected with a quantity underbill, the Resolve button is disabled. This is because resolving a quantity overbill with a quantity underbill is not allowed since it is typically resolved with a different type of reason code action.
When one item is selected or multiple items with similar discrepancies are selected, clicking the Resolve button opens the Resolve Discrepancy dialog which allows the discrepancy resolution process to proceed on all selected items. Note that both cost and quantity discrepancies can be resolved with the same Resolve Discrepancy dialog.
Substitute Items
Situations may arise where a substitution may need to be made on a receipt item. For example:
If a retailer ordered one item, but when the supplier went to ship the order there was a problem with the ordered item (maybe an out of stock). The supplier then shipped a replacement item. The replacement item is received at the retailer site, but the invoice was never updated to reflect the new item. When the invoice arrives, the summary match is outside of tolerance so detail matching is attempted. It is unsuccessful however since the invoice item which was replaced does not match to any items on the receipt.
When a situation like this occurs, the user is allowed to perform a substitute action on the receipt item to facilitate the matching process.
Substitution involves isolating a receipt row for an item, selecting it, and then identifying the sku where you want to move the substitute item. Receipt items can be selected for substitution as follows:
-
From the Invoice Matching Detail Match screen, ensure that only a single sku row is selected. Substitution only allows one sku at a time.
-
For the sku that you want to use for a substitution, uncheck the 'include' check box for any invoice row associated with the sku and check the 'include' check box for the receipt row you want to use for the substitution.
-
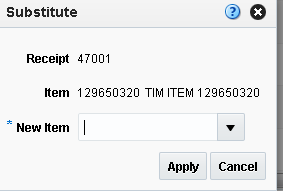
Click the Substitute button. The Substitute dialog is displayed.
-
Enter the item ID for which the receipt item is a substitute. Only items from invoices in the current match are allowed in the substitute action.
When the substitution is complete, the receipt entry displays the substituted item ID under the hierarchy of the substitute item. The original item ID is retained and is available if you hover over the substitute item. Note that when the substituted item comes over into the hierarchy of the new item, the Include checkbox on the substitute item is off and must be checked to be included for it to be included in any subsequent matching or resolution.
Note:
If there was a receipt item already present for the substitute item, the unit costs must be the same on the receipt items or they can not be matched together.Note:
If a substitute process is started, but then the substituted item is not matched or resolved with the new item, it reverts to its original state if the user leaves the Detail Match screen and then returns.
Match by Parent
Some retailers order and receive product at the style level allowing the supplier some flexibility in substituting one size or color within the style for another. The Parent Match type is an extension of Detail Level Matching, allowing matching at the parent (or style) level instead of the sku level. Parent Level Matching is available through the Auto Match Batch by using a 'Parent Level' type on a Match Strategy Detail Level entry. It is also available in the online matching with the 'Online Parent Matching' Supplier Option.
Parent Level tolerances were added to the Tolerance Maintenance screen to facilitate parent matching. If a parent is outside of tolerance, no matching occurs. Discrepancy resolution is not supported at the parent level.
Use Auto-match
The ReIM auto-match program allows for four types of matching:
-
Cost Pre-matching
-
All-to-All Summary
-
One-to-Many Summary
-
Detail Matching
Retailers will be able to select which types of matches should be attempted and in what order the match attempts should occur, with the exception of Cost Pre-Matching which must be performed first if enabled. Also, users are able to specify what match key to use to combine documents together for matching.
The batch Auto-match program utilizes Match Strategies to determine which types of matches to attempt. Match strategies are setup on the Match Strategies Maintenance screen while the Supplier Options Maintenance screen allows a match strategy to be assigned to a supplier group or a supplier. If a match strategy is not defined at the supplier group or supplier level there is a system level default match strategy.
The auto-match program does not attempt to match an invoice if one or more items on the invoice meet the following criteria:
-
a cost discrepancy exists for the for an item but the quantity is flagged as matched
-
a quantity discrepancy exists for the item but the cost is flagged as matched
These conditions essentially are indicating that an item on an invoice is partially matched (either quantity or cost) to a receipt item. Therefore, the user is required to manually match the invoice which will require them to address this partially matched scenario directly during the manual matching process.
Use Match Strategies
The batch auto-match program performs several types of match attempts in an effort to match invoices to receipts. The Match Strategy rules feature allows retailers to build and maintain match strategies which specifically define the types of matches which should be attempted and the order in which they should be tried during the auto-match process. The match strategies can be defined at the system, supplier group, or supplier level.
Map Match Strategy to a Supplier Group or a Supplier
The mapping of a Match Strategy to a Supplier or Supplier Group is done in the Supplier Options UI. The Match Strategy is a field on the Supplier Options table, available for either suppliers or supplier groups. If it is populated, then the supplier or supplier group Is mapped to that strategy. If the supplier is not mapped at one of these levels, then the match strategy default is used for that supplier. For additional information, see ”Manage Match Strategies” in the Oracle Retail Invoice Matching Cloud Service Foundation Data User Guide.
The creation of a Supplier Group is tightly integrated to the logic for selecting documents to be processed by the match engine. If a Supplier Group is created, all the documents for all the suppliers in the group are considered by the match engine together. If a match strategy is defined at the Supplier Group level, then it is used to determine what match attempts to apply against the documents in the supplier group.
If a match strategy is not defined at the supplier group level, then the system default match strategy is used to determine which match attempts are used to attempt to match documents for the supplier group. If a match strategy was set up for one of the suppliers for a supplier group, it is ignored by the match engine and the UI should show it as N/A.
If a supplier is not part of a supplier group, then all the documents for that supplier are considered by the match engine together. If a match strategy is defined at the Supplier level, then it is used to determine what match attempts to apply against the documents for that supplier.
If a match strategy is not defined at the supplier level, then the system default match strategy is used to determine which match attempts should be used to attempt to match documents for the supplier.
Cost Pre-Matching
The Cost Pre-Matching routine is optional but if it is run, it is always ran as the first step of the Auto-match batch. When the Cost Pre-Matching routine is run, it is run against all suppliers. The routine is only executed if no receipts are found for the invoice in the match pool. If it finds differences in the cost on the order and the cost on the invoice which are outside of the tolerance level, it generates a cost discrepancy.
Note:
If the costs do match, the item is not flagged as 'cost matched' because it is still possible that the cost in RMS will change before the receipt comes in which would then need to be recognized as a variance.Summary Match
The Auto Match Batch attempts various types of Summary Matches based on the Match Strategy associated with the supplier or supplier group. Summary Matching involves looking at the total document values (cost and optionally quantity) without considering the specific items on each document. The various types of Summary Matches are described below.
All to All
An all-to-all match attempts to match all invoice documents to all receipt documents in the match pool. Used in combination with the Match Strategy table, all-to-all matching provides the user:
-
The option to choose whether or not to run the all-to-all match.
-
The option to choose the order in which the all-to-all match is attempted. For example, the user could decide to execute the one-to-many match before the all-to-all match.
-
The option to choose the number of times an all-to-all match is attempted. Ideally, multiple of the same type of match attempt will be separated by other types of match attempts.
-
The option to decide how to group the invoices and receipts together to attempt matching by specifying the match key.
Note:
The Best Match parameter is not applicable for all-to-all matches.One to Many
A one-to-many match attempts to match one invoice document to one or more receipt documents. There are two options when performing a one-to-many summary match:
-
Regular Match
Regular Match attempts to match the invoices and receipts in the pool as one to one matches. If an invoice could match to two or more receipts within tolerance, then the match fails. Similarly, if two or more invoices could match to a single receipt (within tolerance), then the match fails and both invoices are put in multi-unresolved status. If Regular Match fails because the invoice could be matched to multiple receipts or if it failed because multiple invoices could be matched to one receipt, the invoice is flagged as multi-unresolved. If a Regular Match fails for a any other reason, the invoice is flagged as an 'Unresolved' match.
-
Best Match
The Best Match setting applies additional logic to select better matches when multiple receipts or receipt combinations can be matched to a single invoice. The best match process creates all combinations of one invoice to one or more receipts and selects the best match.
The best match logic selects the receipt or combination of receipts that provides the lowest absolute variance. If two potential matches to the invoice have the same absolute variance but one is an overbill and one is an underbill, the underbill takes precedence. If the two potential matches have identical variances, then the invoice quantity matching will be used as additional criteria. The match with the smallest absolute quantity variance with be taken as the 'best match'. If the absolute quantity variances are the same then no best match can be determined and the invoice is left as unmatched.
SKU Compliance on Summary Match
Generally, a match is valid at the summary level if the invoices and receipts match within tolerance. The match is always checked against total cost tolerance and it is optionally checked against quantity. However, summary matching does not look at the items on the invoice at all so it is possible to get a match at the summary level where none (or only a few) of the items on the invoice are actually on the receipt. In this case, the value of the match is acceptable, so the match does happen, but the quality of the match (meaning was the invoice really charging for items which were received) can be completely suspect.
The SKU compliance feature can be used with summary matching to ensure that the items on the invoice(s) were also on the receipt(s) which were included in the match. SKU compliance is only calculated if all invoices in a match have details. Therefore, if any of the invoices in the match is a header only invoice, the SKU compliance is skipped.
SKU compliance checks for how many of the items on the invoice(s) are on the receipt(s) and how many of the items on the receipt(s) are on the invoice(s). There is a percent calculation for each of these ratios, and both ratios must pass the Supplier's or Supplier Group's configured SKU compliance percent for the match to be accepted.
Tax Validation on Header only Matches
ReIM uses a routine in the auto-matching program to perform a tax validation for header only invoices. The tax validation is executed when a header only invoice matches (either perfectly or within tolerance). The tax validation compares the taxes on the invoice to the taxes generated by the items from the receipt. In addition, the tax validation:
-
ensures that all tax codes used on the invoice(s) are also used on the receipts in the match, and that the tax rates are exactly the same.
-
ensures that all tax codes on the receipts used in the match are also on the invoice(s) and that the rates match.
If the match passes these two criteria, the invoice (and receipts) can be considered matched. If the validation fails, the invoice(s) are put into tax discrepant status.
Detail Match
Detail matching provides the last level of matching possible.
Eligibility for Detail Matching
In auto-matching, matching can be performed for the entire invoice or it can be broken down to the line level. Detail (or line level) matching is performed by item.
In order to be eligible for detail matching, an invoice or receipt must meet the following conditions:
-
Lines must be present on the invoice: Auto-matching assumes that invoices either have all lines in the system or no lines. The system neither validates nor processes partial invoices. If any lines are present, auto-matching assumes that all lines are present.
-
The invoice must not be part of a manual group. Manual groups are created during the detail match process when an item is partially resolved to a receipt item (for instance the cost is resolved but quantity is deferred). In this circumstance, the invoice and receipt will be ignored by Auto Match Batch and the match will need to be completed through the online processing.
Routing Discrepancies
Part of the detail matching process includes the 'routing' of discrepancies. The 'routing' of discrepancies means that the discrepancies will appear on the 'Discrepancy Review List'. Discrepancies are not routed until after the 'routing date' has passed.
The system uses settings and a formula to arrive at its determination of routing days. A supplier option is used to define how long the system should wait before routing discrepancies for invoices for that supplier. However, if the invoice is due sooner than the routing date, then discrepancies may be routed earlier than the routing date. A system option determines the number of days before the invoice 16x that discrepancies will be routed. The earliest date between the routing date defined by the supplier option and the routing date dictated by the system option is the date on which auto-match routes discrepancies for an invoice.
Supplier option: routing days = x days
System option: maximum days before 16x = y days
Supplier driven routing date = invoice date + x days
System driven routing date = invoice 16x - y days
The date of actual routing is the earlier of the supplier driven routing date and the system-driven routing date.
Therefore, discrepancies are typically not seen on the Discrepancy Review List until after the routing date has passed. (A discrepancy could potentially get to the Discrepancy Review List before the routing date if it was partially resolved manually through the UI.) There is also a system option called Delay Line Matching. If this indicator is checked, then the system does not even attempt detail matching until after the routing date has passed. If the indicator is unchecked, then detail matching is attempted before the routing date passes, but discrepancies will not show up on the Discrepancy Review List until after the routing date has passed.
Regular versus Best Match
Regular detail matching compares the invoice item with the matching receipt item from all receipts in the pool.
When regular matching is only done within a PO, the unit costs on all the receipt items are the same. If the match key being used allows the user to cross PO's, a constraint is included to require all receipt costs on an item to be the same. If receipt costs are different for the same item, detail matching is not allowed for the item.
The Best Match Strategy for detail matching does two separate routines when attempting to match items within the match pool:
-
If the cost of the item on all invoices in the pool is the same, (remember the cost of the item on all receipts also has to be the same - though not necessarily the same as the invoice item), Best Match attempts to match all invoices to all receipts in the pool for that item (an all-to-all match). If they are within tolerance for both cost and quantity in the all-to-all step, then the item is matched on all invoices and on all receipts within the pool. If either the cost or quantity match fails, then nothing is flagged as matched and the process continues with step 2.
-
For the item, look at the item on each invoice in the pool individually and compare it to the sum of all receipts in the pool and select the best match. The criteria for determining the best match in this scenario is as follows:
-
Calculate the unit cost variance, and if it is out of tolerance the invoice is rejected from best match consideration.
-
Calculate the quantity variance and if it is out of tolerance the invoice is rejected from best match consideration.
-
At this point the match is eligible for consideration for best match. Calculate the variance on the extended cost between the invoice item and the receipt item(s). This variance is compared against all matches that have passed steps 1 and 2 and thus are eligible for best match consideration.
-
Compare the absolute variance for all the matches which are eligible for best match consideration. Take the match with the least absolute variance as the best match. If two matches have the same absolute variance but one is an overbill and one is an underbill, select the underbill as the best match. If the variances are identical, then a best match is not possible, so the match is skipped.
-
If the Best Match attempt is unsuccessful, it means that the Regular Match would also have not been successful. However, if the routing date has passed you should attempt regular matching including the auto-resolution process and the generation of discrepancies.
Note:
A Best Match may not have been valid because just the unit cost or just the quantity was out of tolerance. Therefore, it is possible that either unit cost or quantity is within tolerance.The Regular Match attempts to match the invoice item with the receipt items from all receipts in the match key (all receipt unit costs must match the unit cost of the item for the PO/Location) for the invoice being matched).
Generate Discrepancies
During regular detail matching (not best match), the auto-matching process generates discrepancies for cost and quantity discrepancies which are outside of tolerance. There are four types of discrepancies possible:
-
Cost in favor of supplier
-
Quantity in favor of supplier
-
Cost in favor of the retailer
-
Quantity in favor of the retailer
In addition, the Tolerance table includes an Auto Resolution column which is used to determine the variance percent (or amount) allowed to complete an automatic resolution. The Auto Resolution column means that there are three types of discrepancies:
-
Discrepancies which are within the 'variance within tolerance' (VWT) setting
-
Discrepancies which have a variance which can be automatically resolved
-
Discrepancies which have a variance which is too large to be automatically resolved. These variances generate a discrepancy and are sent to the Discrepancy Review list
Discrepancies which are within the variance within tolerance setting
Variance within tolerance (VWT) is a variance that is less than or equal to the tolerance amount.
Discrepancies which have a variance which can be automatically resolved
Discrepancies which can be automatically resolved are discrepancies where the variance is between the tolerance value (exclusive) and the auto resolution value (inclusive) from the tolerance table. When doing automatic resolutions, in addition to the auto resolution value being populated, the Reason Code column needs to be populated.
Automated Discrepancy Resolution
When a discrepancy has been identified as one which can be automatically resolved (based on comparing the variance with the applicable tolerance from the tolerance table), the resolution steps should mirror the processes which would occur if the discrepancy were resolved using the online discrepancy resolution process. These steps include:
-
The discrepancy is generated and sent to the review list.
Note:
The remaining steps in the process effectively remove the discrepancy from the review list, but the data trail is the same whether a discrepancy is automatically or manually resolve. -
The system looks up the appropriate resolution action on the reason code table using the code assigned on the tolerance table row associated with the discrepancy.
-
The resolution action is applied to resolve the discrepancy. If the resolution is a receipt adjustment, entries are made to the appropriate tables in ReIM to execute the trigger which performs the receipt adjustment in RMS.
-
If this is the last item on the invoice to be resolved then the whole invoice is flagged as matched. If this was the last item for the receipt to be resolved, then the receipt is also flagged as matched.
-
When the automated resolution process has been completed, the resolution actions generate debit and/or credit memos during the rollup job assuming the invoice is not on hold. If the invoice is on hold, the documents are generated when the invoice is removed from hold after all credit note requests have been satisfied.
Match Across Purchase Orders
By utilizing the ability to assign additional Purchase Orders to an invoice, which enables the match engine to focus its matching efforts on the specific POs associated with the invoice, ReIM provides the ability to automatically match a merchandise invoice across multiple purchase orders.
This auto match is initiated only when the match key for the supplier (or supplier group) is above the PO level. This means that auto matching across POs is available when the match key is set to one of the following:
-
Supplier Group/Location
-
Supplier/Location
-
Supplier Site/Location
On the One to Many Summary Match and Detail Match (Regular and Parent) strategies, the additional Purchase Orders assigned to an invoice are used to further filter the receipts which will be included in the match pool.
The Discrepancy Review List pulls receipts for an invoice/item based on the match key. When the 'Match Across Multiple Purchase Orders' indicator is set for a supplier, (or supplier group), the receipt results should be further filtered based on the list of POs for the invoice.
When the Summary Match screen is called from the Invoices Due Report on the dashboard, the match key is used to pull in all invoices and receipts associated with the match key. When the Match Across Multiple Purchase Orders indicator is set for a supplier (or supplier group), the results on the Summary Match screen should be further filtered based on the list of POs associated with the selected invoice on the dashboard.