 from the header to display the applications in a Tiles menu.
Data entry Forms and Queries (DEFQ) within the Infrastructure system facilitates you to design web-based user-friendly Data Entry windows with a choice of layouts for easy data view and data manipulation. An authorized user can enter new data and update the existing data in the shared database. Data entry Forms are primarily focused to create data entry systems that access the database and load the generated input data.
To access Data Entries Forms and Queries:
1. Login to OFSAA.
2. Click from the header to display the applications in a Tiles menu.
3. Select the Financial Services Enterprise Modeling application from the Tiles menu. The Navigation list to the left is displayed.
4. Click Common Tasks to expand the list.
5. Click Data Entries Forms and Queries to expand the list further. The following links are displayed on the Navigation list:
d. Data Entry
The Atomic Schema Upload window consists of Excel Utilities such as Excel-Entity Mappings and Excel Upload. The Excel Entity Mappings and Upload utilities have restricted access depending on the following function roles mapped:
· Users with XLADMIN and XLUSER function roles can perform both mapping and upload operations.
· Users with the XLADMIN function role can only define mapping and authorize, but cannot upload the file.
· User with the XLUSER function can only retrieve mapping definition (pre-defined by XLADMIN user) and can upload the file based on the retrieved mapping.
Click on the below links to view the section in detail.
You can access the Excel Upload window by expanding Data Entries Forms and Queries from the Navigation list to the left and clicking Excel Upload (Atomic).
Excel-Entity Mapping helps you to map Excel Data to the destination table in the database. Excel-Entity Mapping supports excel files created in Microsoft 2007 and earlier versions along with the option to map and upload multiple sheets created within a single excel file. You need to have the XLADMIN function role mapped to define the mapping.
To define the mapping in the Excel-Entity Mappings window:
1. From the LHS menu of DEFQ- Excel Upload window, click Excel-Entity Mappings. The Excel-Entity Mappings window is displayed.
Figure 12: Excel-Entity Mappings window

2. Click the  button in the Mappings Summary toolbar. The Add Excel-Entity Mappings window is displayed.
3. Enter the Mapping Name and a brief Description.
4. Click Browse. The Choose File to Upload dialog is displayed.
5. Select the required Excel file to be used as the template and click the  button.
The columns in the selected Excel template are listed in the Select Excel Columns grid and the database tables are listed in the Select Entities grid.
Figure 13: Excel-Entity Mappings window

6. Enter the format in which the dates are stored in the excel sheet in the Source Date Format field.
7. Select the Apply to all Dates checkbox if you want to apply the source date format to all date fields in the excel sheet.
8. Select the First Row is the Header checkbox if your Excel template has a header row.
9. Select the Template Validation Required checkbox to validate whether the Excel template you use is the same as the Excel sheet you use during the Excel Upload window. The validation is done when you upload the excel sheet. The error will be displayed if there is any mismatch between the Excel template you use to map and the actual Excel sheet you upload.
This field is displayed only if you have selected the First Row as the Header checkbox.
10. Select the Bulk Authorization checkbox to assign the “Excel_Name” across the selected column. For example, the selected column “v_fic_description” will have the Excel Name assigned.
NOTE:
Ensure that the selected “Varchar2” column contains the required length to hold the Excel Name. To select Bulk Authorization, you need to have Save with Authorization checkbox selected.
11. Select Save with Authorization checkbox to authorize the data upon successful data load. The three mandatory fields namely Maker ID, System Date, and Authorization Status are displayed in the Select Excel Columns grid.
You need to map these fields to the corresponding columns in the Select Entities grid. The value for the Maker ID column is updated with the User ID of the user who is performing the Excel Upload. The value for Maker Date is updated with the current System Date during which the upload is performed and the value for Authorization Status is updated with the flag 'U'. See Save with Authorization to create a Form where the uploaded data can be authorized.
12. Select a column from the Select Excel Columns grid and select an attribute or column from the required table from the Select Entities grid. Click Map.
13. Click Automap. The respective columns with similar names in the Excel sheet and the database are mapped. You need to manually map the other columns. The mapping details are displayed in the Mapping Information grid which facilitates you to edit the details as required.
14. Click Save Mapping. The Excel-Entity Mapping window displays the excel-database table mapping details.
In the Excel-Entity Mappings window, you can also do the following:
§ Click the View button in the Mappings Summary toolbar to View the mapping details.
§ Click the Edit button in the Mappings Summary toolbar to Edit the mapping details.
§ Click the Delete button in the Mappings Summary toolbar to Delete the mapping details.
§ Click the Download Excel button to download the Excel template used in the mapping.
Excel Upload helps you to upload Excel Data to the destination table in the database. You need to have the “XLUSER” function role mapped to access the Excel Upload window and retrieve mapping definition (pre-defined by XLADMIN user) to upload excel data. Excel Upload supports excel files created in Microsoft 2007 and earlier versions along with the option to map and upload multiple sheets created within a single excel file. You need to ensure that the excel data contains the dates in the format as defined in Add Excel-Entity Mapping definition.
To upload excel data in the Excel Upload window:
1. Click Browse in the Excel File to Upload grid. The Choose File to Upload dialog is displayed.
2. Select the required Excel file and click the Move button.
Select the required sheet in the Excel file from the Sheet drop-down list and the Preview grid displays the data of the selected sheet of the Excel file.
Figure 14: Excel Upload window
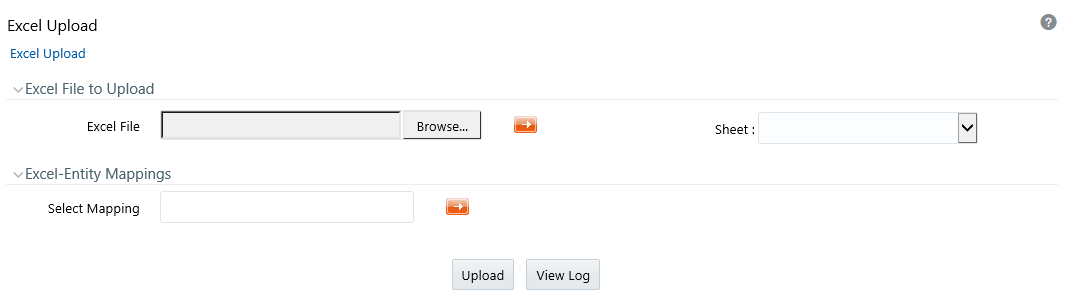
3. Click the Move button in the Excel-Entity Mappings grid. The Mapping Selector dialog is displayed with the pre-defined mapping details.
4. Select the checkbox adjacent to the required mapping definition and click OK.
NOTE:
You can download the Excel template used in the mapping by clicking the Download Excel button.
5. Click Upload. A confirmation dialog is displayed on successful upload and the excel data is uploaded to the database table. You can click on View Log to view the log file for errors and upload status.
NOTE:
1. This functionality doesn’t work when CSRF is enabled. To disable CSRF, see the section Update General Details.
2. This functionality displays only on the Microsoft Internet Explorer™ browser.
Forms Designer within the Data Entry Forms and Queries section facilitates you to design web-based user-friendly Forms using the pre-defined layouts. You can access DEFQ - Forms Designer by expanding Data Management Framework and Data Entry Forms and Queries within the tree structure of the LHS menu and selecting Forms Designer.
Figure 15: Forms Designer window
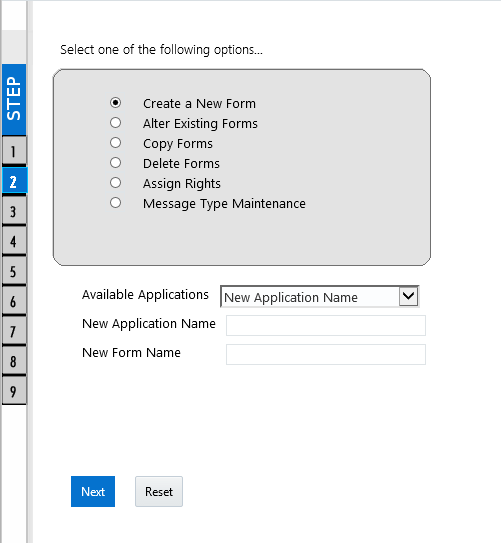
The DEFQ - Forms Designer window displays a list of pre-defined options to create, modify, and delete Forms. You can also assign rights and define messages. By default, the option to Create a New Form is selected and the left pane indicates the total steps involved in the process. The available options are as indicated below. Click on the links to view the section in detail.
To design a new Form in the DEFQ - Forms Designer window:
1. Ensure that Create a New Form option is selected and do the following:
§ Specify the application name by either entering the New Application Name or selecting Available Applications from the drop-down list.
§ Enter the New Form Name.
2. Click Next. The DEFQ - Layout Window is displayed with a range of pre-defined layouts for you to choose from.
Figure 16: DEFQ – Layout window (Step 3 of Designing Form)
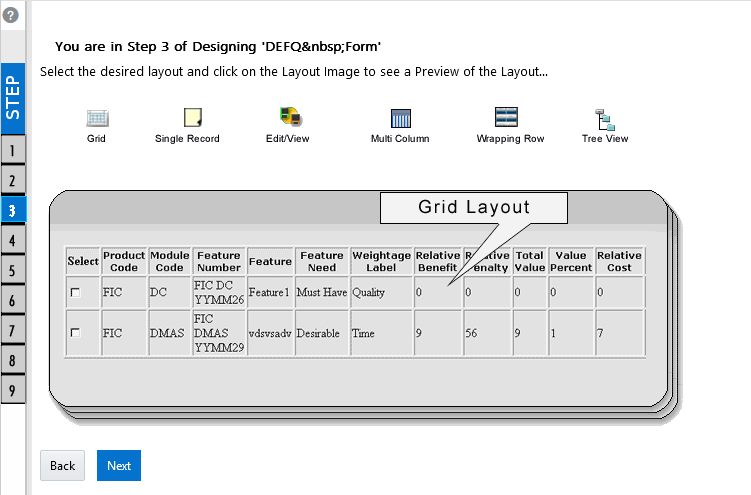
The following table describes the layouts in the DEFQ – Layout window.
Layout |
Description |
|---|---|
Grid Layout |
It is the default layout that displays the records in the Form of a table/grid with multiple rows of data. |
Single Record Layout |
It displays a single record at a time. |
Edit/View Layout |
It is a combination of the Single Record and Grid layout. By selecting a record in the grid, the record is displayed in a single record format, which is editable. By default, the first record will be displayed in the editable grid. Note: The column names are editable only during altering the created Form. |
Multi-Column Layout |
It displays a single record with its column in a grid format. You can view a multi-column layout Form without having to scroll or with minimum scrolling to view all the columns. |
Wrapping Row Layout |
It displays rows of a single record in a wrapped manner in a grid format. You can view a wrapping row layout Form easily without having to scroll horizontally to view all the data. |
Tree View Layout |
It displays the Hierarchical dimensional table with the selected dimension details. You can select the following options: Dimensional Table Tree Parent-Child Tree Note: The process to create a Form using the Tree View Layout differs from the procedure explained below. For more information, refer Create Tree View Form in the References section. |
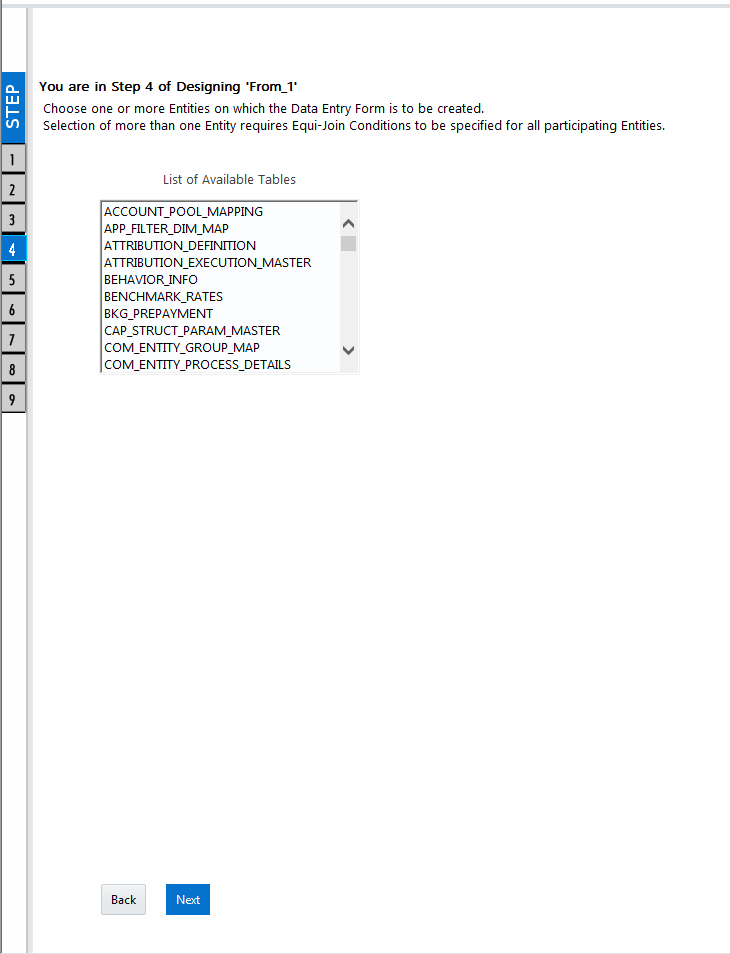
3. Select the required layout and click Next. The List of Available Tables is displayed.
4. Select the required Table from the list on which the Form is to be created.
Figure 17: DEFQ – List of Available Tables Selection window (Step 4 of Designing Form)
NOTE:
You should use tables with names not longer than 25 characters. This is a limitation.
For multiple selections, you can either press the Ctrl key for nonadjacent selection or the SHIFT key for adjacent selections. Click Next, the Fields Selection window is displayed.
NOTE:
If multiple tables are selected, you need to specify Join Conditions. Select the Table from the drop-down list and select the Available Fields. Specify the Join Condition. Click Next, the join conditions are validated and the Fields Selection window is displayed.
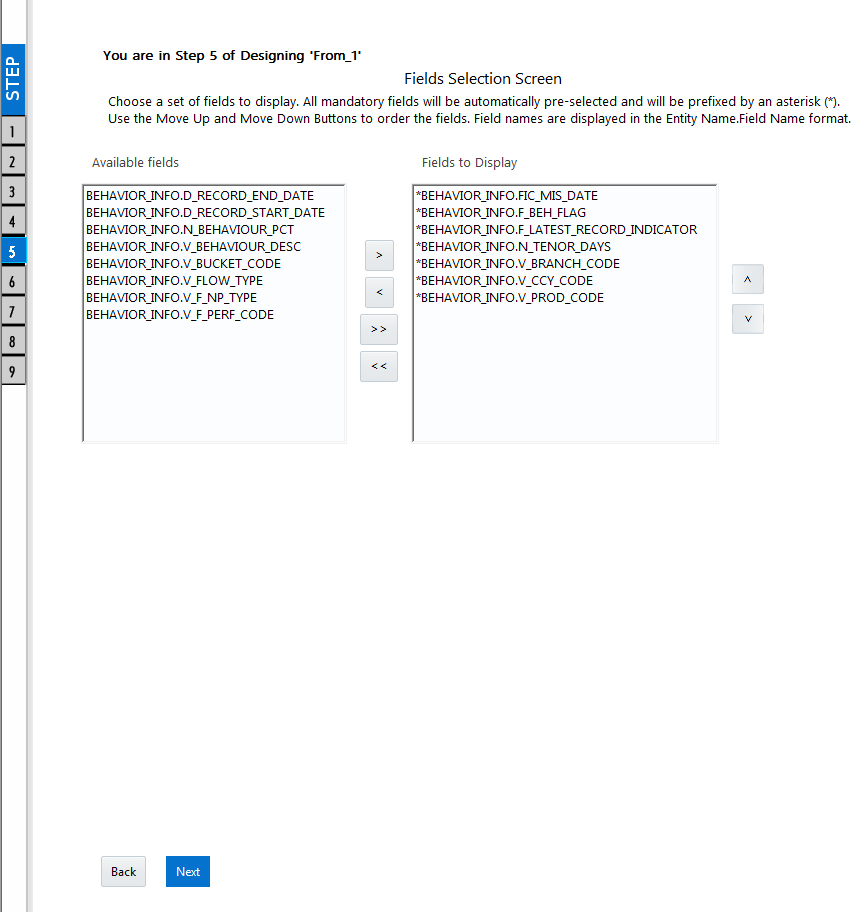
5. Select the fields to be joined from the Available Fields list and click the Move icon. You can press the Ctrl key for multiple selections and also click Move All icon to select all the listed fields. All mandatory fields are auto-selected and are indicated on the window with an asterisk (*).
Figure 18: DEFQ – Fields Selection window (Step 5 of Designing Form)
NOTE:
You can click  or
or  buttons to arrange the fields in the required order as intended to display in the Data Entry Form. The fields order need not be similar to the arrangement in the underlying table.
Ensure the fields selected are not of CLOB data type since it is not supported in DEFQ.
6. Click Next. The Sort Fields Selection window is displayed.
Figure 19: DEFQ – Sort Fields Selection window (Step 6 of Designing Form)
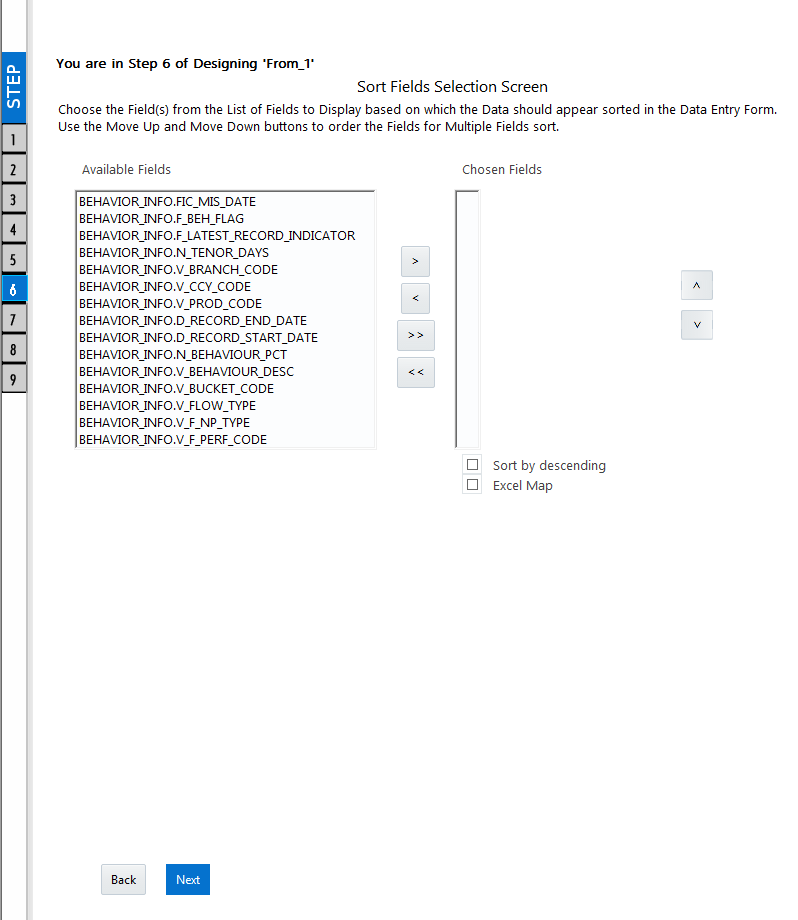
You can sort the fields in the required order as intended to display in the Data Entry Form. Also, the mandatory fields which need user inputs are indicated in the '*' symbol and are auto-selected in the Selected Fields pane.
§ Select the field from the Available Fields list and click  . You can press the Ctrl key for multiple selections and also click
  to select all the listed fields.
§ (Optional) To arrange multiple fields, select the Sort by Descending checkbox.
§ (Optional) Select the Excel Map checkbox to enable Bulk Authorization.
NOTE:
In case you have selected the Excel Map checkbox, you need to select “Excel Name” from the Store Field As a list in the DEFQ Field Properties window. Only on selection, the “SelectExcelSheetName” list is displayed for the authorizer in the DEFQ - Data Entry window.
7. Click Next. The DEFQ Field Properties window is displayed with the Form details such as Field Name, Display Name, In View, In Edit/Add, Allow Add, Store Field as, Rules, and Format Type.
Figure 20: DEFQ – Field Properties window (Step 7)
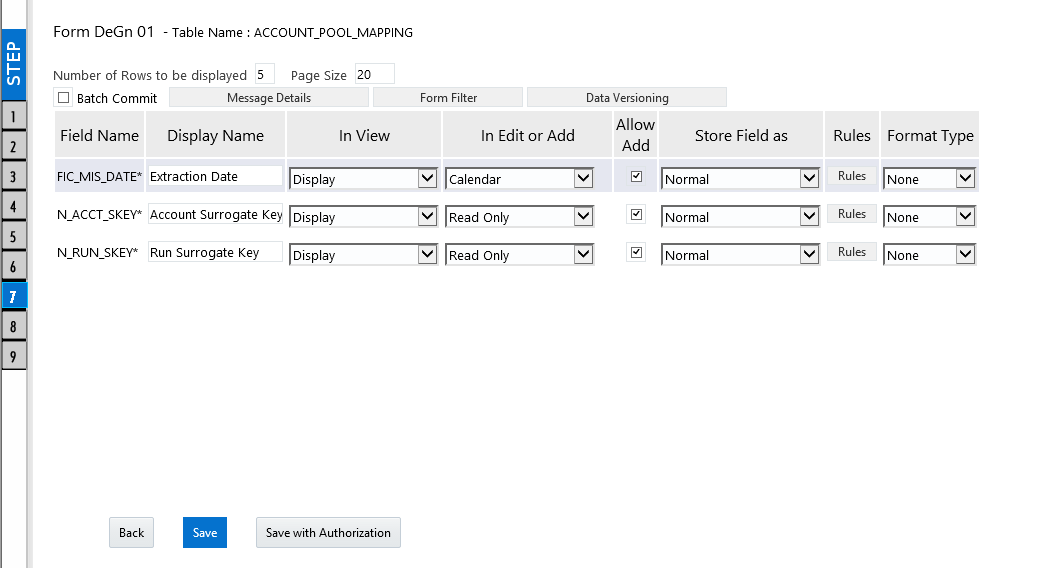
Specify the parameters for each field as tabulated.
The following table describes the fields in the DEFQ – Field Properties window.
Field |
Description |
|---|---|
Display Name |
Edit the default Display Name if required. |
In View |
Select either Display or Do not Display to display the field in the Form. If the field is a foreign key field or if more than one table is selected, then the following options are available in the drop-down list; Same Field Alternate Display Field Do not Display options |
In Edit/Add |
Specify the edit parameters by selecting from the drop-down list. The available options depend on the type of field selected. For normal fields, you can select Text Field, Text Area, Select List, Protected Field, Read-Only, and Do Not Show. For foreign key fields s you can select Read-Only, Select List, and Do Not Show. For primary key fields, you can select Read Only and Do Not Show. For calendar fields, you can select Calendar and Do Not Show. Note: If you choose the Select List option, you need to define the values. For more information, refer to Define List of Values. |
Allow Add |
Select the checkbox to permit users to add a new record. Note: An alert message is displayed if you are trying to save a Form with add option disabled for the mandatory fields. |
Store field as |
Select the required option from the drop-down list. You can select the store format as Normal, Sequence Generator, Maker Date, Checker Date, Created Date, Modified Date Auth Flag, Maker id, Maker Date, Checker id, Checker Date, Checker Remarks, Maker Remarks, and Excel Name (If Excel Map is selected in Sort Fields Selection window). |
Rules |
Click Rules and specify Rules and Expressions for the selected field in the Specifying Rules and Expressions for Data - Validations window. For more information, refer Applying Rules section in the References. |
Format Type |
Select the required Format type from the drop-down list depending on the field type selected. CLOB data type is not supported. |
Batch Commit |
Select the checkbox to group all the sets of table Forms into a batch. All the Form tables are executed along with the batch execution and if in case, a Form in the table fails to execute, the entire set of Forms are returned. |
Message Details |
Click Message Details to define the message type for Creator and Authorizer in the Messaging Details for a Form window. For more information, refer to Define Message Details. |
Form Filter |
Click Form Filter to define an expression for Form-level filter condition in the Filter for Form window. |
Data Versioning |
Click Data Versioning to perform data versioning on an authorized Form. For more information, refer to Form Data Versioning. |
8. Click either Save to only save the Form details or click Save for Authorization to save the changes with authorization. For more details, refer Save for Authorization section.
Figure 21: DEFQ – Save window
NOTE:
Sometimes, on clicking Save, the form does not get saved. This is because the Java heap size setting for the OFSAAI service is set too high and the webserver memory setting is too low. Contact System Administrator to modify it to the appropriate setting by viewing the log file created in the path: $FIC_APP_HOME/common/FICServer/logs/.
While saving, the User for Mapping - DEFQ window is displayed which facilitates you to assign user rights to the Form. For more information, refer to Assign Rights.
To alter the field details of an existing Form in the DEFQ - Forms Designer window:
1. Select Alter Existing Forms from the available options and do the following:
§ Select the Available Applications from the drop-down list.
§ Select the Available Forms from the drop-down list. The listed Forms are dependent on the DSN (Data Source Name) that you have specified.
2. Click Next. The Fields Selection Window is displayed.
Add or remove the selected fields as required to be displayed in the Form. You can choose a field from the Available Fields list and click to add, or choose the selected field from the Fields to the Display list and click  to de-select. You can press the Ctrl key for multiple selections and also click or
  buttons to select/deselect all the listed fields.
3. Click Next. The Sort Fields Selection Window is displayed.
§ Sort the fields in required order as intended to display in the Form. You can choose a field from the list and click or  buttons to select/deselect. You can also click
  or buttons to select/deselect all the listed fields.
§ Select a field and click or buttons to arrange fields in the required order.
§ (Optional) To arrange multiple fields, select the Sort by Descending checkbox.
§ (Optional) Select the Excel Map checkbox to enable Bulk Authorization.
NOTE:
In case you have selected the Excel Map checkbox, you need to select “Excel Name” from the Store Field As a list in the DEFQ Field Properties window. Only on selection, the “SelectExcelSheetName” list is displayed for the authorizer in the DEFQ - Data Entry window.
4. Click Next. The DEFQ Field Properties window is displayed.
Modify the parameters for each field as required. Refer to DEFQ Field Properties details.
5. Click either Save to save the Form details or click Save for Authorization to save the changes with authorization.
While saving, the User for Mapping - DEFQ window is displayed which facilitates you to assign user rights to the Form. For more information, refer to Assign Rights.
You can duplicate and recreate a Form with the required variants from an existing Form. You can also change user rights or display options and other subtle variations for the selected layout.
To Copy a Form in the DEFQ - Forms Designer window:
1. Select Copy Forms from the available options and do the following:
§ Select the application from the From Application drop-down list which consists of the required Form which you want to copy.
§ Select the application from the To Application drop-down list for which you want to copy the Form.
§ Select the required Form from the Save Form drop-down list.
§ Enter a name for the Form in the As Form field.
2. Click Next. The specified Form is duplicated as a new Form and a confirmation dialog is displayed with the status.
You can remove the forms which are not required in the system by deleting them from the DEFQ - Forms Designer window.
1. Select Delete Forms from the available options and do the following:
§ Select the application from the Available Application drop-down list which consists of the required Form which you want to delete.
§ Select the Form from the Available Forms drop-down list which you want to delete.
2. Click Next. An information dialog is displayed for confirmation. Click OK.
You can assign user permissions to view, add, edit, and delete the Form details in the User for Mapping - DEFQ window.
1. Select Assign Rights from the available options and do the following:
§ Select the required application from the Available Applications drop-down list.
§ Select the required form for which you want to assign rights to a user from the Available Forms drop-down list.
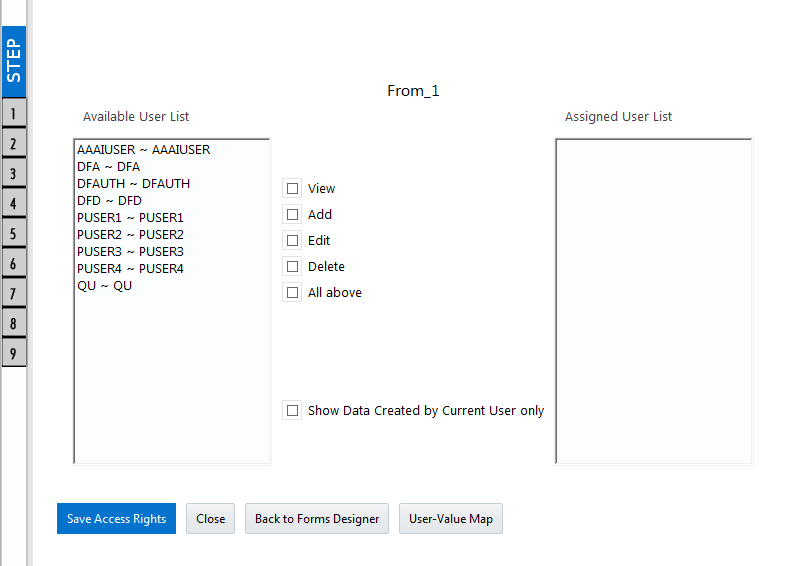
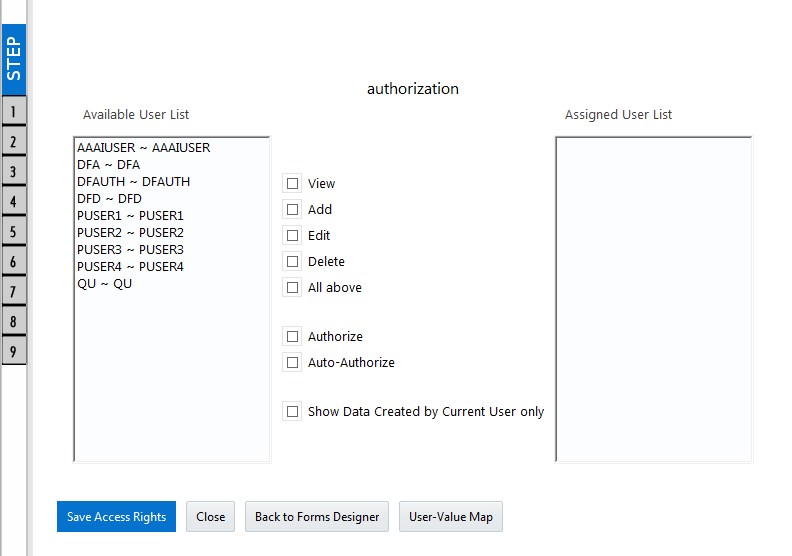
2. Click Next. The DEFQ- Assign Rights window is displayed.
3. Select the required user from the Available User List. You can also click or buttons to reload the previous/next set of users in the list.
4. Select the checkbox corresponding to the user permissions such as View, Add, Edit, Delete, or All Above. You must give View permission to allow users to Edit or Delete a Form.
5. Select Authorize or Auto-Authorize checkbox as required.
The Authorize and Auto-Authorize options are applicable for all the forms that have been saved with the Authorize option. The Auto-Authorize feature for records is applicable in scenarios where the Creator and Authorizer are the same. If a user has Add and Auto-Authorize permissions, the data entered by the user is auto authorized and the data will be in Authorized status. In the case of normal Authorization, the Record added by the creator has to be authorized by a different user who has Authorize permissions.
NOTE:
The Auto-Authorize feature in Forms Designer is applicable only for data entered through the Data Entry window and not through the Excel Upload window.
6. Select the Show Data Created by Current Users Only checkbox if you want the current user to view data created by him only.
7. Click User Value Map to map users to the form based on data filter.
8. Click Save Access Rights. A confirmation dialog is displayed after saving and the user is added to the Assigned User List.
This feature allows you to create a data filter based on any field/column of the table you selected for designing the Form. When a user tries to access the form in the Data Entry window, data will be filtered and displayed based on the selected field, to the users associated with that column.
NOTE:
The data type of field/column you select to define the filter should be NUMBER or VARCHAR. The users mapped to the DEFQ form whose assign rights are authorized through “Forms Authorization” can save the filter.
There are two types of filters, Global Data Filter and Custom Data Filter.
Global Data Filter: In this filter, the value will be fetched from the DEFQ_GLOBAL_VALUES table of the Atomic schema, which is automatically created during information domain creation. The table needs to be populated manually through excel upload. The table contains all the entities and the users mapped to them.
Custom Data Filter: This filter enables the user to provide a custom filter for the form you design. In this filter, you should enter values for all the users mapped to the form manually.
To set a Data Filter:
1. Click User Value Map in the DEFQ- Assign Rights window.
The User Value Map window is displayed.
2. Select the Global Data Filter option to filter the data globally.
§ Select the field based on which the data should be filtered and displayed for the user, from the Fields to the Display section.
NOTE:
Normally the user can access all the data from the table whenever the DEFQ form is created. Based on this filter, the user will be displayed only the data which is mapped to him.
3. Select the Custom Data Filter to provide a custom filter for a specific DEFQ Form.
§ Select User ID from the drop-down list and enter Values for that user. It is mandatory
4. Click Save.
You can manage the Message Type details which alert the Creator of the Form or to an Authorizer in the DEFQ Message Type Maintenance window. Message Type details can be defined while creating a Form. For more information, refer to Define Messaging Details.
In the DEFQ - Forms Designer window, do the following:
1. Select Message Type Maintenance from the available options and click Next.
The DEFQ - Message Type Maintenance window is displayed.
2. Select the message category from the Message Type drop-down list.
3. Edit the message details by doing the following:
§ The defined Message Subject and Message Content are auto-populated. Edit the details as required.
§ Add or remove the defined recipients. Double-click on the required member to toggle between the Available and Mapped Recipients list.
NOTE:
Selecting Authorizer alerts all the selected authorizers for authorization.
4. Click Save. A confirmation is displayed on updating the Message Type details.
NOTE:
1. This functionality doesn’t work when CSRF is enabled. To disable CSRF, see the section Update General Details.
2. This functionality displays only on the Microsoft Internet Explorer™ browser.
Forms Authorization within the Data Entry Forms and Queries section of the Infrastructure system facilitates you to view and authorize/approve any changes that are made to the privileges assigned to a user in a particular Form.
You need to have the FRMAUTH function role mapped to access the Forms Authorization window.
NOTE:
You cannot authorize or reject a right request created by you, even if you have the FRMAUTH function role mapped.
You can access the Forms Authorization window from the left-hand side (LHS) menu of the Infrastructure home page. Click “+” and expand the Data Model Management and select Data Entry Forms and Queries.
Figure 22: Forms Authorization window

The Forms Authorization window displays the list of privileges assigned to a user in different Forms. These privileges include create, view, modify, delete, authorize, and auto-authorize records. The Forms Authorization window allows you to select a user from the drop-down list adjacent to the User ID field. This field displays the User IDs associated with the selected Information Domain.
On selecting a user from the User ID field, the columns in the Forms Authorization window lists the grants requested for that user on different Forms as listed below.
The following table describes the columns in the Forms Authorization window.
Column Name |
Description |
|---|---|
Application |
Lists the specific application to which the Form has been assigned. |
Form Name |
Displays the Form Name. |
Access Rights Before |
Displays the available Right Requests for the selected user in the Form. Note: For the new Form, the column remains blank. |
Access Rights After |
Displays the Right Requests raised for authorization. DV - DEFQ VIEW DA - DEFQ ADD DE - DEFQ EDIT DD - DEFQ DELETE A - AUTHORIZE DU - AUTO AUTHORIZE S - SHOW DATA CREATED BY CURRENT USER ONLY |
Operations |
Displays the operation carried out in the Form. For example, “ADD” indicates a new form is created and specific roles are assigned. |
Created By |
Displays the USER ID from which the Right Request has been created. |
Created Date |
Displays the date on which the Right Request has been created. |
Last Saved By |
Displays the USER ID from which the previous Right Request change has been saved. |
Last Saved Date |
Displays the date on which the previous Right Request change has been saved. |
Checked By |
Displays the USER ID from which the Right Request has been authorized. |
Checked Date |
Displays the date on which the Right Request has been authorized. |
To authorize or Reject a form in the Forms Authorization window:
1. Select the User ID from the drop-down box. 4B43BThe Right Requests submitted on various forms are displayed.
2. Select the checkbox(s) adjacent to the requests to authorize / reject.
You can also select all the requests at once for a user, by clicking the Select All checkbox.
3. Click Authorize / Reject to authorize or reject the selected Right Requests.
Once Form action privileges are authorized for a user, those actions can be performed on the Form. For an existing Form with certain rights, the rights remain the same until the changes are authorized/rejected by an authorizer.
NOTE:
Special characters are not allowed in DEFQ definitions except underscore (_).
NOTE:
This functionality doesn’t work when CSRF is enabled. To disable CSRF, see the section Update General Details.
This functionality displays only on the Microsoft Internet Explorer™ browser.
Data Entry within the Data Entry Forms and Queries section of the Infrastructure system facilitates you to view, add, edit, copy, and delete data using the various layout formats and Authorize/Re-authorize data records based on the permissions defined during the Form creation.
You can use the Search option to query the records for specific data and also export the data in Microsoft Excel format for the reference. You can launch multiple instances of the Data Entry window using the URL to search and update records simultaneously.
You can access DEFQ - Data Entry by expanding the Data Entry Forms and Queries section of the Data Model Management module within the tree structure of the LHS menu.
NOTE:
An alert message is displayed if you are not mapped to any Forms in the system.
Figure 23: DEFA – Data Entry window
The DEFQ - Data Entry window displays the list of Data Entry Forms and Query Forms mapped to the logged-in user in the LHS menu. You can select the required Form to view the details. In the DEFQ - Data Entry window, you can do the following:
The DEFQ - Data Entry window displays the selected Form Data in the View mode by default. The Forms are displayed based on the application names in the LHS menu. There are various layouts available to customize the view and by default, the Form details are displayed in the layout in which it was designed.
In the DEFQ - Data Entry window, the following layout types are available. You can click on any of the following layouts to view the Form details. The buttons i.e. Previous Page, Back, Next, and Next Page helps you to navigate through the records. However, the customized header sorting does not apply when you have navigated to Previous or Next pages.
NOTE:
The Roll Back option can be used only for authorized records i.e. after the records are edited and saved, you can roll back/undo the changes in view mode.
The following table describes the Layouts in the DEFQ – Data Entry window.
Layout |
Description |
|---|---|
Single Record |
To view the details of a single record at any given point. You can use the navigation buttons to view the next record in the table. |
Editable View |
To view and edit a single record. A list of five rows/records is displayed by default, and the same can be changed by entering the required number in Display Rows. You need to select the required record from the list to view/edit and click Save to update the changes. |
Grid (Default) |
To view all the records in a list. A list of five rows/records is displayed by default, and the same can be changed by entering the required number in Display Rows. You can click on the column header to alphabetically sort the list of records in the table. |
Multi-column |
To view all the columns of a selected record. This layout enables you to view a record without having to scroll or with minimum scrolling to view all the columns. |
Wrapped rows |
To view all the rows of a selected record. This layout enables you to view a wrapping row easily without having to scroll horizontally to view the columns. |
In the DEFQ - Data Entry window, you can search for a record in the View, Edit, and Authorize modes. You can perform a quick Search to find a specific record or run an Advanced Search to further query the record for the required details.
To search for a record in the DEFQ - Data Entry window:
1. Click  . The search fields are displayed.
2. Select Field Name from the drop-down list.
3. Enter the value/data in the Search field.
4. Click Go. The search results are displayed in the list.
To perform an Advanced search in the DEFQ - Data Entry window:
5. Click  within the Search fields. The Advanced Search window is displayed.
Figure 24: Advanced Search window

6. Select the required Parentheses/Join, Field, Operator from the drop-down list and enter the Value as required to query the Form data.
7. Click GO. The results are displayed with the field names containing the searched data.
You can edit the permitted Form field values in the DEFQ - Data Entry window. However, you cannot modify the primary key fields which are displayed in a non-editable format.
To edit Form Details in the DEFQ - Data Entry window:
1. Open the required Form in view mode and click  . The editable fields are enabled.
2. Enter/update the required details.
3. Click Save and update the changes.
4. If required, you can click Reset to undo the changes and return to original field values.
If you have edited an Authorized record, the same is again marked for authorization. Once the record is updated, a modified status flag is set, and only these record changes can be rolled back. The Roll Back option is supported in view mode only for authorized records, i.e. records that are updated and saved.
You can add a row to the required table and enter the field details. To Add Form Data in the DEFQ - Data Entry window:
1. Open the required Form in view mode and click  .
.
2. By default, five rows are displayed. You can modify by specifying the number of required rows in the Display Rows field and clicking Reset.
3. Enter the required numeric data in the new fields. If you want to view the numeric data separated by commas, enter the details accordingly.
4. Click Save and update the data to the selected table.
You need to have DEFQMAN and SYSAUTH function roles mapped to access and authorize Forms in the DEFQ framework. You can Authorize a single record or all the records of a selected Form within the DEFQ - Data Entry window. You can Authorize a record in a table that has a primary key field. A primary key field in the record is indicated by “PK”. You need to have the authorization rights defined by the user who has created the record. You can also Reject or Hold inappropriate records in the table.
Figure 25: DEFQ - Data Entry Authorization window
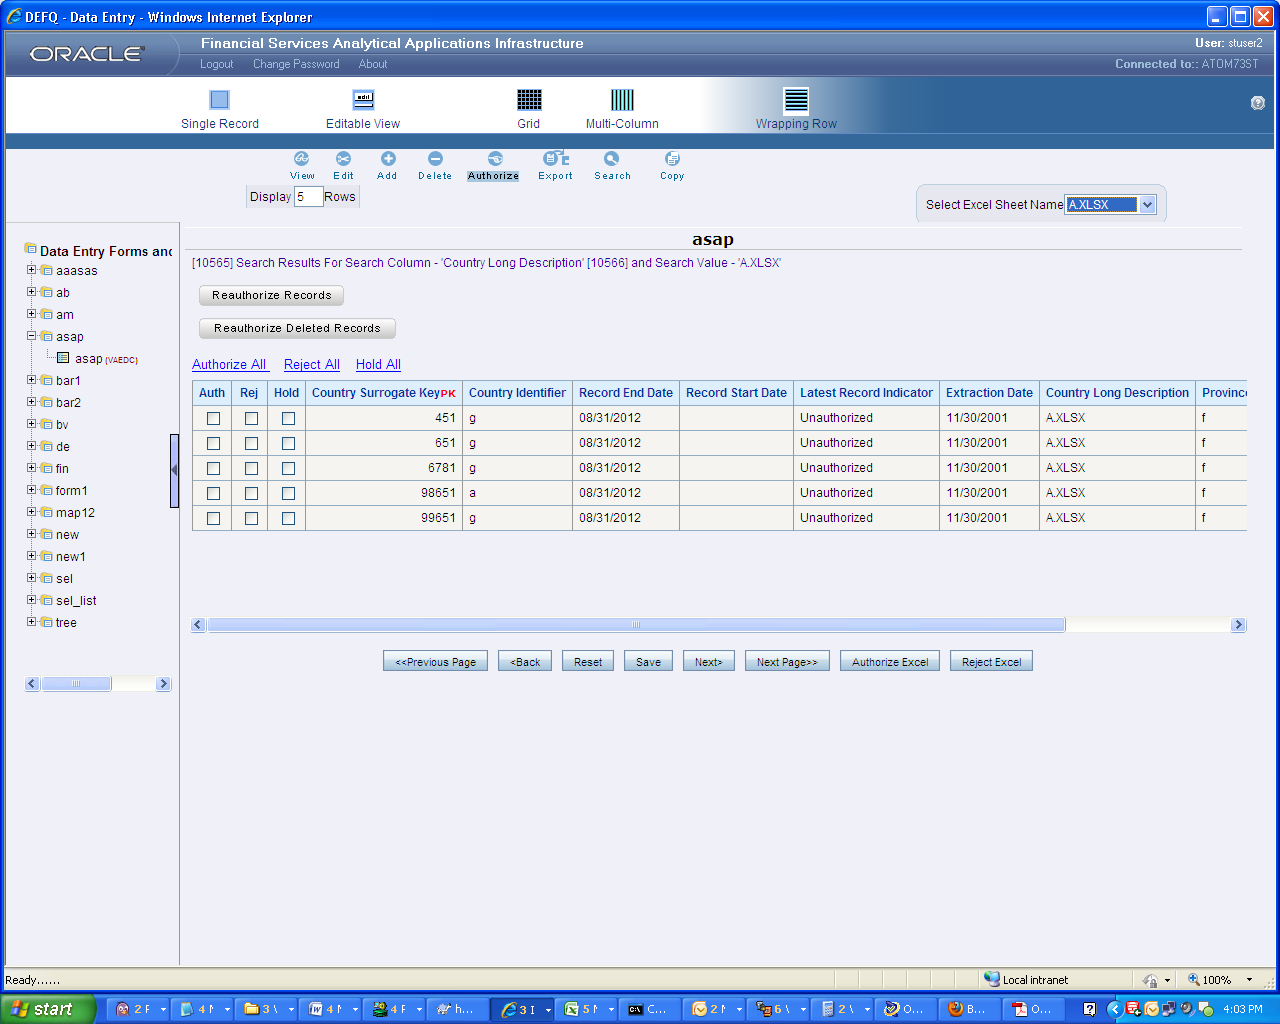
The status of each record in the table is indicated with an “AuthFlag” as indicated below:
· Unauthorized records are displayed with the status flag “U”
· Authorized records are displayed with the status flag “A”.
· Rejected records are displayed with the status flag “R”.
· Modified records are displayed with the status flag “M”.
· Deleted records are displayed with the status flag “D”.
· If an Unauthorized record is on Hold, the status flag is displayed as “H”.
· If a Modified record is on Hold, the status flag is displayed as “X”.
· If a Deleted record is on Hold, the status flag is displayed as “Z”.
To Authorize Data in the DEFQ - Data Entry window:
1. Open the required Form in view mode and click  .
.
The list of available records for Authorization is displayed. If there are “no records” for Authorization in the selected Information Domain, an alert message is displayed.
2. Select the “Auth” checkbox adjacent to the required record with the status flag “Unauthorized / Put On Hold” and click Save. A confirmation dialog is displayed. Click OK.
You can also do a Bulk Authorization if Excel Map is selected in the Sort Fields Selection window. Select the mapped Excel Name from the “SelectExcelSheetName” drop-down list. The DEFQ - Data Entry window displays only those records which are uploaded through the selected Excel sheet. Click Authorize Excel. A confirmation dialog is displayed. Click OK.
You can Reject / Hold a record by doing the following:
· To Reject a record, select the checkbox in the “Rej” column adjacent to the required record and click Save. A confirmation dialog is displayed. Click OK.
You can also Reject records in Bulk Mode if Excel Map is selected in the Sort Fields Selection window. Select the mapped Excel Name from the “SelectExcelSheetName” drop-down list. The DEFQ - Data Entry window displays only those records which are uploaded through the selected Excel sheet. Click Reject Excel. A confirmation dialog is displayed. Click OK.
· To Hold a record and to authorize or reject at a later point, select the checkbox in the “Hold” column adjacent to the required record and click Save.
In the DEFQ - Data Entry window, you can also do the following:
· Click Authorize All and click on Save to authorize all the records displayed on the current page.
· Click Reject All and click on Save to reject all the records displayed on the current page.
· Click Hold All and click on Save to hold all the records displayed on the current page.
If you have enabled the option to send alerts to the Creator of the Form in the Message Type Maintenance window, a message is sent indicating that the records are authorized/rejected/put on hold.
You can re-authorize an authorized record that has been updated by other users. When an authorized record is updated, the status flag (AuthFlag) is set to “M” indicating that the record has been modified and needs re-authorization.
Figure 26: DEFQ - Data Entry Re-Authorize window
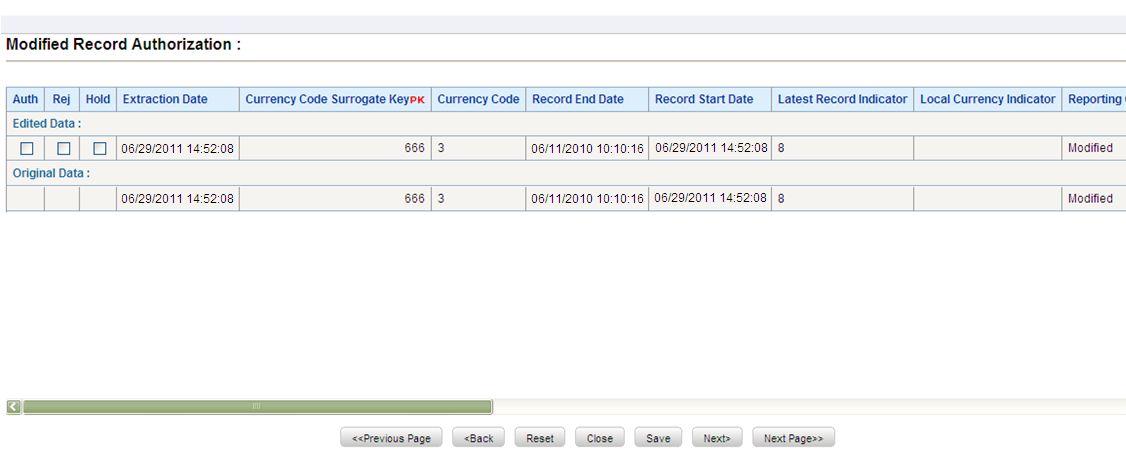
To re-authorize modified records in the DEFQ - Data Entry window:
1. Open the required Form in view mode and click .
The list of available records with the Authorization status is displayed. If there are “no records” for Authorization in the selected Information Domain, an alert message is displayed.
2. Click Reauthorize Records. The DEFQ Authorization Window is displayed.
3. Select the “Auth” checkbox adjacent to the required record.
4. Click Save. On re-authorization, a confirmation message is displayed.
You can also select the checkbox adjacent to “Rej” to reject the record, or “Hold” to re-authorize or reject at a later point. A message is sent to the Form creator indicating that records are authorized/rejected/put on hold.
You can re-authorize the delete action when an authorized record has been deleted by other users. When an authorized record is deleted, the status flag (AuthFlag) is set to “D” indicating that the record has been deleted and needs re-authorization.
Figure 27: DEFQ - Data Entry Re-Authorize Deleted Records window
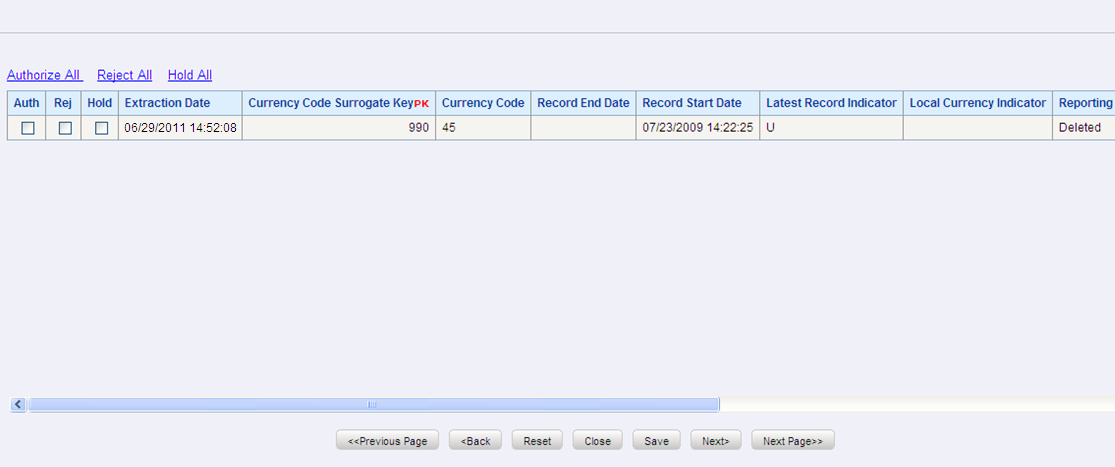
To re-authorize deleted records in the DEFQ - Data Entry window:
1. Open the required Form in view mode and click .
The list of available records with the Authorization status is displayed. If there are “no records” for Authorization in the selected Information Domain, an alert message is displayed.
2. Click Reauthorize Deleted Records. The DEFQ Authorization Window is displayed.
3. Select the “Auth” checkbox adjacent to the required record.
4. Click Save. On re-authorization, a confirmation message is displayed.
You can also select the checkbox adjacent to “Rej” to reject the record, or “Hold” to re-authorize or reject at a later point. A message is sent to the Form creator indicating that records are authorized/rejected/put on hold.
You can export the required record(s) to a selected location in CSV format. To Export Form Data in the DEFQ - Data Entry window:
1. In the View mode, select the checkbox adjacent to the record(s) which you want to export.
2. Click  . The File Download dialog is displayed.
3. Click Save. The Save As dialog is displayed.
4. Select the location and click Save. The selected record is exported.
You can copy the existing fields and create new fields in a record. When you copy a field, the primary key values are incremented from the pre-defined value to the next acceptable value. However, the other fields can be modified as required.
To copy fields in the DEFQ - Data Entry window:
1. Open the required Form in view mode and click  .
.
The list of available records is displayed. All the primary field data (indicated by *) is incremented by default.
2. Click Save. The field values are added to the record.
You can click Edit to modify the values or click Next to copy the next set of fields.
You can remove Form details that are no longer required by deleting them from the DEFQ - Data Entry window.
1. In the View mode, select the checkbox adjacent to the record which you want to delete.
2. Click  . An information dialog is displayed.
3. Click OK to confirm and delete the record.
This section of the document consists of information related to intermediate actions that need to be performed while completing a task. The procedures are common to all the sections and are referenced where ever required. You can refer to the following sections based on your need.
The process to create a Form using the Tree View Layout differs from the procedure as explained for other layouts. You can create a Form using the Tree View Layout, by selecting either Dimensional Table Tree or Parent-Child Tree.
If you want to create a Form using the Dimension table Tree, select Tree view > Dimension Table Tree option in the DEFQ - Layout window. On clicking Next, you need to provide the required details in the following windows:
1. Dimension Table Selection: Enter the Root Name and select the Table. Click Next.
2. Fields Selection: Select required Fields to Display from Available fields and click Next.
3. Dimension Node Selection: Select Field Nodes from Available fields and click Next.
4. Select Dimensional Tree Nodes for the selected fields and click Next.
5. DEFQ Field Properties window: Specify the required details. For more information, refer to DEFQ Field Properties.
If you want to create a Form using the Parent-Child Tree, select Tree view > Parent-Child Tree option in the DEFQ - Layout window. On clicking Next, you need to provide the required details in the following windows:
1. Hierarchy Table Selection: Enter the Root Name and select the Table. Click Next.
2. Parent-Child Node Selection: Select Parent Node, Child Node, and Node Description from the drop-down list.
3. Fields Selection: Select required Fields to Display from Available fields and click Next.
4. DEFQ Field Properties window: Specify the required details. For more information, refer to DEFQ Field Properties.
You can apply rules to Validate Form Data to specific fields such as Text Field, Text Area, or Protected Field. To specify rules for a field in the DEFQ - Forms Designer DEFQ Field Properties window:
1. Click Rule adjacent to the required field. The Specifying Rules and Expressions for Data Validations window is displayed.
2. Select the required Fields, Operators, and Functions from the list.
3. Enter the Rule Expression in the Expression Viewer field.
4. Depending on the data type of the selected field, the following column constraints are displayed. Select the required checkbox.
§ No Spaces
§ Characters Only
§ Alpha Numeric
§ Not Null
§ Non Negative
5. Select the Alignment type from the drop-down list.
6. Click OK and save the details.
While creating a Form, if you choose the Select List field parameter option in the In Edit/Add column in the DEFQ Field Properties window, you need to define the list of values in the Select List window. However, you do not need to define the values for foreign key fields and primary key fields.
In the Select List Window, select the required Field Type from the following options:
· Comma Separated Values: Supports only the user-specified values while creating a Form.
· Dynamic List of Values: Supports field name from a table and stores it in the database. The same can be used during Data Entry.
If Comma Separated Values is selected:
1. Enter the List of Values to be displayed.
2. Specify Alternate Display Values to be displayed.
3. Click OK and save the specified list of values.
If Dynamic List of Values is selected:
4. Select Table Value, List Value, and Display Value field.
5. Select the Field, Operator, and Functions from the list.
6. Define a filter condition for the selected values.
7. Click OK and save the specified list of values.
While creating a Form, you can click Message Details in the DEFQ Field Properties window to define the messaging details. You can specify an alert message which is sent to the Creator of the Form or an Authorizer.
Figure 28: Messaging Details window
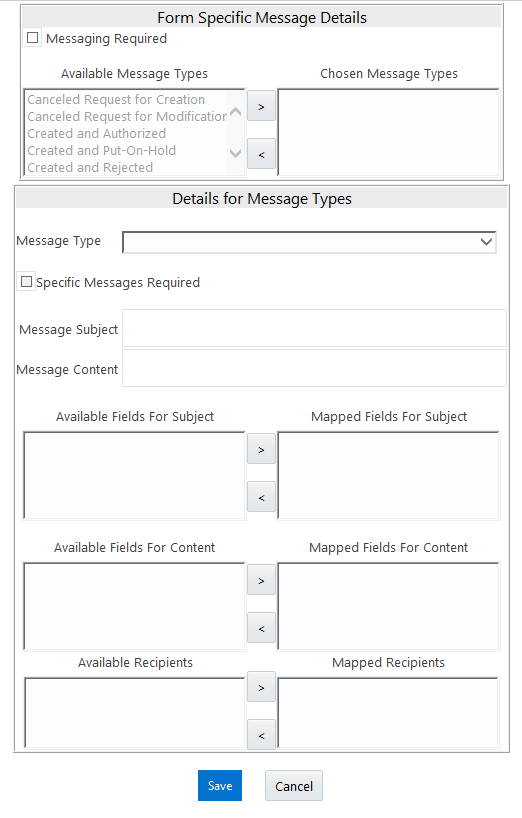
In the Messaging Details for a Form window:
8. Select Messaging Required checkbox to activate the Messenger feature.
NOTE:
If the option is not selected, a single mail is sent for the entire batch. Message details such as recipients, subject, and contents are fetched from the metadata.
9. Select the required Available Message Types from the list and click .
10. Select the Message Type from the drop-down list based on a specific action.
11. Select Specific Messages Required to add a specific message.
12. Select Available Fields for Subject, Content, & Recipients from the list and click .
13. Click Save and save the messaging details. You also need to select Save with Authorization in the DEFQ Field Properties window for the messages to be functional.
You can perform data versioning on an authorized Form. The modifications made to the particular Form are tracked and displayed as per date versioning. In the Data Versioning for Form window, do the following:
1. Select Enable Data Versioning checkbox to ensure that the version is tracked.
2. Select the Table and Version Identifier from the drop-down list.
3. Click OK and save the versioning details.
The Save with Authorization feature in Forms Designer (Sort Fields Selection window) allows you to authorize the uploaded data. Authorization serves as a checkpoint for the validation of uploaded data.
Figure 29: DEFQ – Data Entry Save Authorization window
To authorize the uploaded data, you need to create a Form in DEFQ with the Save with Authorization checkbox selected.
4. Before any DEFQ Form is created to authorize the data, the underlying table in the data model needs to have the below columns added to its table structure. You need to perform a data model upload to have the new structures reflected in the application.
Columns required:
V_MAKER_ID VARCHAR2(20),
V_CHECKER_ID VARCHAR2(20),
D_MAKER_DATE DATE,
D_CHECKER_DATE DATE,
F_AUTHFLAG VARCHAR2(1),
V_MAKER_REMARKS VARCHAR2(1000),
V_CHECKER_REMARKS VARCHAR2(1000)
5. Navigate to Create a New Form in the Forms Designer section and complete the design steps up to Step 6. From the DEFQ Field Properties window explained in step 7, select the appropriate values as listed below for Store Field As depending on the columns selected:
V_MAKER_ID - MakerID
V_CHECKER_ID - CheckerID
D_MAKER_DATE - Maker Date
D_CHECKER_DATE - Checker Date
F_AUTHFLAG - AuthFlag
V_MAKER_REMARKS - Maker Remarks
V_CHECKER_REMARKS - Checker Remarks
6. Click Save with Authorization. Once data is loaded into the table, you can log in as 'Authorizer' and navigate to the Data Entry window. Select the Form to open and authorize the records loaded.