Filters in the Infrastructure system allow you to filter metadata using the defined expressions.
You can access Filters by expanding the United Analytical Metadata section within the tree structure of the LHS menu and selecting Filter.
Based on the role that you are mapped to, you can access read, modify or authorize the Filters window. For all the roles and descriptions, see Appendix A in the OFS Analytical Applications Infrastructure User Guide. The roles mapped to Filters are as follows:
§ Filter Access
§ Filter Advanced
§ Filter Authorize
§ Filter Phantom
§ Filter Read Only
§ Filter Write
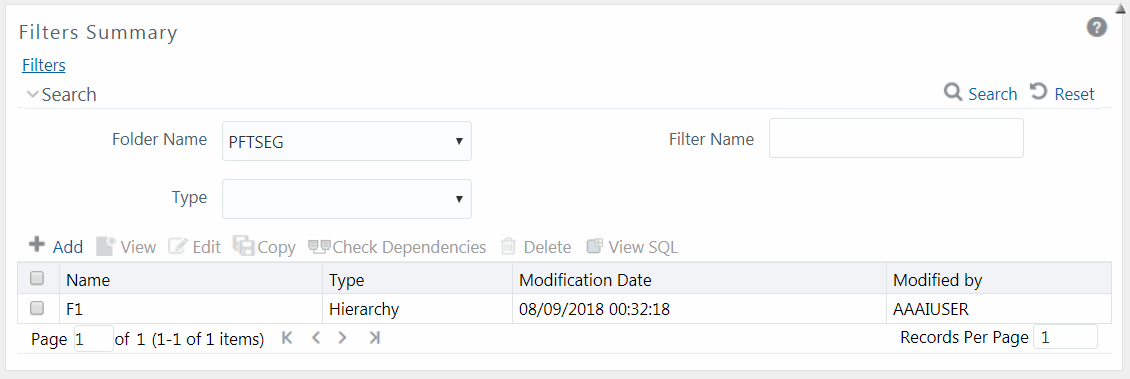
Figure 37: Filter Summary window
The Filters Summary window displays the list of Filters created in all public folders, shared folders to which you are mapped, and private folders for which you are the owner, along with the other details such as the Name, Type, Modification Date, and Modified By. For more information on how object access is restricted, see the Object Security in Dimension Management module section in the OFS Analytical Applications Infrastructure User Guide.
You can also search for a specific Filter definition based on Folder Name, Filter Name, or Type and view the list of existing definitions within the system. If you have selected Hierarchy from the Type drop-down list, the Dimension drop-down list is also displayed.
This option allows you to add a filter. A Filter can be of 4 types namely, Data Element, Hierarchy, Group, and Attribute. To create a filter definition, the Write role should be mapped to your user group.
To create a new filter from the Filters Summary window:
1. Click  Add button in the Filters toolbar. The Filter Definition window is displayed.
Figure 38: Filter Definition New window

2. Enter the Filter Details section details as tabulated:
The following table describes the fields in the Filter Definition window.
Field |
Description |
|---|---|
Filter Details |
|
Folder Name |
Select the Folder Name where the Filter is to be stored from the drop-down list. The Folder selector window behavior is explained in the User Scope section in the OFS Analytical Applications Infrastructure User Guide. Click Note: You can select Segment/Folder Type as Private and the Owner Code as your user code only. |
Access Type |
Select the Access Type as Read Only or Read/Write. Read-Only: Select this option to give other users access to the only view the filter definition. Note: A user with Phantom and Write role can modify or delete the filter even though the access type is selected as Read-only. Read/Write: Select this option to give all users access to view, modify (including Access Type) and delete the filter definition. |
Filter Name |
Enter the filter name in the Filter Name field. Note: The characters &’ ” are restricted. |
Description |
Enter the description of the filter in the Description field. Note: The characters ~&+' " @ are restricted. |
3. From the Filter Type Selection pane, select the Filter Type from the drop-down list.
There are four different Filter Types available in the Filter Type Selection grid as tabulated. Click the links to navigate to the appropriate sections.
The following table describes the fields in the Filter Type pane.
Filter |
Description |
|---|---|
Data Element Filter is a stored rule that expresses a set of constraints. Only columns that match the data type of your Data Element selection are offered in the Data Element drop-down list box. Example: Balances between 10,000 and 20,000 Accounts opened in the current month Loans with amortization terms greater than 20 years. Data Element Filters can access most instrument columns and most columns in the Management Ledger. Data Element Filters are used within other OFSAA rule types (example, Allocation rules, Transfer Pricing rules, Asset | Liability Management rules, and so on) |
|
Hierarchy Filter allows you to utilize rollup nodes within a Hierarchy to help you exclude (filter out) or include data within an OFSAA rule. Example: You might want to process data for a specific set of divisions or lines of business where you have a Hierarchy rule that expresses those divisions or lines of business as rollup nodes. A Hierarchy Filter could be constructed to "enable" the Commercial and Retail lines of business while NOT enabling the Wealth Management line of business. Each of these lines of business might include a handful or even thousands of cost centers. When incorporated into an OFSAA processing rule, this Hierarchy Filter would include every cost center in the Commercial and Retail lines of business. |
|
Group Filters can be used to combine multiple Data Element Filters with a logical "AND". Example: If Data Element Filter #1 filtered on mortgage balances greater than 100,000 and Data Element Filter #2 filtered on current mortgage interest rates greater than 6%, you could construct a Group Filter to utilize both Data Filters. In this case, the resulting Group Filter would constrain your data selection to mortgage balances greater than 100,000 AND current mortgage interest. |
|
Attribute Filters are created using defined Attributes. Attribute filters facilitate you to filter on one or more Dimension Type Attributes. For each attribute, you can select one or more values. Example: Consider a filter that selects all records where the dimension Common Chart of Account member represents an attribute value Expense account, i.e., the attribute "Account Type" = Expense. Now, using Attribute Filters, you can specify complex criteria as given below: Common Chart of Accounts where the Account Type attribute is Earning Assets or Interest-bearing Liabilities, and the Accrual Basis attribute is Actual/Actual Also, You could further refine the filter by adding another condition for: Organizational Unit where the Offset Org ID is a specific Org member The Filter then saves these criteria rather than the member codes which meet the criteria at the time the Filter is saved. During execution, the engine dynamically selects all records from your processing table (example. Mortgages, Ledger, and so on.), which meet the specified member attribute criteria. |
Once the required filter conditions are defined, save the Filter definition.
When you have selected the Filter Type as Data Element, define the Filter conditions by doing the following in the Data Element Selection section:
1. In the Data Element Selection section, click the  button. The Data Element Selection window is displayed.
Figure 39: Data Element Selection window
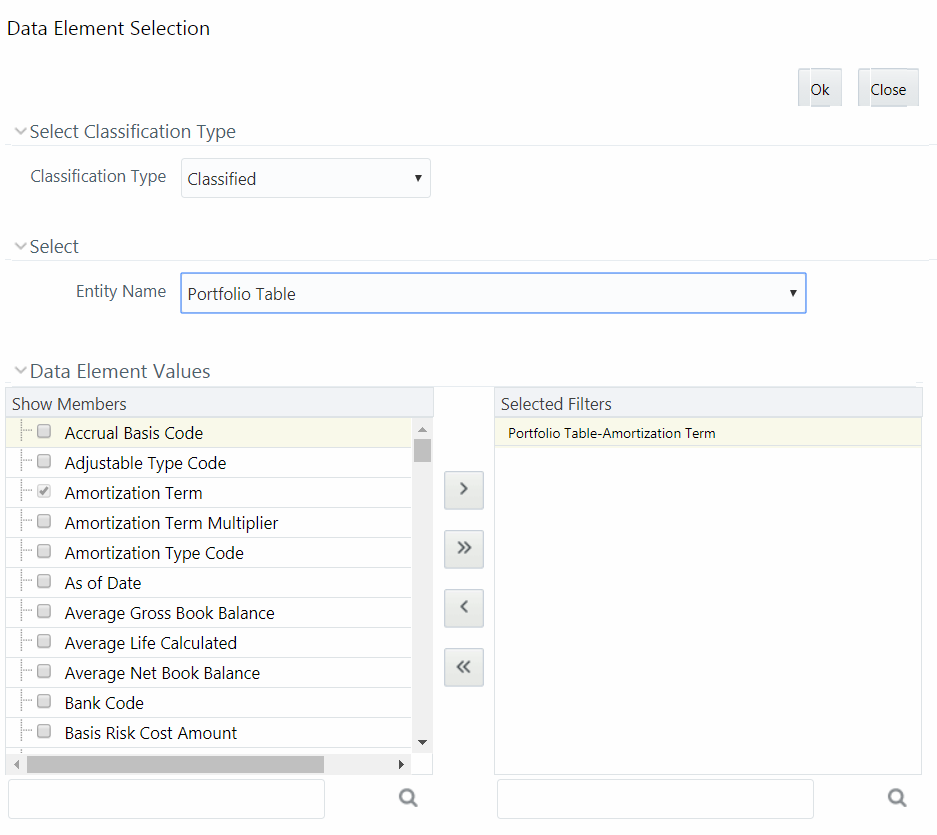
§ Select any of the following Filter Classification Type from the drop-down list:
— Classified - This is the default selection and displays all the classified EPM specific entities. If you are an EPM user, you need to select this option while defining Data Element Filter to list all the related entities.
— Unclassified - This option displays all the non-classified i.e. non EPM specific entities. If you are a non EPM user, you need to select this option while defining Data Element Filter to list all the related entities.
— All - This option will select all the tables available in the selected Information Domain irrespective of whether an entity has its table is classified or not.
§ Select the required database table from the Entity Name drop-down list. The associated members are displayed in the Show Members section.
§ Select the required member and click  . The member is listed in the Selected Members panel. Click
  to move all Members.
You can click  to deselect a Member or click
  to deselect all Members.
§ Click OK. The selected Data Elements are displayed in the Data Element Selection field.
2. Select the Filter Method from the drop-down list.
For each column you wish to include in your Data Filter definition, you must specify one of the following Filter Method:
The following table describes the fields in the Data Filter Definition.
Filter |
Description |
|---|---|
Specific Values |
Specific Values are used to match a selected database column to a specific value or values that you provide. You may either include or exclude Specific Values. You can add additional values by clicking the
To remove a row, select the checkbox and click When comparing Specific Values for a character type column, you must provide Specific Values that are character strings. When comparing Specific Values for a date type column, you must provide Specific Values that are dates (the application displays a Calendar control). When comparing Specific Values for a numeric column, you must provide Specific Values that are numbers. Select Include Values or Exclude Values to include or exclude the selected values. |
Ranges |
Ranges are used to match a selected database column to a range of values or to ranges of values that you provide. You may either include or exclude Range values. Range Type is available for OFSA Datatype Term, Frequency, Leaf, Code, and Identity and Column Datatype Date, Numeric and Varchar. You can add additional values by clicking the
To remove a row, select the checkbox and click If the Column Datatype is VARCHAR, provide Specific Values (alphanumeric) that are character strings. If the Column Datatype is DATE, provide Specific Values that are dates (the application displays a Calendar control). If the Column Datatype is Numeric, provide Specific Values that are numbers. If OFSA Datatype is LEAF, provide either numeric values or click If OFSA Datatype is CODE, provide either numeric values or click If OFSA Datatype is IDENTITY, provide specific numeric values. However, no validation is done during save to validate the input value for a valid identity code. Select Include Values or Exclude Values to include or exclude the selected values |
Another Data Element |
Another Data Element is used to match a selected database column to another database column. When constructing an Another Data Element Filter Method, you may only compare a column to other columns that you have already selected (the Data Element drop-down list box will only contain columns that you have already selected). You may use any of the following operators when choosing the Another Data Element Filter Method: =, <> (meaning "not equal to"), <, >, <=, or >=. |
Expression |
Expression is used to match a selected database column to the results of an OFSAAI Expression rule. You may any of the following operators when choosing the Expression Filter Method: =, <> (meaning "not equal to"), <, >, <=, or >=. |
§ Click Add to list the completed filter conditions in the Filter Conditions grid.
§ Click Update after modifying a filter condition to update in the Filter Conditions grid.
§ Click  or
or  buttons to move a selected Filter Condition up or down.
§ Click the  button to delete selected individual Filter Conditions records.
3. Click Add or Edit in the Filter Definition window if you are creating a new or updating an existing Filter definition.
4. Click Save to validate the entries and save the filter details.
When you have selected the Filter Type as Hierarchy, define the Filter conditions by doing the following in the Hierarchy Selection section:
1. Select the required Dimension from the drop-down list.
2. Select the associated Hierarchy from the drop-down list. You can select More to search for a specific Hierarchy in the Hierarchy more dialog.
3. Select any combination of rollup points and leaf (last descendent child) values.
Figure 40: Show Hierarchy tab
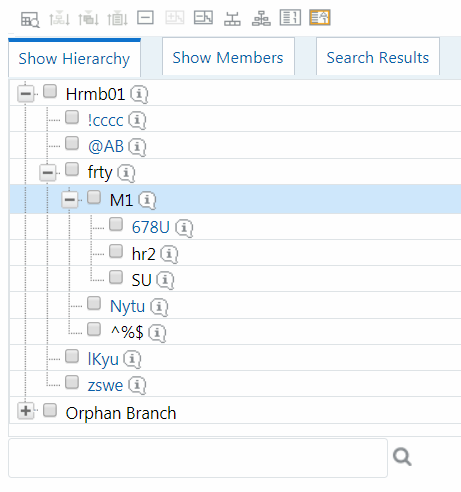
The Show Hierarchy tab displays the leaves in each node in ascending order of Members.
To sort the nodes alphabetically, HIERARCHY_IN_FILTER_SORT-$INFODOM$-$DIMENSION_ID$=$VALUE$ in the AMHMConfig.properties file present in the deployed location should be set as Y. You should add such entry for all the required Dimension IDs for the sort functionality to work for those dimensions.
For example:
HIERARCHY_IN_FILTER_SORT-OFSAAINFO-4345=Y
Restart servers after making any change in AMHMConfig.properties file for the change to take effect.
From this pane, you can:
§ Click  button to search for a hierarchy member using Dimension Member Alphanumeric Code, Dimension Member Numeric Code, Dimension Member Name, or Attribute and by keying in Matching Values in the Search dialog. The search results are also displayed in the ascending order of Member Names.
§ Click  to collapse the members under a node.
§ Click  or
or  to expand a branch or collapse a branch.
§ Click  or
or  to view the name of members right or left.
§ Click  or
or  to view the Numeric code values of members right or left.
§ Click  or
or  to show code or show the name of the members.
§ Click  or
or  to focus or defocus a selected node except the root node.
You can also click the  button to find a member present in the nodes list using keywords. For a large tree (nodes>5000), this search will not return any value if the tree is not expanded.
4. Click Save to validate the entries and save the filter details.
When you have selected the Filter Type as Group, define the Filter conditions by doing the following in the Data Element Filters grid:
1. Select the checkbox(s) adjacent to the required member names in the Available Filters section and click  . The selected members are displayed in the Selected Filters section. Click
  to select all the Members.
You can click  to deselect a Member or click
  to deselect all the Members.
You can also click button to search for a member in the Data Element Filter Search dialog using Folder Name and Filter Name.
2. Click Save to validate the entries and save the filter details.
When you have selected the Filter Type as Attribute, define the Filter conditions by doing the following in the Attribute Selection section:
1. Select the required Dimension from the drop-down list.
2. Select the associated Attribute from the drop-down list. The list consists of only Dimension Type attributes for selection.
3. Click the  button in the Attribute Values grid. The Attribute Values window is displayed.
In the Attribute Values window, the Dimension field under the Dimension grid is auto-populated with the Dimension name with which the selected Attribute is defined and is non-editable. In the Search grid, you can search for Attribute Values depending on Alphanumeric Code, Numeric Code, or Name.
4. Select the checkbox(s) adjacent to the Alphanumeric Codes of the required Attribute Values in the Attribute Values grid and click OK. The Attribute Values grid displays the selected attribute values.
Select Attribute Value(s) in the Attribute Values grid and click the button to delete it.
You can use the Attribute Values present in the Attribute Values grid to generate conditions.
5. Click Add button in the Attribute Values grid. The Filter Conditions grid is populated with the filter condition using all the Attribute values.
You cannot define two conditions using the same attributes. Because conditions are joined with a logical ‘AND’ and this will make the query invalid.
In the Filter Conditions grid, you can select a condition to view the Attribute Values used to generate it and can update the condition.
You can also click  button to view the SQL statement in the View SQL window. Click the button to view a long filter condition in the View Condition dialog.
6. Click Save. The Attribute Filter definition is saved.
You can view individual Filter details at any given point.
To view the existing Filter Definition details in the Filters Summary window:
1. Select the checkbox adjacent to the Filter Name.
2. Click  View button in the Filter tool bar.
The View – Filter Details window is displayed with the filter details.
This option allows you to modify the details of Filters.
1. Select the checkbox adjacent to the Filter Name whose details are to be updated.
2. Click  Edit button and the Edit – Filter Details window is displayed. Modify the required changes. For more information, see Add Filter Definition.
3. Click Save to save the changes.
The Copy Filter Definition facilitates you to quickly create a new Filter Definition based on the existing parameters or by updating the values.
To copy an existing Filter Definition in the Filters window:
1. Select the checkbox adjacent to the Filter Name which you want to create a copy.
2. Click  Copy button in the Filters tool bar. Copy button is disabled if you have selected multiple checkboxes. The Copy – Filter Details window is displayed.
3. In the Copy – Filter Details window you can:
§ Create a new filter definition with existing variables. Specify a new Filter Name and click Save.
§ Create a new filter definition by updating the required variables. Specify a new Filter Name and update the required details. For more information, see Add Filter Definition. Click Save.
The new filter definition details are displayed in the Filters Summary window.
You can view the dependencies of a defined Filter. You can use a filter in a Run definition. However, the Run definitions are not shown as dependent objects when you check dependency for a filter. This is a limitation.
To check the dependencies of a filter from the Filters Summary window:
1. Select the checkbox adjacent to the Filter Name.
2. Click the  button in the Filters tool bar. The Check Dependencies button is disabled if you have selected multiple members.
The Dependent Objects window is displayed with Object ID, Name, and ID Type of the dependent Objects.
You can view the corresponding SQL of a defined filter.
To view the SQL of a filter from the Filters Summary window:
1. Select the checkbox adjacent to the filter to view the SQL.
2. Click  View SQL button. The SQL equivalent of the selected filter is displayed in the View SQL window.
You can remove the Filter Definitions which are not required in the system by deleting them from the Filters Summary window.
NOTE:
A filter definition with dependency cannot be deleted. However, if the dependent object is a Run Definition, you can delete the filter definition. This is a limitation.
3. Select the checkbox adjacent to the Filter Name whose details are to be removed.
4. Click  Delete in the Filters tool bar.
5. Click OK in the information dialog to confirm the deletion.
 to create a new private folder. The
  adjacent to
  .
.

 to select the numeric member ids.