After analyzing the reports using the Reports Details page, an authorized user can take the following actions on reports:
· Requesting the Report for Approval: As an Analyst, you can request the supervisor to approve the report for filing when it is in the Open, Reopened, Requested for Approval, or Rework status. Click Request Report for Approval to take this action. The status of the report changes to Requested for Approval.
· Approving Reports: As a Supervisor, you can assess the reports that are requested for your approval. You can approve reports that are in Open, Reopened, Requested for Approval, or Rework status. Click Approve Report to take this action. If you approve the request, the status of the report changes to Approved.
· Reworking on Reports: As a Supervisor, you can send reports for rework if they are incomplete or need more investigation. You can order reports for rework when they are in the Open, Reopened, Requested for Approval, or Rework status. Click Rework Report to take this action. The status of the report changes to Rework.
· Canceling Report Filing: As an Analyst or a Supervisor, you can decide to cancel the filing of the report. You can cancel the reports from filing when they are in the Open, Reopened, Requested for Approval, or Approved status. Click Cancel Filing to take this action. The status of the report changes to Canceled.
· Reopening Reports: If a report is canceled for any reason and needs to be evaluated again, an Analyst or a Supervisor can reopen a report. Note that you can reopen a report only when it is in the Canceled status. Click Reopen a Report to take this action. The status of the report changes to Reopen.
· Generating E-File: After the reports are approved then an Analyst or a Supervisor can generate reports by clicking Generate Report. The status of the report changes to E-File Generated.
· Submitting the Reports: After the reports are validated, they must be submitted. As an Analyst or a Supervisor, you can submit a report by clicking the Submit button.
· Additional Actions: All users can: Adding Comments, Set a Due Date, Add Narrative, Audit, and Add Documents in any status. The status of the report does not change if you take these actions.
An Analyst requests the supervisor to approve the report for filing when it is in the Open, Reopened, Requested for Approval, or Rework status. A Supervisor evaluates and then approves the report, sends the report for rework, or cancels the filing of the report.
To request a report for approval, an analyst must follow these steps:
1. On the Reports Details page, click Request for Approval. The Request for Approval window is displayed.
2. Enter the comments in the Request for Approval window.
NOTE |
In the comments box in the Request for Approval window, you can enter a maximum of 255 characters. |
3. Click Save. A confirmation message is displayed. The Report Details page is displayed and the status of the report changes to Requested for Approval. The Audit section tracks both actions and comments entered while performing the Request for Approval action.
A Supervisor can approve a report when it is in the Open, Reopened, Requested for Approval, or Rework status.
To approve a report, follow these steps:
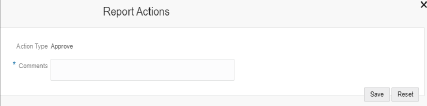
1. On the Reports Details page, click Approve. The Approve window is displayed.
2. Enter the comments in the Approve window.
NOTE |
In the comments box in the Request for Approval window, you can enter a maximum of 255 characters. |
3. Click Save. A confirmation message is displayed.
NOTE |
The naming convention for the final STR is in the format STR_Case ID_Approved Date (DD-MM-YYYY_HH24-MM-SS).doc. If the report is created from the OFS AML XE, you can rename the final STR while saving. When the report is created manually, the naming convention for final STR is in the format STR_Manual_Approved Date (DD-MM-YYYY_HH24-MM-SS).doc. |
4. Click OK. The Report Details page is displayed and the status of the report changes to Approved.
After the report is approved, the application generates the final report containing the required information that must be submitted to the regulatory authority. The Audit section tracks both actions and the comments entered while performing the Approve action.
A Supervisor can send a report for rework, if it is incomplete, inaccurate, or needs additional investigation. If a report is sent for rework, an Analyst must rework on the report and submit it again for the approval. This process continues until the report is approved or canceled.
To send a report for rework, follow these steps:
1. On the Reports Details page, click Rework. The Rework window is displayed.
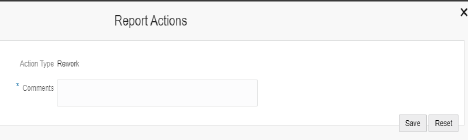
2. Enter the comments in the Rework window.
NOTE |
In the comments box in the Request for Approval window, you can enter a maximum of 255 characters. |
3. Click Save. A confirmation message is displayed.
4. Click OK. The Report Details page is displayed and the status of the report changes to Rework.
The Audit section tracks both actions and comments entered while performing the Rework action.
For any valid reasons, if you determine that a report should not be filed, then you can cancel it. After the report is canceled, you cannot edit the report details.
Only authorized users can cancel a report from filing. For more information on user privileges, see Table 4 .
To cancel filling the report, follow these steps:
1. On the Reports Details page, click Cancel Filing. The Cancel Filing window is displayed.
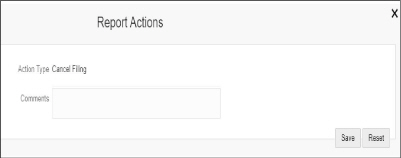
2. Enter comments in the Comments box.
NOTE |
In the comments box in the Request for Approval window, you can enter a maximum of 255 characters. |
3. Click Save. A confirmation message is displayed.
4. Click OK. The Report Details page is displayed and the status of the report changes to Canceled.
NOTE |
The due date of the report is deleted on taking the Cancel Filing action. |
The Audit section tracks both actions and comments entered while performing the Cancel action.
If a report is canceled for any reason or it needs to be evaluated again, an Analyst or a Supervisor can reopen a report in the Canceled status.
To reopen a report from Report Details page, follow these steps:
1. On the Reports Details page, click Reopen. The Reopen Reports window is displayed.
2. Enter comments in the Reopen window.
NOTE |
In the comments box in the Request for Approval window, you can enter a maximum of 255 characters. |
3. Click Save. A confirmation message is displayed.
4. Click OK. The Report Details page is displayed and the status of the report changes to Reopened.
The Audit section tracks both actions and comments entered while performing the Reopen action.
After the report is approved, authorized users can generate the E-File.
To generate a E-File, follow these steps:
1. On the Reports Details page, click Generate E-File. The Generate Reports window is displayed.
2. Enter comments in the Generate Reports window.
NOTE |
In the comments box in the Request for Approval window, you can enter a maximum of 255 characters. |
3. Click Save. A confirmation message is displayed.
4. Click OK. The Report Details page is displayed and the status of the report changes to E-File Generated.
The Audit section tracks both actions and comments entered while performing the Generate Reports action.
Authorized users can submit a report after the report is validated.
To submit a report, follow these steps:
1. On the Reports Details page, click Submit. The Submit window is displayed.
2. Enter Comments, if required.
3. Click Save, the report is submitted.
The following activities are allowed after submitting a report:
§ The final report can be viewed, saved as a local copy, or printed.
§ The report can be edited by any user.
§ System Initiated feedback to OFS AML XE can be sent on processing Generate Revised Reports actions.
§ In the revised reports, the feedback is sent to the original case from which the revised report is created. For manually created reports, no feedback is sent.
Adding Comments , Set a Due Date, Add Narrative, and Add Documents are additional actions, which you can take on a report in any status. By taking these actions, the status of the report does not change. For more information on user roles, see Table 4.
Analyst, Auditor, or Supervisor can add comments to a report in any status.
To add comments to a report, follow these steps:
1. On the Reports Details page, click Audit. The Audit window is displayed.
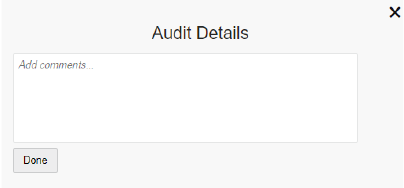
2. Enter the comments in the Comments box.
NOTE |
In the comments box in the Request for Approval window, you can enter a maximum of 255 characters. |
3. Click Done. The Audit section tracks both actions and comments entered while performing the Set Due Date action
Analyst and Supervisor can set a due date or modify an existing due date of a report.
The Set Due Date action is available in the application only when an Administrator set the Edit Due Date Flag attribute to Y in the Application Parameters table.
Attribute Name |
Value |
Behavior |
|---|---|---|
Due Date with edit |
|
Users mapped to this role can set/edit/view the due date. |
Due date with view |
|
Users mapped to this role can only view the due date. |
Number of Days |
N |
When a report is created either manually or through action from the case, the application automatically sets the due date to action date + N calendar days. If the parameter is blank, no date is set. The default is five days. |
Table 27 explains the statuses in which the Analyst and Supervisor users can perform the Set Due Date action:
NOTE |
An auditor can only view the Due Date. |
To set a due date for a report, follow these steps:
1. On the Reports Details page, click Set Due Date. The Set Due Date window is displayed.
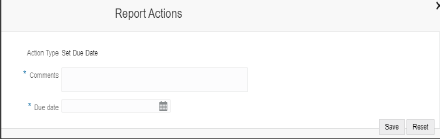
2. Enter the comments in the Comments box.
NOTE |
In the comments box in the Request for Approval window, you can enter a maximum of 255 characters. |
3. Select a date from the calendar.
4. Click Save. A confirmation message is displayed.
5. Click OK. The updated Report Details page is displayed.
The Audit section tracks both actions and comments entered while performing the Set Due Date action.
Use the Narrative option to summarize any suspicious activity and to mention the action taken by the reporting entity.
To use the Narrative option, follow these steps:
1. On
the Reports Details page, click
![]() .
The Narrative window is displayed.
.
The Narrative window is displayed.
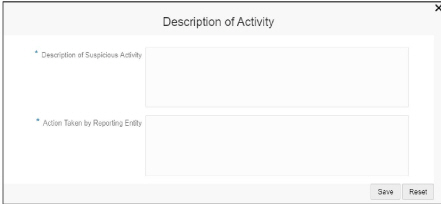
2. Enter the following information in the respective text fields. Fields marked with * are mandatory.
§ Description of Suspicious Activity: Enter the summary of the suspicious activity.
§ Action Taken by Reporting Entity: Enter the action taken by the reporting entity.
3. Click Save. A confirmation message is displayed.
4. Click OK. The updated Report Details page is displayed.
The Audit section tracks both actions and comments entered while performing the Narrative action.
Use the Audit section to view the audit history of a report. It provides complete details of the actions performed on the report and comments provided by the users in the various statuses.
To use the Audit option, follow these steps:
1. On
the Reports Details page,
click ![]() . The Audit window is
displayed.
. The Audit window is
displayed.
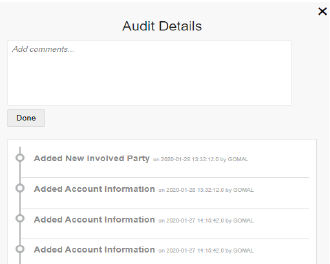
The Audit captures the following actions:
§ Created From Case
§ Created Manually
§ Modified Reporting Entity
§ Modified Account Involved Details
§ Modified Person or Account Owner details
§ Modified Transaction Details
§ Modified Suspicious Activity Description
§ Modified Narrative and Action
§ Added New Document
§ Modified Document
§ Removed Document
§ Edit/ Delete Report
1 Originating Report
2 New Report
§ E-File Generation Unsuccessful
§ Acknowledgment Details
- If the report is accepted then Upload Acknowledgment (Comments displayed - Report is Accepted)
- If the report is rejected then Upload Acknowledgment (Comments displayed- Report is Rejected along with error message)
The Actions section displays all the actions taken on the report. This section displays the fields described in Table 28 .
While filing the report with regulatory authorities, you can also send additional documents. This additional information aids in taking a correct decision on the report. When you attach a document to a report, the status of that report does not change. However, the attachment is added to the report’s history.
An Analyst or a Supervisor can attach or delete documents in all statuses except when the report is in View Only mode. For more information on user roles, see Table 4 .
To attach a document, follow these steps:
1. On
the Reports Details page,
click ![]() .
The Upload Document window is
displayed.
.
The Upload Document window is
displayed.
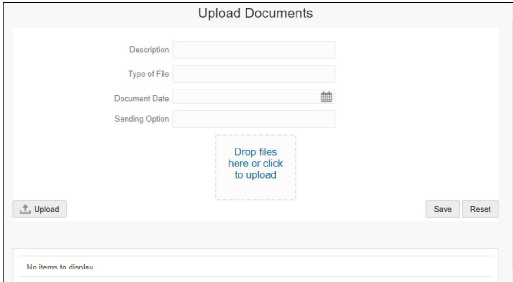
2. Enter the information as described in Table 29.
3. Click Drop Files Here or Click Upload to select the document from your computer. The selected file is displayed in the document list. The document list provides the information of the document such as file name, size of the document, and type of document.
You can also delete the document from the
list by clicking  .
.
4. Select the document from the list and click Upload. The document is attached to the selected report.