4 Mass Return Transfers
Mass return transfers (or MRTs) allow you to transfer a set of items from multiple locations back to a single location. A return to vendor (RTV) can also be included as part of the MRT. This may be used for end of season when pulling inventory back from stores to a warehouse, or for product recalls.
Create a Mass Return
The Mass Return Transfer (MRT) page allows you to create a transfer of multiple items and locations back to a single location by specifying the following information:
-
Mass return transfer details
-
RTV
-
Items
-
Locations
From the Tasks menu, select Inventory > Transfers > Create Mass Return Transfer. The Mass Return Transfer page appears.
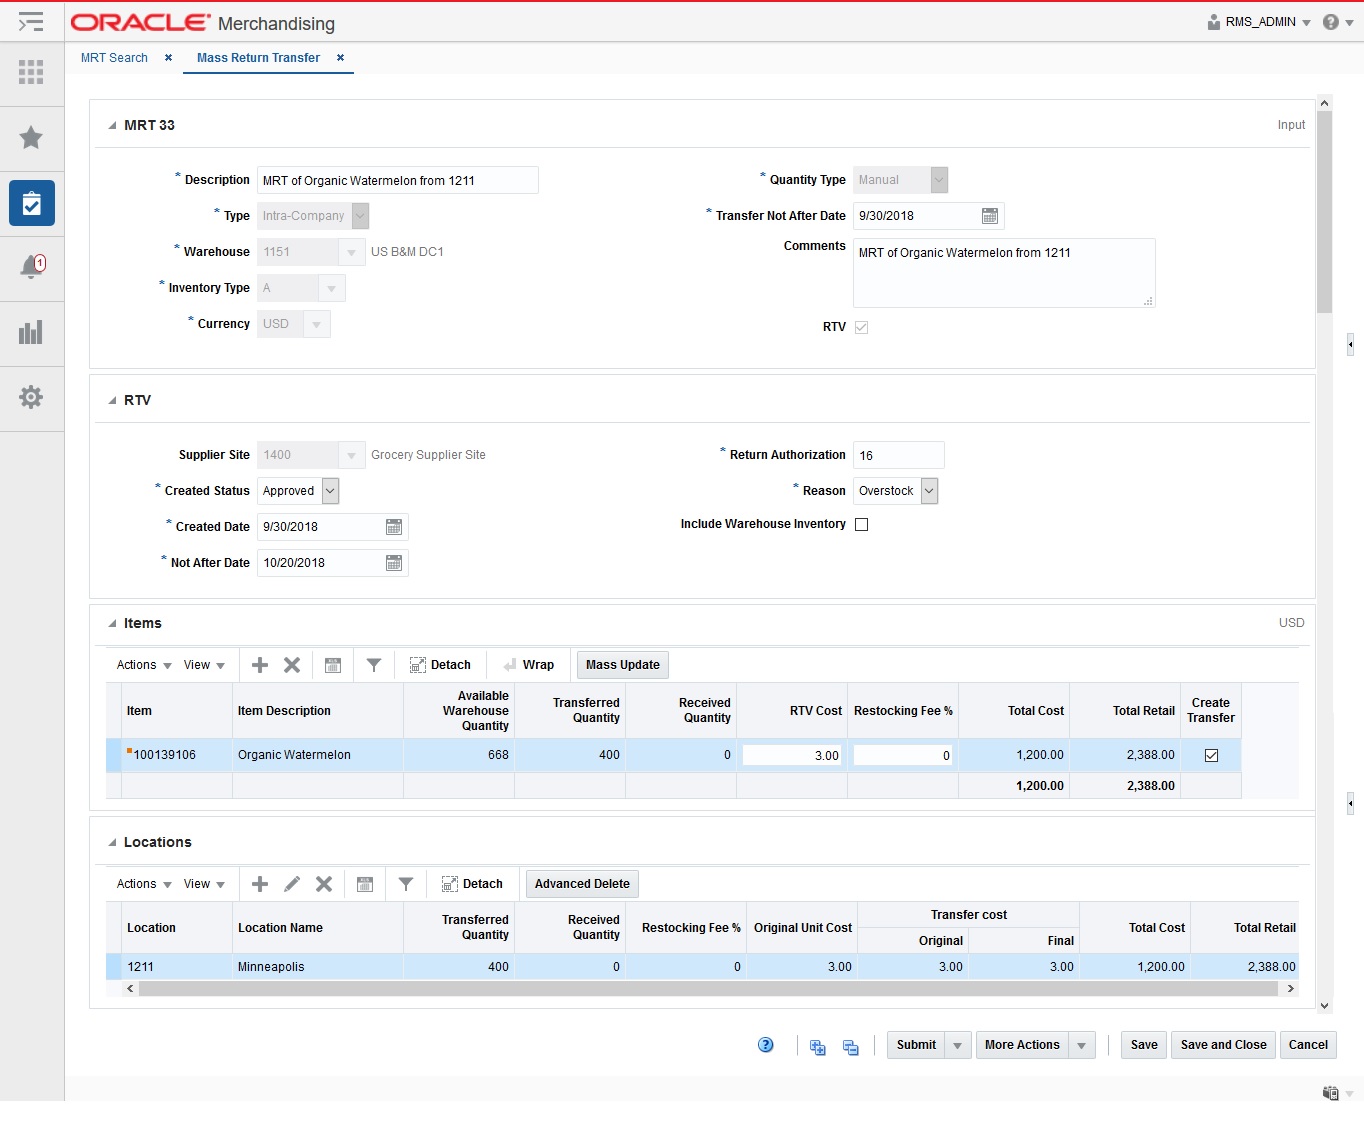
Table 4-1 Mass Return Transfer Header - Fields and Description
| Fields | Description |
|---|---|
|
Title |
The title displays the Mass Return Transfer ID. The MRT Status is displayed at the top right of the header. This field contains the MRT number by default. |
|
Description |
Enter a description of the mass return transfer. This field is a required field. |
|
Type |
Select the type of the MRT you are creating. The options are:
This field is a required field. |
|
Warehouse |
Enter, select or search for the warehouse. This field is a required field. |
|
Currency |
Enter, select or for search the currency. This field is a required field. |
|
Quantity Type |
Select how you will determine the number of items to transfer. The options are:
This field is a required field. |
|
Transfer Not After Date |
Enter the last date the transfer can occur, or click the Calendar icon to select a date. This field is a required field. |
|
Comments |
Enter any additional comments as necessary. |
|
RTV |
Select the RTV. The RTV section appears. For more information on the RTV, see the Create with an RTV section. |
Create with an RTV
Once you select the RTV checkbox, the RTV section appears in the Mass Return Transfer page.
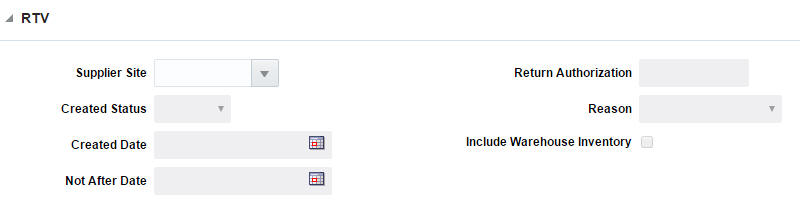
The RTV section includes the following fields.
Table 4-2 RTV - Fields and Description
| Fields | Description |
|---|---|
|
Supplier Site |
Enter, select or search for the supplier site. |
|
Created Status |
Select the status the RTV will be created in. The options are: Input, Output, and Manual. |
|
Created Date |
Enter the date the RTV is created, or use the Calendar icon to select a date. |
|
Not After Date |
Enter the last date the transfer can occur, or use the Calendar icon and select a date. |
|
Return Authorization |
Enter the return authorization number of the supplier. |
|
Reason |
Select the reason you are creating the RTV. |
|
Include Warehouse Inventory |
Select this option to indicate warehouse inventory is included in the creation of the RTVs. |
Add Items
The Items section displays item information such as the item number, item description, quantity and cost information.
To add items to a mass return transfer, follow the steps below.
-
In the Mass Return Transfer page, go to the Items section.
-
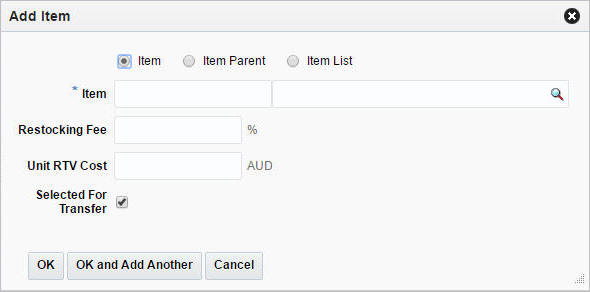
From the Actions menu, select Add or click the Add icon
 . The Add Item pop-up appears.
 -
Select any one of the following options: Item, Item Parent, or Item List.
-
In the Item field, enter the item or search and select from the list. This is a required field.
-
If you have selected Item Parent or Item List then you will have to enter, search or select Item Parent and Item List respectively to add items to MRT.
-
In the Restocking Fee % field, enter the percentage that is applied for restocking fees.
-
In the Unit RTV Cost field, enter the Unit RTV cost for the item
-
The Selected For Transfer checkbox is selected by default. This indicates whether the transfer for the item should be created when the MRT is approved or not.
-
Then choose one of the following option.
-
Click OK to add the item and close the page.
-
Click OK and Add Another to add additional items.
-
Click Cancel to reject all entries and close the page.
-
Add Locations
The Locations section allows you to indicate at which locations the transfer is effective.
To add the locations to the mass return transfer, follow the steps below.
-
In the Mass Return Transfer page, go to Locations section.
-
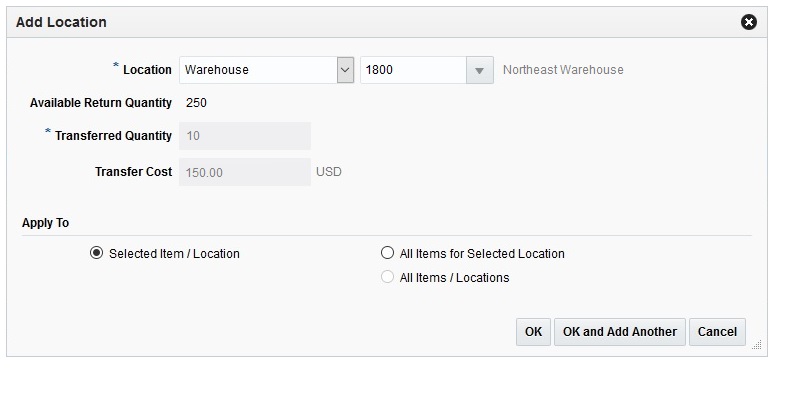
After entering the header details, select Actions > Add, or click the Add icon
. The Add Locations page appears. -
Select the location type from the list. Then enter, select or search for the location.
-
The available return quantity is displayed.
-
In the Transfer Quantity field, enter the quantity you want to transfer.
-
In the Transfer Cost field defaults to the transfer cost associated to the location.
-
The Transfer Price field defaults to the transfer price associated to the location.
-
In the Apply to section, select if you want to apply the changes to the selected item/location, all items for selected locations or all item/locations.
-
Then choose one of the following option.
-
Click OK to add the location and close the page.
-
Click OK and Add Another to add additional locations.
-
Click Cancel to reject all entries and close the page.
-
Mass Return Transfer - More Actions Menu
Use the More Actions menu to navigate to the following pages. The More Actions menu contains the following options.
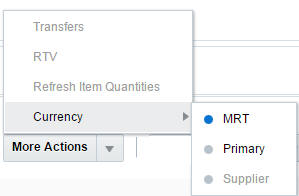
Table 4-3 Mass Return Transfer - More Actions Menu and Description
| Icon/Buttons | Description |
|---|---|
|
More Actions |
You can navigate to open the following pages by clicking More Actions menu:
|
Manage Mass Return Transfers
Managing mass return transfers involves performing one or more of the following tasks:
-
Searching for a mass return transfer
-
Editing a mass return transfer
-
Viewing a mass return transfer
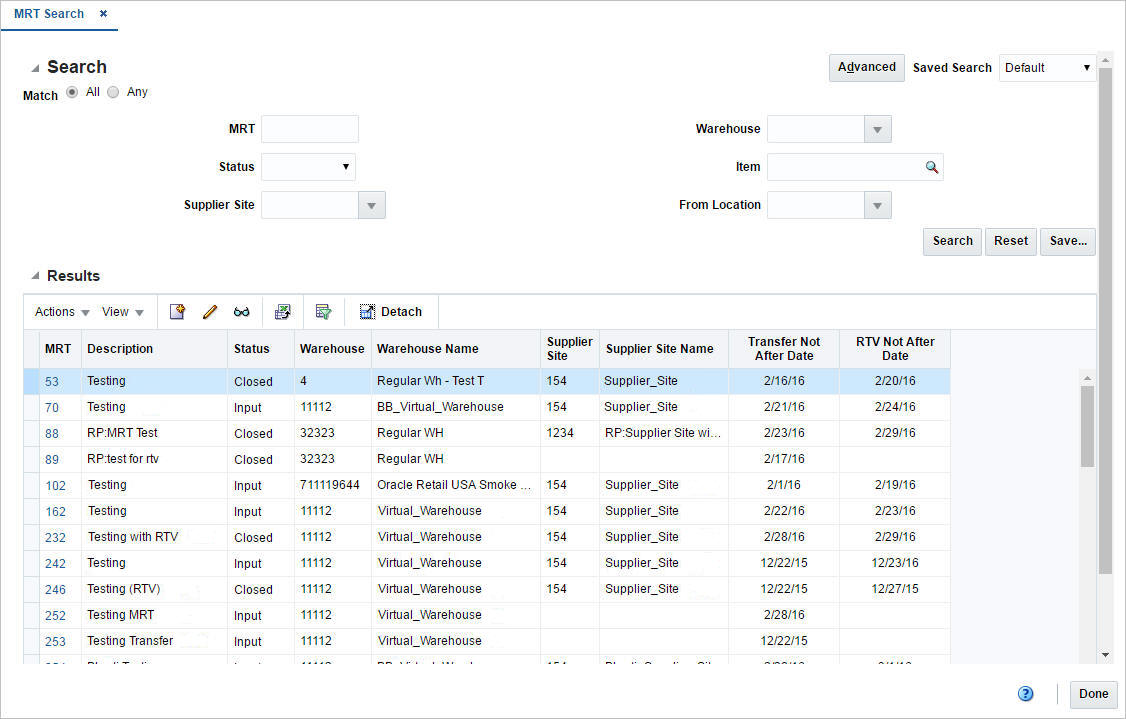
Search for Mass Return Transfer
You can access the MRT Search page from the Task menu, select Inventory > Transfers > Manage Mass Return Transfer. The MRT Search page appears.
In the MRT Search page you can search for mass return transfers by specifying various search criteria. You can choose to access mass return transfers in the search results in edit or view mode depending on security privileges. There are also options for creating a new mass return transfer.
To search for an MRT:
-
From the Tasks menu, select Inventory > Transfers > Manage Mass Return Transfer. The MRT Search page appears.
-
You can search for a mass return transfer by providing search criteria in the search section. The criteria can be provided either in Basic or Advanced mode, depending on the requirement. Basic is the default mode when the search page is entered. Click Advanced to access search panel in advanced mode. You can return to Basic mode by clicking Basic.
Search for an MRT Through the Basic Search Criteria
To search for an MRT through the basic search criteria:
-
Enter or select one or all of the following basic search criteria.
Table 4-4 MRT Search - Basic Search Criteria and Description
Fields Description Match option
Check radio button All or Any.
All - only MRTs matching all entered search criteria are shown.
Any - MRTs matching any of the entered search criteria are shown.
MRT
Enter the MRT description.
Status
Select the status of the mass return transfer. The options are: Input, Submitted, Approved, RTV Created, Closed.
Supplier Site
Enter the supplier site, select or search the supplier site and number from the list.
Warehouse
Enter the warehouse ID, select or search the warehouse.
Item
Enter the item number of the item or search the item.
From Location
Enter the location or select and search the location and the ID.
Note:
For more information about searches, see Search Screens in the Oracle® Retail Merchandising Do the Basics User Guide. -
Click Search. The MRTs that match the search criteria are displayed in the Results section.
-
Click Reset to execute the saved search.
-
Click Done to close the page.
Search for an MRT Through the Advanced Search Criteria
To search for an MRT through the advanced search criteria:
-
Enter or select one or all of the following advanced search criteria. Click Add Fields to add more fields for the advanced search. To remove the field from the search, click the x right next to the field.
Table 4-5 MRT Search - Advanced Search Criteria and Description
Fields Description Match option
Check radio button All or Any.
All - only MRTs matching all entered search criteria are shown.
Any - MRTs matching any of the entered search criteria are shown.
MRT
Enter the MRT description.
Status
Select the status of the mass return transfer. The options are: Input, Submitted, Approved, RTV Created, Closed.
Supplier Site
Enter the supplier site, select or search the supplier site and number from the list.
Warehouse
Enter the warehouse ID, select or search the warehouse.
Item
Enter the item number of the item or search the item.
From Location
Enter the location or select and search the location and the ID.
Subclass
Enter a subclass or select and search for a subclass containing items on MRTs.
Class
Enter a class or select and search for a class containing items on MRTs.
Department
Enter a department or select and search for a department containing items on MRTs.
Group
Enter a group or select and search for a division containing items on MRTs.
Division
Enter a division or select and search for a division containing items on MRTs.
From Location Type
Select a location type to filter MRTs returned in the results to those containing that location type. Valid options are store or warehouse.
Item Description
Enter a partial description of an item to return MRTs containing items whose descriptions match the entered partial description.
RTV
Enter the ID of the RTV linked with an MRT.
RTV Created
Enter the user ID, or select from the list, the person who created the RTV associated with an MRT.
RTV Created Date
Enter the date, or select from the calendar, that the RTV associated with an MRT was created.
Return Authorization Number
Enter the return authorization code for the RTV associated with an MRT.
Supplier Site Name
Enter a partial supplier site name to return MRTs linked to supplier sites that match the description.
Transfer Note After Date
Enter the date, or select from the calendar, that was entered as the latest date for the "from" locations to ship their transfer associated with an MRT.
Note:
For more information about searches, see Search Screens in the Oracle® Retail Merchandising Do the Basics User Guide. -
To narrow down the search, use the list next to the search fields. For example, determine if the entered value should equal or not equal the search result.
-
Click Search. The MRTs that match the search criteria are displayed in the Results section.
-
Click Reset to clear the search section and results.
-
Click Done to close the page.
Edit an MRT
To edit an MRT, follow the steps below.
-
From the Tasks menu, select Inventory > Transfers > Manage Transfers > Manage Mass Return Transfer. The MRT Search page appears.
-
Select the mass return transfer you want to edit.
-
From the Actions menu, select Edit or click the Edit icon.
 . The Mass Return Transfer page appears.
 -
Make the necessary changes.
For more information about the Mass Return Transfer page, see the Mass Return Transfers chapter.
-
Save your changes.
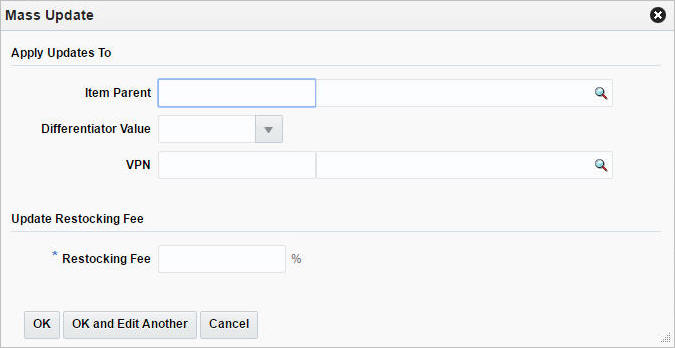
Mass Update
To update the Restocking fee based on either an Item Parent, a Differentiator, or VPN use the Mass Update function in the Mass Return Transfer page.
-
In the Items section, select Actions > Mass Update, or use the Mass Update button. The Mass Update pop-up appears.
-
In the Apply Updates to section, you can choose any one of the following fields: Item Parent, Differentiator Value, or VPN. You can narrow down the items for which restocking fee % will be updated. If none of the values are chosen, the update will be applicable to all the items.In the Update Restocking Fee section, enter the intended value of Restocking Fee % . This field is a required field.
-
Then choose one of the following options.
-
Click OK to commit the mass update and close the pop-up.
-
Click OK and Edit Another to commit the changes and edit an additional mass update.
-
Click Cancel to reject all entries and close the pop-up.
-
Advanced Delete
To select delete location options, follow the steps below.
-
In the Mass Return Transfer page, go to Locations section.
-
From the Actions menu, click the Advanced Delete button.The Delete Location pop-up appears.
-
You can delete any one of the following options:
-
Selected Location for Selected Item
-
Selected Location for All Items
-
All Locations for Selected Item
-
All Item/Locations
-
-
Then choose one of the following options.
-
Click OK to delete the locations.
-
Click Cancel to reject all entries an close the pop-up.
-

Edit Locations on the Mass Return Transfer
To edit locations, follow the steps below.
-
Select the locations you want to edit.
-
From the Actions menu, click Edit or click the Edit icon
. The Edit Location page appears. -
Edit the enabled fields as necessary.
-
Click OK to return to Mass Return Transfer page.