3 Suppliers
A supplier is a person or entity that provides merchandise to a retailer resulting in an invoice. You can maintain a variety of information about suppliers such as financial arrangements, inventory management parameters, types of EDI transactions, and invoice matching attributes. Suppliers are typically created in a financial system and interfaced into Merchandising. Supplier enrichment can be maintained in Merchandising.
Supplier sites are physical locations of a supplier that also define the business relationship between supplier and the retailer. The supplier site captures business terms and conditions as negotiated by the retailer with the supplier. Supplier sites can be locations from which orders are placed, remittances made, or both; however it is assumed to represent a single location for the supplier, so all address types for a particular site must have the same address information. Most transactions between the supplier and the retailer occur at the supplier site level, with the exception of deals which occur at the supplier level.
The supplier structure can be extended to supplier-parent and supplier-site relationships, to accommodate financial systems that support this configuration. A supplier site is a location from which the supplier ships merchandise.
The supplier management feature allows you to add, edit, and view the following information about suppliers:
-
Multiple contact persons and addresses: You can enter multiple addresses of different types, such as business, invoice, order, postal, remittance, and returned goods.
-
Financial arrangements: You can indicate the payment terms, freight terms, currency, settlement code, and payment method.
-
Inventory management parameters: You can set up a replenishment cycle, order attributes, scaling attributes and constraints, order minimum constraints, and due order processing. You can also indicate whether quality control checking is required and what percentage of the received goods must be checked.
-
Return to vendor (RTV) requirements: You can indicate whether returns are allowed, whether an authorization number is required, the minimum value of a return, the preferred courier, and the handling charge.
-
Required documents: You can select which documents, if any, are required by the supplier.
-
Expense profiles: You can enter the supplier's costs by country or by cost zone.
-
Types of electronic data interchange (EDI) transactions: You can indicate which EDI transactions the supplier can process.
-
Generic attributes: You can indicate which attributes apply to the supplier, such as co-op agreement terms, volume rebate terms, whether a PO is required, or whether items are pre-ticketed.
-
Import attributes: You can enter import-related information such as agent, advising and issuing banks, lading and discharge ports, manufacturer ID, and beneficiary.
-
Invoice matching attributes: You can indicate when debit memos are sent, whether invoices and debit memos are approved automatically, whether the supplier is allowed to charge freight, and whether invoices are pre-paid. (Oracle Retail Invoice Matching must be installed.)
-
Supplier traits: You can select the traits by which you want to group the supplier with other suppliers.
-
Payment types by store: You can select the methods by which the supplier can be paid, such as cash, money order, and by invoice. You can also indicate the payment type by store.
-
Delivery schedules at stores and warehouses: After you create a delivery schedule, you can specify which items are not to be delivered to the location on a specific delivery day.
-
Vendor managed inventory (VMI): Use VMI to allow a supplier to manage the inventory levels of designated product at the warehouse. Inventory data is shared with the supplier, who uses the information to create inbound purchase orders, which will achieve and/or maintain budgeted inventory and service levels in the warehouse.
Create a Supplier
The Supplier/Supplier Site page allows you to create, edit, and view suppliers and supplier sites. Suppliers are vendors that provide your stores and warehouses with merchandise.
Depending on how you enter the page, the label varies.
-
If you enter the page for a parent supplier, the page is labeled Supplier. For more information about how to create a supplier, see the Creating a Supplier section.
-
If you enter the page for another supplier site of a supplier, the page is labeled Supplier Site. For more information about how to create a supplier site, see the Creating a Supplier/Supplier Site section.
You can indicate whether the supplier/supplier site is active or inactive. You can also enter the primary contact, financial, shipping, and payment information.
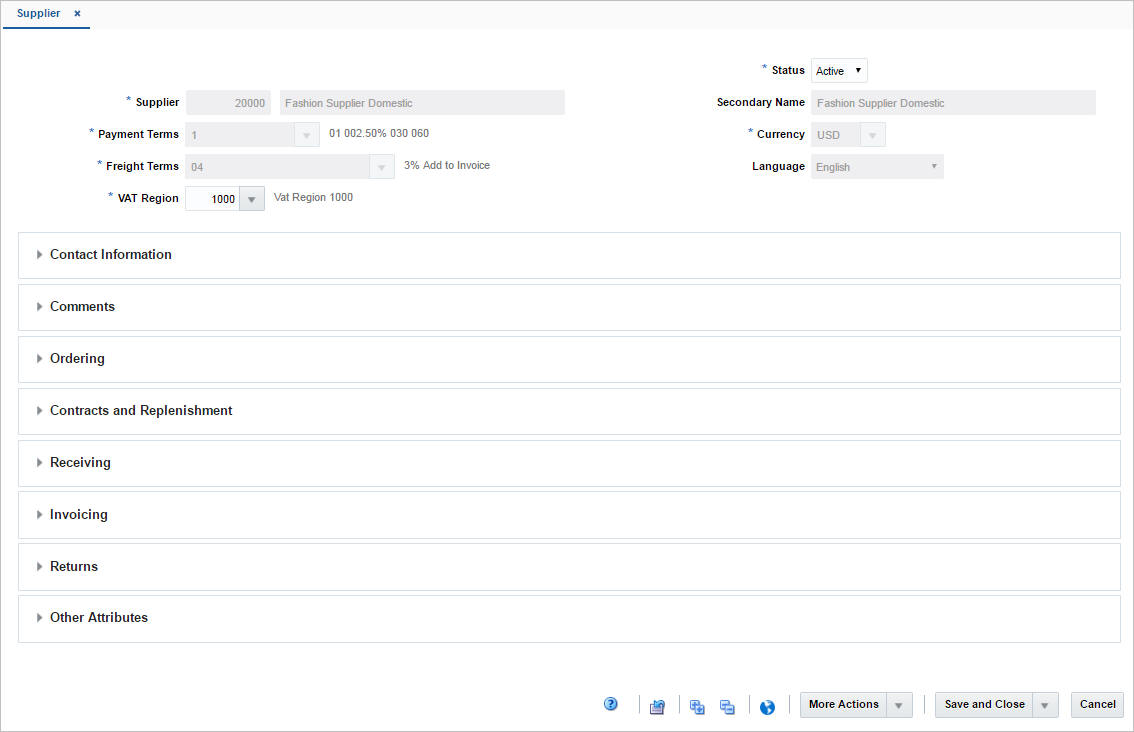
Header
The header contains the following fields.
Table 3-1 Header - Fields and Description
| Fields | Description |
|---|---|
|
Supplier |
The supplier ID is generated automatically. Enter the supplier name. This field is a required field. |
|
Payment Terms |
Enter, select or search for the supplier's payment terms. This field is a required field. |
|
Freight Terms |
Enter, select or search for the supplier's freight terms. This field is a required field. |
|
VAT Region |
Enter, select or search for the supplier's VAT region. This field is a required field. |
|
Status |
Select, if the current supplier is an active or inactive supplier. This field is a required field. |
|
Secondary Name |
Enter the secondary name for the supplier. |
|
Currency |
Enter, select or search for the supplier's currency. This field is a required field. |
|
Language |
Select the supplier's language from the list. |
Contact Information
In the Contact Information section enter the name, phone number, email address, fax, telex and pager for the primary contact person at the supplier's location.
Name and Phone are required fields.
Comments
In the Comments section you can enter any comments relevant for the supplier.
Ordering
The Ordering section contains the following fields and checkboxes.
Table 3-2 Ordering - Fields/Checkboxes and Description
| Fields/Checkboxes | Description |
|---|---|
|
Inventory Management Level |
Select an inventory management level from the list. This field is a required field. |
|
Ship Method |
Select a shipping method for the supplier from the list. |
|
Lead Time |
Enter the amount of time a supplier needs between receiving an order and having the order ready to ship. This value will be defaulted to item/supplier relationships. |
|
Delivery Policy |
Select a delivery policy from the list. This field is a required field. |
|
Quantity Level |
Select a quantity level from the list to indicate purchase order quantities that are communicated to the supplier in multiples of units (eaches) or cases. This field is a required field. |
|
DSD checkbox |
Select the checkbox to indicate that the supplier can provide direct store deliveries. |
|
Premark checkbox |
Select the checkbox to indicate that the supplier will break orders into separate, marked boxes that can be shipped directly to stores. |
|
Bracket Costing checkbox |
Select the checkbox to indicate that the supplier uses bracket costing in its pricing. |
|
Back Orders checkbox |
Select the checkbox to indicate the supplier accepts back orders. |
|
EDI: |
|
|
Orders checkbox |
Select the checkbox to indicate that the orders are transmitted electronically. |
|
Order Changes checkbox |
Select the checkbox to indicate that order changes are transmitted electronically. |
|
Order Acknowledgments checkbox |
Select the checkbox to indicate that order acknowledgments are transmitted electronically. |
Contracts and Replenishment
The Contracts and Replenishment section contains the following fields and checkboxes.
Table 3-3 Contracts and Replenishment - Fields/Checkboxes and Description
| Fields/Checkboxes | Description |
|---|---|
|
Scale AIP Orders checkbox |
Select the checkbox to indicate that AIP (Advanced Inventory Planning) is allowed to do order scaling. Order scaling refers to the increase and decrease of the order quantity within constraints to meet purchasing objectives and increase efficiency. |
|
VMI Order Status |
Select the VMI order status from the list. |
|
VMI Channel |
Enter, select or search for the VMI channel. |
|
EDI Availability checkbox |
Select the checkbox to indicate that the supplier processes orders through EDI (Electronic Data Interchange). |
|
EDI Contracts checkbox |
Select the checkbox to indicate that the supplier process contracts through EDI. |
|
Auto Contract Approval checkbox |
Select the checkbox to indicate that contract orders are created in Approved status. |
Receiving
The Receiving section contains the following fields and checkboxes.
Table 3-4 Receiving - Fields/Checkboxes and Description
| Fields/Checkboxes | Description |
|---|---|
|
QC Required checkbox |
Select the checkbox to indicate that goods received from the supplier must be inspected for quality. |
|
QC % |
Enter what percentage of the goods must be inspected. |
|
QC Frequency |
Enter how often the items will be inspected. |
|
EDI ASN checkbox |
Select the checkbox to indicate that the advanced shipping notice (ASN) is transmitted electronically. |
|
Vendor Control Required checkbox |
Select the checkbox to indicate that orders from this supplier require vendor control by default. |
|
Vendor Control % |
Displays the percentage of items per receipt that are marked for vendor checking. |
|
Vendor Control Frequency |
Displays the frequency in which items per receipt are marked for vendor checking. |
Invoicing
This section contains the following fields and checkboxes.
Table 3-5 Invoicing - Fields/Checkboxes and Description
| Fields/Ceckboxes | Description |
|---|---|
|
Settlement Code |
Select the settlement code from the list. This field is a required field. |
|
Payment Method |
Select the payment method from the list. |
|
Send Debit Memos |
Select how often debit memos should be sent to the supplier. |
|
Receive Invoice |
Select where invoices from this supplier are received, either at the store or centrally through corporate accounting. This field is only enabled, if invoice matching is used. |
|
Pay Invoice |
Indicates where invoices from this supplier are paid, either at the store or centrally through corporate accounting. Valid values are S (paid at the store) and C (paid centrally). This field only displays Store, if Sales Audit is used to accept payment at the store level. Additionally, the field is only enabled, if invoice matching is used. |
|
Invoice at |
Select, if invoice amounts are net or gross values. |
|
Final Match Destination checkbox |
Select this checkbox to indicate that the supplier can ship to the final destination as per allocation. |
|
EDI Invoice checkbox |
Select the checkbox to indicate that the invoices are transmitted electronically. |
|
Auto-approve Invoices checkbox |
Select this checkbox to indicate that the supplier's invoice matches can be automatically approved for payment. This field is only enabled, if invoice matching is used. |
|
Auto-approve Debit Memos checkbox |
Select this checkbox to indicate that debit memos sent to the supplier can be automatically approved on creation. This field is only enabled, if invoice matching is used. |
|
Allow Supplier to Charge-Freight checkbox |
Select this checkbox to indicate that the supplier is allowed to charge freight costs to the client. This field is only enabled, if invoice matching is used. |
|
Invoices Pre-paid for Supplier checkbox |
Select this checkbox to indicate that all invoices for the supplier can be considered pre-paid invoices. This field is only enabled, if invoice matching is used. |
|
Services Performed Confirmation Required checkbox |
Select this checkbox to indicate that all suppliers services, for example shelf stocking, must be confirmed before the invocie can be paid. |
Returns
The Returns section contains the following fields and checkboxes.
Table 3-6 Returns - Fields/Checkboxes and Description
| Fields/Checkboxes | Description |
|---|---|
|
Returns Allowed checkbox |
Select the checkbox to indicate that this supplier allows returns. |
|
Authorization Required checkbox |
Select the checkbox to indicate that returns must be accompanied by an authorization number when sent back to the vendor. |
|
Maximum Return Amount |
Enter the maximum amount allowed for returns. |
|
Courier |
Enter the courier for the returns. |
|
Handling % |
Enter the handling percentage. |
Other Attributes
The Other Attributes section contains the following fields
Table 3-7 Other Attributes - Fields and Description
| Fields | Description |
|---|---|
|
DUNS Number |
Enter the appropriate Dun and Bradstreet codes to identify the supplier. |
|
DUNS Location Number |
Enter the appropriate Dun and Bradstreet codes to identify the supplier location. |
|
EDI Sales |
Select the EDI Sales from the list. |
|
External Ref. ID |
Displays the external reference ID, if available. |
|
Cost Change Variance: |
|
|
Amount |
This field displays the cost change variance as amount. |
|
Percent |
This field displays the cost change variance in percent. |
Creating a Supplier
To create a supplier, follow the steps below.
-
From the Tasks menu, select Foundation Data > Suppliers and Partner Foundation > Create Supplier. The Supplier page appears.
-
The supplier ID is generated automatically. Enter the necessary information in the individual sections.
For more information about the available sections of the Supplier page, see the Create a Supplier section.
-
Then choose one of the following options.
-
Click Save to save the supplier.
-
Click Save and Close to save the supplier and close the page.
-
Click Save and Create Another to save the current supplier and create additional supplier entries.
-
Click Cancel to reject all entries and close the page.
Note:
You can also create a supplier in the Supplier Search screen, for more information about this function, see the Creating a Supplier/Supplier Site section. -
Adding Importers/Exporters
To add importers/exporters to a supplier site, follow the steps below.
-
In the Importers/Exporters section, select Actions > Add or use the Add icon. The Add Importer/Exporter page appears.
-
In the Type field, select if you want to add an importer or exporter. This field is a required field.
-
In the Importer/Exporter field, enter, select or search for the importer/exporter ID and description. This field is a required field.
-
Select the Default checkbox to indicate that the current importer/exporter is the supplier's default importer/exporter.
-
Then choose one of the following options.
-
Click OK to add the importer/exporter and close the page.
-
Click OK and Add Another to add additional importers/exporters.
-
Click Cancel to reject all entries and close the page.
-
Editing Importers/Exporters
To edit importers/exporters for a supplier site, follow the steps below.
-
In the Importers/Exporters section, select Actions > Edit or use the Edit icon. The Edit Importer/Exporter page appears.
-
Change the Type and Importer/Exporter field as well as the Default checkbox, as necessary.
-
Then choose one of the following options.
-
Click OK to save your changes and close the page.
-
Click Cancel to reject all entries and close the page.
-
Adding Routing Locations
To add routing locations to a supplier site, follow the steps below.
-
In the Routing Locations section, select Actions > Add or use the Add icon. The Add Routing Locations page appears.
-
In the Routing Location field, enter, select or search for the location ID. This field is a required field.
-
Select the Default checkbox to indicate that the current routing location is the supplier's default routing location.
-
Then choose one of the following options.
-
Click OK to add the routing location and close the page.
-
Click OK and Add Another to add additional routing locations.
-
Click Cancel to reject all entries and close the page.
-
Editing Routing Locations
To edit routing locations for a supplier site, follow the steps below.
-
In the Routing Locations section, select Actions > Edit or use the Edit icon. The Edit Routing Locations page appears.
-
Change the Routing Location field and Default checkbox, as necessary.
-
Then choose one of the following options.
-
Click OK to save your changes and close the page.
-
Click Cancel to reject all entries and close the page.
-
Supplier Import Attributes
The Supplier Import Attributes page allows you to enter import information about a particular supplier. You can track information specific to the supplier, such as:
-
Agent
-
Factory
-
Advising bank
-
Issuing bank
-
Lading port
-
Discharge port
-
Manufacturer ID
-
Additional partner information
-
Beneficiary information
The Supplier Import Attributes page contains the following sections.
-
Header
The header displays the supplier site ID and name.
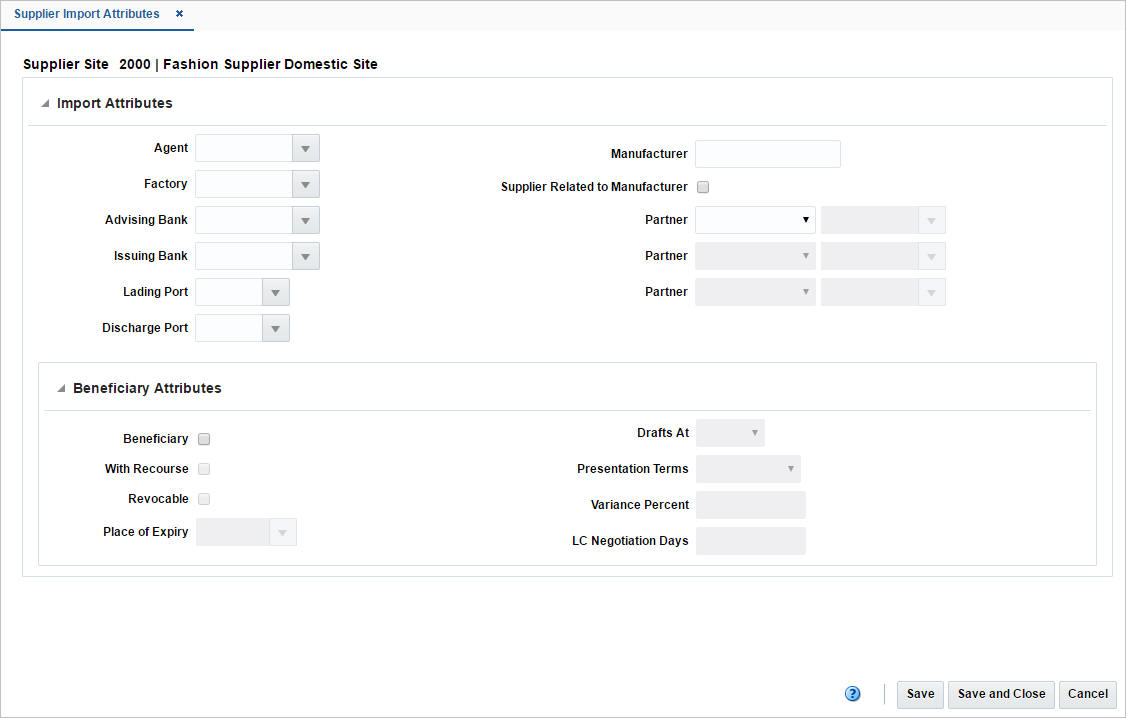
Import Attributes
The Import Attributes section contains the following fields.
Table 3-8 Import Attributes - Fields and Description
| Fields | Description |
|---|---|
|
Agent |
Enter, select or search for the agent ID. |
|
Factory |
Enter, select or search for the factory ID. |
|
Advising Bank |
Enter, select or search for the ID of the advising bank. |
|
Issuing Bank |
Enter, select or search for the ID of the issuing bank. |
|
Lading Port |
Enter, select or search for the ID of the lading port. |
|
Discharge Port |
Enter, select or search for the ID if the discharge port. |
|
Manufacturer |
Enter the manufacturer. |
|
Supplier Related to Manufacturer checkbox |
Select the checkbox to indicate that the supplier is related to the manufacturer. |
|
Partner |
Select a partner type from the list. In the field next to the partner type, enter, select or search for the partner ID. You can add up to three partners in this page. |
Beneficiary Attributes
The Beneficiary Attributes section contains the following fields.
Table 3-9 Beneficiary Attributes - Fields and Description
| Fields | Description |
|---|---|
|
Beneficiary checkbox |
Select the checkbox to indicate that the supplier can be a beneficiary in a Letter of Credit transaction. |
|
With Recourse checkbox |
Select the checkbox to indicate that the paying bank will be able to claim refunds from the beneficiary in case the letter of credit documents are not paid by the issuing bank. |
|
Revocable checkbox |
Select the checkbox to indicate that the Letter of Credit is revocable. If the LC is revocable, it can be amended or cancelled by the buyer or buyers bank at any time. If the LC is not revocable, the buyer as well as seller must approve any changes. |
|
Place of Expiry |
Enter, select or search for the place of expiry. |
|
Drafts At |
Select the drafts at entry from the list. |
|
Payment Terms |
Select the appropriate payment terms from the list. |
|
Variance Percent |
Enter the variance in percent. |
|
LC Negotiation Days |
Enter the negotiating days for the LC. |
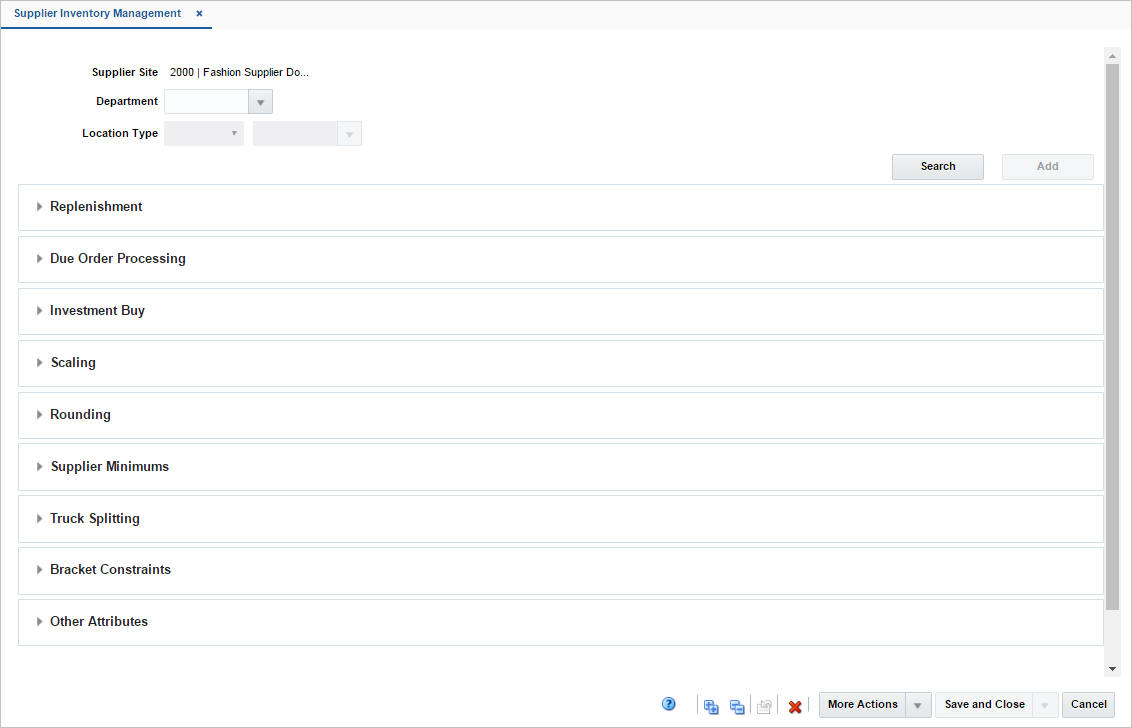
Add Supplier Inventory Management Parameters
The Supplier Inventory Management page allows you to create, maintain, delete and view inventory management information for a supplier site, or for a department and supplier site.
The Supplier Inventory Management page contains the following sections.
-
Header
The header contains the supplier site ID, name, department, location type and ID.
Replenishment
The Replenishment section contains the following fields.
Table 3-10 Replenishment - Fields and Description
| Fields | Description |
|---|---|
|
Order Control |
Select how the POs are processed for the supplier from the list. |
|
Review Cycle |
Select how often the items are reviewed for replenishment from the list. |
|
Weekdays checkboxes |
Select the day on which the items are reviewed.
|
|
Single Loc on Order checkbox |
Select the checkbox, if only one location can be on an order. |
Due Order Processing
The Due Order Processing section contains the following fields.
Table 3-11 Due Order Processing - Fields and Description
| Fields | Description |
|---|---|
|
Due Order Processing checkbox |
Select the checkbox to have due order processing performed for replenishment items from the supplier. |
|
Create Non-Due Orders checkbox |
Select the checkbox to have purchase orders created in Worksheet status for items that are not due to be ordered. |
|
Due Order Level |
Select the level at which the due order processing is based from the list. |
|
Service Basis |
Select the parameter that is used in calculating the stock out level from the list |
Investment Buy
The Investment Buy section contains the following fields.
Scaling
The Scaling section contains the following fields.
Table 3-13 Scaling - Fields and Description
| Fields | Description |
|---|---|
|
Scale Orders to Constraints checkbox |
Select the checkbox to enable the scaling constraints area. |
|
Multiple Vehicles checkbox |
Select the checkbox to indicate that multiple vehicles may be used when delivering the order. |
|
Scaling Objective |
Select whether purchase orders are scaled to the minimum or maximum values of the scaling constraints. |
|
Scaling Level |
Select the level at which the scaling is performed. |
|
Primary: |
In the Scaling Constraints Primary column, complete the following fields. |
|
Type |
Select the primary type of constraint to use when scaling orders. |
|
UOM |
If you select Mass or Volume as the primary type, enter, select or search for the unit of measure. |
|
Currency |
If you select Amount as the primary type, the currency code is displayed in this field. |
|
Maximum Value |
Enter the maximum value of the constraint. |
|
Tolerance |
Enter the percentage tolerance for the maximum value of constraint. |
|
Minimum Value |
Enter the minimum value of the constraint. |
|
Tolerance |
Enter the percentage tolerance for the minimum value of the constraint. |
|
Secondary: |
In the Scaling Constraints Secondary column, complete the following fields. |
|
Type |
Select the secondary type of constraint to use when scaling orders. The secondary type cannot be the same as the primary type. |
|
UOM |
If you select Mass or Volume as the secondary type, enter, select or search for the unit of measure. |
|
Currency |
If you select Amount as the secondary type, the currency code is displayed in this field. |
|
Maximum Value |
Enter the maximum value of the constraint. |
|
Tolerance |
Enter the percentage tolerance for the maximum value of the constraint. |
|
Minimum Value |
Enter the minimum value of the constraint. |
|
Tolerance |
Enter the percentage tolerance for the minimum value of the constraint. |
Rounding
The Rounding section contains the following fields.
Table 3-14 Rounding - Fields and Description
| Fields | Description |
|---|---|
|
Rounding Level |
Select the level to which quantities should be rounded. |
|
Rounding to Inner Threshold |
Enter the percent of the inner needed to round to an additional inner. |
|
Round to Case Threshold |
Enter the percent of the case needed to round to an additional case. |
|
Round to Layer Threshold |
Enter the percent of the layer needed to round to an additional level. |
|
Round to Pallet Threshold |
Enter the percent of the pallet needed to round to an additional pallet. |
Supplier Minimums
The Supplier Minimums section contains the following fields.
Table 3-15 Supplier Minimums - Fields and Description
| Fields | Description |
|---|---|
|
Purge Orders Failing Minimum checkbox |
Select the checkbox to create POs that meet the supplier minimum. |
|
Minimum Level |
Select the minimum order quantity at which the supplier accepts orders. |
|
Conjunction |
When you define two minimum order requirements, select the relationship between the requirements in the Conjunction field. |
|
Minimum 1: |
In the Minimum 1 column, complete the following fields. |
|
Type |
Select the type for the first minimum order requirement. |
|
UOM |
If you select Mass or Volume as the first minimum order requirement type, enter, select or search for the unit of measure |
|
Currency |
If you select Amount as the first minimum order requirement type, the currency code is displayed in this field. |
|
Value |
Enter the value of the first minimum order requirement for the supplier. |
|
Minimum 2: |
In the Minimum 2 column, complete the following fields. |
|
Type |
Select the second type for the minimum order requirement. |
|
UOM |
If you select Mass or Volume as the first minimum order requirement type, enter, select or search for the unit of measure. |
|
Currency |
If you select Amount as the first minimum order requirement type, the currency code is displayed in this field. |
|
Value |
Enter the value of the first minimum order requirement of the supplier. |
Truck Splitting
The Truck Splitting section contains the following fields.
Table 3-16 Truck Splitting - Fields and Description
| Fields | Description |
|---|---|
|
Split Orders into Truckloads checkbox |
Select the checkbox to enable the truck splitting constraints. |
|
Auto Approve LTL Orders checkbox |
Select the checkbox to allow Less than a Truckload (LTL) orders. |
|
Truck Split Method |
Select the method of truck splitting used with this supplier. |
|
Constraint 1: |
In the Constraint 1 column, complete the following fields. |
|
Type |
Select the primary type of constraint to use when splitting orders into truckloads. |
|
UOM |
If you select Mass or Volume as the primary type, enter, select or search for the unit of measure. |
|
Value |
Enter the value of the constraint. |
|
Tolerance |
Enter the percentage tolerance for the maximum value of the constraint. |
|
Constraint 2: |
In the Constraint 2 column, complete the following fields. |
|
Type |
Select the secondary type of constraint to use when splitting orders into truckloads. The second constraint type cannot be the same as the first constraint type. |
|
UOM |
If you select Mass or Volume as the secondary type, enter, select or search for the unit of measure. |
|
Value |
Enter the value of the constraint. |
|
Tolerance |
Enter the percentage tolerance for the maximum value of the constraint. |
Bracket Constraints
The Bracket Constraints section contains the following fields.
Table 3-17 Bracket Constraints - Fields and Description
| Fields | Description |
|---|---|
|
Threshold % |
Enter the percentage of the bracket value that the order must meet in order to be rounded up to that bracket. |
|
Primary: |
In the Primary column, complete the following fields. |
|
Type |
Select the type of the primary bracket costing constraint. |
|
UOM |
If you select Mass or Volume as the primary type, enter, select or search for the unit of measure. |
|
Secondary: |
In the Secondary column, complete the following fields. |
|
Type |
Select the type of secondary bracket costing constraints. |
|
UOM |
If you select Mass or Volume as the secondary type, enter, select or search for the unit of measure. |
Other Attributes
The Other Attributes section contains the following fields.
Table 3-18 Other Attributes - Fields and Description
| Fields | Description |
|---|---|
|
Pooled Supplier |
Enter, select or search for the supplier ID. |
|
Pooled Supplier Site |
Enter, select or search for the supplier site ID. |
|
Purchase Type |
Select the purchase order type from the list. |
|
Pickup Location |
Only enabled, if you select pick-up as purchase type. Enter the pickup location. |
Add Supplier Brackets
In the Supplier Brackets page, you can add, edit, delete and view primary and secondary bracket values. You can also specify default brackets, or delete the entire bracket structure.
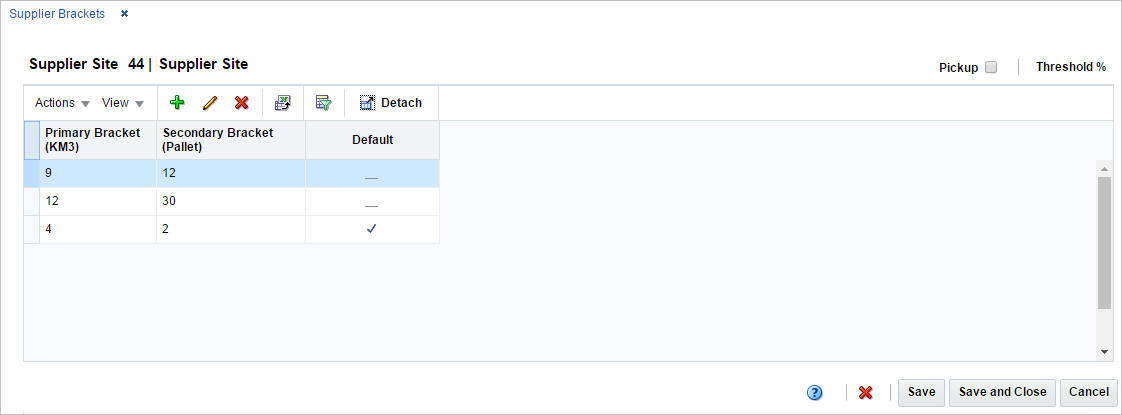
Adding Bracket Values
To add bracket values for a supplier site, follow the steps below.
-
From the Tasks menu, select Foundation Data > Suppliers and Partner Foundation > Manage Suppliers. The Supplier Search page appears.
-
Restrict your search to suppliers with enabled Bracket Costing.
-
Click Search. The suppliers that match the search criteria are displayed in the Results section.
-
In the Supplier Site column, click the supplier site ID link, or mark a record and select Actions > Edit, or use the Edit icon. The Supplier Site page appears.
-
Select More Actions > Inventory Management. The Supplier Inventory Management page appears.
-
Select More Actions > Bracket Costing. The Supplier Brackets page appears.
Note:
The Bracket Costing checkbox must be selected in the Supplier/Supplier Site page in order to access the Supplier Brackets page. -
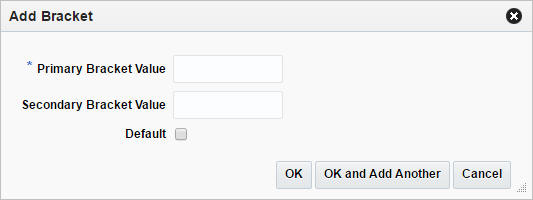
Select Actions > Add, or use the Add icon. The Add Bracket page appears.
-
In the Primary Bracket Value field, enter the lower value of the primary bracket. This field is a required field.
-
In the Secondary Bracket Value field, enter the lower value of the secondary bracket, if applicable.
-
Select the Default checkbox to indicate that the bracket value is a default value for this bracket structure.
-
Select the Pickup checkbox to indicate that the bracket pricing uses pickup prices. The pickup price is the price of the goods without shipping costs, as if the goods were picked up at the supplier's location.
-
Then select one of the following options.
-
Click OK to add the bracket value and close the page.
-
Click OK and Add Another to add additional bracket values.
-
Click Cancel to reject all entries and close the page.
-
-
Editing Bracket Values
To edit bracket values for a supplier site, follow the steps below.
-
From the Tasks menu, select Foundation Data > Suppliers and Partner Foundation > Manage Suppliers. The Supplier Search page appears.
-
Restrict your search to suppliers with enabled Bracket Costing.
-
Click Search. The suppliers that match the search criteria are displayed in the Results section.
-
In the Supplier Site column, click the supplier site ID link, or mark a record and select Actions > Edit, or use the Edit icon. The Supplier Site page appears.
-
Select More Actions > Inventory Management. The Supplier Inventory Management page appears.
-
Select More Actions > Bracket Costing. The Supplier Brackets page appears.
Note:
The Bracket Costing checkbox must be selected in the Supplier/Supplier Site page in order to access the Supplier Brackets page. -
Select a record in the table.
-
Then select Actions > Edit, or use the Edit icon. The Edit Bracket page appears.
-
In the Primary Bracket Value and Secondary Bracket Value field, edit the values as necessary.
-
Select/deselect the Default checkbox to indicate that the bracket value is a default value for this bracket structure.
-
Select/deselect the Pickup checkbox to indicate that the bracket pricing uses pickup prices.
-
Then choose one of the following options.
-
Click OK to save your changes value and close the page.
-
Click Cancel to reject all entries and close the page.
-
-
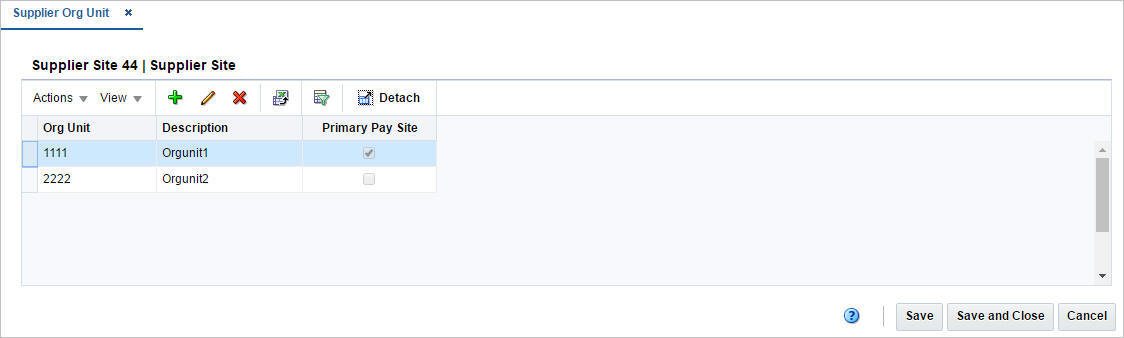
Add Org Units
In the Supplier Org Unit page you can add, edit, delete and view organizational unit information for the selected supplier site.
Adding Organizational Unit Information for Suppliers
To add organizational unit information for a supplier, follow the steps below.
-
From the Tasks menu, select Foundation Data > Suppliers and Partner Foundation > Manage Suppliers. The Supplier Search page appears.
-
Enter or select search criteria as desired to make the search more restrictive.
-
Click Search. The suppliers that match the search criteria are displayed in the Results section.
-
In the Supplier Site column, click the supplier site ID link, or mark a record and select Actions > Edit, or use the Edit icon. The Supplier Site page appears.
-
Select More Actions > Org Unit. The Supplier Org Unit page appears.
-
Then select Actions > Add, or use the Add icon. The Add Org Unit ID page appears.
-
In the Org Unit field, enter select or search for the appropriate unit. This field is a required field.
-
Select the Primary Pay Site to indicate that the current org unit is the primary pay site.
-
Then choose one of the following options.
-
Click OK to add the org unit and close the page.
-
Click OK and Add Another to add additional org units.
-
Click Cancel to reject all entries and close the page.
-
-
Editing Organizational Unit Information for Suppliers
To edit organizational unit information for suppliers, follow the steps below.
-
From the Tasks menu, select Foundation Data > Suppliers and Partner Foundation > Manage Suppliers. The Supplier Search page appears.
-
Enter or select search criteria as desired to make the search more restrictive.
-
Click Search. The suppliers that match the search criteria are displayed in the Results section.
-
In the Supplier Site column, click the supplier site ID link, or mark a record and select Actions > Edit, or use the Edit icon. The Supplier Site page appears.
-
Select More Actions > Org Unit. The Supplier Org Unit page appears.
-
Then select Actions > Edit, or use the Edit icon. The Edit Ord Unit ID page appears.
-
In the Org Unit field, change the org unit, if necessary.
-
Select/deselect the Primary Pay Site to indicate that the current org unit is the primary pay site.
-
Then choose one of the following options.
-
Click OK to save your changes and close the page.
-
Click Cancel to reject all entries and close the page.
-
-
Add Traits
The Supplier Traits page allows you to add, delete and view supplier traits. After you create supplier traits, you can then associate suppliers with a trait or associate traits with a supplier.
You can also use traits to indicate which of your suppliers have a master supplier. A master supplier is an outside source that provides merchandise to one or more of your suppliers, such as a manufacturer or distributor. You can enter an external ID for the master supplier as well.
Adding Supplier Traits
To add supplier traits, follow the steps below.
-
From the Tasks menu, select Foundation Data > Suppliers and Partner Foundation > Manage Suppliers. The Supplier Search page appears.
-
Enter or select search criteria as desired to make the search more restrictive.
-
Click Search. The suppliers that match the search criteria are displayed in the Results section.
-
In the Supplier Site column, click the supplier site ID link, or mark a record and select Actions > Edit, or use the Edit icon. The Supplier Site page appears.
-
Select More Actions > Supplier Traits. The Supplier Traits page appears.
-
Then select Actions > Add, or use the Add icon. The Add Supplier Traits page appears.
-
In the Supplier Trait field, enter, select or search for the supplier trait you want to associate with the supplier.
-
Select the Master Supplier checkbox to indicate that the current trait is a master supplier trait.
-
Then choose:
-
Click OK to add the supplier trait and close the page.
-
Click OK and Add Another to add additional supplier traits.
-
Click Cancel to reject all entries and close the page.
-
-
Manage Supplier Traits
Within Merchandising, there is the ability to define information about supplier traits which can later be associated with one or more suppliers. Supplier Traits can be useful for defining specific attributes of suppliers for purposes of reporting, regulatory compliance, and mass maintenance. The specific implementation of supplier traits is to be defined by each retailer however. This functionality is accessed from the main Merchandising task list under Foundation Data > Download Foundation Data and Foundation Data > Upload Foundation Data.
To add, update, or remove supplier trait information, you will need to select the template type of Foundation from the Download Data screen and then the template Supplier Traits. Click the Download button and when prompted, choose to either open the .ods file that is generated or save the file and open it separately in the spreadsheet application of your choice.
To add a new supplier trait, select the action type of Create on the Supplier Traits tab. Next, enter the trait ID and its description. You can also indicate which of your suppliers have a master supplier, who is an outside source such as a manufacturer or distributor that provides merchandise to one or more of your suppliers. The translations tab will hold the supplier trait details in the specified language.
If you would like to update a supplier trait, then a similar process will have to be followed to that described above for entering new trait information. First, download the spreadsheet, and then find the supplier trait that you want to update. In that row select the action type of Update, and then update the current details in the spreadsheet.
If you wish to delete a supplier trait, update the action column to select Delete in each of the rows you want to delete.
For all actions defined above, once all the updates have been made to the data in the spreadsheet, save the file and close it. Then, return to the Merchandising screens and select Foundation Data > Upload Foundation Data from the main task list. In this screen, select the template type Foundation and the template Supplier Traits. This will generate a process description automatically, but this can be updated if desired. Lastly, select the Browse button and navigate to the directory where you saved the updated spreadsheet. To review the status of the upload and check whether any errors occurred, select the Foundation Data > Review Status task from the main task list.
See also Download/Upload Data from Spreadsheets and View Data Loading Status.
Update a Supplier
The Manage Suppliers option opens the Supplier Search page. In this page you can perform the following actions.
-
Search for suppliers by various search criteria
-
View the search results
-
View supplier information
-
Create supplier information
-
Edit supplier information
-
Edit supplier sites
-
View supplier sites
You can access the Supplier Search page from the Task menu, select Foundation Data > Suppliers and Partner Foundation > Manage Suppliers. The Supplier Search page appears.
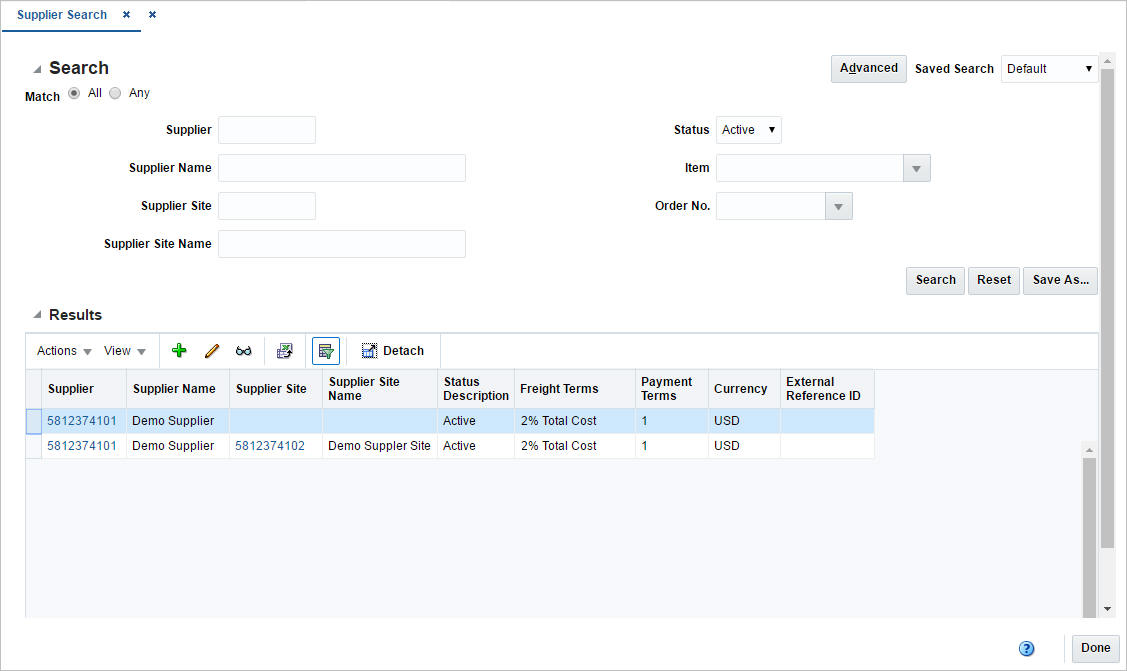
Searching for a Supplier
To search for a supplier:
-
From the Task menu, select Foundation Data > Suppliers and Partner Foundation > Manage Suppliers. The Supplier Search page appears.
-
You can search for a supplier by using basic or advanced search criteria, depending on the requirement. The basic mode is the default search mode.
-
Click Advanced to access the search section in advanced mode.
-
Click Basic to return to basic mode.
-
Searching for a Supplier Through the Basic Search Criteria
To search for a supplier by using basic search criteria:
-
Enter, select or search for one or all of the following basic search criteria.
Table 3-19 Supplier Search - Basic Search Criteria and Description
Fields Description Match option
Check radio button All or Any.
All - only suppliers matching all entered search criteria are shown.
Any - suppliers matching any of the entered search criteria are shown.
Supplier
Enter the supplier ID.
Supplier Name
Enter the supplier name.
Supplier Site
Enter the supplier site ID.
Supplier Site Name
Enter the supplier site name.
Status
Select the status of the supplier.
Item
Enter, select or search for the supplier's items.
Order
Enter, select or search for the supplier's orders.
-
Click the Saved Search list to select one of the saved search criteria. Selecting a saved search populates the search section with the saved search criteria. If the run automatically function is enabled for the search, the search is executed immediately.
You can also personalize your saved searches by selecting Personalize. The Personalized Saved Searches page appears.
For more information about the Personalized Saved Search, see Personalize Saved Search in the Oracle® Retail Merchandising Do the Basics User Guide.
-
Click Search. The suppliers that match the search criteria are displayed in the Results section.
-
Click Reset to clear the search section and results.
-
Click Save As... to save the current search criteria. The Create Saved Search page appears.
For more information about how to save your search criteria, see Create Saved Search in the Oracle® Retail Merchandising Do the Basics User Guide.
-
Click Done to close the page.
Searching for a Supplier Through Advanced Search Criteria
To search for a supplier by using advanced search criteria:
-
To search by using advanced search criteria, enter or select one or all of the advanced search criteria.
Table 3-20 Supplier Search - Advanced Search Criteria and Description
Fields Description Match option
Check radio button All or Any.
All - only suppliers matching all entered search criteria are shown.
Any - suppliers matching any of the entered search criteria are shown.
Supplier
Enter the supplier ID.
Supplier Name
Enter the supplier name.
Supplier Site
Enter the supplier site ID.
Supplier Site Name
Enter the supplier site name.
Status
Select the status of the supplier.
Division
Enter, select or search for the division.
Group
Enter, select or search for the group.
Department
Enter, select or search for the department.
Class
Enter, select or search for the class.
Subclass
Enter, select or search for the subclass.
Item
Enter, select or search for the supplier's items.
Order No.
Enter, select or search for the order number.
-
To narrow down the search, use the list next to the search fields. For example, determine if the entered value should be equal or not equal to the search result.
-
Click the Saved Search list to select one of the saved search criteria. Selecting a saved search populates the search section with the saved search criteria. If the run automatically function is enabled for the search, the search is executed immediately.
You can also personalize your saved searches by selecting Personalize. The Personalized Saved Searches page appears.
For more information about the Personalized Saved Search, see Personalize Saved Search in the Oracle® Retail Merchandising Do the Basics User Guide.
-
Click Search. The suppliers that match the search criteria are displayed in the Results section.
-
Click Reset to clear the search section and results.
-
Click Save As... to save the current search criteria. The Create Saved Search page appears.
For more information about how to save your search criteria, see Create Saved Search in the Oracle® Retail Merchandising Do the Basics User Guide.
-
Click Add Fields to add more fields for the advanced search. To remove the field from the search, click the x right next to the field.
-
Click Reorder to change the order of the available search fields. The Reorder Search Fields page appears.
-
Select the desired search field and use the up and down arrows to rearrange the order of the fields.
-
Click OK to confirm the new order of the fields and close page.
-
Click Cancel to reject any changes and close the page.
-
-
Click Done to close the page.
Results
The Results section lists the retrieved suppliers and supplier sites.
Creating a Supplier/Supplier Site
To create a supplier or supplier site in the Supplier Search page, follow the steps below.
-
From the Tasks menu, select Foundation Data > Suppliers and Partner Foundation > Manage Suppliers. The Supplier Search page appears.
-
Enter or select search criteria as desired to make the search more restrictive.
-
Click Search. The suppliers/supplier sites that match the search criteria are displayed in the Results section.
-
Then select Actions > Create Supplier, or use the Create Supplier icon. The Create Supplier page appears.
-
In the Supplier Level field, select supplier or supplier site from the list. This field is a required field.
-
In the Supplier field, enter, select or search for the supplier you want to create the site for. If you selected supplier as the supplier level, this field is disabled.
-
Click OK. The Supplier/Supplier Site page appears.
-
-
Enter the necessary information in the individual sections.
For more information about the available sections of the Supplier/Supplier Site page, see the Create a Supplier section.
-
Then choose one of the following options.
-
Click Save to save the supplier/supplier site.
-
Click Save and Close to save the supplier/supplier site and close the page.
-
Click Save and Create Another to save the current supplier/supplier site and create additional entries.
-
Click Cancel to reject all entries and close the page.
-
Editing a Supplier
To edit a supplier, follow the steps below.
-
From the Tasks menu, select Foundation Data > Suppliers and Partner Foundation > Manage Suppliers. The Supplier Search page appears.
-
Enter or select search criteria as desired to make the search more restrictive.
-
Click Search. The suppliers that match the search criteria are displayed in the Results section.
-
Select a supplier in the Results section.
-
Then select Actions > Edit Supplier, use the Edit Supplier icon, or click on the supplier link. The Supplier page appears.
-
Edit the information in the individual sections.
For more information about the available sections of the Supplier/Supplier Site page, see the Create a Supplier section.
-
Then choose one of the following options.
-
Click Save to save your changes.
-
Click Save and Close to save your changes and close the page.
-
Click Save and Edit Another to your changes and edit additional suppliers.
-
Click Cancel to reject all entries and close the page.
-
Editing a Supplier Site
To edit a supplier site, follow the steps below.
-
From the Tasks menu, select Foundation Data > Suppliers and Partner Foundation > Manage Suppliers. The Supplier Search page appears.
-
Enter or select search criteria as desired to make the search more restrictive.
-
Click Search. The suppliers that match the search criteria are displayed in the Results section.
-
Select a supplier site in the Results section.
-
Then select Actions > Edit Supplier Site, or click on the supplier site link. The Supplier Site page appears.
-
Edit the information in the individual sections.
For more information about the available sections of the Supplier Site page, see the Create a Supplier section.
-
Then choose one of the following options.
-
Click Save to save your changes.
-
Click Save and Close to save your changes and close the page.
-
Click Save and Edit Another to your changes and edit additional supplier sites
-
Click Cancel to reject all entries and close the page.
-