3 Change Ownership of Items
The Ownership Change page allows you to schedule a change of ownership of items from owned to consignment or concession or vice versa. You can also change primary supplier and primary country of an item/location with the purchase type as consignment or concession.
Items can be added to an ownership change by item or item list and an ownership change can be applicable to a single location or supplier/country level. You can also choose to change the calculation basis of item cost and specify cost per unit or purchase rate. A batch process changes item ownership of those items whose effective date is next day.
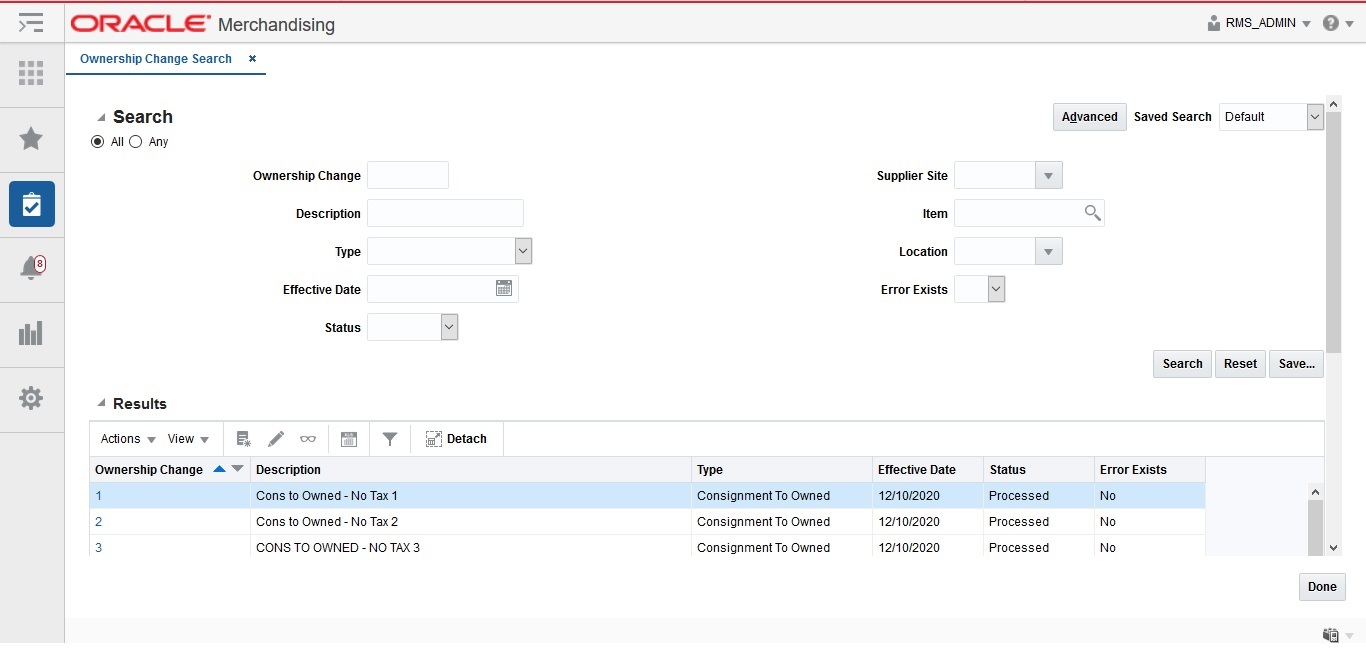
Search Ownership Change
To search for an ownership change list:
-
From the Task menu, select Item > Consignment/Concession > Manage Ownership Change. The Ownership Change Search page appears.
-
You can search for an ownership change by using basic or advanced search criteria, depending on the requirement. The basic mode is the default search mode.
-
Click Advanced to access the search section in advanced mode.
-
Click Basic to return to the basic mode.
-
Searching for an Ownership Change Through the Basic Search Criteria
To search for an ownership change by using basic search criteria:
-
Enter, select or search for one or all of the following basic search criteria.
Table 3-1 Ownership Change Search - Basic Search Criteria and Description
Fields Description Ownership Change
Enter the ownership change ID.
Description
Enter the ownership change transaction description.
Type
Select type of ownership change transaction. Options are:
-
Owned to Consignment
-
Owned to Concession
-
Consignment to Owned
-
Concession to Owned '
-
Update Primary Supplier
Effective Date
Enter or select the effective date of the ownership change transaction
Status
Enter or select the status of the ownership change transaction.
Supplier Site
Enter or select the supplier site of the ownership change.
Item
Enter or search for an item.
Location
Enter or select the location of the ownership change.
Error Exists
Select whether the ownership change contains errors. Options are Yes or No.
-
-
Click the Saved Search list to select one of the saved search criteria. Selecting a saved search populates the search section with the saved search criteria. If the run automatically function is enabled for the search, the search is executed immediately.
You can also personalize your saved searches by selecting Personalize. The Personalized Saved Searches page appears.
For more information about the Personalized Saved Search, see Personalize Saved Search in the Oracle® Retail Merchandising Do the Basics User Guide.
-
Click Search. The ownership change lists that match the search criteria are displayed in the Results section.
-
Click Reset to clear the search section and results.
-
Click Save As... to save the current search criteria. The Create Saved Search page appears.
For more information about how to save your search criteria, see Create Saved Search in the Oracle® Retail Merchandising Do the Basics User Guide.
-
Click Done to close the page.
Searching for an Ownership Change Through the Advanced Search Criteria
To search for an ownership change through the advanced search criteria:
-
Enter or select one or all of the advanced search criteria.
-
To narrow down the search, use the list next to the search fields. For example, determine if the entered value should equal or not equal the search result.
-
Click on the Saved Search list to select one of the saved search criteria. Selecting a saved search populates the search section with the saved search criteria. If the run automatically function is enabled for the search, the search is executed immediately.
You can also personalize your saved searches by selecting Personalize. The Personalize Saved Searches page appears.
For more information about the Personalized Saved Search, see Personalize Saved Search in the Oracle® Retail Merchandising Do the Basics User Guide.
-
Click Search. The ownership changes that match the search criteria are displayed in the Results section.
-
Click Reset to clear the search section and results.
-
Click Save As... to save the current search criteria. The Create Saved Search page appears.
For more information about how to save your search criteria, see Create Saved Search in the Oracle® Retail Merchandising Do the Basics User Guide.
-
Click Add Fields to add more fields for the advanced search. To remove the field from the search, click the x right next to the field.
-
Click Reorder to change the order of the available search fields. The Reorder Search Fields page appears.
-
Select the desired search field and use the up and down arrows to rearrange the order of the fields.
-
Click OK to confirm the new order of the fields and close the page.
-
Click Cancel to reject any changes and close the page.
-
-
Click Done to close the page.
Create Ownership Change
To create an ownership change:
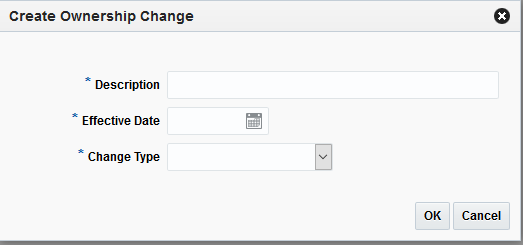
-
From the Tasks menu, select Item > Consignment/Concession > Create Ownership Change. The Create Ownership Change pop-up appears.
-
In the Description field, enter a description for the ownership change.
-
In the Effective Date field, select the date on which the ownership change goes into effect.
-
In the Change Type field, select the type of ownership change that is being made. Options are:
-
Owned to Consignment –
-
Owned to Concession –
-
Consignment to Owned –
-
Concession to Owned –
-
Update Primary Supplier –
-
-
Then choose one of the following options.
-
Click OK. The Create Ownership Change page appears.
-
Click Cancel to reject all entries close the page.
-
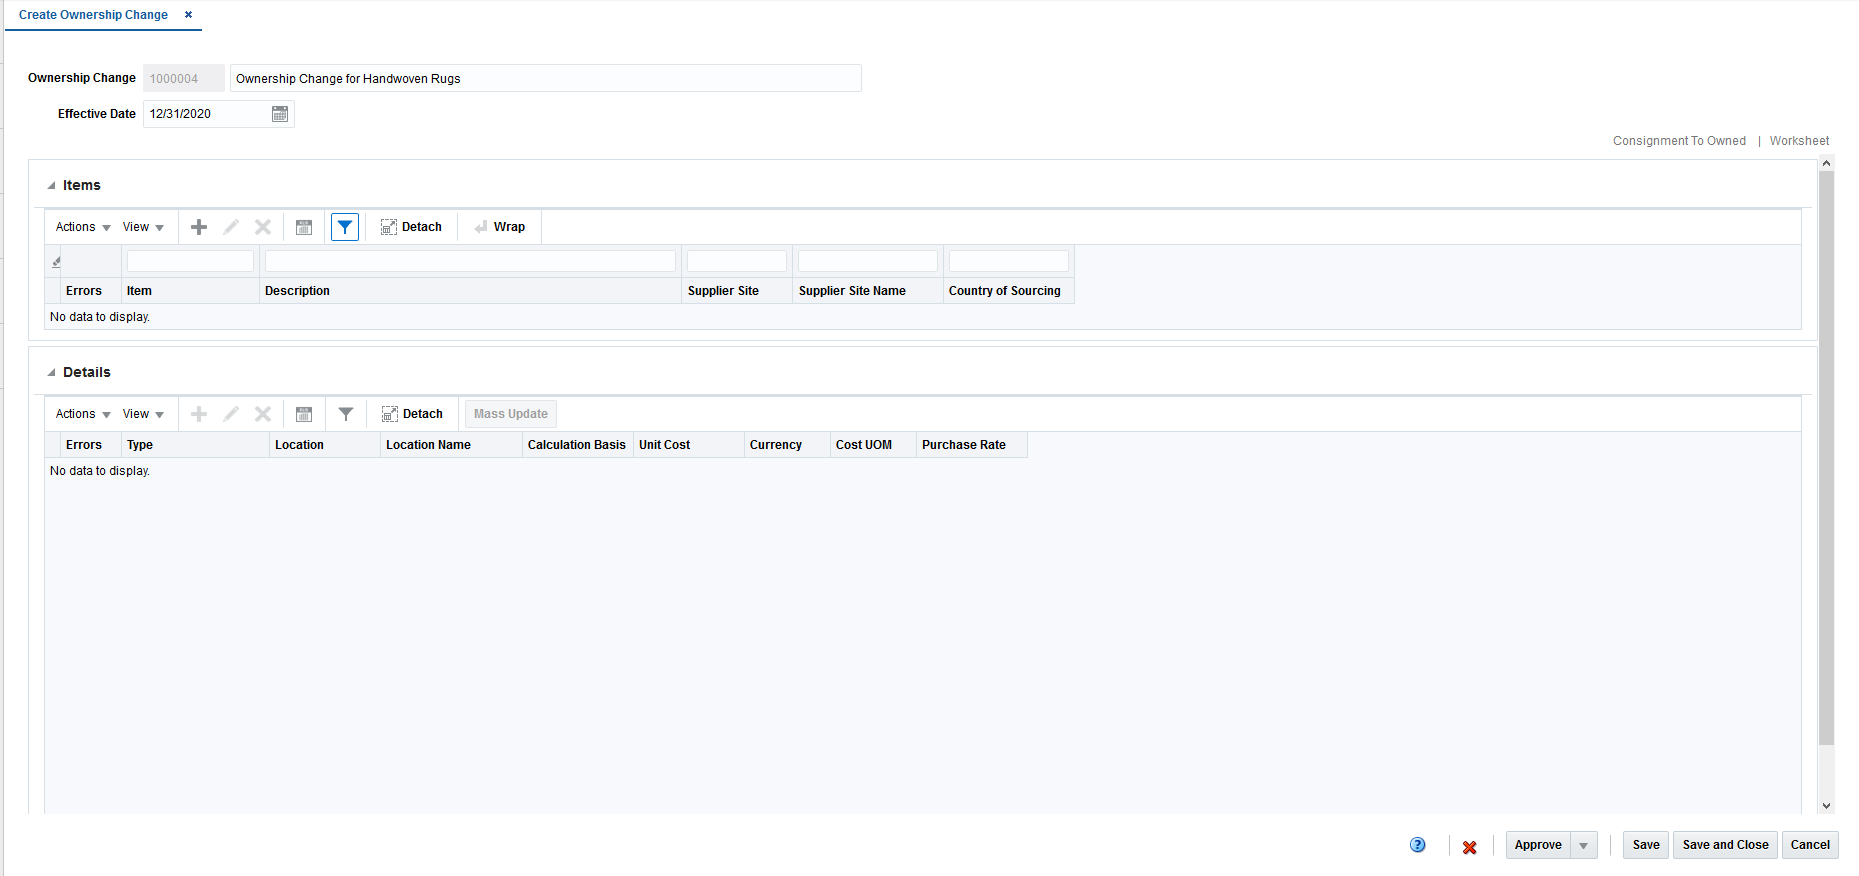
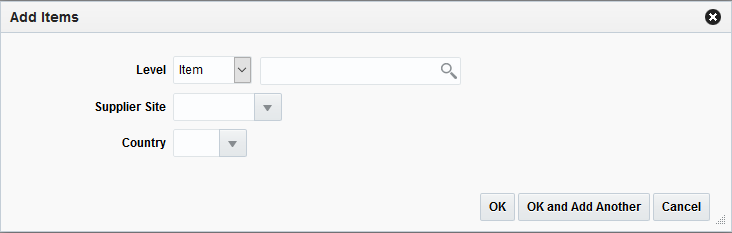
Add Items
Adding items varies depending on the change type associated with the ownership change.
Adding Items to Consignment to Owned, Concession to Owned, Owned to Consignment, or Owned to Concession
Perform the following procedure to add items to an ownership change when the change type is set to Consignment to Owned, Concession to Owned, Owned to Consignment, or Owned to Concession:
-
Search for or create an ownership change with a change type of Consignment to Owned, Concession to Owned, Owned to Consignment, or Owned to Concession. The Create Ownership Change page appears.
-
From the Actions menu, click Add or click the Add icon
 . The Add Items page appears.
 -
Enter the following information:
-
Item/Item List – Select Item or Item List. Only approved parent (level 1), inventoried and orderable items, except pack items are available to be selected.
-
Supplier Site – Select the supplier sites that are associated with the item
-
Country – Select the country associated with item and the supplier site entered
-
-
Then choose one of the following options.
-
Click OK to add the item to the table and close the page.
-
Click OK and Add Additional to add additional items.
-
Click Cancel to reject all entries and close the page.
-
Adding Items to Update Primary Supplier
Perform the following procedure to add items to an ownership change when the change type is set to Update Primary Supplier:
-
Search for or create an ownership change with a change type of Update Primary Supplier. The Create Ownership Change page appears.
-
From the Actions menu, click Add or click the Add icon
. The Add Items pop-up appears. -
Enter the following information:
-
Item/Item List – Select Item or Item List. Only approved parent (level 1), inventoried and orderable items, except pack items are available to be selected.
-
Primary Supplier Site – Enter, select, or search for the primary supplier site that is to be change with new primary supplier site.
-
Primary Country – Enter, selector search for the primary country that is to be changed with new primary country.
-
New Primary Supplier Site – Enter, select or search for the new supplier site if you intend to update the primary supplier site of the items which are included in ownership change transaction.
-
New Primary Country – Enter, select, or search for the new primary country of sourcing ID if you intend to modify the primary country of sourcing of the items which are included in ownership change transaction.
-
-
Then choose one of the following options.
-
Click OK to add the item to the table and close the page.
-
Click OK and Add Additional to add additional items.
-
Click Cancel to reject all entries and close the page.
-

Add Details
Use the Add option in the Actions menu to add details to the ownership change.
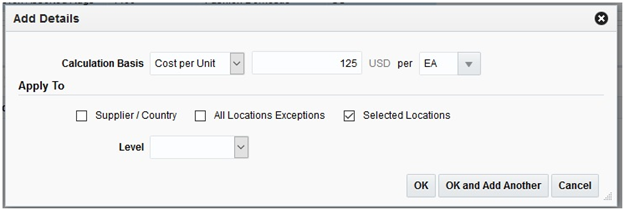
The following fields are available:
-
Calculation Basis – This is available when the purchase type of the item is changed from owned to consignment or concession. If the purchase type is being changed to Owned, then this defaults to Cost per Unit and disabled. If the transaction type is Update Primary Supplier then it is hidden. Valid values are Cost per Unit, Purchase Rate, and No change.
Enter cost per unit or purchase rate according to the selection. In case of cost per unit, the UOM also needs to be specified.
-
Supplier/Country checkbox – Check this option when you want to create the ownership change at the supplier-country level.
-
All Location Exceptions – Check this option when you want to create the ownership change for existing item-supplier-country-location records
-
Selected Locations – Check this option when you want to create the ownership change for selected locations.
-
Level and Location LOV – This field allows the user to select the level at which the locations are added to the highlighted item in item table.
Note:
This field is only displayed when the Selected Locations checkbox is checked.
Approve Ownership Change
After an ownership change is created in Merchandising, it needs to be approved. Depending on your organization and process, the person to create and approve the item may be different. In that case it first needs to be submitted and then approved. This workflow facilitates accountability and shared responsibility. An ownership change can be submitted by using the status button on the screen. This button label shows the most logical next step in the approval flow. If there are other actions possible, they can be accessed through the Actions dropdown menu. For example, when an ownership change is in worksheet status, the button label is Approve and the Submit option is available in the dropdown. However, when an ownership change is in submitted status, the label of the button is Approve and the additional action available in the dropdown is Worksheet. If the ownership change is in Approved status the button label is Worksheet and there are no items in the Action dropdown menu. When the status is Processed, there is no further action possible and there is no button.
When an ownership change is approved, there are a number of validations that are carried out by merchandising to ensure successful creation of such transaction. If any item or location does not fulfill the validation criteria, this will result in Approval Error and such items/locations will be written to the Ownership Change Approval Error screen. The ownership change transaction will remain in the submitted status and there will be an error symbol next to the item/location in the respective table and also next to Ownership Change in the page header as hyperlink to open Ownership Change Approval Errors screen.
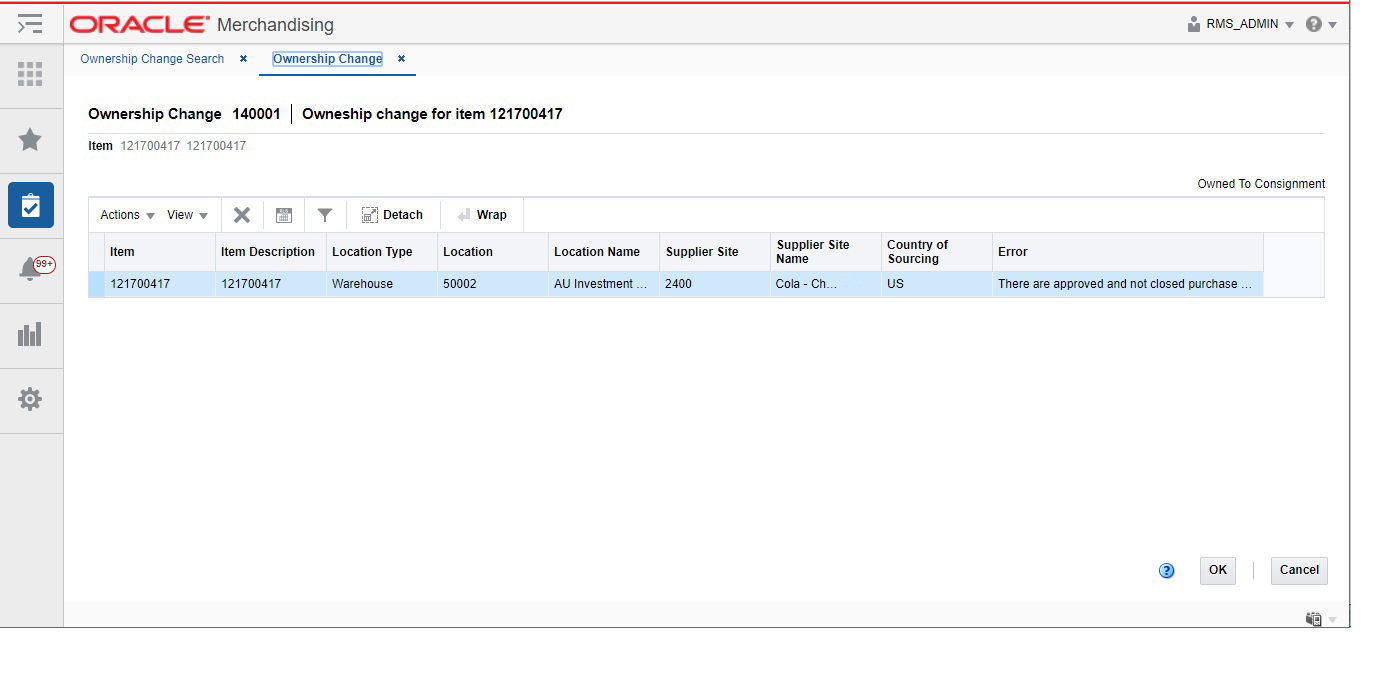
Review Approval Errors
The Ownership Change Approval Errors screen allows you to view the reasons why an ownership change cannot yet be approved. This screen will show all the item/locations that do not fulfill the validation criteria or the items that do not have any location specified in the ownership change screen. User can choose and delete item/locations listed here. Once deleted on this screen, they will also be deleted from the Ownership change screen tables.
You can access this screen by clicking the Error icon in the Items or Location table or Error icon at the page header on the Ownership Change screen.
-
From the Items table – If this screen is accessed by clicking the error icon in the Items table then the table in the screen will list only the items and associated locations for which is error icon was clicked.
-
From the Locations table – If this screen is accessed by clicking the error icon in the Locations table then the table in the screen will list only the particular location for which is error icon was clicked.
-
From the page header – If this screen is accessed by clicking the error icon in the page header then the table in the screen will list all the items and associated locations with errors.