5 Item Foundation Data
In the context of item maintenance, there are several attributes that could vary for different retailers and for different product hierarchies. To provide flexibility many of these attribute groups have been made configurable or user defined. Some such groups these include differentiators, pack templates, brands, seasons and phases, user-defined attributes (UDAs), and tickets. More details are available for creating and maintaining these item attributes in the sections below.
Manage Diff Types and Diffs
In Merchandising, differentiators are used as unique identifying features to differentiate an item from its parent. This feature is used primarily for fashion items, where SKU items are differentiated from styles by size, color, fit and so on. However, differentiators can be used for any product type. Diff Types are used to classify differentiators, whereas differentiators represent the components of the diff type. For example, if the diff type is color, then the differentiators could be red, blue, and so on. Differentiators are created, maintained or deleted in Merchandising through spreadsheet upload and download processes. These processes are accessed through the main Merchandising task list under Foundation Data > Download Foundation Data and Foundation Data > Upload Foundation Data.
To add or update diffs, you will select the template type of Items from the Download Data screen and then the template Differentiators. Click the Download button and when prompted, choose to either open the .ods file that is generated or save the file and open it separately in the spreadsheet application of your choice. Once opened, there will be four sheets that can be modified - Diff Types, Diff Type Translations, Diff IDs, and Diff ID Translations.
To add a new diff type, start in the Diff Types tab, and, in a blank line in the template, select the action type of Create. Next enter a unique diff type (up to 6 characters) and the description for the diff type in the primary language (as defined in the Merchandising system options) of up to 120 characters. Next, if you wish to add translations for the diff type in languages other than the primary language, this can be done in the Diff Type Translations tab. Navigate to a blank row and select the action type of Create and the language in which the translated description will be entered. Then, enter the diff type for which the translation applies. Finally, enter the translated description. The translated description can also be up to 120 characters long. This is an optional step.
Next, the diff IDs that belong in this diff type must be added. To do this, move to the Diff IDs tab in the spreadsheet. Again, navigate to a blank row in the sheet and select an action type of Create. Enter the first diff ID (up to 10 characters), along with its description. The description here should be in the primary language (as defined in the Merchandising system options) and can be up to 120 characters. Then add the diff type that was added in the Diff Type tab. You can optionally choose to add Industry Code (up to 10 characters) and Industry Subgroup (up to 10 characters). The last two columns are used to hold the unique code and sub group thereof used by industry standards to identify the differentiator. Continue this process until all the new IDs for the type have been added. If you are adding a new diff ID to an existing diff type, this same process would apply, just using an existing diff type instead.
Lastly, if you wish to add translations for the diff IDs in languages other than the primary language, this can be done in the Diff ID Translations tab. Navigate to a blank row and select the action type of Create and the language in which the translated description will be entered. Then, enter the diff ID for which the translation applies. Finally, enter the translated description. The translated description can also be up to 120 characters long. This is an optional step.
If you would like to update any details for existing diff types or IDs, a similar process will be followed as that described above for creating new types or IDs. First, download the spreadsheet, and then navigate to the tab where you would like to make your updates.
The following columns can be updated in each tab:
-
Diff Types - Description
-
Diff Type Translations - Description
-
Diff IDs - Diff Description, Industry Code, Industry Subgroup
-
Diff ID Translations - Diff Description
In the tab where you are going to make your updates, select the action type of Update, and then correct the value in the spreadsheet.
If you wish to delete a Diff Type or ID, update the action column to select Delete in each of the tabs where it occurs. A diff type cannot be deleted if there are diff IDs already created under it. Similarly, a diff ID cannot be deleted if an item is created by using the diff.
For all actions defined above, once all the updates have been made to the data in the spreadsheet, save the file and close it. Then, return to the Merchandising screens and select Foundation Data > Upload Foundation Data from the main task list. In this screen, select the template type Items and the template Differentiators. This will generate a process description automatically, but this can be updated if desired. Lastly, select the Browse button and navigate to the directory where you saved the updated spreadsheet.
Note:
Because all the tabs in this spreadsheet have a lot of rows, it's recommended that you delete any you are not updating from the template. This will not remove them from the system, but will make your updates process faster. Worksheets and columns in the spreadsheet cannot be removed, however.To review the status of the upload and check whether any errors occurred, select the Foundation Data > Review Status task from the main task list.
See also Download/Upload Data from Spreadsheets.
Manage Diff Groups
The Differentiator Groups page is used for maintaining differentiator groups. Differentiator groups are used to simplify associating items with multiple differentiators. Differentiator groups can also be assigned to levels of merchandise or organizational hierarchies. You can add, edit, delete or view differentiator groups in this page.
The Differentiator Groups page contains the following sections.
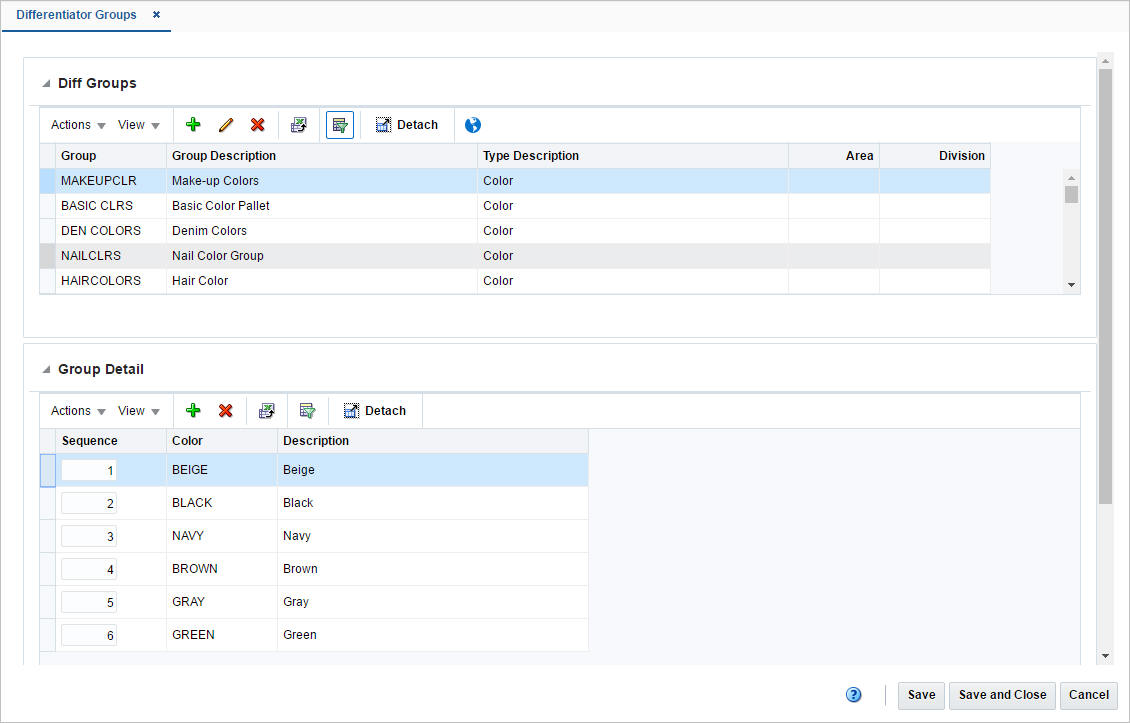
Group
The Groups section displays the available differentiator groups.
Groups - Actions Menu and Icons
Use the Actions Menu and icons to apply actions to the table. You can perform the actions listed below.
Table 5-1 Groups - Actions Menu/Icons and Description
| Actions Menu/Icons | Description |
|---|---|
|
Add and Add icon |
You can add new groups by selecting Actions > Add or by using the Add icon. For more information about how to add groups, see the Adding a New Differentiator Group section. |
|
Delete and Delete icon |
You can delete differentiator groups:
|
|
Edit and Edit icon |
Select Actions > Edit or use the Edit icon to edit the selected groups. For more information about how to edit a group, see the Editing a Differentiator Group section. |
|
Export to Excel and Export to Excel icon |
You can export the records in the table to a Microsoft Excel spreadsheet by selecting Actions > Export to Excel or by using the Export to Excel icon. |
|
Translate and Translate icon |
You can create a translation by selecting Actions > Translate or by using the Translate icon. |
Groups - View Menu and Icons
You can customize the view of the table by using the options in the View Menu.
Table 5-2 Groups/Group Details- View Menu/Icons and Description
| View Menu/Icons | Description |
|---|---|
|
Columns |
You can manage which of the columns will be shown in the table by clicking the Show All and Manage Columns options. |
|
Detach and Detach icon |
You can view the tables in the application in a separate page by clicking Detach or by using the Detach icon. |
|
Sort |
You can sort columns by the following options:
|
|
Reorder Columns |
You can reorder columns by clicking the Reorder Columns option. |
|
Query by Example and Query by Example icon |
You can filter the items by one or multiple column values by clicking the Query by Example option or by using the Query by Example icon. |
Group Details
In the Group Details section you can maintain the differentiators that are members of the group and specify their listing order.
Adding a New Differentiator Group
To add a new differentiator group, follow the steps below.
-
From the Tasks menu, select Foundation Data > Items > Differentiator > Groups. The Differentiator Groups page appears.
-
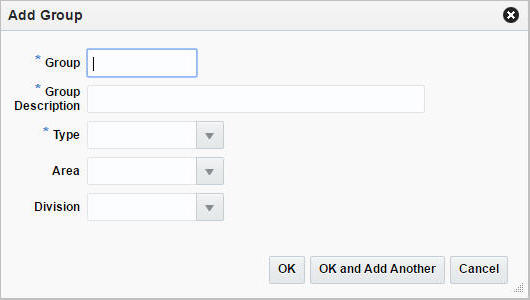
In the Groups section, select Actions > Add, or use the Add icon. The Add Group page appears.
-
In the Group field, enter the group name. This is a required field.
-
In the Group Description field, enter a more detailed description for the group. This is a required field.
-
In the Type field, enter, select or search for a type ID. This field is a required field.
-
In the Area field, enter, select or search for an area.
-
In the Division field, enter, select or search for a division.
-
Then choose one of the following options.
-
Click OK to add the group and close the page.
-
Click OK and Add Another to add additional groups.
-
Click Cancel to reject all entries and close the page.
-
-
Adding Group Details to Differentiator Groups
To add details to differentiator groups, follow the steps below.
-
In the Group Detail section, select Actions > Add, or use the Add icon. The Add Detail page appears.
-
In the Sequence field, enter the sequence number for the group detail.
Note:
You can also add the sequence number for the group detail, directly in the table. -
In the Diff Type Description field, enter, select or search for the diff type description. This field is a required field.
-
Then choose one of the following options.
-
Click OK to add the detail to the diff group and close the page.
-
Click OK and Add Another to add additional details to the diff group.
-
Click Cancel to reject all entries and close the page.
-
Editing a Differentiator Group
To edit a diff group, follow the steps listed below.
-
From the Tasks menu, select Foundation Data > Items > Differentiator > Groups. The Differentiator Groups page appears.
-
In the Groups section, select Actions > Edit, or use the Edit icon. The Edit Group page appears.
-
In the Group Description field, change the description for the group, as necessary.
-
In the Area field, enter, select or search for another area, if necessary.
-
In the Division field, enter, select or search for another division, if necessary.
-
Then choose one of the following options.
-
Click OK to edit the group and close the page.
-
Click Cancel to reject all entries and close the page.
-
-
Manage Diff Ranges
The Manage Diff Ranges option opens the Manage Range page. In this page you can delete a diff range or add, edit, delete or view diff range details.
To manage a diff range, follow the steps below.
For more information about the available fields and functions in this page, see the Creating Differentiator Ranges section.
-
From the Tasks menu, select Foundation Data > Items > Differentiators > Manage Diff Ranges. The Manage Range page appears.
-
In the Range Field, enter, select or search for the diff range ID you want to edit. The diff range description and range type as well as the diff types and groups are displayed.
-
Change the diff range description, if necessary.
-
In the Details section, add, edit or delete diff range details, as necessary.
-
Note:
To include diffs in the diff range, see the Adding Diff Group Details section.To edit diffs of a diff range, see the Editing Diff Group Details section.
-
Then select one of the following options.
-
Click Save and Close to save your changes and close the page.
-
Click Save to save your changes.
-
Click Save and Edit Another to save the current change and edit additional diff ranges.
-
Click Cancel to reject all entries and close the page.
-
Creating Differentiator Ranges
The Create Diff Range option opens the Differentiator Range page. In this page you can create, edit, delete and view ranges of differentiators.
A differentiator range is a list of differentiators that are grouped under one ID. A differentiator range can be used to apply multiple differentiators to an item with less repetition and effort than applying each differentiator ID individually.
The Differentiator Range page contains the following sections.
Range
The Range section contains the following fields.
Table 5-3 Range - Fields and Description
| Fields | Description |
|---|---|
|
Range |
Enter a range. |
|
Translate and Translate icon |
You can create a translation by using the Translate icon. |
|
Range Type |
Select a range type from the list. |
|
Type 1 - 3 |
Enter, select or search for a type. You can add up to 3 diff types. |
|
Group |
Enter, select or search for groups for diff types 1-3. |
Detail
In the Detail section you can add, edit, delete and view diffs of the diff range.
Note:
If you create a new diff range, press Add Details to open this section.Creating a Differentiator Range
To create a diff range, follow the steps below.
-
From the Tasks menu, select Foundation Data > Items > Differentiators > Create Diff Range. The Differentiator Range page appears.
-
In the Range Field, enter a range ID and description of the diff range.
-
In the Range Type field, select a type from the list.
Note:
After you have entered the diff range ID, description and type, the Like Range button enables. Use the button to create a diff range from an existing one. -
In the Type fields, enter, select or search for the desired diff types you want to include in the range.
-
In the Group fields, enter, select or search for the desired diff groups you want to include in the range.
Note:
Repeat steps 4 - 5 for up to three diff type/group combinations.To include diffs in the diff range, see the Adding Diff Group Details section.
-
Then select one of the following options.
-
Click Save and Close to save the current diff range and close the page.
-
Click Save to save the current diff range.
-
Click Save and Create Another to save the current entry and create additional diff ranges.
-
Click Cancel to reject all entries and close the page.
-
Adding Diff Group Details
To add a diff to a diff range, follow the steps below.
-
In the Differentiator Range page, click Add Details to enable the Detail section.
-
Then select Actions > Add, or use the Add icon. The Add Detail page appears.
-
In the Differentiator Group field, enter, select or search for a new diff you want to add to the diff range.
-
In the Ratio/Percentage field, enter the rate/percentage for the selected diff.
-
Then choose one of the following options.
-
Click OK to add the diff to the table and close the page.
-
Click OK and Add Another to add the current diff and add additional diffs.
-
Click Cancel to reject all entries and close the page.
-
-
Editing Diff Group Details
To edit a diff of a diff range, follow the steps below.
-
In the Differentiator Range page, open the Detail section.
-
Then select Actions > Edit or use the Edit icon. The Edit Detail page appears.
-
In the Differentiator Group field(s), enter, select or search for a another diff.
-
In the Ratio/Percentage field, enter the rate/percentage for the selected diff.
-
Then choose one of the following options.
-
Click OK to save the changes and close the page.
-
Click Cancel to reject all entries and close the page.
-
-
Manage Diff Ratios
In the Differentiator Ratio page you can create, edit, or view a differentiator ratio. The differentiator ratio is based on the sales history for an item in the department, class, and subclass. You can select the type of sales (regular, promotional, or clearance) and the time period to include in the calculation of the differentiator ratio in this page. The ratio is calculated by a batch program.
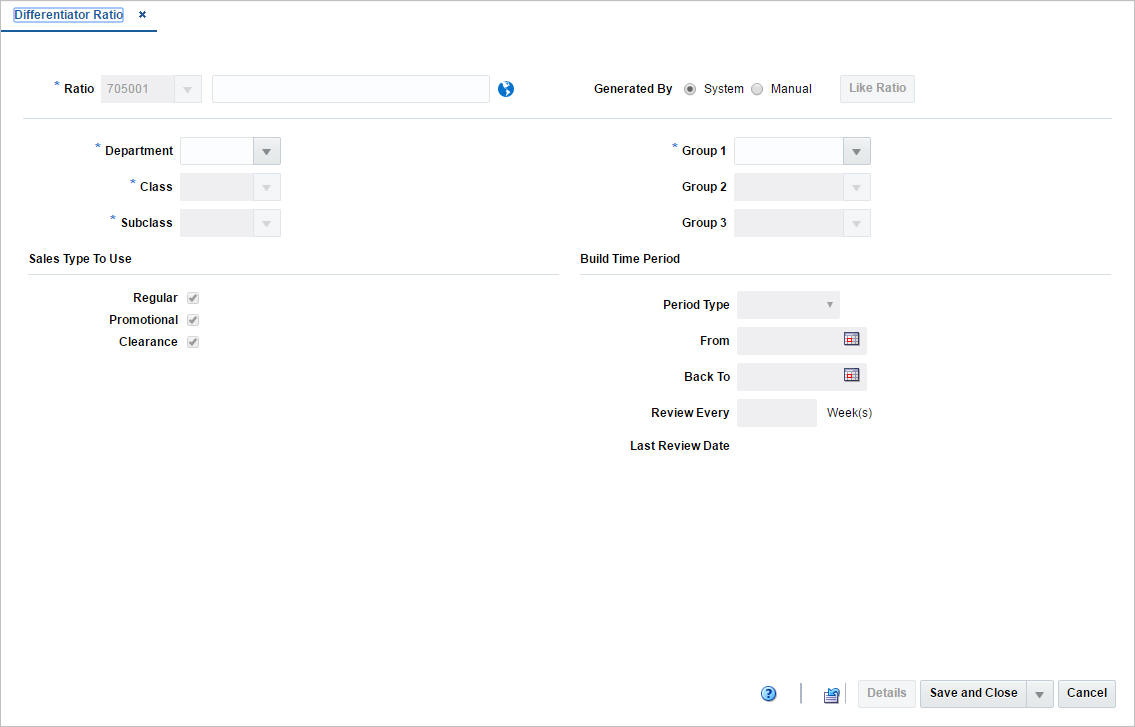
The Differentiator Ratio page contains the following fields.
Table 5-4 Differentiator Ratio - Fields and Description
| Fields | Description |
|---|---|
|
Ratio |
The ratio ID is generated automatically. Enter a description for the ratio. This field is a required field. |
|
Translate icon |
You can create a translation by using the Translate icon. |
|
Generated By |
Select manual if the diff ratio is calculated manually or system if through a batch program. If you select Manual, the Like Ratio button is enabled and all the other fields are disabled. |
|
Like Ratio button |
Opens the Like Ratio Selection page, to create a diff ratio from an existing ratio. This button is only available, if you create a differentiator ratio. |
|
Department |
Enter, select or search for the department. This field is a required field. |
|
Class |
Enter, select or search for the class. This field is a required field. |
|
Subclass |
Enter, select or search for the subclass. |
|
Group 1 - 3 |
Enter, select or search for the groups. |
|
Sales Type to Use: |
Select the sales type you want to use for the diff ratio. |
|
Regular |
Indicates that you want to use regular sales. |
|
Promotional |
Indicates that you want to use promotional sales. |
|
Clearance |
Indicates that you want to use clearance sales. |
|
Build Time Period: |
Select the time period for the diff ratio. |
|
Period Type |
Displays the type of period to take the sales history for. Select the period type from the list. |
|
From |
Displays the starting date for the sales history to be used. Enter a from date or use the Calendar icon to select a date. |
|
Back To |
Displays the weeks back of sales history to be used. Enter a back to date or use the Calendar icon to select a date. |
|
Review Every |
Enter the number of weeks. |
|
Last Review Date |
Displays the last review date. |
Creating a Differentiator Ratio
To create a diff ratio, follow the steps below.
-
From the Tasks menu, select Foundation Data > Items > Differentiators > Create Diff Ratio. The Differentiator Ratio page appears.
-
In the Ratio field, enter the description of the diff ratio.
-
In the Generated By area, select System or Manual.
-
If you select System:
-
Enter, select or search for the department, class, and subclass.
-
Enter, select or search for up to three diff groups to be associated with this ratio.
-
In the Sales Type area, select the types of sales you want to include in the ratio.
-
In Build Time Period area, select the type of time period. Then enter the dates.
-
In the Review Every Week(s) field, enter how often the ratio should be reviewed.
-
-
If you select Manual:
-
The Like Ratio button enables, all other fields are disabled.
-
Select the Like Ratio button. The Select Like Ratio page appears.
-
In the Ratio field, enter, select or search for the diff ratio you want to copy from.
-
Then choose:
-
Click OK. The settings of the selected diff ratio are applied to the current diff ratio.
-
Click Cancel to reject all entries and close the page.
-
-
Editing a Differentiator Ratio
To edit a diff ratio, follow the steps below.
-
From the Tasks menu, select Foundation Data > Items > Differentiators > Manage Diff Ratios. The Differentiator Ratio page appears.
-
Enter or select search criteria as desired to make the search more restrictive.
-
Click Search. The diff ratios that match the search criteria are displayed in the Results section.
-
In the Ratio column, click the ratio link, or mark a record and select Actions > Edit, or use the Edit icon. The Differentiator Ratio page appears.
-
Edit the fields, as necessary.
Differentiator Ratio Detail Page
In the Differentiator Ratio Detail page you can edit and view the results of a differentiator ratio that has been calculated by a batch program. In edit mode, if you select a store that is not yet associated with the current diff ratio, you can base the store's ratios on those for another store. After you select a store or all stores, you can edit the quantity for each diff or diff combination.
The Differentiator Ratio Detail page contains the following sections.
-
Header
The header displays the ratio, department, class and subclass ID and description.
Diff Ratio Detail Table
The table contains the diff IDs and description as well as the quantity.
Editing Diff Ratio Details
To edit diff ratio details, follow the steps below.
-
Edit the description, sales types, and review number as necessary.
-
Click Detail. The Differentiator Ratio Detail page appears.
-
In the Level field, select if you want to edit the diffs at all stores, or at a specific store. Then enter, select or search for the store ID.
-
Click Search.
-
If you select a store that is not yet associated with the diff ratio, you are prompted to add the store using another store as template.
-
Select Yes to confirm the prompt. The Create Like Store page appears.
-
In the Store field, enter, select or search for the store.
-
Then choose one of the following options.
-
Click OK to copy the details and close the page.
-
Click Cancel to reject all entries and close the page.
-
-
Edit the quantity of each diff as necessary in the table.
-
Click the Recalculate icon to update the ratios in the Ratio column.
-
Then choose one of the following options.
-
Click Save to save your changes.
-
Click Save and Close to save your changes and close the page.
-
Click Save and Edit Another to edit additional diff ratios.
-
Managing Diff Ratios
The Manage Diff Ratios option opens the Differentiator Ratio Search page. In this page you can perform the following actions.
-
Search for diff ratios by various search criteria
-
View the search results
-
View a diff ratio
-
Create a diff ratio
-
Edit diff ratio
You can access the Differentiator Ratio Search page from the Task menu, select Foundation Data > Items > Differentiators > Manage Diff Ratios. The Differentiator Ratio Search page appears.
The Differentiator Ratio Search page contains the following sections.
-
Search
For more information about how to search for a diff ratio, see the Searching for a Diff Ratio section.
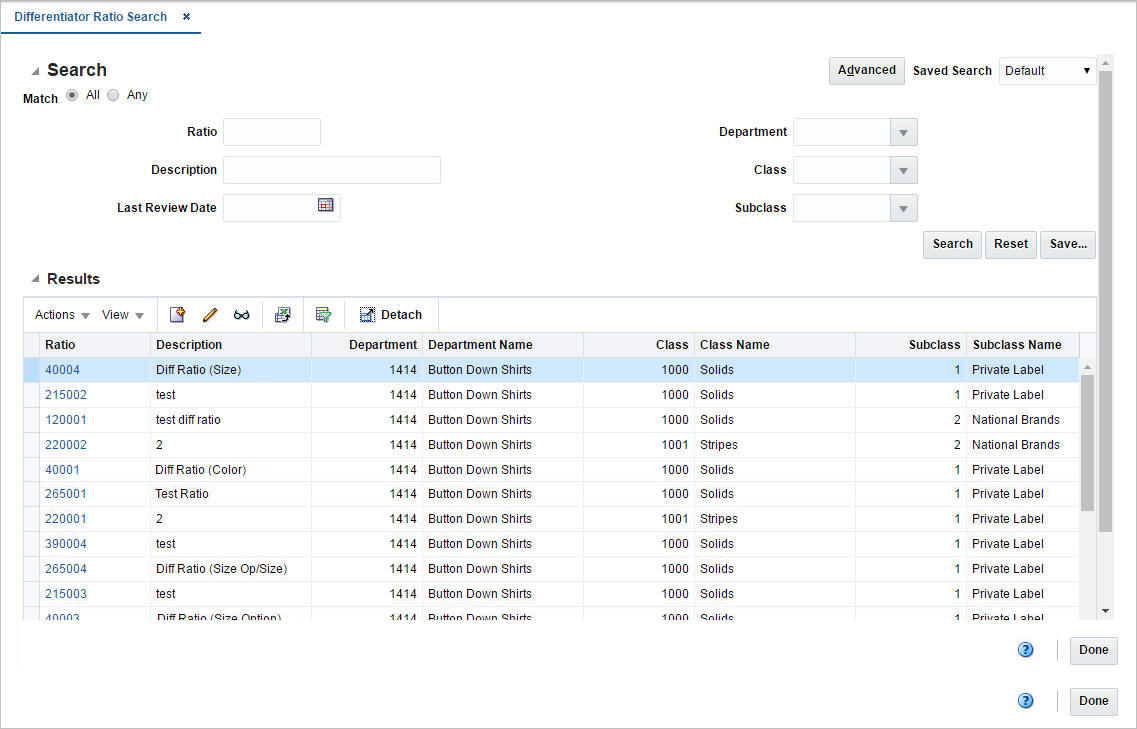
Searching for a Diff Ratio
To search for a diff ratio:
-
From the Task menu, select Foundation Data > Items > Differentiators > Manage Diff Ratios. The Differentiator Ratio Search page appears.
-
You can search for a diff ratio by using basic or advanced search criteria, depending on the requirement. The basic mode is the default search mode.
-
Click Advanced to access the search section in advanced mode.
-
Click Basic to return to basic mode.
-
Searching for a Diff Ratio Through the Basic Search Criteria
To search for a diff ratio by using basic search criteria:
-
Enter, select or search for one or all of the following basic search criteria.
Table 5-5 Diff Ratio Search - Basic Search Criteria and Description
Fields Description Match option
Check radio button All or Any.
All - only diff ratios matching all entered search criteria are shown.
Any - diff ratios matching any of the entered search criteria are shown.
Ratio
Enter the ratio ID.
Description
Enter the ratio description.
Last Review Date
Enter the last review date or use the Calendar icon to select a date.
Department
Enter, select or search for the department.
Class
Enter, select or search for the class.
Subclass
Enter, select or search for the subclass.
-
Click the Saved Search list to select one of the saved search criteria. Selecting a saved search populates the search section with the saved search criteria. If the run automatically function is enabled for the search, the search is executed immediately.
You can also personalize your saved searches by selecting Personalize. The Personalized Saved Searches page appears.
For more information about the Personalized Saved Search, see Personalize Saved Search in the Oracle® Retail Merchandising Do the Basics User Guide.
-
Click Search. The diff ratios that match the search criteria are displayed in the Results section.
-
Click Reset to clear the search section and results.
-
Click Save As... to save the current search criteria. The Create Saved Search page appears.
For more information about how to save your search criteria, see Create Saved Search in the Oracle® Retail Merchandising Do the Basics User Guide.
-
Click Done to close the page.
Searching for Diff Ratios Through Advanced Search Criteria
To search for a diff ratio by using advanced search criteria:
-
To search by using advanced search criteria, enter or select one or all of the advanced search criteria.
Table 5-6 Diff Ratio Search - Advanced Search Criteria and Description
Fields Description Match option
Check radio button All or Any.
All - only diff ratios matching all entered search criteria are shown.
Any - diff ratios matching any of the entered search criteria are shown.
Ratio
Enter the ratio ID.
Description
Enter the ratio description.
Last Review Date
Enter the last review date or use the Calendar icon to select a date.
Department
Enter, select or search for the department.
Class
Enter, select or search for the class.
Subclass
Enter, select or search for the subclass.
Division
Enter, select or search for the division.
Group
Enter, select or search for the group.
-
To narrow down the search, use the list next to the search fields. For example, determine if the entered value should be equal or not equal to the search result.
-
Click the Saved Search list to select one of the saved search criteria. Selecting a saved search populates the search section with the saved search criteria. If the run automatically function is enabled for the search, the search is executed immediately.
You can also personalize your saved searches by selecting Personalize. The Personalized Saved Searches page appears.
For more information about the Personalized Saved Search, see Personalize Saved Search in the Oracle® Retail Merchandising Do the Basics User Guide.
-
Click Search. The diff ratios that match the search criteria are displayed in the Results section.
-
Click Reset to clear the search section and results.
-
Click Save As... to save the current search criteria. The Create Saved Search page appears.
For more information about the Personalized Saved Search, see Personalize Saved Search in the Oracle® Retail Merchandising Do the Basics User Guide.
-
Click Add Fields to add more fields for the advanced search. To remove the field from the search, click the x right next to the field.
-
Click Reorder to change the order of the available search fields. The Reorder Search Fields page appears.
-
Select the desired search field and use the up and down arrows to rearrange the order of the fields.
-
Click OK to confirm the new order of the fields and close the page.
-
Click Cancel to reject any changes and close page.
-
-
Click Done to close the page.
Results
The Results section lists the retrieved diff ratios. The Results table shows the following columns by default.
-
Ratio
-
Description
-
Department and Department Name
-
Class and Class Name
-
Subclass and Subclass Name
-
Last Review Date
Manage Pack Templates
Creating Pack Template
A pack template is used to order diffs that are frequently ordered as a set, rather than ordering individual items. When creating a pack item, you must specify a quantity for each combination.
To create a pack template:
-
From the Tasks menu, select Items > Create Pack Template. The Create Pack Template page appears.
-
In the Template field, a Pack Template ID is automatically generated and displayed. Enter a description for the template.
-
In each Type field, enter the ID of a diff type you want to assign to this template for up to four diff types, or select the diff type.
-
In each Group field, select the diff group you want to assign to this template, for up to four diff groups.
-
For each Diff field, enter a diff ID, select or search for a diff for each diff group/type combination. The field label will display the value that you selected in the Diff Type field.
-
Click Add Details. The Detail section appears. For more information about adding details, see the Adding Details section.
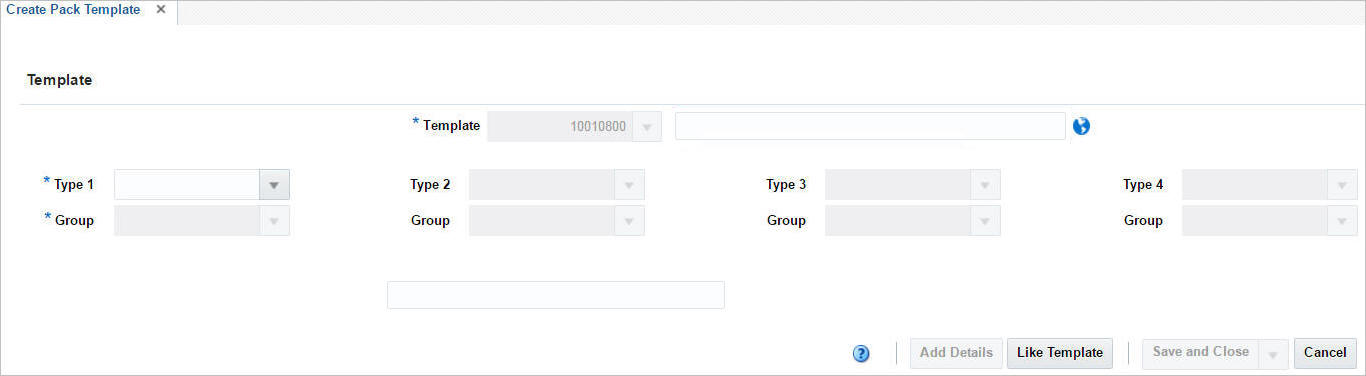

Detail
The detail table displays the differentiator values.
Adding Details
To add details:
-
In the Detail section, select Actions > Add, or click the Add icon
 . The Add Detail page appears.
 -
In the enabled fields, enter, select or search for the diffs.
-
In the Quantity field, enter the quantity.
-
Then choose one of the following options.
-
Click OK to add the diff details to the table and close the page.
-
Click OK and Add Another to add additional diff details.
-
Click Cancel to reject all entries and close the page.
-
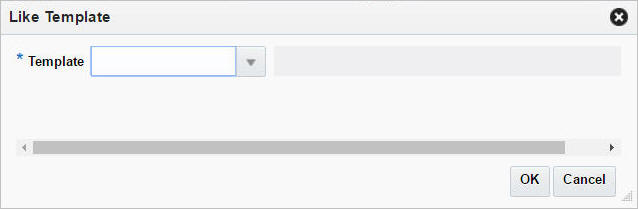
Adding a Like Template
The Like Template button is enabled when you enter the value of a group.
To add a like template:
-
In each Type field, enter the ID of a diff type you want to assign to this template for up to four diff types, or select the diff type.
-
In each Group field, select the diff group you want to assign to this template, for up to four diff groups.
-
Click Like Template. The Like Template page appears.
-
Then choose one of the following options.
-
Click OK to create the like template and close the page.
-
Click Cancel to reject all entries and close the page.
-
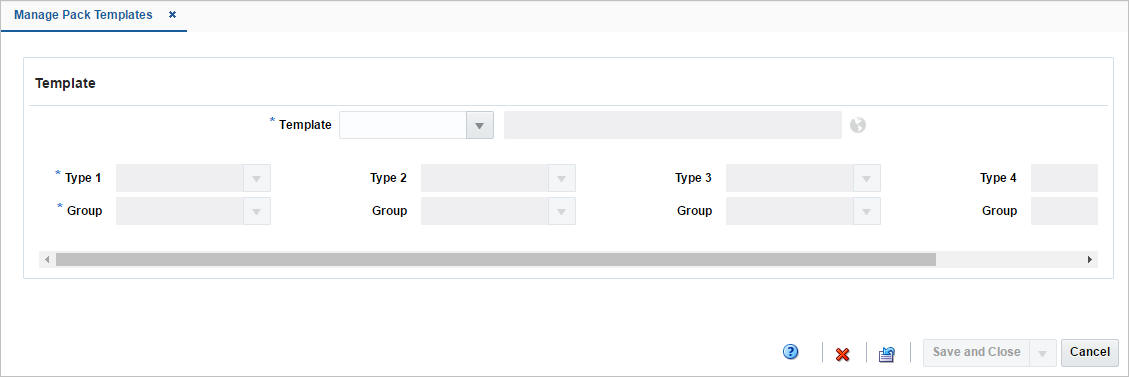
Managing Pack Templates
To manage pack templates:
-
From the Tasks menu, select Items > Manage Pack Templates. The Manage Pack Template page appears.
-
In the Template field, you can either enter, select or search for a template.
-
The Type and Group fields of that particular template gets populated by default.
-
The columns of the template get populated in the Details table.
Manage Brands
Brand is one of the important item attributes used to help establish an item's unique identity. They can optionally be attached to an item during or after item creation. Further, Brand can be used as search or grouping criteria in Merchandising or allied systems. To upload or maintain brands, a spreadsheet download and upload process is used. This functionality is accessed through the main Merchandising task list under Foundation Data > Download Foundation Data and Foundation Data > Upload Foundation Data.
To upload or modify brands, select the template type of Items from the Download Data screen and then the template Brands. Click the Download button and when prompted, choose to either open the .ods file that is generated or save the file and open it separately in the spreadsheet application of your choice.
Once opened, there will be 2 sheets that can be modified - Brands and Brand Translations. The Brands will show all the brand names along with their long descriptions. This tab supports addition, update and delete of brands. Next, Brand Translations tab will show the brands with their translated description in other languages, as applicable for your implementation. This tab allows for the addition of new rows, removal of existing rows, and update to existing.
To add a new brand, select the Brands tab and in a blank line in the template, select the action type of Create and enter the Brand Name. The name can be up to 30 characters. Next, add the description of the brand in the primary language (as defined in the Merchandising system options). The description can be up to 120 characters.
If you wish to add brand description in any other languages, then select the Brand Translations tab and in a blank row select an action type of Create. Then select the language in which you wish to add description in. Next enter brand name which was added in the Brands tab translated description and finally the translated description. The translated description can also be up to 120 characters long. This is an optional step.
If you would like to update any details a similar process will be followed as that described above for creating new brand. First, download the Brands spreadsheet, and then navigate to the tab where you would like to make your updates.
The following columns can be updated in each tab:
-
Brands – Brand Description
-
Brand Translations – Brand Description
In the tab where you are going to make your updates, select the action type of Update, and then correct the value in the spreadsheet. Once your updates are complete, save and close the spreadsheet.
If you wish to delete a Brand, update the action column to select Delete in each of the tabs where it occurs.
For all actions defined above, once all the updates have been made to the data in the spreadsheet, save the file and close it. Then, return to the Merchandising screens and select Foundation Data > Upload Foundation Data from the main task list. In this screen, you'll again select the template type Items and the template Brands. This will generate a process description automatically, but this can be updated if desired. Lastly, you'll select the Browse button and navigate to the directory where you saved the updated spreadsheet.
To review the status of the upload and check whether any errors occurred, select the Foundation Data > Review Status task from the main task list.
See also Download/Upload Data from Spreadsheets.
Manage Seasons/Phases
In Merchandising, seasons can be used to define specific time periods of year for which distinct merchandise planning is done. For example - Spring-Summer, Autumn-Winter, Back to School, etc. Seasons can further be divided into Phases for more granular planning. Each item in Merchandising can be attached to a season/phase combination. Seasons and phases are primarily used for replenishment, creating item lists, reporting, and ticketing. Seasons and phases are created, maintained or deleted in Merchandising through spreadsheet upload and download processes. These processes are accessed through the main Merchandising task list under Foundation Data > Download Foundation Data and Foundation Data > Upload Foundation Data.
To add or update seasons or phases, you will select the template type of Items from the Download Data screen and then the template Seasons/Phases. Click the Download button and when prompted, choose to either open the .ods file that is generated or save the file and open it separately in the spreadsheet application of your choice. Once opened, there will be four sheets that can be modified - Seasons, Season Translations, Phases, and Phase Translations.
To add a new season, start in the Seasons tab, and, in a blank line in the template, select the action type of Create. Next enter a unique season ID (up to 3 numeric characters) and the description for the season in the primary language (as defined in the Merchandising system options) of up to 120 characters. Next, enter the start date and end date for the season in in the 'DD-MON-YYYY' format. Optionally, you can also enter the organization ID and merchandise ID in the subsequent columns to limit the users who can use the new season created, if data level security has been set up for users in the system. To limit it by the organizational hierarchy, in the Filter Org ID column, enter the ID of organization hierarchy that will be able to use this season at the level that is defined in the security configuration on System Options. This will be a chain, area, region, or district. To limit the use of the season by the merchandise hierarchy, in the Filter Merch ID column enter the ID of merchandise hierarchy that will be able to use this season at the level that is defined in the security configuration on system options. This will be a division, group, department, class, or subclass. If the merchandise hierarchy level defined in the security configuration is class then enter the department ID as the Filter Merch ID, as well as the class in the Filter Merch ID Class. If the merchandise hierarchy level is set to subclass, then the department ID should be entered as the Filter Merch ID, and the class and subclass entered as the Filter Merch ID Class and Filter Merch ID Subclass, respectively.
For more information on how to configure data level security, see the Merchandising Security white paper, available on My Oracle Support under reference 1585843.1.
Next, if you wish to add translations for the season in languages other than the primary language, this can be done in the Season Translations tab. Navigate to a blank row and select the action type of Create and the language in which the translated description will be entered. Then, enter the season for which the translation applies. Finally, enter the translated description. The translated description can also be up to 120 characters long. This is an optional step.
Next, the phases that belong in this season must be added. To do this, move to the Phases tab in the spreadsheet. Again, navigate to a blank row in the sheet and select an action type of Create. Enter the season ID that you added in the Seasons tab. Then enter the first phase ID (up to 3 characters), along with its description. The description here should be in the primary language (as defined in the Merchandising system options) and can be up to 120 characters. Next, enter the start date and end date for the phase in in the 'DD-MON-YYYY' format. The start and end dates of the phase should be within the start and end dates specified for the season. Continue this process until all the new phases for the season have been added. If you are adding a new phase to an existing season, this same process would apply, just using the existing season instead.
Lastly, if you wish to add translations for the phases in languages other than the primary language, this can be done in the Phase Translations tab. Navigate to a blank row and select the action type of Create and the language in which the translated description will be entered. Then, enter the season and phase for which the translation applies. Finally, enter the translated description. The translated description can also be up to 120 characters long. This is an optional step.
If you would like to update any details for existing seasons or phases, a similar process will be followed as that described above for creating new seasons or phases. First, download the spreadsheet, and then navigate to the tab where you would like to make your updates.
The following columns can be updated in each tab:
-
Seasons - Season Description, Start Date, End Date, Filter Org ID, Filter Merch ID, Filter Merch ID Class, Filter Merch ID Subclass
-
Season Translations - Season Description
-
Phases - Season, Phase Description, Start Date, End Date
-
Phase Translations - Phase Description
In the tab where you are going to make your updates, select the action type of Update, and then correct the value in the spreadsheet.
If you wish to delete a season or phase, update the action column to select Delete in each of the tabs where it occurs. A season cannot be deleted if there are phases already created under it. Similarly, a phase cannot be deleted if it's associated with an item in the system.
For all actions defined above, once all the updates have been made to the data in the spreadsheet, save the file and close it. Then, return to the Merchandising screens and select Foundation Data > Upload Foundation Data from the main task list. In this screen, select the template type Items and the template Seasons/Phases. This will generate a process description automatically, but this can be updated if desired. Lastly, select the Browse button and navigate to the directory where you saved the updated spreadsheet.
To review the status of the upload and check whether any errors occurred, select the Foundation Data > Review Status task from the main task list.
See also Download/Upload Data from Spreadsheets.
Manage User Defined Attributes
User Defined Attributes (UDAs) are used to capture attribute values that may be specific to a distinct item or item hierarchy such as handling instructions, material composition, import dates, etc. Because these attributes are user defined, they are able to be configured to meet the unique needs of each implementation. UDAs are created, maintained or deleted in Merchandising through spreadsheet upload and download processes. These processes are accessed through the main Merchandising task list under Foundation Data > Download Foundation Data and Foundation Data > Upload Foundation Data.
To add or update UDAs, you will select the template type of Items from the Download Data screen and then the template User Defined Attributes. Click the Download button and when prompted, choose to either open the .ods file that is generated or save the file and open it separately in the spreadsheet application of your choice. Once opened, there will be five sheets that can be modified - UDAs, UDA Translations, UDA Values, UDA Value Translations, and UDA Defaults.
To add a new UDA, start in the UDAs tab, and, in a blank line in the template, select the action type of Create. Next enter a unique UDA id (up to 5 digits) and the description for the UDA in the primary language (as defined in the Merchandising system options) of up to 120 characters. Next, choose the type of UDA that you are creating by selecting Date, or Free Form Text, or List of Values as the Display Type. Then, select the Data Type that applies for the UDA, date, alphanumeric, or number. The Data Length field can be left blank as it is not used by Merchandising. Next, choose whether the UDA should allow only a single value. UDAs that are specified as single valued will allow the UDA to be added only once to a particular item. A UDA may be associated with an item twice if it is possible for it to have two different values. For example, a UDA of Fabric may have more than one valid value for an item. (e.g. Cotton and Wool).
Optionally, you can also enter the organization ID and merchandise ID in the subsequent columns to limit the users who can use the new UDA created, if data level security has been set up for users in the system. To limit it by the organizational hierarchy, in the Filter Org ID column, enter the ID of organization hierarchy that will be able to use this UDA at the level that is defined in the security configuration on System Options. This will be a chain, area, region, or district. To limit the use of the UDA by the merchandise hierarchy, in the Filter Merch ID column enter the ID of merchandise hierarchy that will be able to use this UDA at the level that is defined in the security configuration on system options. This will be a division, group, department, class, or subclass. If the merchandise hierarchy level defined in the security configuration is class then enter the department ID as the Filter Merch ID, as well as the class in the Filter Merch ID Class. If the merchandise hierarchy level is set to subclass, then the department ID should be entered as the Filter Merch ID, and the class and subclass entered as the Filter Merch ID Class and Filter Merch ID Subclass, respectively.
Note:
For newly UDAs, the ID captured in the UDA definition will be used as a key to cross reference the different UDA worksheets and will be replaced by a system generated value upon upload.Next, if you wish to add translations for the UDA in languages other than the primary language, this can be done in the UDA Translations tab. Navigate to a blank row and select the action type of Create and the language in which the translated description will be entered. Then, enter the UDA for which the translation applies. Finally, enter the translated description. The translated description can also be up to 120 characters long. This is an optional step.
For List of Values type UDAs, in addition to the above described attributes, the definition should also include the list of valid values that the UDA can take in the UDA Values worksheet. The values defined in this worksheet will be available for selection in the list of values for any given item or hierarchy. To add the values for a newly created UDA, navigate to a blank row in the UDA Values tab and select an action type of Create. Next, enter the UDA ID that you added in the UDAs tab. Then, enter a UDA value ID (up to 5 digits) and description (up to 120 characters) in the primary language. The UDA Value IDs must be unique for the UDA. Repeat these until all valid values have been added for the new UDA. As with the UDA, any translations you wish to add for the values can be entered in the UDA Value Translations tab. If you are adding a new detail to an existing UDA, this same process would apply, just using the existing UDA ID instead.
As part of the UDA template, defaults can be defined for a department, class, or subclass in the UDA Defaults tab. This is optional functionality, but allows for UDAs to be either automatically defaulted to items created in the hierarchy or make them required before items created in the hierarchy can be approved. For any UDA default defined as "required", if the hierarchy already has items associated to it that do not have the UDA defined, an error will be raised when processing the upload. To add a default, navigate to a blank row in the UDA Defaults tab and select an action type of Create. Next, enter the UDA ID and the department, class, and/or subclass for which the default applies. If it is a List of Values type UDA, then you can optionally specify the value that should default when items are created in the UDA Value column. Finally, select whether the UDA will be required. Repeat these steps for all departments, classes, or subclasses for which this UDA default will apply.
Note:
The New UDA Value column is used for updates only.If you would like to update any details for an existing UDA, a similar process will be followed as that described above for creating new UDAs. First, download the spreadsheet, and then navigate to the tab where you would like to make your updates.
The following columns can be updated in each tab:
-
UDAs - UDA Description, Single Value, Filter Org ID, Filter Merch ID, Filter Merch ID Class, Filter Merch ID Subclass
-
UDA Translations - UDA Description
-
UDA Values - UDA Value Description
-
UDA Value Translations - UDA Value Description
-
UDA Defaults - New UDA Value, UDA Required
In the tab where you are going to make your updates, select the action type of Update, and then correct the value in the spreadsheet.
If you wish to delete a UDA, update the action column to select Delete in each of the tabs where it occurs. A UDA cannot be deleted if it's associated with an item in the system. Translations and default for the UDA or the values associated with a UDA can also be deleted from an existing UDA in a similar manner; however the UDA values likewise cannot be deleted if associated with an item.
For all actions defined above, once all the updates have been made to the data in the spreadsheet, save the file and close it. Then, return to the Merchandising screens and select Foundation Data > Upload Foundation Data from the main task list. In this screen, select the template type Items and the template User Defined Attributes. This will generate a process description automatically, but this can be updated if desired. Lastly, select the Browse button and navigate to the directory where you saved the updated spreadsheet.
To review the status of the upload and check whether any errors occurred, select the Foundation Data > Review Status task from the main task list.
See also Download/Upload Data from Spreadsheets.
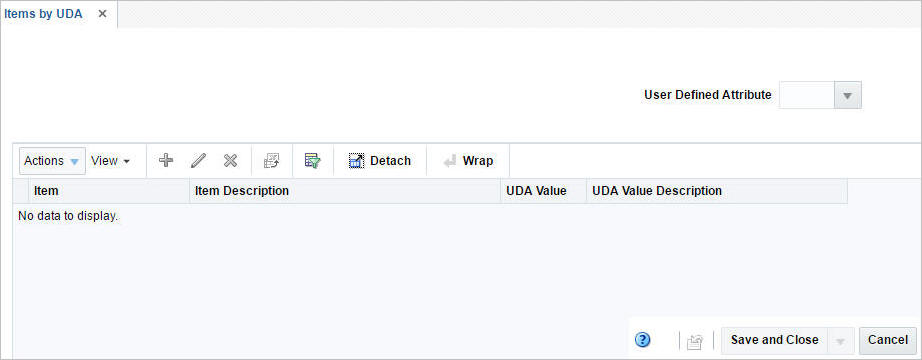
Items by User Defined Attribute
The Item by UDA page allows you to maintain and view the items that are associated with a user defined attribute (UDA). You can edit the default date, text, or value of the user defined attribute for each item.
To access the Items by UDA page, follow the steps below.
-
From the Tasks menu, select Items > Items by UDA. The Items by UDA page appears.
-
To search by user defined attribute, enter the user defined attribute, or click the Search link to search and select the user defined attribute.
-
The item and descriptions of the items by UDA appear.
-
Click Save and Close to save your changes and close the page.
Adding UDA to Items
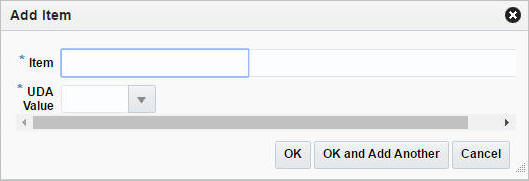
To add a UDA to items:
-
From the Tasks menu, select Items > Items by UDA. The Items by UDA page appears.
-
From the Actions menu, click Add or click the Add icon
. The Add Items Page appears. -
In the Item field, enter, select or search for the item from the list.
-
Add the UDA value, UDA date or UDA text.
-
Then choose one of the following options.
-
Click OK to add the UDA/Item combination to the table and close the page.
-
Click OK and Add Another to add additional item/UDA combinations.
-
Click Cancel to reject your entries and close the page.
-
Editing UDAs of an Item
To edit UDAs of an item:
-
From the Tasks menu, select Items > Items by UDA. The Items by UDA page appears.
-
From the Actions menu, click Edit or click the Edit icon.
 . The Edit Items page appears.
 -
The item is displayed by default in the Item field.
-
Edit the UDA value, UDA date or UDA text.
-
Then choose one of the following options.
-
Click OK to add your changes and close the page.
-
Click Cancel to reject all entries and close the page.
-
Manage Tickets
Tickets are used for providing multiple points of information about an item in a retail store such as price, description, care, size, or country of sourcing. These can be attached to a product or used as a shelf label. While creating an item in Merchandising, different tickets can be attached to an item along with print timing and quantity. Tickets are created, maintained or deleted in Merchandising through spreadsheet upload and download processes. These processes are accessed through the main Merchandising task list under Foundation Data > Download Foundation Data and Foundation Data > Upload Foundation Data.
To add or update tickets, you will select the template type of Foundation from the Download Data screen and then the template Tickets. Click the Download button and when prompted, choose to either open the .ods file that is generated or save the file and open it separately in the spreadsheet application of your choice. Once opened, there will be three sheets that can be modified - Ticket Type, Ticket Type Translations, and Ticket Items.
To add a new ticket, start in the Ticket Type tab, and, in a blank line in the template, select the action type of Create. Next enter a unique ticket type (up to 4 characters) and the description for the ticket in the primary language (as defined in the Merchandising system options) of up to 120 characters. Next, specify if the ticket is going to be used as shelf edge label. Valid values are Yes and No. Optionally, you can also enter the organization ID and merchandise ID in the subsequent columns to limit the users who can use the new ticket created, if data level security has been set up for users in the system. To limit it by the organizational hierarchy, in the Filter Org ID column, enter the ID of organization hierarchy that will be able to use this ticket at the level that is defined in the security configuration on System Options. This will be a chain, area, region, or district. To limit the use of the ticket by the merchandise hierarchy, in the Filter Merch ID column enter the ID of merchandise hierarchy that will be able to use this ticket at the level that is defined in the security configuration on system options. This will be a division, group, department, class, or subclass. If the merchandise hierarchy level defined in the security configuration is class then enter the department ID as the Filter Merch ID, as well as the class in the Filter Merch ID Class. If the merchandise hierarchy level is set to subclass, then the department ID should be entered as the Filter Merch ID, and the class and subclass entered as the Filter Merch ID Class and Filter Merch ID Subclass, respectively.
For more information on how to configure data level security, see the Merchandising Security white paper, available on My Oracle Support under reference 1585843.1.
Next, if you wish to add translations for the ticket in languages other than the primary language, this can be done in the Ticket Type Translations tab. Navigate to a blank row and select the action type of Create and the language in which the translated description will be entered. Then, enter the ticket type for which the translation applies. Finally, enter the translated description. The translated description can also be up to 120 characters long. This is an optional step.
Next, the details that belong to this ticket must be added. To do this, move to the Ticket Items tab in the spreadsheet. Again, navigate to a blank row in the sheet and select an action type of Create. Enter the ticket type that you added in the Ticket Types tab. Then add the sequence number to make this detail line unique. Next, in the Attribute column, select an attribute which should appear on the ticket or label. The valid values for this field are found in the Codes and Descriptions template with code type as TCKT. Alternately, a user-defined attribute (UDA) ID can be added in the User Defined Attribute column for a particular row. Continue this process until all the details for the ticket type have been added. If you are adding a new detail to an existing ticket type, this same process would apply, just using the existing ticket type instead.
If you would like to update any details for an existing ticket, a similar process will be followed as that described above for creating new tickets. First, download the spreadsheet, and then navigate to the tab where you would like to make your updates.
The following columns can be updated in each tab:
-
Ticket Type - Ticket Description, Shelf Edge Label, Filter Org ID, Filter Merch ID, Filter Merch ID Class, Filter Merch ID Subclass
-
Ticket Type Translations - Ticket Description
-
Ticket Items - Attribute, User Defined Attribute
In the tab where you are going to make your updates, select the action type of Update, and then correct the value in the spreadsheet.
If you wish to delete a ticket, update the action column to select Delete in each of the tabs where it occurs. A ticket cannot be deleted if it's associated with an item in the system. Translations for the ticket or the items associated with a ticket can also be deleted from an existing ticket in a similar manner.
For all actions defined above, once all the updates have been made to the data in the spreadsheet, save the file and close it. Then, return to the Merchandising screens and select Foundation Data > Upload Foundation Data from the main task list. In this screen, select the template type Foundation and the template Tickets. This will generate a process description automatically, but this can be updated if desired. Lastly, select the Browse button and navigate to the directory where you saved the updated spreadsheet.
To review the status of the upload and check whether any errors occurred, select the Foundation Data > Review Status task from the main task list.
See also Download/Upload Data from Spreadsheets.