2 Create a Price Change
New price changes can be added to a new price change group or an existing price change group. Creating a new price change group can be done by selecting the Create Price Change Group task from the Task List, or selecting the 'Create' action from the Price Change Group Search screen. Either of these steps create a new Price Change Group into which price changes can be added by following the steps below (starting with step 3). Adding a price change is performed using the Price Change Wizard. There are four potential stops within the wizard:
-
Items Page
-
Locations Page
-
Price Change Page
-
Summary Page
-
To add price changes to an existing Price Change group, perform a search for the price change group that you want to edit. See Search for a Price Change Group.
-
From the search results pane of the Price Change Group Search tab, highlight the price change group to which you want to add a price change and select Edit from the Actions menu. The Price Change Group tab appears.
-
From the Item table, select Add from the Actions menu. The Add Price Change Wizard launches. Continue with the Add Items.
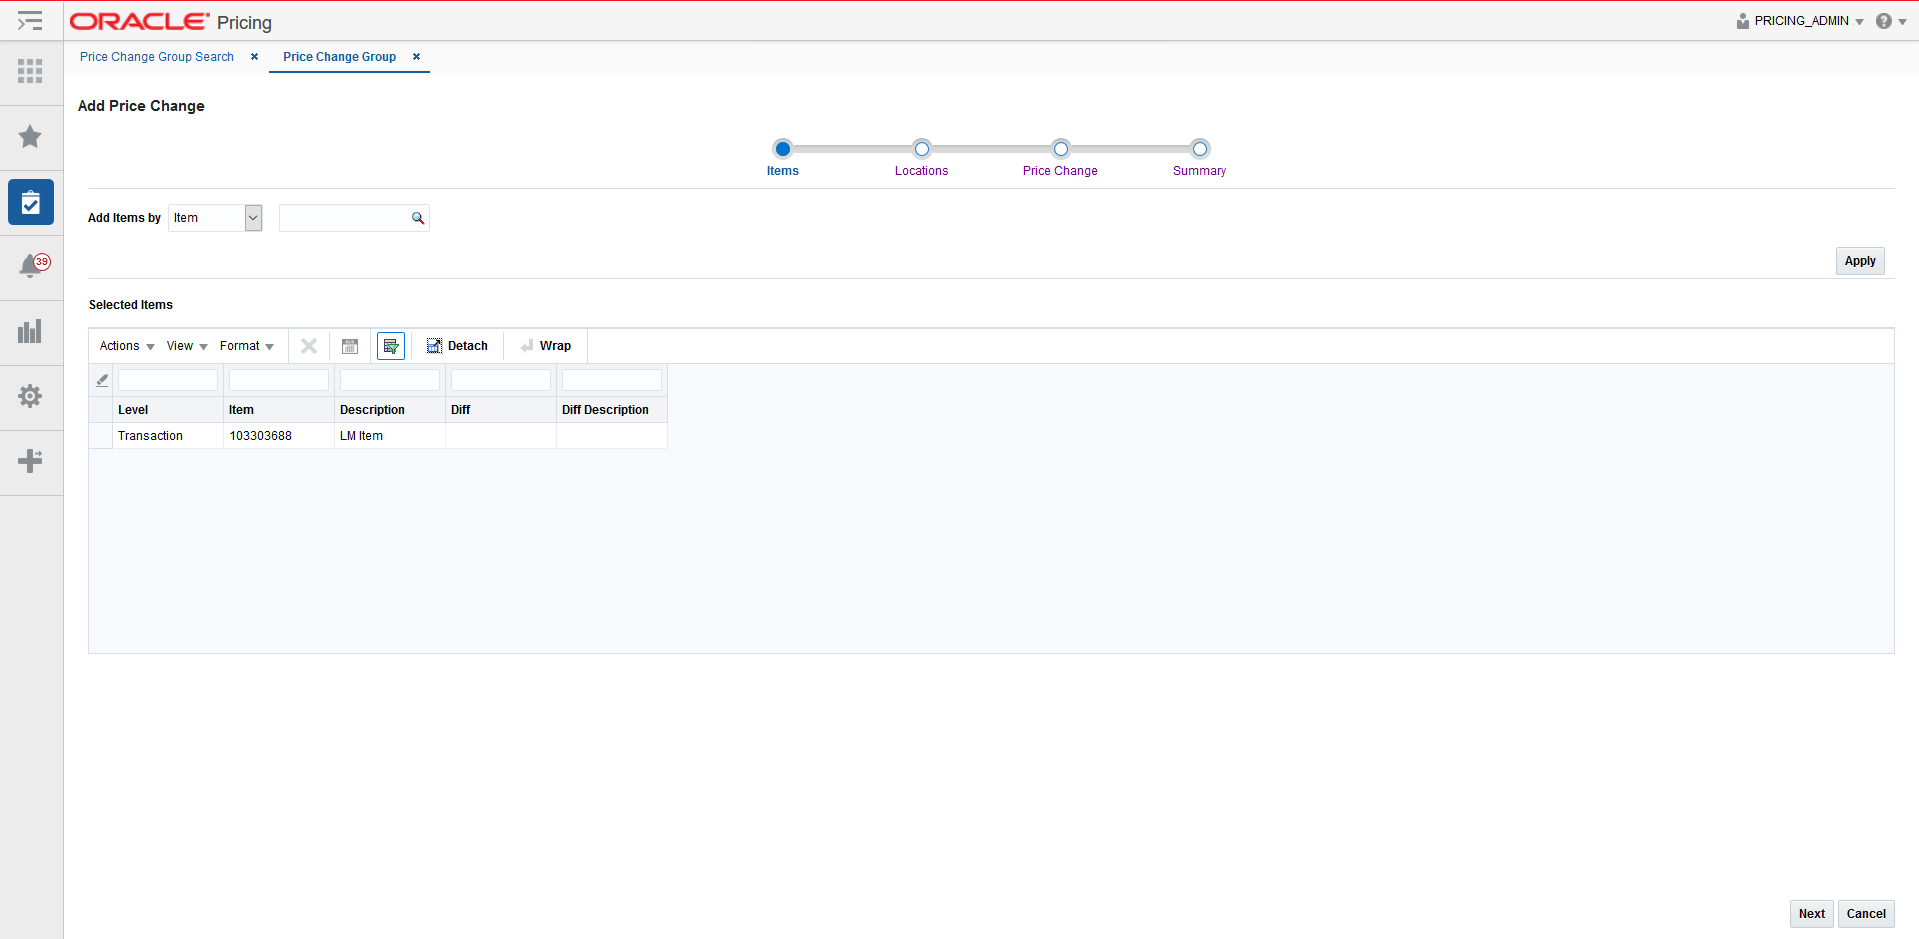
Add Items
The initial page in the Price Change Wizard allows you to select the items that you want to add to the price change.
-
From the Add Price Change Items page, enter the items to add to the new price change using the following criteria:
Table 2-1 Price Change Items Page Fields
Field Description Add Items by
The Add Items by field allows you to select a category by which you can narrow the list of things to add to the price change. Options are:
-
Item
-
Parent/Diff
-
Item List
-
Upload List
Item
The Item field is active if you select Item in the Add Items by field. Click the magnifying glass to search for an item to add to the price change.
Parent/Diff
When Parent/Diff is selected for 'Add Items by' the display of the screen changes, showing an item field and diff type field as the top row, with a Diffs table directly below. Entering an Item and Diff type will populate the diff table where diffs can then be selected. Combinations of the entered parent item and the selected diffs are added to the Selected Items table when the apply button is selected.
Diff Type
The Diff Type field is active if you select Parent/Diff in the Add Items by field.
Item List
The Item List field is active if you select Item List in the Add Items by field. Click the dropdown to select a defined list of items to add to the price change.
Source File
Source File is active if you select Upload List in the Add Items by field. Click Browse to select the file to upload.
-
-
Once you have entered your criteria, click Apply to move entered or selected data for the item selection option to the Selected Items table. In the case of an Item List or Upload List, the items in the list are populated into the Selected Items table. Once all your items are added to the price change, click Next. The Add Price Change Locations page appears. Continue Add Locations.
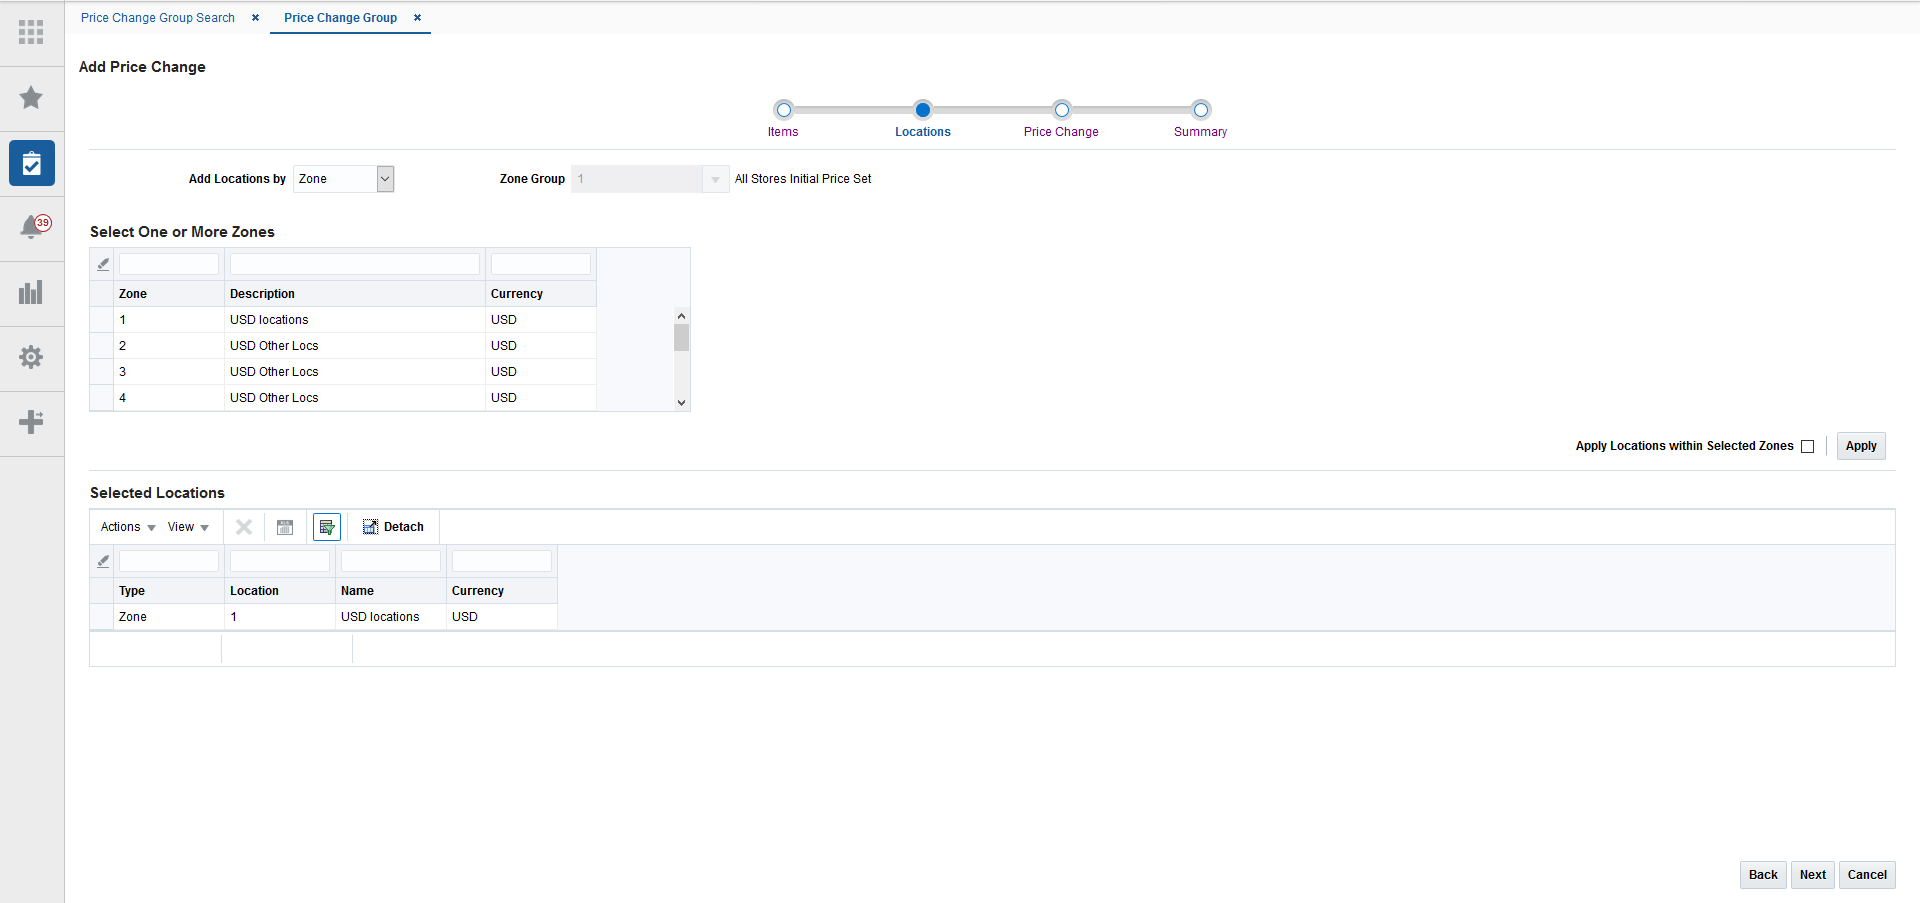
Add Locations
The Locations page of the Price Change Wizard allows you to define the locations associated with the price change.
-
From the Add Price Change Location page, select the location type you want to use for adding locations using the following criteria:
Table 2-2 Locations Page Fields
Field Description Add Locations by
The Add Locations by field allows you to select a category by which you can narrow the list of locations to add to the price change. Options are:
-
Zone
-
Location List
-
Store
-
Warehouse
Note: The Warehouse option is only displayed if the Recognize Warehouses as Locations option is set to Yes.
Zone Group
The Zone Group field is active if you select Zone in the Add Locations by field.
Zone Table
The Zone Table is active if you select Zone in the Add Locations by field. When a zone group is entered, the Zone Table will be populated with the zones in the zone group.
Apply Locations within Selected Zones
The Apply Locations within Selected Zones check box is active if you select Zone in the Add Locations by field. This checkbox allows exploding the zone into stores and warehouses for populating the Selected Locations table. If you have access to one location in a zone, you can use the zone to create events.
Location List
The Location List dropdown list is active if you select Location List in the Add Locations by field. Click the dropdown to select from a defined list of locations to add to the price change.
Store
The Store dropdown list is active if you select Store in the Add Locations by field. Click the dropdown to select from a defined list of stores to add to the price change.
Warehouse
The Warehouse dropdown list is active if you select Warehouse in the Add Locations by field. Click the dropdown to select from a defined list of warehouses to add to the price change.
-
-
From the search results pane, select the location(s) to add to the price change and click Apply.
-
Once all your locations are added to the price change, click Next. The Add Price Change page appears. Continue with Add Price Change Attributes.
Add Price Change Attributes
The Price Change page of the Price Change Wizard allows you to define the price change itself.
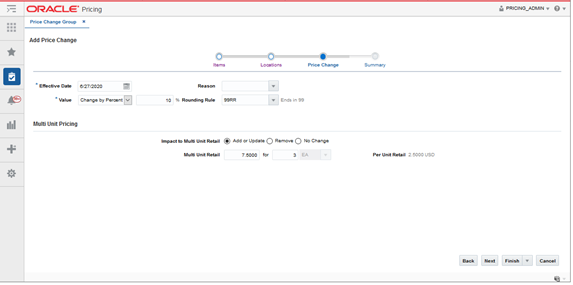
Note:
Fields associated with Multi Unit Pricing will be hidden when the 'Allow Multi Unit Pricing' system option is unchecked.-
From the Price Change page, define the information for the price change(s) being added using the following criteria:
Table 2-3 Price Change Page Fields
Field Description Effective Date
The date on which the price change is set to take effect. Users have the option to key in a date or select one using the calendar widget.
Value
The Value field provides the options that derive the new retail price. Users have the option to modify the value. Options are:
-
Change by Percent: A percent is defined in the change value field that is used to calculate the new retail.
-
Change by Amount: An amount is defined in the change value field that adds to (or subtracts from if a negative value is entered) the retail price to determine the new retail.
-
Fixed Price: The item is at a specified retail that is defined in the change value field.
-
Reset POS Price: The item is recognized on a price change but no change to the retail occurs.
-
Multi Unit Fixed Price: The Price Change is only for the multi unit price of the item.
After selecting the change type, users will enter the actual value for the change. This field is required entry for every change type. The field supports up to four decimal places for Change by Percent value. For Change by Amount and Fixed Price, decimal placement is based on the currency of selected locations.
Reason
The Reason value defines the reason the price change is being created.
Users have the option to update this field or remove the value in this field.
Rounding Rule
The Rounding Rule field provides the ability to smooth retails for an item or location.
Users have the option to update this field or remove the value in this field.
Impact to Multi Unit Retail
This radio button indicates the type of action to be performed on the Multi Unit Retail for the items selected for this price change. Options include:
-
Add or Update
-
Remove
-
No Change
Multi Unit Retail
The specified retail for the multiple units of the item.
for (number of units)
Indicates the number of units of the item which can be purchased for the specified multi unit retail.
No label (Multi Unit UOM)
The unit of measure associated with the multi unit retail.
Per Unit Retail
A calculation of the retail for a single unit of the multi unit retail (multi unit retail/number of units)
-
-
Once all your price change information is entered, click Next. The Add Price Change Summary page appears. Continue with Review, Submit and Approve.
If you want to skip the Summary Page, you can double click on Finish or select Submit, or Approve options from the Finish drop down menu.
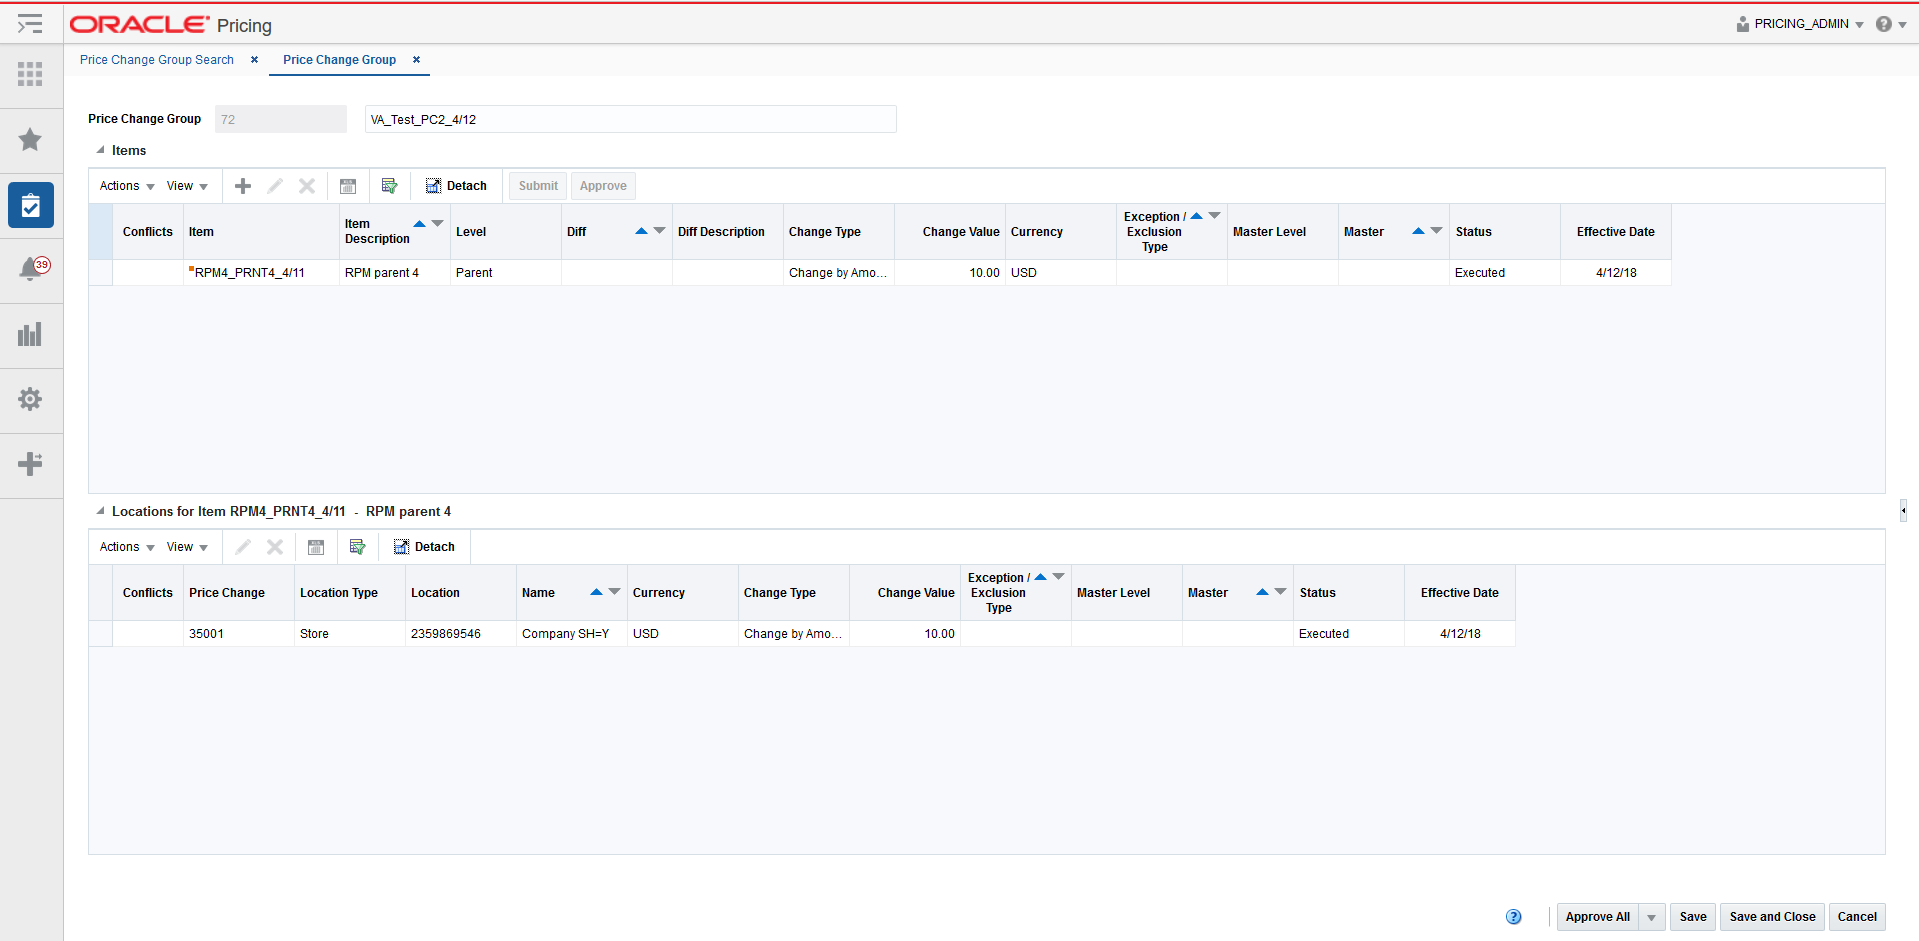
Review, Submit and Approve
When a price change is added, it must go through a series of checks before it can be applied to an item/location. Depending on your user role, you may not be able to move the retail price change to the next status. A change to submitted or approved status, or from approved back to worksheet, results in a conflict check. A price change may be in any of the following statuses:
| Status | Definition |
|---|---|
|
Worksheet |
The price change has been started, but not reviewed or sent out. |
|
Submitted |
The price change has been completed and is pending review. Conflict checking may have occurred (depending on the run for submit system option) for the price change. |
|
Approved |
The price change has been reviewed and accepted. The price change is communicated to the locations for which the price change is effective. |
|
Executed |
The new prices established are effective for the item/location. |
|
Rejected |
The price change has been reviewed and declined. |
|
Processing |
While the price change is being processed through conflict check the status will be listed as Processing. |
The Summary page displays the details of the price change before it is added to the Price Change Group.

-
Confirm the price change settings and double click on Finish or select Submit or Approve from the Finish drop down menu. You are returned to the Price Change Group screen. Your new price change is listed in the Item table.
Note:
The Summary Page allows individual price changes to be removed before they are added to the Price Change Group.
Update Price Change Status for One or More Price Changes
Users have options to perform status maintenance at Item level for one or many items, at the Item/Location level for one or more Locations tied to an item or they have the option to update for all displayed records using the page level buttons.
Updating Group Level Price Change Status
Perform the following procedure to update the price change status:
-
Perform a search for the price change group that you want to update. See Search for a Price Change Group.
-
From the search results pane, select the Price Change Group for which you want to update status. and select Edit from the Actions menu. The Price Change Group tab appears.
-
From the Price Change Group tab, use the buttons at the bottom of the page to update the price change group status. Options are:
-
Submit All
-
Approve All
-
Worksheet All (Select from the More Actions button menu.)
-
Reject All (Select from the More Actions button menu.)
-
-
After selecting the status change, click Save to save the updated status and remain on the Price Change Group Maintenance tab. Click Save and Close to save the updated status and return to the Price Change Group Search tab.
Note:
If a price change is selected for a status change and the new status is not valid, the status change is ignored and the price change will not be updated.
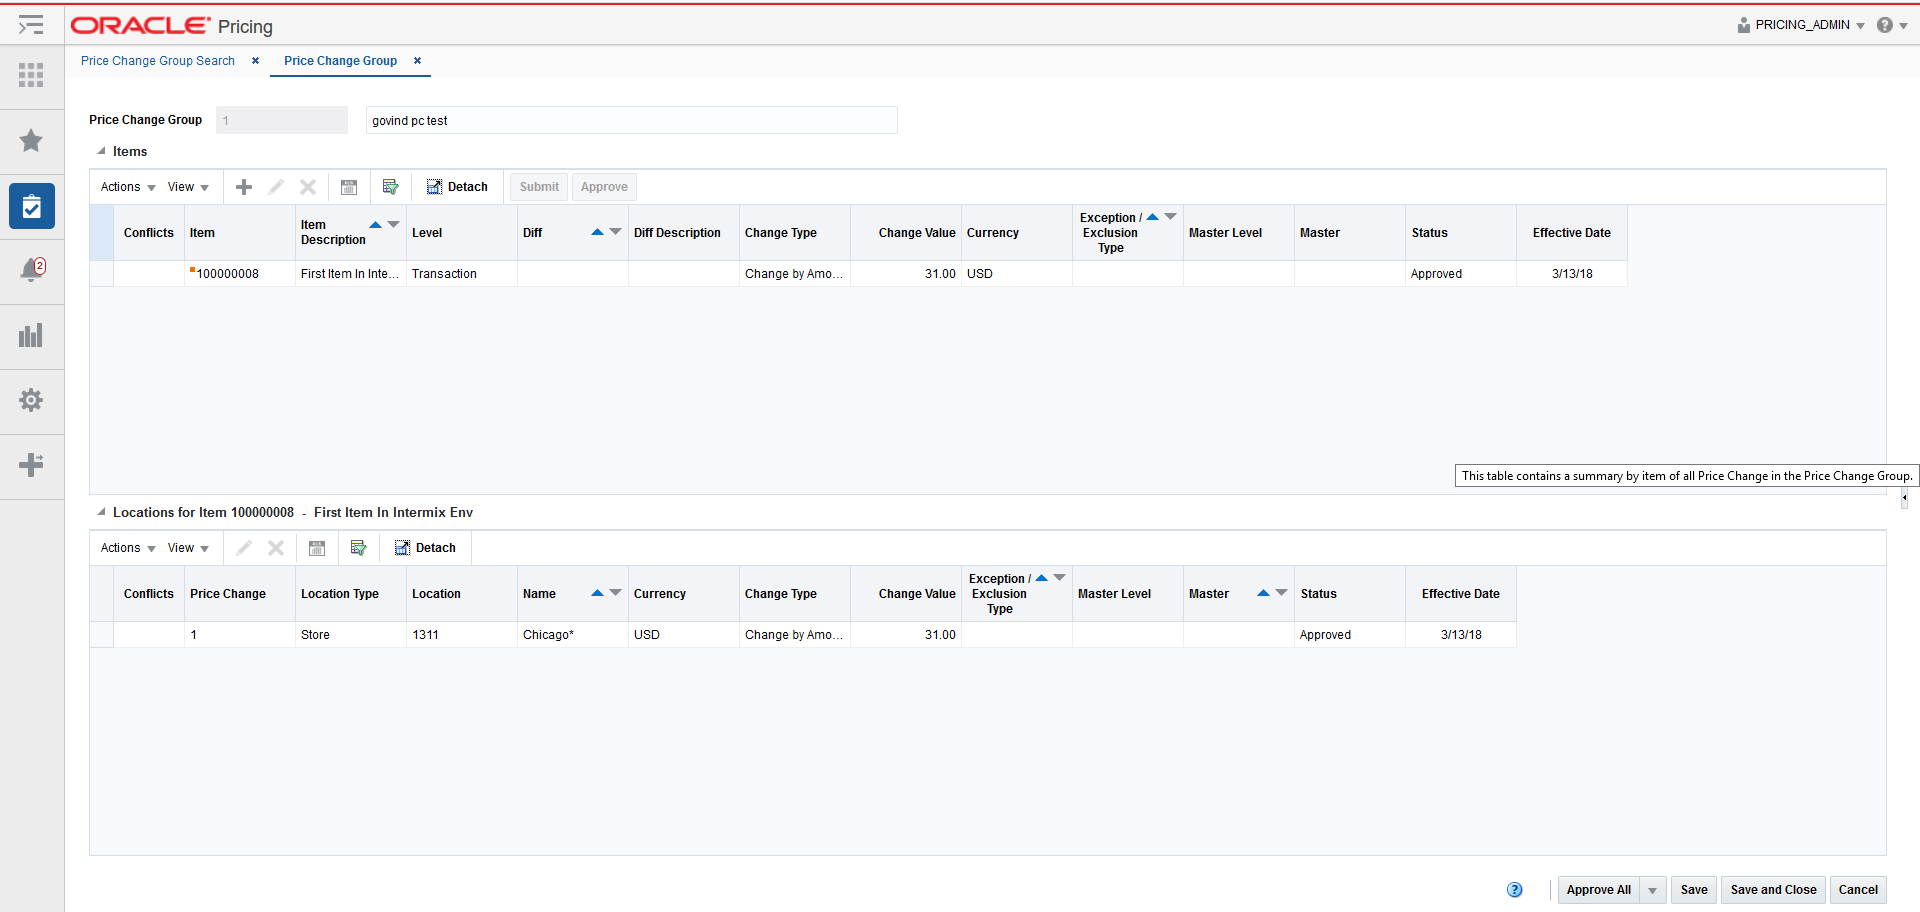
Update Item Level Price Change Status
Perform the following procedure to update the price change status:
-
Perform a search for the price change group that you want to update. See Search for a Price Change Group.
-
From the search results pane, select the Price Change Group for which you want to update status. and select Edit from the Actions menu. The Price Change Group tab appears.
-
From the Price Change tab, from the Items table, highlight the item or items for which you want to update status.
-
With the item highlighted, select the desired status update from the Actions menu.
-
After selecting the status change, click Save to save the updated status and remain on the Price Change Group Maintenance tab. Click Save and Close to save the updated status and return to the Price Change Group Search tab.
Note:
If a price change is selected for a status change and the new status is not valid, the status change is ignored and the price change will not be updated.
Update Location Level Price Change Status
Perform the following procedure to update the price change status:
-
Perform a search for the price change group that you want to update. See Search for a Price Change Group.
-
From the search results pane, select the Price Change Group for which you want to update status. and select Edit from the Actions menu. The Price Change Group tab appears.
-
From the Price Change tab, from the Locations table, highlight the location or locations for which you want to update status.
-
With the location highlighted, select the desired status update from the Actions menu.
-
After selecting the status change, click Save to save the updated status and remain on the Price Change Group Maintenance tab. Click Save and Close to save the updated status and return to the Price Change Group Search tab.
Note:
If a price change is selected for a status change and the new status is not valid, the status change is ignored and the price change will not be updated.
Review and Resolve Conflicts
Whenever a price change is submitted or approved, it will be subject to the conflict checking process. This ensures that invalid prices, or prices out of alignment with your pricing strategy, are not sent down to the point of sale. Conflicts that are checked can be configured using some of the Pricing Cloud Service system options. It also relies on a calculated "future retail" to help determine when a conflict has occurred.
When a conflict occurs, a notification is sent to the user who attempted to approve the price event. The notification allows the user to navigate to the price change group of the price event with the conflict, and from there they can continue on to the conflict details screen to review the conflict. After identifying the cause of the conflict, the user can make adjustments to either the current price event which they are trying to approve, or to the approved event which conflicted with the current price event and then resubmit the price event for approval.
Future Retail
When price events are approved or unapproved, they can negatively impact the retail value of an item/location when it goes into effect, which can cause conflicts. As such, the Pricing module uses these events to calculate a future retail price for the impacted items and locations on the events. This allows it to have a view to the regular or clearance price on any given day and helps facilitate the conflict checking process.
A roll-up batch ensures the system holds future retail data at the highest level possible. This batch looks at lower-level timelines and attempts to roll up to a higher level where timelines match exactly between lower levels and higher levels.
When conflicts occur, the Conflicts window displays the price event at the level of the timeline where the conflict occurred, which could be higher than transaction item and location level.
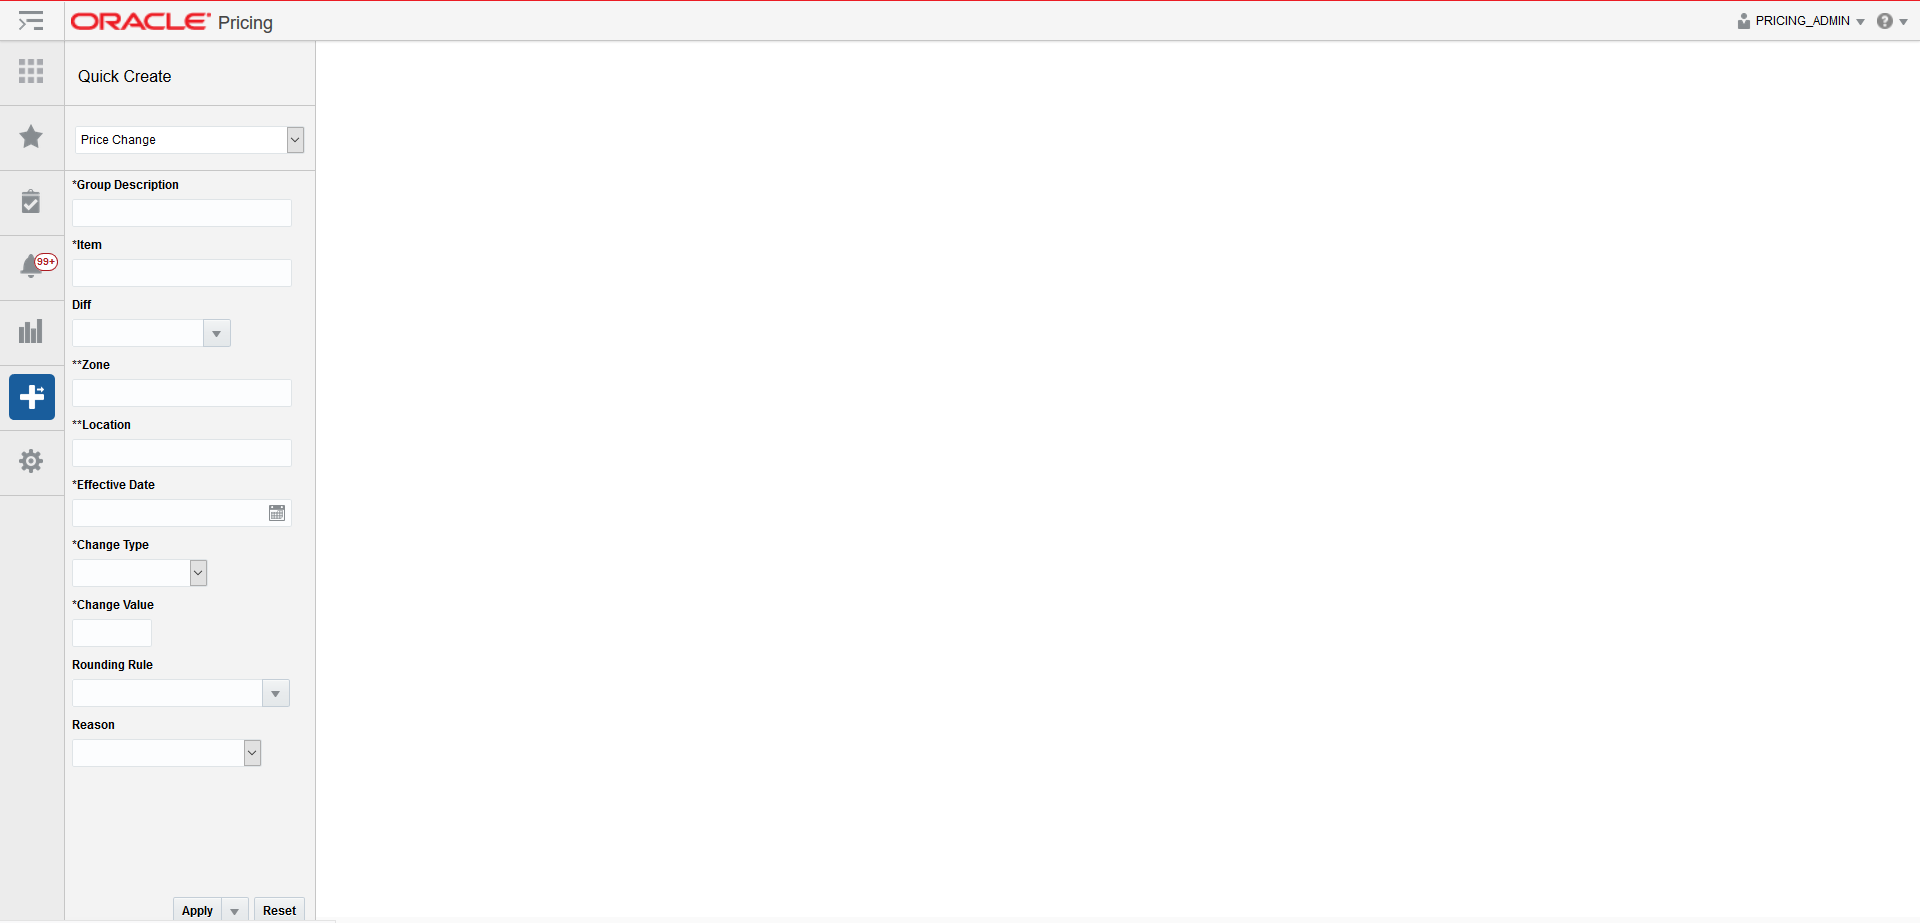
Use Quick Create
The Price Change Quick Create feature is designed as a key entry path for users to create a regular price change. The Quick Create feature supports grouping multiple price changes for different items and locations into a single Price Change Group. Mass maintenance can then be performed on this group later in the workflow through the Price Change Group Maintenance workflow.
Use the following procedure to quick create a price change:
Note:
The Quick Create feature is available in the left pane menu and can be opened at any time regardless of what screens are open.-
From the Pricing tab Tasks list, click the Quick Create icon.
The Quick Create pane appears.
-
From the Quick Create pane, select Price Change from the Quick Create drop down list.
-
From the Quick Create pane, enter information for the following fields:
Note:
Fields marked with an asterisk are required. Fields marked with a double asterisk means that one of the fields needs to be populated.Table 2-5 Price Change Quick Create Fields
Field Description Group Description
This field allows for entry of a description that can be used on a new Price Change group. This description may then be used to search for the price change or price change group for maintenance purposes.
Item
The Item field allows for entry of a parent item or transaction level item. Users may enter a single item or multiple items. If multiple items are entered a semicolon is used to separate values. The field will accept up to 4000 characters.
Diff
The Diff field allows for entry or selection of a single Diff Value. Users have the option to use the list of values to search on Diff Type to find the Diff value.
Zone
The Zone field allows for entry of one or more zones within a single zone group If multiple zones are entered a semicolon is used to separate values.
Note: Either a Zone(s) or Location(s) must be entered, but not both.
Location
The Location field allows for entry of a location. The user may enter a single location or multiple locations. If multiple locations are entered a semicolon is used to separate values. The field will accept up to 4000 characters.
Note: Either a Zone(s) or Location(s) must be entered, but not both.
Effective Date
The Effective Date is the date when the price change will go into effect. Users have the option to key in a date or select one using the calendar widget.
Change Type
The Change Type field provides the options that will derive the new retail price. Options are:
-
Change By Amount – An amount is defined in the change value field that either adds or subtracts from the retail price to determine the new retail. Users should enter a minus symbol (-) prior to the value to subtract from the retail.
-
Fixed Price – The item is at a specified retail that is defined in the change value field (rounding rule may impact entered retail). Selecting this option enables the Selling UOM field. Users have the option to enter or select a UOM value however the field is not required.
-
Reset POS Price – The item will be recognized on a price change but no change to retail will occur. Reset POS Price is hidden unless the user has emergency price change security privilege.
-
Change by Percent – A percent is defined in the change value field that either adds or subtracts from the retail price to determine the new retail. Users should enter a minus symbol (-) prior to the value to subtract from the retail.
Change Value
The Change Value field contains the change by percent, change by amount, or fixed price value depending on the change type selected.
-
Change by Amount – the amount entered in this field is added or subtracted from the current retail when the price change takes effect
-
Fixed Price – the amount entered in this field is the new retail on the effective date.
-
Reset POS Price – Change value is null and disabled when Reset POS Price is selected.
-
Change by Percent – the amount entered in this field is the percentage that the current retail will be changed by to come up with the new retail (support up to four decimal places for percent value). The field displays a percent sign to the right of the right of the field before the per label
Rounding Rule
The Rounding Rule field allows the user to associate a specific rule with a price change record. Users are allowed to enter a single Rounding Rule. A rounding rule helps users create a uniform pricing strategy.
Reason
The Reason field value defines the reason the price change is being created.
-
-
Once you have entered all information for the newly created price change record, click Apply, Submit, or Approve. The new price change is created.
Note:
If you select locations (or zones) with multiple currencies, you can only choose to create a price change by percent or to reset the point of sale (POS) price. You cannot create price changes by amount or for a fixed price across multiple currencies.