Install Oracle SD-WAN Aware On A New VM Using VMware
Before attempting this procedure, make sure your server meets the minimum requirements. The following procedure must be performed from a Microsoft Windows environment.
Import the ISO into vSphere Client
- Download the release you plan to upgrade to.
- Download the Aware VM Image (full VM Install) to download the software update file (e.g., Aware_OS_R8_2_0_0_0_GA_09192019_Aware_R8_2_0_0_0_GA_09192019_nmsv1_aware_vmware.ova).
- Start and log in to the vSphere Client program.
- When the start screen of
the vSphere Client opens, click on
File, then
Deploy OVF
Template...
Figure 2-1 Deploy OVF Template

- Browse to the location of the Oracle SD-WAN Aware VM Image (.ova package) that was downloaded from the Talari Support portal.
- Click Next and a screen will display information for the VM being imported.
- Click Next and a screen will display the End User License Agreement. Click Accept.
- Click
Next and the
Name and
Location screen displays a default name for the VM. Change the name if
desired and click
Next.
Figure 2-2 Name the VM

- Accept the defaults on the
next three screens by clicking
Next, then
click
Finish. This
will have vSphere create the VM.
Note:
Decompressing the disk image onto the server can take several minutes.Note:
If this is the first time you’ve used the vSphere Client, you may need to click on the Inventory icon, identify the server, and expand its inventory list.
Configure the VM
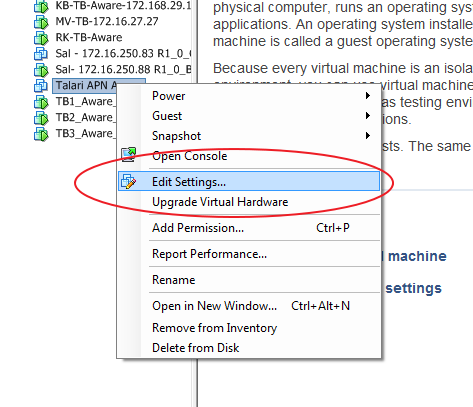
- From the inventory list,
right click on the new VM and select
Edit Settings…
from the menu.
Figure 2-3 Edit VM Settings
- On the right side of the
Virtual Machine
Properties screen, change the
Memory Size.
Figure 2-4 Adjust Memory Size

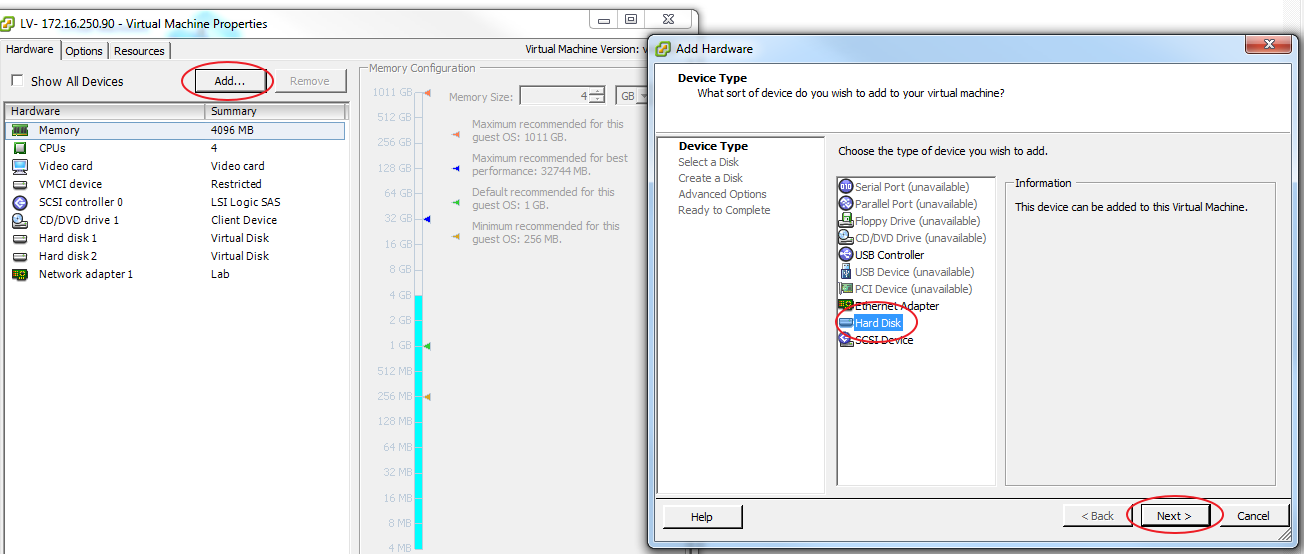
- Click on
Add… When the
Add Hardware
screen opens, select
Hard Disk and
click
Next.
Figure 2-5 Add Hard Disk
- Click the radio button for Create a new virtual disk and click Next.
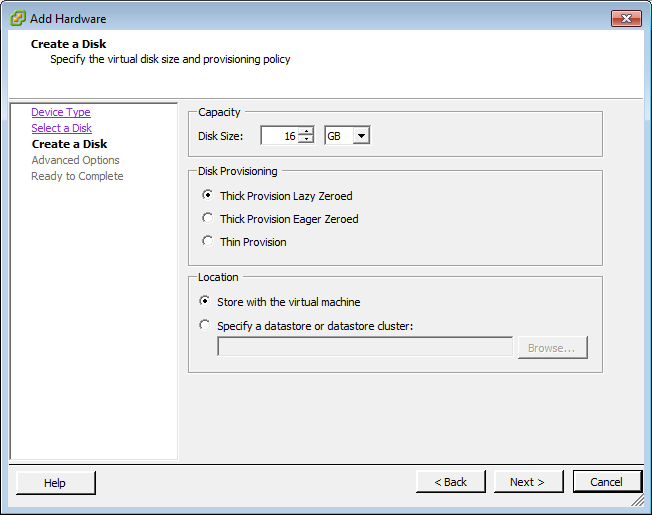
- On the
Create a Disk
screen, change the
Disk Size.
Figure 2-6 Adjust Disk Size
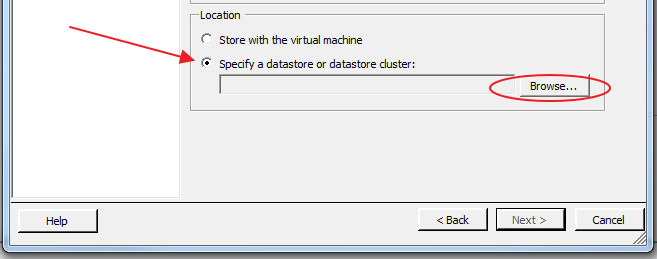
- In the
Location
section of the
Create a Disk
screen, click the
Specify a datastore
or datastore cluster radio button and click
Browse.
Figure 2-7 Specify Datastore
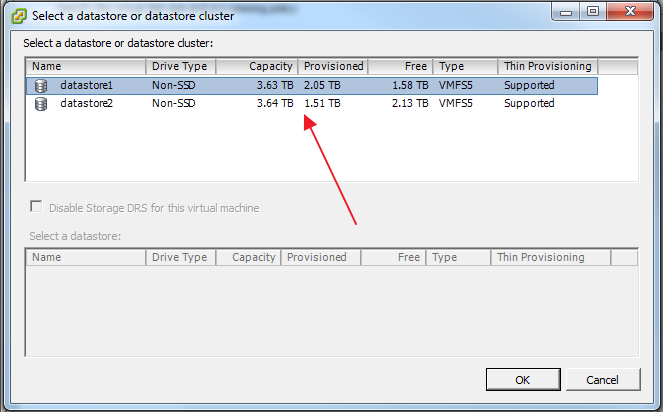
- On the
Select a datastore
or datastore cluster screen, choose any available datastore with enough
space remaining and click
OK to return to
the
Add Hardware
screen.
Figure 2-8 Choose Datastore
- Accept the default settings by clicking Next and then Finish to return to the Virtual Machine Properties screen.
- Click OK to exit the Virtual Machine Properties screen.
- A progress bar appears at
the bottom of the screen illustrating the creation of the virtual disk.
Figure 2-9 VM Reconfiguration Progress

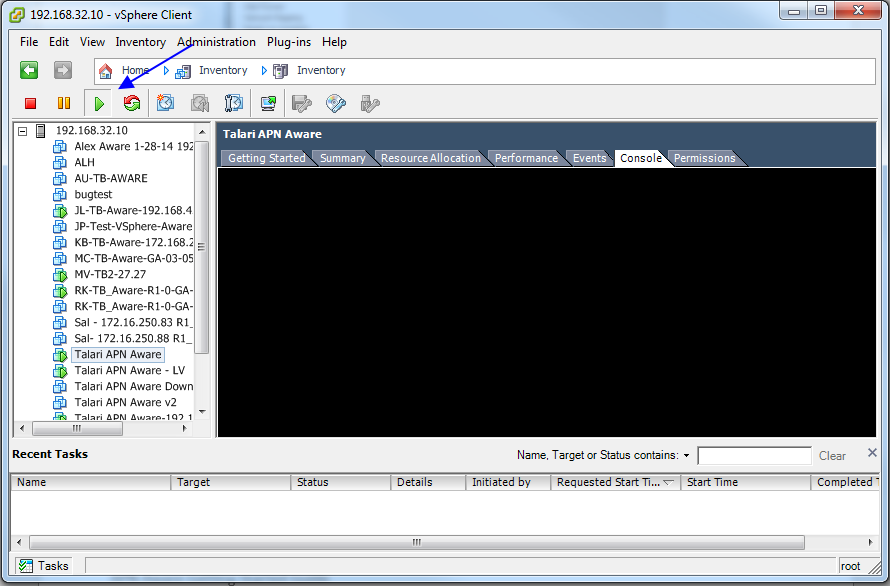
Start the VM
- From the inventory list, make sure the new VM is still selected and power it on by clicking the Play icon.
- Click on the
Console tab in
the right-hand pane of the vSphere Client screen.
Note: To exit the console, release the mouse by pressing and holding the Ctrl and Alt buttons simultaneously.
Note: It may take up to 15 minutes for the Oracle SD-WAN Aware instance to finish initializing the first time the VM is launched. The login prompt will not be displayed until initialization is complete.
Figure 2-10 Open vSphere Client Console

- Enter your login credentials.
Configure DHCP
- If you are using a DHCP server, record the Host IP address that appears.
- If you are not using a DHCP server, set the
Host IP
manually as follows:
- From the command line, manually set the
Host IP and
Netmask.
ifconfig eth0 <host_ip> netmask 255.255.0.0
- From the command line,
manually add the
default
gateway.
route add default gateway <gw_ip>
- Edit the /etc/network/interfaces file as follows:
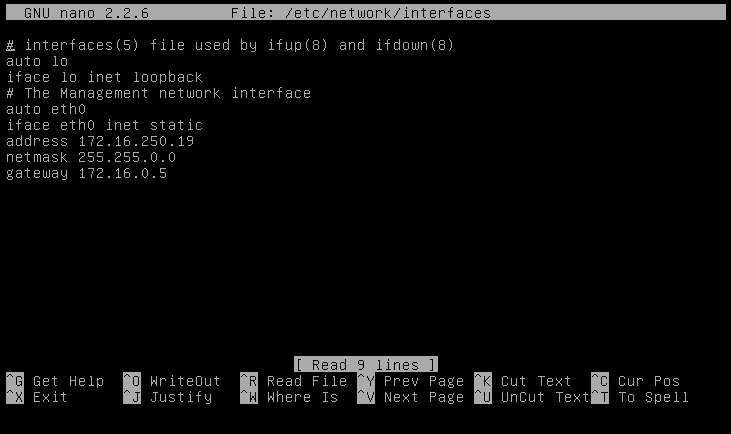
Note:
The address line in the /etc/network/interfaces file is the Host IP.- In case of Aware OS is
7.0, do this - Edit the /etc/sysconfig/network-scripts/ifcfg-eth0 file as
follows:
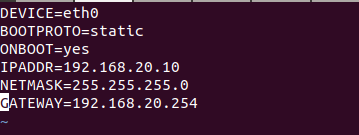
- Substitute the IPADDR, NETMASK and GATEWAY as applicable to your network and save the file.
- From the command line, manually set the
Host IP and
Netmask.
- From the command line,
kill the
dhclient:
sudo pkill dhclient
- From the command line,
restart networking. For Aware OS 5.01/4.x, do the following:
/etc/init.d/networking restart
For Aware OS 7.0, do the following:sudo service network restart
Configure the Storage System
- Open any web browser and navigate to the Host IP.
- Login with your
credentials.
Figure 2-11 Login to Oracle SD-WAN Aware

- Click on
Manage, and
then
Storage.
Figure 2-12 Click on the Storage tile

- Click the
Active
radio button next to the storage partition you created and click
Apply.
Figure 2-13 Switch the Storage Partition
- The
Delete All Existing
Files
warning dialog appears. Click
Switch.
Figure 2-14 Delete All Existing Files Warning Dialog

- The
Switch Active
Storage System dialog appears. Click
Switch.
Figure 2-15 Switch Active Storage System Warning Dialog

- This will place
Oracle SD-WAN Aware into
Maintenance
Mode and a progress bar appears.
Figure 2-16 Put Aware in Maintenance Mode

- When the progress bar completes, click Continue.
Configure Oracle SD-WAN Aware Settings
- Click Manage, then APN Aware Settings.
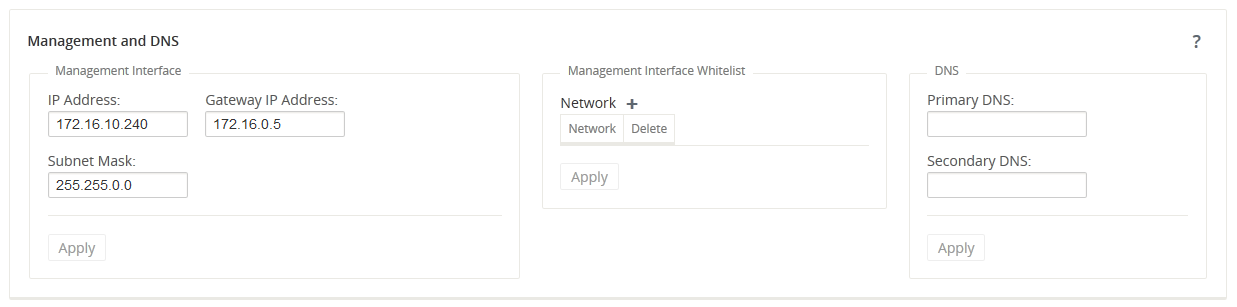
- Change the Management IP/DNS/Time Settings as
desired.
Note:
Enter the Host IP address, Netmask, and Gateway information here to enforce the settings as static.Figure 2-17 Change Management IP and DNS Settings
- Click Manage, then APN Discovery.
- Click on Download Certificate, then Save to save the certificate file to the local workstation.
- Login to the
NCN, click
Manage Network,
then
APN Aware
Certificates.
Figure 2-18 Choose APN Aware Certificates

- Click
Choose File
and choose the file you downloaded (e.g.,
APNAAwareSSLCert) to open
it.
Figure 2-19 Open Aware SSL Certificate from the NCN
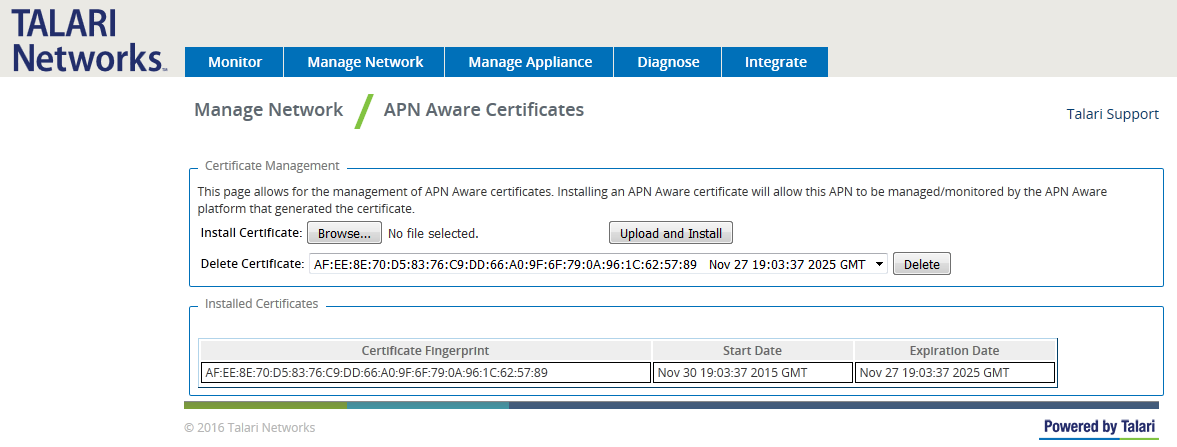
- Click Upload and Install. When installation is complete, go back to the Aware installation.
- In Aware, click on the Manage, then APN Discovery.
- Enter the
NCN Management IP Address and click
Test. If
everything is correct a green check mark appears with a message stating, “Connection
established. This Appliance is the active NCN.”
Figure 2-20 Enter the NCN Management IP Address

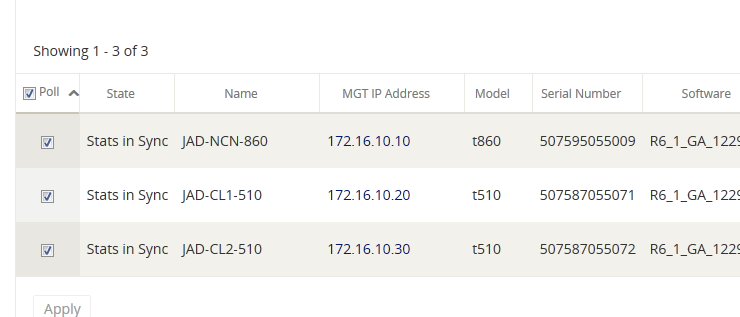
- Click Discover and all the configured appliances will autopopulate in a list at the bottom of the screen.
- Click the checkbox next to
Poll to
automatically select all the polling checkboxes for discovered devices and
click
Apply.
Figure 2-21 Choose the Devices to Poll
- The Oracle SD-WAN Aware installation is complete.
Upgrading an Oracle SD-WAN Aware VM
An upgrade may be done either on an existing VM or by provisioning a new VM.
Upgrade Aware On Existing VM
Note:
Before attempting this upgrade procedure, make sure your server meets the minimum requirements.- Download the software update file (e.g., talari-nms_Aware_R3_0_GA_P1_11082016_amd64.tar.gz).
- Open any web browser and
navigate to the Host IP. Login with your existing credentials.
Figure 2-22 APN Aware Login Screen
- On the Web interface click
on
Manage, then
APN Aware
Settings.
Figure 2-23 Manage APN Aware Settings
- In the
APN Aware Software
Update section, click on
Browse
and navigate to the file downloaded.
Figure 2-24 Select Software Update File

- Click Upload, and once the upload finishes, click Install, and follow the onscreen prompts to complete the software upgrade.
Upgrade Oracle SD-WAN Aware Using a New VM
Check Aware OS version with Monitor→System Information.
If the current Aware OS version is 5.01 and the new VM install is for Aware R8.1 or earlier follow the steps below to upgrade using a new VM.
If the current Aware OS version is 5.01 and the new VM install is for Aware R8.2 or later with Aware OS 7.0 or later, please follow the steps in section Upgrade Aware Using a New VM moving from OS 5.01 to OS 7.0.
- From the
Select a Disk
screen, click the radio button next to
Use an existing
virtual disk then click
Next.
Figure 2-25 Use Existing Virtual Disk

- Click the
Browse button,
and select the
Disk File Path
of the existing
Oracle SD-WAN Aware VM
you want to upgrade.
Figure 2-26 Choose Existing Oracle SD-WAN Aware VM

- Click the
Next button
after selecting the VM, and a progress bar will appear at the bottom of the
screen illustrating the reconfiguration of the virtual machine. Wait for the
update to reach
Completed
status.
Figure 2-27 Wait for Reconfiguration to Complete

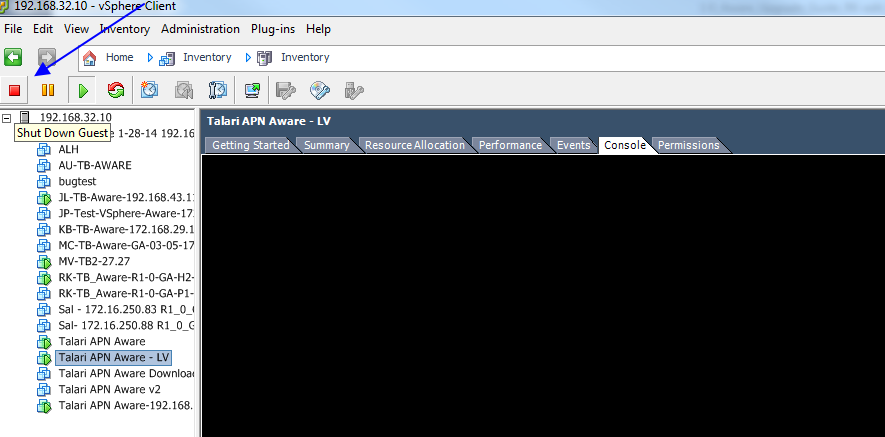
- From the inventory list,
select your previous
Oracle SD-WAN Aware VM
and power it down by clicking the red Stop icon.
Figure 2-28 Power Down the Existing VM
- Power on the VM you chose
to upgrade by clicking the green
Play icon.
Figure 2-29 Power On Upgraded VM
Increase Storage On Existing Oracle SD-WAN Aware VMs
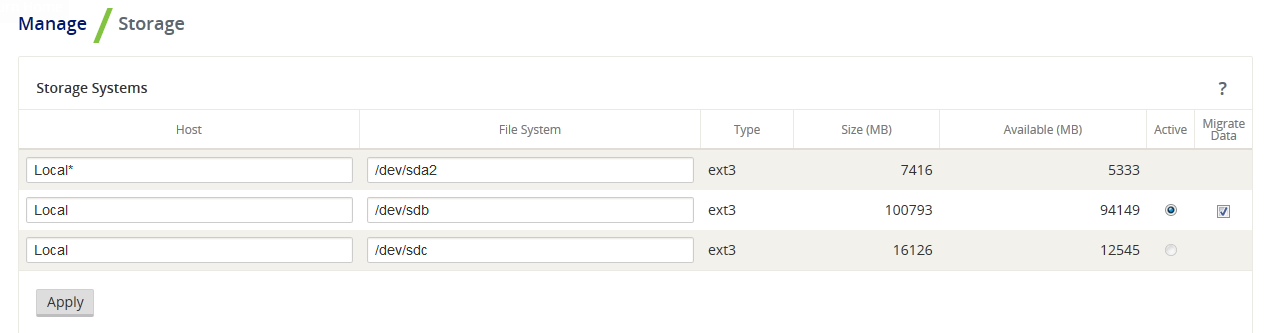
-
Click the radio
button under Active then click apply (the migrate option is checked by
default).
Figure 2-30 Oracle SD-WAN Aware Storage Systems
Aware Database Backup and Restore
Aware database backup option is available in Aware R8.2 or later to take a backup of the Aware database. This backup can be used to restore Aware database at a later point in time. The database backup requires extra space of two times the size of the current database.
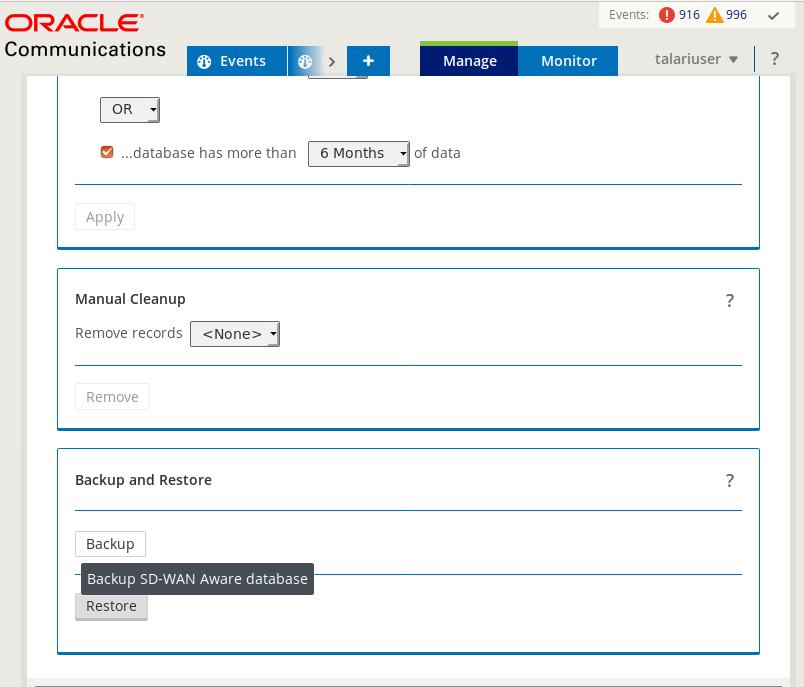
Clicking on the Backup option in Manage→Database→Backup and Restore section brings up a confirmation dialog. Clicking Backup button on the confirmation dialog initiates the backup operation in the background. The Aware system is put in maintenance mode during the backup operation. Depending on the size of the database, the CPU and memory available, the database backup operation could take many hours to complete. For example the backup operation took about 23 hours to complete for a database size of 200GB. It also needed additional 400GB of storage for the backup files before they are compressed.
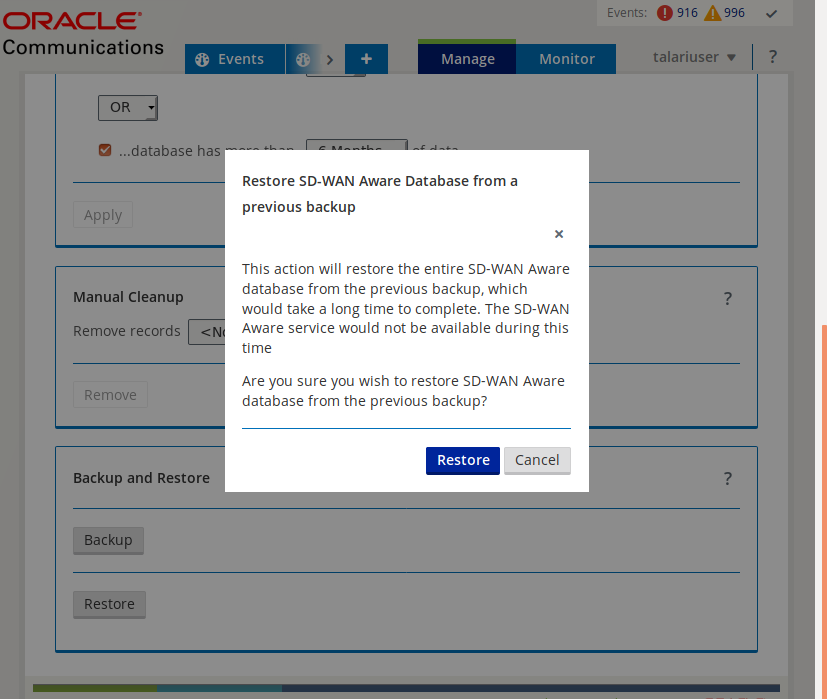
Database restore option can be used to restore Aware database to the previous restore point from the previous backup if available. The user needs to create the backup of the database for future restore.
Upgrade Aware Using a New VM moving from OS 5.01 to OS 7.0
- Upgrade to Aware R8.2 or later in the current VM using Manage→SD-WAN Aware Settings→Install.
- After upgrading to Aware R8.2 in the current Aware VM, click on Backup button in Manage→Database→Backup and Restore section.
- Install a new Aware VM with Aware R8_2 or later by following the steps 1 to 7 in section Upgrade Aware Using a New VM.
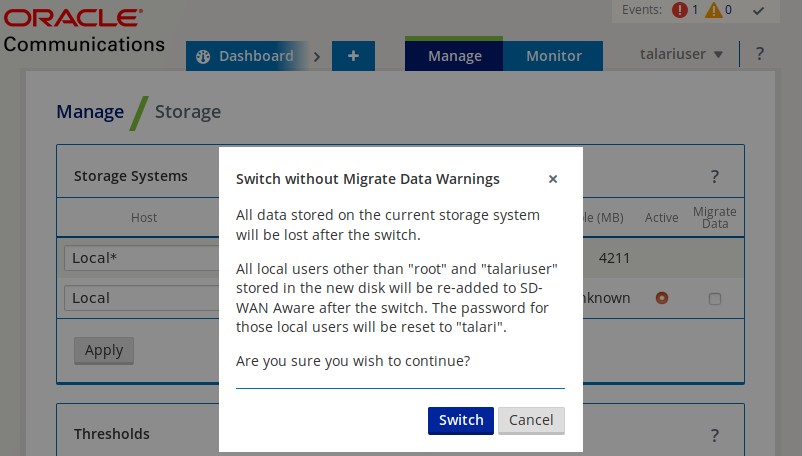
- In the newly installed Aware VM, go to Manage→Storage section. The disk added from the previous VM will be shown as not active.
- Click on the Active button of the added disk. Migrate Data option will be shown as checked. Uncheck the Migrate Data option and click on Apply. A confirmation dialog will show Switch without Migrate Data Warnings.
- Click the Switch button to make the added disk as Active disk storage. See the diagram Aware storage Active option.
- After the added disk is made active, go to Manage→Database→Backup And Restore section and click on Restore button. Complete the Restore action by clicking on the confirmation dialog.

Upgrade Aware Using a New VM moving from OS 4.x to OS 7.x
- Use the procedure to move to new VM with Aware full install having OS 5.01 and moving the disk from the previous VM and make it active. Note that Migrate Data option should not be checked while making the new disk active.
- This completes migration from Aware OS 4.x to Aware OS 5.x. Follow the steps described in section Upgrade Aware Using a New VM moving from OS 5.01 to OS 7.0.


