E-RECEIPTS
E-receipts are electronic receipts that are generated for a transaction from the confirmation page. E-receipts are proof of payment, showing that a payment or a transaction has been done in the bank account. Alternately e-receipts can be generated from the transaction journey page, on the dashboard – for all completed transactions.
An e-receipt displays the transaction name, transaction details along with date and time stamp. It’s a configurable feature; the user can view the E-receipt button on the transaction only if it is configured (this is done by the bank, when the user requests for the feature)
Pre-requisites
- User has a Current and/or Savings account with the bank with online banking enabled
- The E-receipts maintenance is configured, for the user by the admin
Features Supported In Application
- Provide e-receipts for a transaction
Example for e-receipt generation
To transfer the money to existing payee:
- In the Transfer Type field, select the Existing Payee option.
Make Payment - Existing Payee
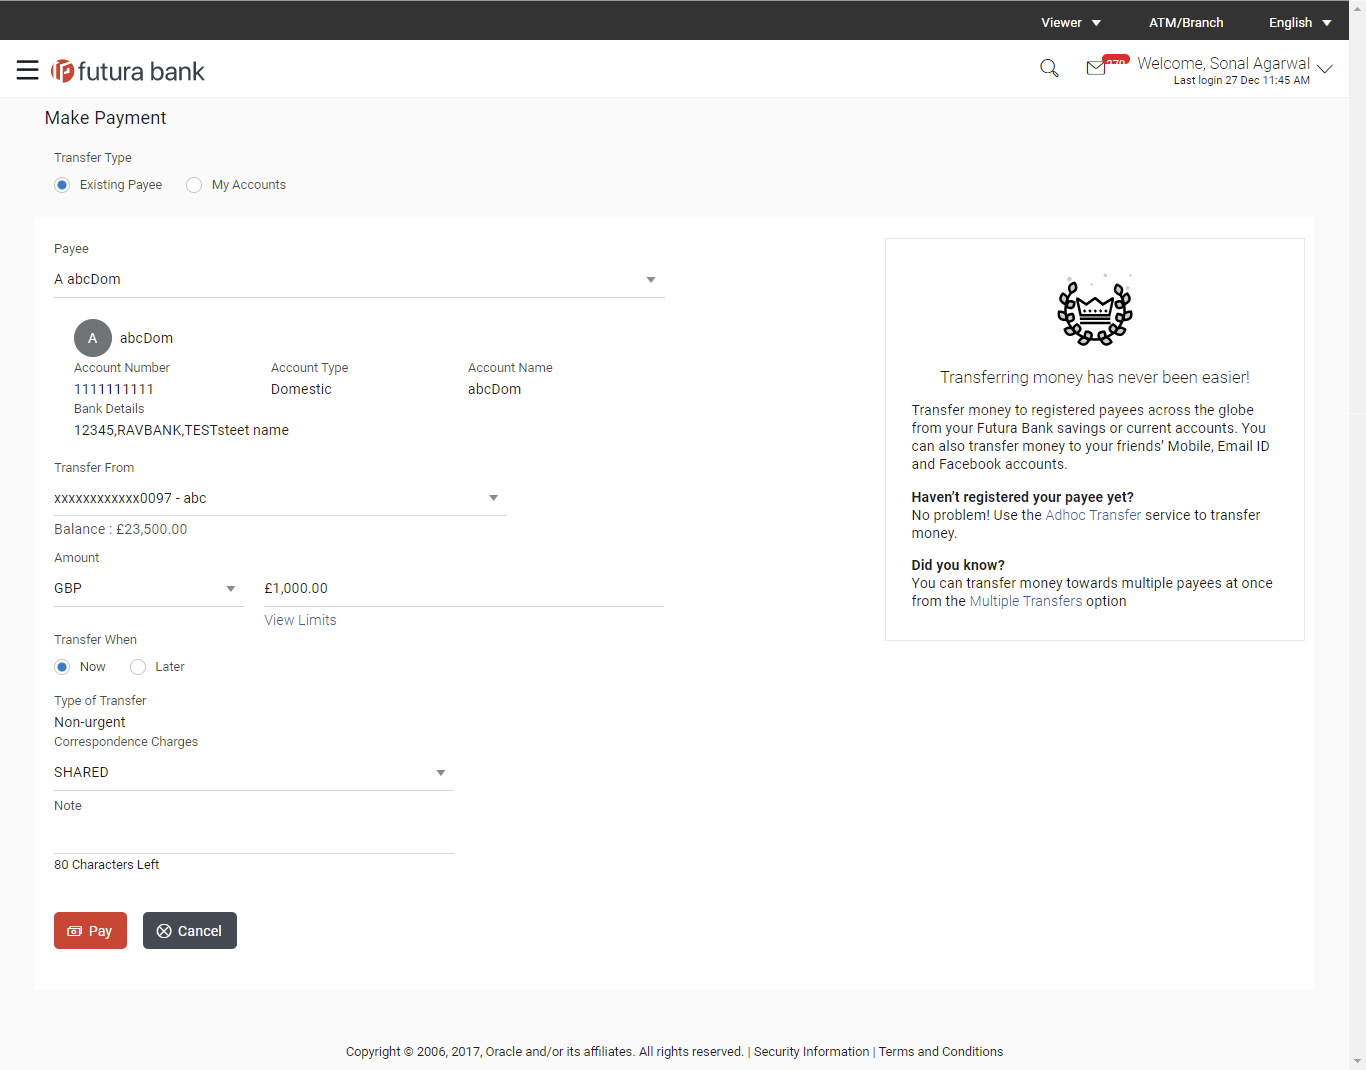
- From the Payee list, select the payee towards whom funds are to be transferred. The details of the selected payee appear.
- From the Transfer From account list; select the account from which transfer needs to be made.
- From the Currency list, select the appropriate currency for the amount to be transferred. (Applicable for international payees only. For domestic and internal payees, currency gets defaulted.)
- In the Amount field, enter the transfer amount.
- If user clicks to book the new forex deal. The Initiate Forex Deal Booking screen appears.
- If user selects the checkbox Use Pre-Existing Deals to select an existing forex deal.
- In the Deal Number field, enter the forex deal number.
Click . The deal details of selected deal appear.
OR
Select deal from the Lookup by clicking the Lookup Deal Number link.
In the Search by Deal Number field, enter the forex deal number to be searched.
Click to search. The list existing forex deal appears.
Click on Deal Number field, to select the appropriate deal from the list.
Click to continue the transaction with selected deal.
The deal details of selected deal from Lookup appear.
Click to clear the entered details. - In the Transfer When field, select the option to indicate when the transfer is to take place.
- If you select the option Now, the transfer will be made on the same day.
OR
If you select the option Later select the date on which you want the transfer to be initiated from the Transfer Date field,. - If the transfer type is Domestic, in the Pay Via field, select the appropriate network for payment.
If the transfer type is Domestic India region, only those networks that are enabled, based on transfer details defined, will be selectable. Select a network of choice. - If the transfer type is International, select the appropriate option from the Correspondence Charges list.
- In the Transfer via Intermediary Bank field, select the appropriate option.(Applicable for international payees only.)
- If you have selected Yes option in the Transfer via Intermediary Bank field, select the appropriate network for payment in the Pay Via field.
-
- If you select Swift option:
- In the SWIFT Code field, enter the SWIFT code or search and select it from the lookup.
- Click to fetch bank details based on Bank Code (BIC).
- If you select National Clearing code option:
- In the National Clearing code field, enter the National Clearing code or search and select it from the lookup.
- Click to fetch bank details based on Bank Code (BIC).
- If you select Bank details option:
- In the Bank Name field, enter the bank name.
- In the Bank Address field, enter the complete address of the bank.
- From the Country list, select the country of the bank.
- From the City list, select the city to which the bank belongs.
- From the Payment Details list, select the appropriate purpose of transfer.(Applicable for international payees only.
- In the Note field, specify a note or remarks.
- Click to initiate the payment.
OR
Click to cancel the operation and to navigate back to the dashboard. - The Make Payment - Review screen appears. Verify the details, and click .
OR
Click to navigate to Dashboard .
OR
Click to navigate back to the previous screen. -
Note: If a standing instruction or a pay later transfer is due to the payee within the next X days (as configured), a warning message will appear on the review page intimating the user about the same. This is applicable only if the transfer being initiated is an internal or domestic transfer.
- The success message appears along with the transaction reference number, status and transaction details.
Click Go To Dashboard to go to the Dashboard screen.
OR
Click Add Favorite to mark the transaction as favorite. The favorite transaction is added. For more information, click here.
OR
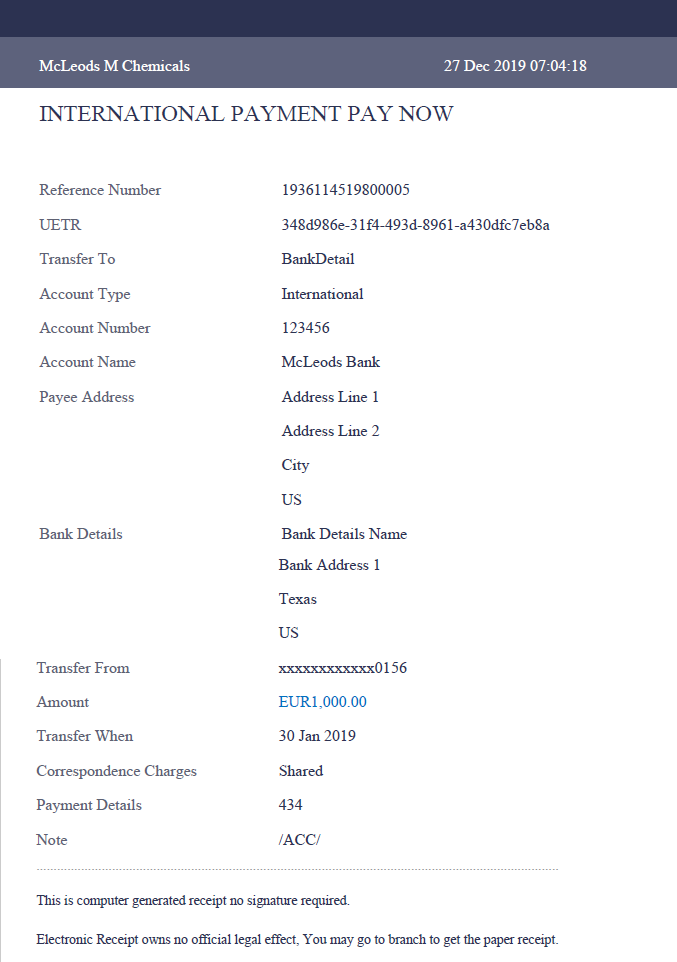
Click the e-Receipt link to download the electronic receipt.
E-receipt
FAQs