You may have a large number of codes that are used within the Generic Cost Manager. In addition you may have a large number of shells in your implementation. To update codes and columns in your generic cost manager sheets with a minimal effort, you can push columns in a project or shell template generic cost sheet from the Columns Log to cost sheets.
Notes:
About updating shell instance dashboards:
- A cost sheet must already exist in the destination shell. Pushing a column from a template will not create a cost sheet that can receive the column.
- You can push one column at a time.
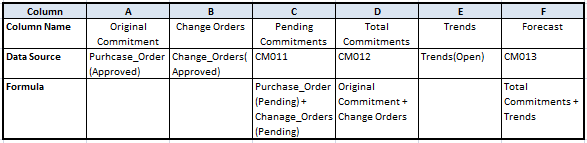
- If a source column is a single data source, then the destination column will be created with that single data source if it does not already exist. (Column A or B in example below)
- If a source column is a formula with only single data sources, then pushing the source column will create that column in the destination cost sheet, if it does not already exist. (Column C in example below)
- If a source column is a formula with columns included in the formula, as long as all constituent columns contain single data sources, the source column can be pushed; for any columns that do not exist in the destination cost sheet, the formula will be changed to a single data source in the formula. (Column D in example below)
- If a source column is a formula with constituent columns that include logical data sources, the logical data source must exist in the destination cost sheet. The formula for the logical data source may be different in the destination cost sheet. Any column that contains a single data source will follow the rule above. (Column F in example below)
To add or update generic cost sheet columns from a template
- Go to the Company Workspace tab and switch to Admin mode.
- Click Templates > Shells in the left Navigator.
- Open the shell-type template to update.
- In the shell template, navigate to Configurable Modules > Generic Cost Manager.
- Select the Generic Cost Manager Sheet template and click the Structure button.
- In the Generic Cost Manager Sheet log, select the cost sheet template and then click the Columns button. The Columns Log window opens.
- Select a cost sheet column.
- Click Update Shells and choose one of the following:
- Shells: You can use this option to select one or more shells to update. When the update window opens, it lists all shells in the project. You can use Find to isolate the shells you want to update. The find window contains data elements from the Find form that was designed in uDesigner. When you have isolated the shells to update, click the Update button and select either Selected Shell(s) or All Filtered Shells.
- All Shells: You can use this option to update all shells of that shell type.
- History: You can view the update history from past updates or cancel a request before the update begins.
An Alert window opens letting you know that you are about to push changes to the selected shells; there is no undo for the update.
- Click Yes if you want to proceed with the update, or No to cancel.
To update generic cost sheet rows from a template
- Go to the Company Workspace tab and switch to Admin mode.
- Click Templates > Shells in the left Navigator.
- Open the shell template you want to update.
- In the template, navigate to Configurable Modules > Generic Cost Manager.
- Select the template and click the Structure button.
- Select a row or rows to push to the project/shell level generic cost sheet. You can select multiple rows by holding down the Shift or Ctrl keys as you click on the rows.
Unifier will update leaf-level rows, but not summary rows.
- Click Update Shells and choose one of the following:
- Shells: allows you to choose which shell(s) to update. You can use Find to search for specific shells to select from the complete list of shells. You can select as many shells as you want to update. The Page and Display fields display on the Shell Update window, but are disabled in this case.
- All Shells: updates all active and on-hold shells
- History: allows you to view the update history from past updates or cancel a request before the update begins.
An Alert window opens, detailing the information that will be updated. Read the message carefully, as once a shell is updated, this action cannot be undone.
- Click Yes if you want to proceed with the update, or No to cancel.