In the Business Process Configuration window, the Custom Print tab allows you to customize the layout of a document, using either MS Word® (leveraging the XML style design ) or PDF format (using Adobe® LiveCycle® Design View.)
You can use the custom print templates to print one record at a time. The document shows all the values of the record that are available. This feature is similar to Print Preview for HTML or PDF. The only difference is that you can custom design the format for the selected record.
Unifier automatically generates the XML schema, which is used to define the custom layout in Word or in LiveCycle. For a given business process, you can export the schema and use it to develop your own customized template. You then save the template and upload it to Unifier.
With This button: | Do this: |
|---|---|
Export Schema | Creates a custom print template using the PDF or Word option. |
Download | Select a template and click Download to use a prepared custom template. |
Upload, Rename, or Remove | Add, change, or remove the custom template. Select the template from the list and click the relevant button. |
Rename an existing template
In the Custom Print window, you can make changes to the names of existing templates.
- Select the template from the list and click Rename.
- In the Rename window, make the changes in the Title field.
Note: If the template you chose was a MS Word template, there will be an additional field, Export As. This allows you to export the template as a different name.
- Click OK.
Preparing to build a custom print PDF template
Prior to starting, make sure Adobe LiveCycle Designer has been downloaded to your computer.
- In the Business Process Configuration log, open the desired business process form.
- Click the Custom Print tab.
- Click the Export Schema drop-down and select Schema for PDF. A pop-up window appears.
- Save the XSD schema file to a location.
- Open Adobe LiveCycle and click File > New Blank document.
- Click File > New Data Connection.
- Name the new connection and select XML Schema.
- Click Next.
- In the Select XML Schema File field, click the browse button and find the XML Schema file you just saved.
- In the Options section, select Embed XML Schema.
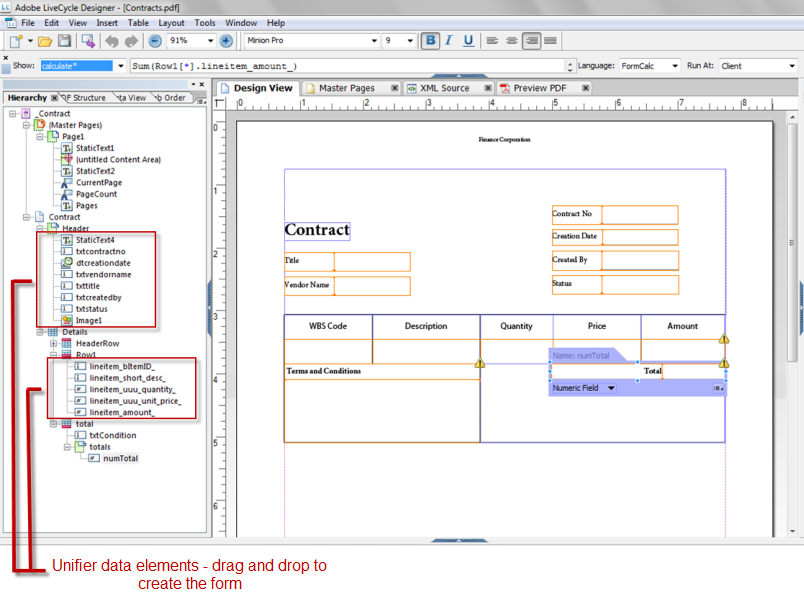
- Click Finish. The XSD tags appear in the Data View tab on the left pane of LiveCycle.
Note: The tag naming scheme is a combination of LiveCycle and Unifier names. The first word before the underscore is LiveCycle’s term, for example, "task," "form," and "lineitem." Everything after the first underscore is a Unifier data element. For a full list of the Unifier data elements definitions (XSD tags), see "XSD tags used in creating a PDF template" below.
Building the template
From the XSD tag list in the Data View tab on the left pane of LiveCycle and drag and drop your tags onto the template. For Attachments, Comments, Tabs and Workflow tags, special care needs to be made to ensure that the tags do not overlap in the printed output.
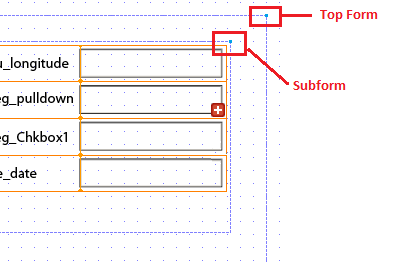
- Select an Attachment, Comment, Tab or Workflow tag and drag and drop it onto the template, for example, "Attachments." The XSD tags display as a group inside a frame ("subform") with four small squares at each corner of the frame. The subform frame rests inside a frame called "top form."
- Right-click on the subform’s frame corner and choose Palette > Objects. The Object tab opens on the right side of the LiveCycle window.
- In the Content field, select Flowed.
- Right-click on the top form’s frame corner and choose Palette > Objects.
- In the Content field of the Object tab, select Positioned.
- To add current workflow steps to the template, use the Task_Details tags.
- When finished, click File > Save.
Uploading the template into Unifier
- In Unifier Custom Print window, click Upload.
- Navigate to the saved LiveCycle template and upload it. The name of the template appears in the Custom Print screen.
The user can now print the business process record using the PDF template option (File > Print Preview > Custom.) The printed output will look similar to this:
XSD tags used in creating a PDF template
Below is a list of all the default XSD tags imported from Unifier into LiveCycle. Comments and attachments are recursive and repeatable. For example, an upper form can have comments with attachments. Line items can have attachments and comments to the attachments recursively
Type of tag Name Description | Type of tag Name Description | Type of tag Name Description |
|---|---|---|
Standard Element |
|
|
Task_Details |
|
|
Upper_Forms |
|
|
Tabs |
|
|
General_Comments |
|
|
Record_Attachments |
|
|
Workflow_details |
|
|
To create a customized XML template in Word
- In the Business Process Configuration log, open the desired business process form.
- Click the Custom Print tab.
- Click the Export Schema drop-down and select Schema for Word 2003. The File Download window opens prompting you to save the file. Click Save.
- Open a new Microsoft Word document.
- Import the XSD file into Word by selecting Tools > Templates and Add-ins.
- Click the XML Schema tab and click Add Schema.
- Navigate to the bp_schema.xsd file and click Open.
In the Schema Settings window, type a unique name for the schema in the URI and Alias field (for example, "Submittal"). The name you enter for the alias appears in the list of available schemas in the Templates and Add-ins window.
Note: Do not select the Schema validate options checkbox.
- Click OK. An MS Word document opens with a list of available Unifier BP tags under "XML Structure" on the right side of the window.
- To add XML tags to the Word document, enter text (e.g.,xxx_project_name to print Project Name) and click the project_name tag that is available as part of the XML structure.
Note: For custom print to work properly, do not add XML tags to the header and footer.
The text will be surrounded with project_name tag. You can follow this process for any element.
- To print line item information, first select the text for all the line item elements and select the appropriate XML tags. Then select all the elements that are part of the line items and click the _bp_lineitems tag.
By doing this you are enclosing all line item elements within the_bp_lineitems XML tag. At runtime, Unifier will know that the elements that are part of _bp_lineitems should be printed for each line item of the BP. Elements that are part of the upper form are prefixed with "form_", and detail form elements are prefixed with "lineitem_".
- Turn off the XML tags before saving.
- Click File > Save As. Name the document, and select XML format for the save option. The document must be saved in XML format. Now you are ready to upload the completed document through the Business Process Configuration window.
- In the Business Process Configuration window, on the Custom Print tab, click Upload. The File Upload window opens.
- Browse and select the Word file you created. You can enter document title, rev. no., and issue date.
- Click OK to save and close the window.