To start the detail form:
- Click the Company Workspace tab and switch to Administration Mode.
- In the left Navigator, click uDesigner.
- Open the business process, manager, or other component for which you want to design the detail form.
- In the Navigator, click Detail Form. The Forms pane opens, showing the standard detail form uDesigner automatically launched.
uDesigner displays the name of the form on the right pane. To complete the form, use the instructions under Adding Blocks to a Form and also Adding Fields to the Form.
Starting Detail Forms for Multiple Tabs
To launch an additional detail form to create a new tab
- Click the Company Workspace tab and switch to Administration Mode.
- In the left Navigator, click uDesigner.
- Open the business process for which you want to design another tab.
- In the Navigator, click Detail Form. The Forms pane opens, showing the standard detail form uDesigner automatically launched.
- On the right pane, choose New > Manual. The Form Design window opens.
Note: If you prefer, you can create the form from a snapshot of another form. To do so, choose New > From Snapshot, then follow the instructions under Restoring a Version of a Design.
- On the General tab, enter a name and description for the detail form, and click OK. uDesigner includes the name of the new detail form on the list in the right panel.
- To create additional tabs (up to fifteen total), repeat steps 3, 4, and 5.
- uDesigner displays the name of the form on the right pane. To complete the form, use the instructions under Adding Blocks to a Form and also Adding Fields to the Form.
- For each of the detail forms you start, uDesigner automatically creates a blank line item list. To design the line item lists, see Adding an Item Log to a Detail Form.
An Extra Step for Multiple-Tab Forms
Designing forms with multiple tabs requires that you return to the properties window for the upper form and specify options that can be activated only after you have designed the detail forms for this component.
To specify upper form options for line item tabs
- Open the business process that contains the multiple tabs.
- In the Navigator, click Upper Forms. The Forms pane opens.
- On the Forms pane, select the name of the upper form and click the Properties button. The Form Design window opens.
- Click the Options tab.
- For View forms, Unifier lists tab names on the left side of the Options > Select Actions > Line Items pane. When you click a tab name, the available option for that tab is Hide current tab.
- For Action forms, more options are available. The Line Items section shows the names of the tabs that have been created, and the list of the available Line Items options.
Note: If a standard tab is hidden in the design, then it will not be displayed at runtime. The standard tab name will be dependent on the tab name specified in the Line item list of Item logs.
- Click the tab name on the left, and specify the line item options on the right as follows:
If the tab should be hidden (for example, if the user should not see the tab at a particular step in the workflow), select the Hide current tab check box.
Select other check boxes if you want to allow users to:
- Add, copy, and remove line items
- Add attachments to line items
- Add summary line item amounts
- Modify line items Modify the statuses of line items
- Click OK.
Mapping Line Items from References during BP Creator Auto-Creation
During auto-creation using a BP Creator, you can copy line items from a source (referenced) business process onto an auto-created (destination) business process, when:
- BP Creator is on the upper form, source (reference) is a picker on the upper form.
- BP Creator is on a detail tab, source (reference) is a picker on the upper form.
- BP Creator is on a detail tab, source (reference) is a picker on the same detail tab.
For example:
An Asset business process references a Motor Template in a line item (via a BP Picker, BP Data Picker, or a BP Creator.) The line item auto-creates another business process, Motor based on the Motor Template (via a BP Creator.) In doing so, all line items from the Motor Template's detail tabs are copied onto Motor's detail tabs.
In addition to being able to copy line items from detail tabs of a parent business process record to the detail tabs of an auto-created business process record, you can copy line items from tabs of another business process record that is referenced by the parent business process record to the selected tabs of the auto-created business process record.
uDesigner Auto-creation Configuration
Upper and Detail configuration windows display a tabbed Business Processes section with two tabs:
- Current
- Referenced
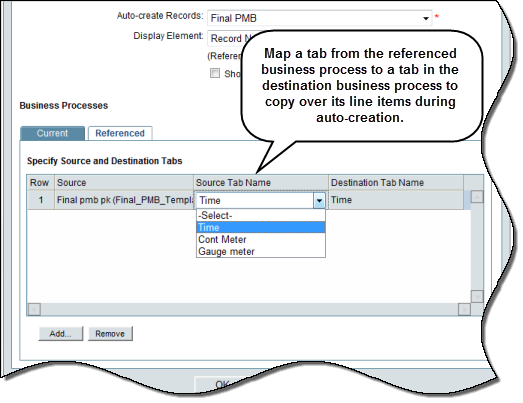
- The purpose of this tab is to specify source and destination tabs for the referenced business process.
- The Referenced tab has four columns for Row, Source, Source Tab Name, and Destination Tab Name.
- Use the Add and Remove options to add or remove mappings in rows.
In the Source list of Detail Configuration, select current business process name, or any BP picker or data picker on the upper or detail form of the business process. (Note Upper Configuration will display only those from the upper form.) In the Source Tab Name list, select a tab from the referenced business process. Destination Tab Name provides a list of all tabs in the business process being created (see Auto-create Records field). These are the same as the values in Destination Tab Name in Current tab. Select any tab in which the line items from the referenced business process will be created.
In the Source Tab Name list, select a tab from the referenced business process.
- Destination Tab Name provides a list of all tabs in the business process being created (see Auto-create Records field).
- These are the same as the values in Destination Tab Name in Current tab.
- Select any tab in which the line items from the referenced business process will be created.
To configure line item mapping in upper or detail form
- Click the Company Workspace tab and switch to Administration Mode.
- Navigate to uDesigner > Business Processes node Navigator.
- Open your line item type business process in which you want to set up line item mapping from a referenced business process to an auto-created business process.
- In the Auto-creation Processes, Upper or Detail log, click New to configure auto-creation on the selected BP Creator field placed on the upper or detail form.
- Complete line item mapping in the Referenced tab, associating tabs in the source business process to tabs in the destination business process.
Creating Query-based Tabs and Summary Elements
A query-based tab (QBT) is a mini business process log within a business process form that displays a filtered list of specific business process records in the tab line item list.
You can create multiple detail forms for a Document type, Line Item type, and Cost type business processes, in uDesigner. Each advanced Document-type business process enables you to include/create up to fifteen tabs, including the query-based tabs.
Note: The first detail form in Document type business process must be used to define a Document-type standard tab that has folder structure, only. The subsequent detail forms must be used to define either the Line Item type, or the query based tabs.
You are required to add a Reference Picker in the Upper Form of a business process that the user wants to run the query.
You can use a query-based tab to:
- View a filtered list of business process records associated with the parent business process.
- Create a new business process from the QBT.
- Copy a business process either with or without attachments.
- Search for business process records based on user-entered criteria.
For example, a contract’s QBT can display all change orders issued against that contract. Another QBT on the same contract record can display all invoices against it. The records displayed in the QBT's line item list are from the same level (project or company.)
Business Processes that do not support query-based tabs include Simple, Resource, Text, RFB, and Project/Shell Creation.
Under the corresponding business process, Query Items has two sub-nodes:
- Query Tabs define the query-based tabs that will be added to the business process. You can create Query tabs as long as the maximum number of tabs (fifteen) has not been reached.
- Summary Elements define the summary data elements to be added to the Upper Form of the business process. They specify the type of summary information (Average/Count/Total/Maximum/Minimum) that will be shown from the selected query tab, for example, the total amount of records, or the count of records in the tab.
The Item Log accommodates both detail form line items lists and query items. The Items log contains:
- Type column to help distinguish between Detail Forms and Query Items.
- Tab Name column appears before Name column.
Required References
You must define references in the source business process from which you want to display information. For example, if Meeting Minutes is the destination business process in which you want to display Action Items data, then:
- Action Items (the source business process) must have:
- A Meeting Minutes reference defined in its Reference Processes.
- A business process picker on the Upper form that you can use to select the Meeting Minutes record in which you want to show Action Items data.
Query-based Tabs
The Query Tabs enable you to define the query-based tabs (QBTs) that you want to be added to a business process.
You can define query conditions in uDesigner (Company Workspace > Admin mode > uDesigner > Cost type business process > Query Items > Query Tabs.
- Navigate to Company Workspace > Admin mode > uDesigner node > Business Processes node.
- From the Designer - Business Processes - Current View window/log, find an existing Cost-type business process in Draft status and open.
- In the opened business process, on the toolbar, click the Status drop-down list to validate status. If the business process status is Complete, you can click Draft so you can edit the business process forms.
- (Optional) Click Detail Form, on the left-hand Navigator, to open the Detail Form - Current View window/log. The log lists previously created tabs. You are allowed fifteen tabs, including the query-based tabs.
- Click Query Items node, on the left-hand Navigator, to expand and click Query Tabs to open the Query Tabs - Current View window/log. The system allows you to create a total of fifteen Query-based Tabs (QBTs) on a business process.
- From the menu, click New to open the Select Business Process window.
- Under the Select Business Process/Attribute field click the drop-down list to see all the available business processes.
- Select the source business process and click OK to open the Query Tab window, General tab.
- Enter values in the Name and Description fields.
- Click the drop-down list of the Reference Picker and select a reference for the source business process.
- Click Apply and then OK.
- From the left-hand Navigator click Item Logs to open the Line Item List - Current View window/log.
- Click to select the name and click Open. The Query items window opens which has two tabs: General and Query. The General tab shows the tab name (Tab Name).
- Click the Query tab and define the query by following these steps:
Note: You can add one query per QBT, only.
- Click Add to open the Query Condition window.
- Under Add Query Condition, the Data Source is displayed. This is the name of the business record from which you want to pull data and show in the destination record.
- Click the drop-down list of the Data Element and select a data element from the Upper Form of the source business process. For example, you can select Status to show all source records of that type in a particular status. In the Values section, select either:
- Dynamic: This option requires a Data Source and a Data Element selection.
Or
- Constant: This option requires that you select a data definition from the list of available data definitions.
- Dynamic: This option requires a Data Source and a Data Element selection.
- When finished, click OK to go back to the Query items window.
- Click Apply and then OK to save your query.
Summary Elements
If you want summarized information from the query tab displayed in the upper form, define the summary data elements and then add them to the upper form of the business process.
To define Summary Elements:
- Click the Summary Element node (beneath the Query Tabs node). The Summary Element log opens.
- Click the New button in the log toolbar. The Summary Element window opens.
- Enter an Element Name. The Summary Element Name is concatenated from the Element Name you enter and the Summary Type you select, with a system-defined prefix. Unifier only allows alphanumeric characters.
- Enter a Form Label. You will add this element to the upper form.
- Select a Summary Type. Available options are Average, Count, Total, Maximum, and Minimum. The interface changes dynamically for the type selected.
- Select the Query Tab on which you want to display this information.
- Click OK when done.
To add Summary Elements to the Upper Form:
- Open the Destination business process Upper form.
- Select a cell into which you will add the Summary Element.
- Click the Summary button on the Upper form toolbar. The Summary Element Picker opens.
- Select a Summary Element and click OK.
- Click Save.
- Click Close Window.
- Follow the same steps to add the Summary Element to any other Upper forms on which you want to include the Summary Element.
- When finished designing the business process, change the Status to Complete.
- Click Deploy to make the business process available in Unifier.
Adding a Grid Summary to a Detail Form
You can add line item grid summary to a line item business process and use it to track and display, for example, the number of hours performed on a project on a daily basis. You can configure the summary to display Total and average amounts. Summary is allowed only for numeric data elements
To configure a grid summary on a detail form
- Click the Company Workspace tab and switch to Administration Mode.
- In the left Navigator, click uDesigner.
- Click the Business Processes node. The Business Processes log opens.
- Open the cost or line-item type business process for which want to configure a Summary for Total Amount and/or Average Amount.
You can use the Find feature to locate the business process in the Business Process log.
- In the Navigator, click Detail Form. The Detail Form log opens.
Select the detail form to which you want to add the grid summary and either double-click or click click the Open button.
- Open the Detail form by either selecting it and clicking the Open button, or by double-clicking the form. The Detail form opens.
In the Detail form tool bar, click the Properties button. The Elements Properties window opens.
- Select an element for which you want to add a summary
- Click the Summary button.The Summary dialog box opens.
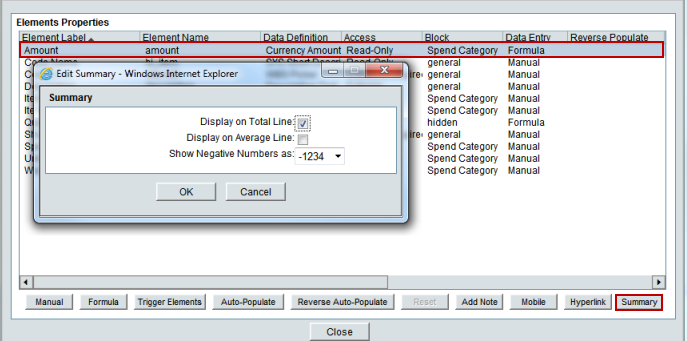
- Select the options you want to use; you can use both average and total summary selections, or just one selection, for the grid summary.
- Display on Total Line — Use this selection to create a summary row at the bottom of the line item grid at run time.
- Display on Average Line — Use this selection to create an average row at the bottom of the line item grid at run time.
- Show Negative Numbers as — Use this selection to define the negative number format.
- Click the OK button to save your selections.
- You will see your selections for the numeric data element in the Summary column on the far right of the Elements Properties window.
At run time, you will see real time updates in the Grid View.
