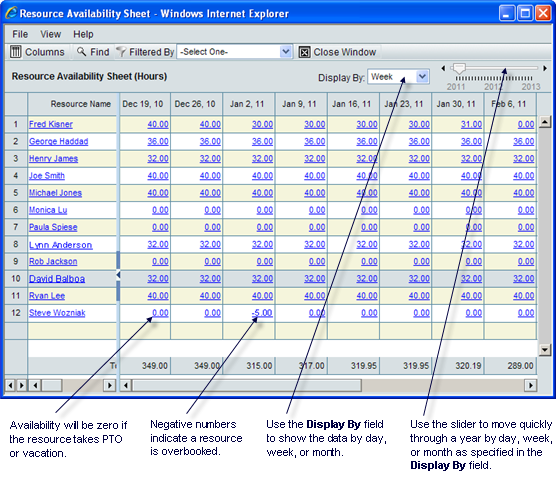
The Resource Availability Sheet resides at the company level. This sheet shows the current availability of each resource across all projects/shells. A resource’s availability equals the resource’s total capacity (hours available), minus the total bookings across the projects/shells, and minus the non-project times specified. The sheet also shows over-bookings and zero hours where the resource is not available due to PTO, vacation, or administrative duties.
Unifier automatically adds the Resource Name column to the sheet; you cannot move this column. Unifier adds rows to the sheet whenever a Resource Booking business process is submitted. You can manually add columns directly to the sheet to show more information. You can also modify data manually on the sheet.
To open an Availability Sheet
In the company-level Resource Sheets log, select Availability Sheet and click Open.
To view a resource’s available hours and other information
Click the resource’s name. Unifier opens a read-only copy of the resource’s properties. These can include the resource’s address and phone number. This window will also show the resource’s capacity of work hours per week. Depending on the design of the Resource Attribute form, this window might also show a breakdown (as in the example below) of the resource’s hourly working capacity by day.

To view booking details
You can drill down to an individual resource to see a read-only copy of the booking information. To do so, click on the value in any date column. Unifier displays the cell details.
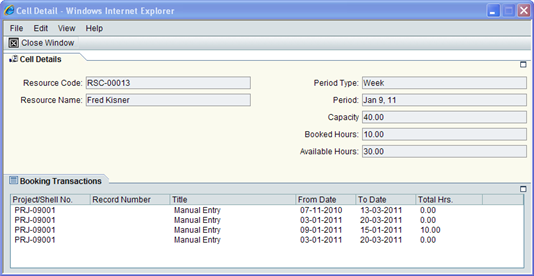
The cell details show the following information:
Resource Code | The code assigned to the resource |
|---|---|
Resource Name | The name of the resource. |
Period Type | The period of availability being displayed. (This reflects what the Display By choice was.) |
Period | The time the data on this window covers (day, week ending date, month ending date). |
Capacity | The hours the resource is available during the period. |
Booked Hours | The number of hours the resource is booked during this period. |
Available Hours | The number of available hours the resource has left for booking during this period. |
Transactions | The booking transactions that are reflected in the data in this window. Project/Shell No. shows the number of the project/shell for which the resource is booked. Record Number shows the number of the business process record (unless the entry was manual). Title shows the title of the business process. This column will show "Manual Entry" for any hours that were manually entered on the sheet. From Date shows the beginning date of the resource’s period of availability. To Date shows the end date of the resource’s period of availability. Total Hrs shows the total number of hours the resource is available during the period. |
To add columns to the sheet
By default, the left column of the sheet displays the name of the resource and cannot be edited or moved. You can add additional columns to the left side of the sheet to customize it to your needs. To add columns:
- On the sheet, click the Columns button. The Columns window opens, showing the columns currently displayed on the left side of the sheet.
- Click the New button. The Column Properties window opens.
- Use the information in the table below to complete the fields in this window.
- Click OK. Unifier closes the Column Properties window.
On the Columns window, you can adjust the order of the column(s) you added by using the Move Up (Left) and Move Down (Right) buttons.
In this field: | Do this: |
|---|---|
Name | This field will show the name of the element you choose in the Datasource field (below). |
Datasource | Select a Data Source from the drop-down list. The list displays the data elements from the Resource Attribute form. |
Data Format | This controls how data is displayed on the sheet. Select: Show as percentage to display the data as a percentage. Decimal places if you want the data to include decimal amounts. Choose 0 to 8. Use 1000 Separator if you want to include a comma (,) separator in numbers. Negative Number Format if you want to show negative numbers in parentheses or with a minus sign. |
Display Mode | Show or Hide to display or hide the column from user view. |
Column Position After | Specify the column after which this new column should appear. |