You can view worksheets for BCWS, BCWP, EAC as well as custom curves that have the "Manual entry intermediate points" option selected in curve properties. These worksheets display the BCWS, BCWP, EAC and custom curve calculations used in the earned value analysis.
BCWS, BCWP and EAC worksheets are read-only. Custom curve worksheets allow manual distribution of cost data in the Incremental view.
You can export data from worksheets. A graphical view is available for the BCWP worksheet. In addition, you can add notes to worksheets.
The More Worksheets option is available from the default CBS Codes view of the earned value sheet, and also the Schedule Sheet-Activities view available from the More Sheets option.
To open a worksheet
- Open the earned value sheet.
- Click the View button and choose More Worksheets. The More Worksheets window opens, listing BCWS, BCWP, EAC (if defined) and any custom curves.
- Select a worksheet and click OK. The worksheet opens. The default view is incremental.
In incremental view, the columns are time based. The range is determined by the Start and Finish dates in the Source Details. Manual entry of cost data, if applicable, can be done in this view.
- To view the cumulative view of the data, click the Cumulative button. (A graphical view of the Cumulative curve is available; click the Graph button from the Cumulative view.)
- For BCWP, to view the graphical view, click the Graph button, then choose All Rows or Selected Row. For more information about displaying graphs, see the example below.
To add or view notes on a worksheet
- Open the BCWS, BCWP, EAC or custom curve worksheet.
- Click the Notes button. The Notes window opens. Any notes that have previously been added will display in the Notes field.
- You can enter a note in the Notes field and click Ok.
To enter or distribute cost data in a custom curve worksheet
- Open the worksheet for the custom curve.
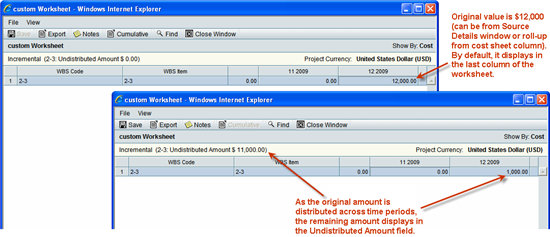
- If (in the custom curve properties) the Data option has been set to manual, then the values that you entered in the Cost field of the Source Details window for each CBS code display by default in the last column on the worksheet. This amount can be distributed among all time periods (columns) on the worksheet.
- If the Data option has been set to Cost Sheet column, then when the earned value sheet is refreshed, actuals data will roll up from the cost sheet column directly to the last period (column) on the worksheet. You can distribute this amount manually across other columns.
- To distribute this cost data, scroll to the last column on the worksheet. The value in the column is the total amount that needs to be distributed.
You can click the Find button to search for a specific value in any column, including to search for a CBS code.
- Double-click inside a cell to make it editable.
- For each applicable CBS code, change the value in the last column to the correct distribution amount and press Enter. The rest of the original cost amount displays in the Undistributed Amount field at the top of the worksheet. If you distribute a total amount that exceeds the original total, the Undistributed Amount field displays a negative amount.
For example, if the original value is $12,000 in the last column (either added manually in the Source Details window or rolled up from a cost column), and the distribution should be $1,000 per month over a 12 month period, then enter $1000 in the last column. The remaining $11,000 will display in the Undistributed Amount field. As you enter $1000 in each of the other month columns, this Undistributed Amount will decrease.
After distribution, if the amount in the cost sheet column or the Cost field in the Source Details (depending on the source) either increases or decreases in amount, then when the earned value sheet is refreshed again, this difference will be reflected automatically in the last column of the worksheet. If there is a decrease that takes the last column to a value of zero, then the difference will be reflected in the next-to-last column.
- Click Save to save the worksheet.