Cycle Cluster Setup for WebSphere
Following are the Steps to setup Cycle cluster environment for DataIntake.
Creating Cycle Cluster in WebSphere Application Server:
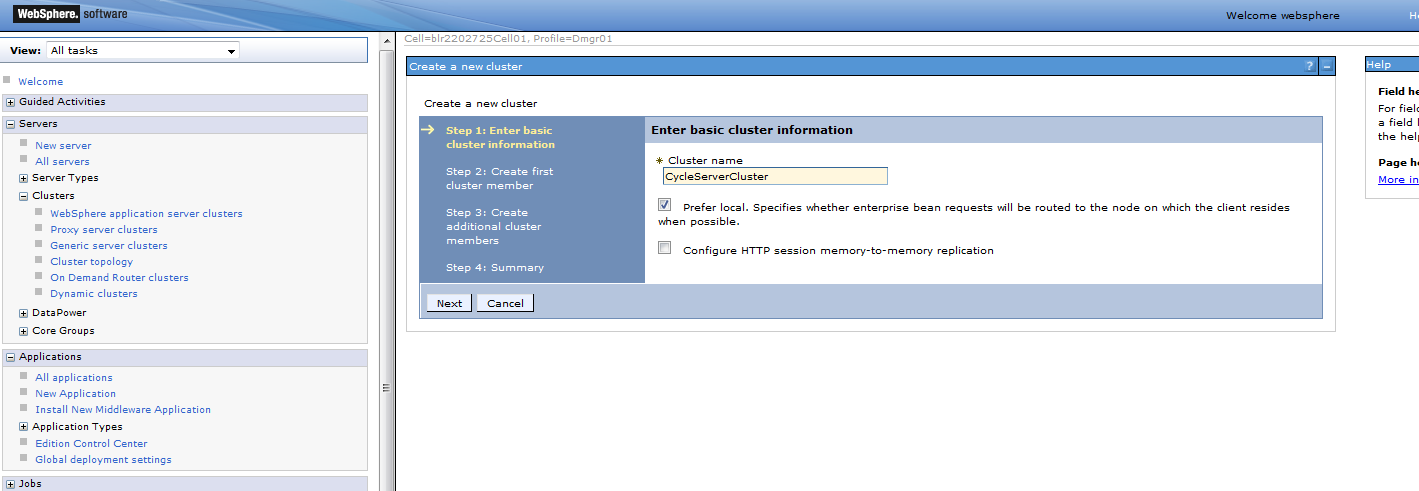
- Navigate to Cluster > WebSphere applications server clusters > click on New.
- Enter the cluster Name.
- Select check box for "Prefer local. Specifies whether enterprise bean requests will be routed to the node on which the client resides when possible." By default it should be selected.
- Click on Next.
-
On Create first cluster member page, enter the following the details:
- Member Name: Enter the first sever member name. For Example, Cycle-ClusterServer-1.
- Select Node: select the correct node.
- Select the check box for "create the member using an existing application server as a template" and select the template cycle server.
- Click on Next.
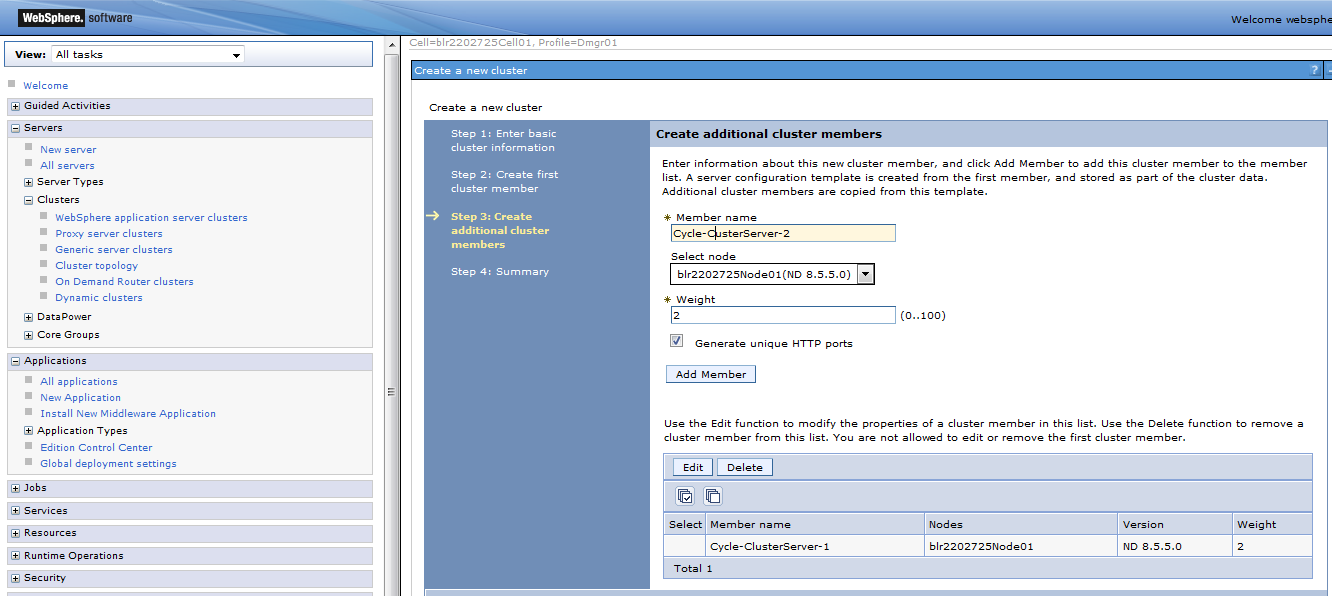
- On Create additional cluster members, in Member Name, Enter the additional member name.
- Click on Add Member .
- Click on Next.
- In Summary page, click on Finish.


Configure the Individual cycle Server:
Configure the cycle server individually as specified in the cycle server deployment document. For this configure JVM Settings, Listening Port and Virtual Host individually for all cluster member servers as specified in WebSphere deployment document for cycle server.
Configure WebSphere Environment Variable for Database Driver:
Environment Variable must have to be created to define database located. Follow the same steps define in Websphere Deployement document for Cycle. Scope must be selected to cycle cluster instead of individual cycle server.
Create Data Sources:
Add the JDBC Provider
Follow the same steps define in Websphere Deployement document for spring-instrumentspring-instrument. Scope must be selected to cycle cluster instead of individual cycle server.
Create the Data Sources
Follow the same steps define in Websphere Deployement document for Cycle. Scope must be selected to cycle cluster instead of individual cycle server.
Deploy the CYCLE application:
Deploy the application (WAR) to the created cycle cluster, instead of cluster members server individually. Follow the steps specified in Websphere deployment document for cycle server to deploy the application.
Create a shared Library for Cycle:
Create the Shared Library for the Scope as created cycle cluster, instead of cluster members server individually. Follow the steps specified in Websphere deployment document for cycle server.
Configure the CYCLE Application:
- Select Applications>Application Types>WebSphere enterprise application.
- Select the Deployed Application.
- Click JSP and JSF options under Web Module Properties and select the JSF implementation to default.
- Under Detailed Properties, click Class loading and update detection.
- Select Classes loaded with local class loader first (parent last) option.
- Select Class loader for each WAR file in application option.
- Click on OK.
- Save the configuration.

Start the CYCLE Cluster:
Navigate to Servers>Clusters>Websphere application server clusters, Select the created cycle cluster and click on start option.
