Create Parent Level Funds
Organizing and Creating Funds
Funds are initially created in the Admin Explorer at the Primary Company level. After they are created at the Primary Company level, they may be associated with specific plans. This must be done prior to setting-up allocation structures, transactions or business rules that use the funds.
All fund administration is handled in the Admin Explorer in the Funds node, where fund details can be edited and funds can be associated to plans. A fund may be associated with multiple plans.
Child funds, lateral funds and benefit funds can be created after a parent fund is set-up. Valuation will run on the child, lateral and benefit funds, unless none are created. Valuation only runs on parent funds when no child, lateral or benefit funds exist.
Basic Fund Database Tables
A complete explanation of the database tables involved in storing fund information is provided in the Fund Database Table section.
| Important | Due to the changes in the Fund table for the 9.5.0.0 GA release, fund functionality is not backwards compatible with previous V9 versions or previous V7 and V8 versions. The significant change to funds involved moving fund association from plan to company level. This eliminates the duplication of funds in multiple plans. |
High Level Steps to Create Funds
The following list provides a general overview of the major steps involved in setting up funds for use in OIPA.
-
Configure the FundScreen business rule.
-
Create the new fund using the Fund wizard. This wizard is accessed from the Funds node in the Admin Explorer.
-
Enter fund information.
- Associate funds with plans.
- Set fund status, if applicable.
Step 1: Configure the FundScreen Business Rule
Before creating funds, the FundScreen business rule must be configured. This rule allows additional fields to be configured for parent level funds. The fields configured are used when entering fund information. They store custom information need by the business in the AsFundField table.
All fields needed by the various fund types must be configured in this rule. There is no way to filter fields by fund type in OIPA so they will all display for the user. If child funds, lateral funds or benefit split funds are needed, they must be defined in this rule as well.
Steps to Configure a FundScreen Business Rule
-
Navigate to the Global Rules Explorer.
-
Expand the Business Rules folder.
-
Expand the Screen folder.
-
Right-click the FundScreen folder and select New FundScreen Override.
-
Select Next in the first screen of the wizard.
- Select the appropriate company from the Company drop down box.
- Click Finish.
-
Open the new override rule in the Configuration Area and click the XMLSource pane.
- Configure the <ParentFundFields> element directly under the opening tag.
- Add a <Field> element for each field that is needed for parent funds. Please see the XML Configuration Guide topic in this help system for a list of all elements, attributes and values needed for configuration. View Common Elements | Field Elements.
-
Right-click on the FundScreen.xml file and select Check-In.
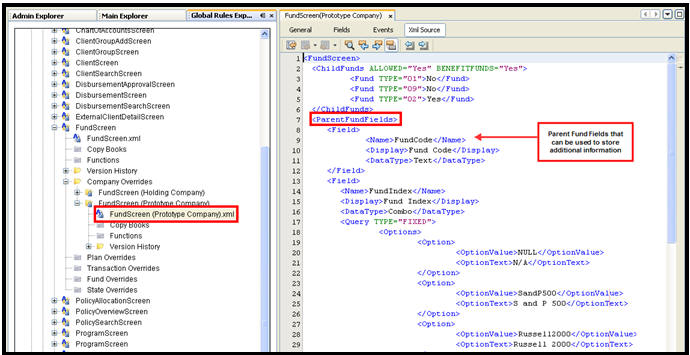 FundScreen Business Rule with ParentFundField Element
Step 2: Create Fund
-
Navigate to the Admin Explorer.
-
Expand the Administration folder.
-
Expand the Funds folder.
-
Right-click on the Company level folder where the fund will reside and select Add New Fund. The New Fund wizard will display.
-
Enter the fund information. Each field is described below.
- Fund Name: the name of the fund being created. Spaces can be used in the fund name.
- Fund Type: the type of fund being created. Types are pulled from AsCodeFundType. These options can be edited through the Code Names editor in the Admin Explorer.
- Currency Code: This is the currency associated with the fund. The default is the currency associated to the primary company or the system properties. This is populated by AsCurrency, which can be edited through the Currency editor in Admin Explorer.
- Calendar Code: This is the calendar that identifies trading days for the fund. This is populated by AsCodeCalendar.
- Override Offset: This check box is available for unit linked funds. Fund offset days can be defined when this box is checked.
- Fund Offset Days: This drop down box becomes enabled when the fund is a unit linked type and the Override Offset box is checked. Enter the number of days OIPA should delay before processing the fund. When entered an entry is made for the fund in AsPriceOffset, which links to AsFund through a FundGUID.
-
Select Finish. If the Finish button is not enabled, required fund information may be missing. When complete, the Fund Detail pane opens for the new fund in the Configuration Area.
Step 3: Enter Fund Information
When the new fund displays in the Configuration Area, additional information can be entered in the fields that were created through the FundScreen business rule in step one.
| Important | Fields that do not apply to the fund type being created can be left blank. Since there is no validation supported, the user must determine the fields that apply to each fund type. |
The image below shows a fund open in the Configuration Area. Section A contains the fund details, which are stored in AsFund and captured through the Fund wizard when the fund is first created. Section B shows the fund fields that were configured in the FundScreen business rule. The user enters information on the screen and when saved it is stored in AsFund.
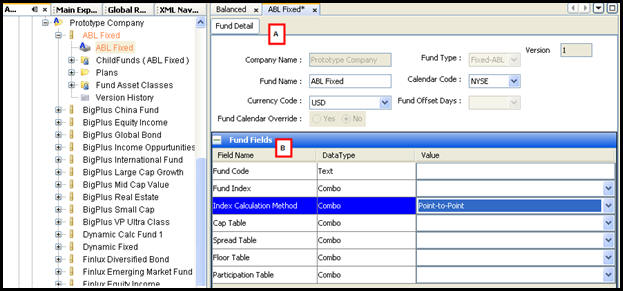
Fund Information from Admin Explorer Funds Node
Step 4: Associate Funds With Plans
There are two ways to associate funds with plans. The first method only applies to parent funds, but the second method can be used by child funds, lateral funds, benefit funds or parent funds.
- Select the fund from the Admin Explorer Funds node and open the Plans | Plan List folder to associate multiple funds to a plan.
- Select the Subsidiary Company folder under Funds in the Admin Explorer and open the appropriate plan folder. The various fund levels each have their own folder where funds can be associated to the plan.
Regardless of the way the association between fund and plan is created, a database record is inserted into AsPlanFund, with any additional details in AsPlanFundStatus. In previous versions of the system, the information was stored in the AsFund database table.
Association 1: Fund to Plan
- In the Admin Explorer, expand Administration | Funds | Primary Company.
- Locate and expand the fund to associate with a plan.
- Expand the Plans | Plan List folder.
- Right-click the PlanList.xml file and select Check Out.
- Use the right-facing arrow button to move the plans that apply into the Attached Plans window. To remove a plan, use the left-facing arrow button to move the plan back to the Available Plans window.
- Under Plan Details, select Yes in the Deposit Level Tracking drop down box to specify that the fund should be tracked at the deposit level. This is typically used for point in time valuation. If No is selected, the fund will be tracked at the fund level. Fund level tracking is the default method. This means the policy will keep the values of each fund on the policy. When Deposit Level tracking is set to Yes, then the value of each individual deposit in a fund is tracked.
- Under Plan Details, the removal method can be set by selecting an option from the Removal Method drop down box. This tells OIPA how to remove money from a fund. The list is populated by AsCodeFundRemoval.
- Under Plan Details, a removal precedence can be specified. This identifies the order in which money is removed from funds. Removal precedence is set by selecting an integer in the Removal Precedence drop down box. A value of zero (0) will not allow the fund to have money removed.
- Under Plan Details, Trailing Calculation Duration can be specified by entering a positive integer value in the corresponding text box. This value specifies the number of days a fund for a specific plan is displayed on valuation screens after the fund value reaches 0. If no value has been entered for a fund, then a database record with "null" value will be inserted for AsPlanFund and the particular fund wont be displayed on Valuation screen in case it reaches zero value. This Column does not affect the negative Funds and supports only Point In time Valuation.
- Check-in the file when all information has been added.
Association 2: Plan to Fund
- In the Admin Explorer, expand Administration | Funds.
-
Expand the Primary Company Name | Subsidiary Companies | Subsidiary Company Name | Plans | Plan Name.
-
Find the folder for the type of fund (Parent, Child, Lateral or Benefit) then expand the folder, right-click on the fund file and select Check Out.
-
Use the right-facing arrow button to move the plans that apply into the Attached Plans window. To remove a plan, use the left-facing arrow button to move the plan back to the Available Plans window.
-
Under Plan Details, select Yes in the Deposit Level Tracking drop down box to specify that the fund should be tracked at the deposit level. This is typically used for point in time valuation. If No is selected, the fund will be tracked at the fund level. Fund level tracking is the default method. This means the policy will keep the values of each fund on the policy. When Deposit Level tracking is set to Yes, then the value of each individual deposit in a fund is tracked.
-
Under Plan Details, the removal method can be set by selecting an option from the Removal Method drop down box. This tells OIPA how to remove money from a fund. The list is populated by AsCodeFundRemoval.
-
Under Plan Details, a Removal precedence can be specified. This identifies the order in which money is removed from funds. Removal precedence is set by selecting an integer in the Removal Precedence drop down box. A value of zero (0) will not allow the fund to have money removed.
- Under Plan Details, Allow Negative Values can be specified to allow negative values for fixed funds from the drop down box. If Yes is selected, the fixed funds used by policies of a plan or product are allowed to have negative deposits. If No or Null is selected, the fund is not allowed to contain a negative value. This field is used by the Palette's Plan Copy and the Detailed Diff Report features.
- Check-in the file when all information has been added.
Step 5: Set Fund Status, If Applicable
When a status is applied to a fund, it controls by date when a fund is available for selection in OIPA. This is an optional feature, as funds don't have to be restricted by date. Plan fund statuses can only be set when the fund file is checked in.
If multiple plan statuses are needed, then there must be a one day difference between the expiration date of the old status and the effective date of the new status.
Steps to Set Fund Status
- In the Admin Explorer select Administration | Funds | Primary Company | Fund name | Plans | Plan Status List.
- Open the appropriate plan folder.
- Right-click on the plan.xml file and select Check Out. The Plan Fund Status will open in the Configuration Area.
- Click Add to create a plan status record.
- Type the status information.
- Status: this is the current status of the fund. Populated by AsCodeFundStatus. These options can be updated through the Code Names editor in the Admin Explorer.
- Effective Date:this is the date when the fund becomes available for investors.
- Expiration Date: this is the date when the fund expires and is no longer available for investors. This date must be later than the effective date.
- Active From Date: this is a disabled field that displays the system date indicating when the AsPlanFundStatus record was saved and checked into the database.
- Active To Date: this checkbox closes the status and populates the database with the current system date. A new status record can be created one the previous one has been closed.
- Check-in the plan status file to save the information.