Creating an Outbound REST Service Based on an OpenAPI Compliant JSON File
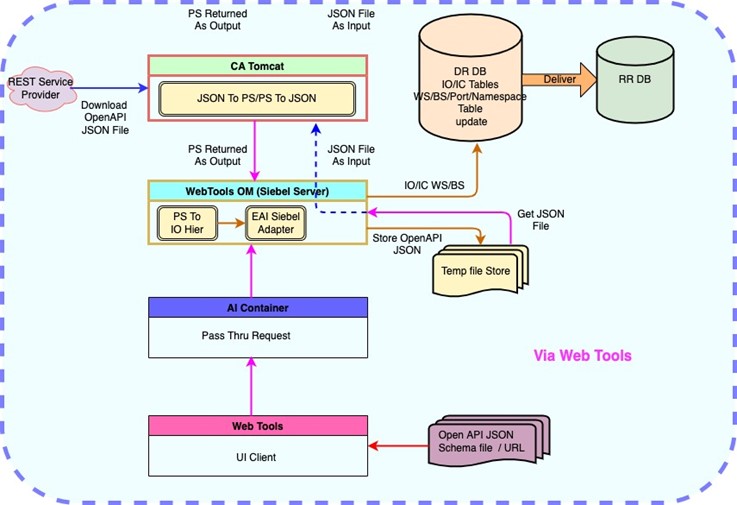
This topic describes how to create an outbound REST service. You do this by importing an OpenAPI compliant JSON file or URL, which describes an external REST API endpoint. The following figure shows how the JSON file or URL import creates an outbound proxy business service, a Web Service, and other artefacts.
To create an outbound REST service in Web Tools
-
In Web Tools, create and open a new workspace.
Start the New Objects Wizard.

Select Web Service and click Start.

The WSDL/JSON Import Wizard appears.
Choose File or URL.
If you choose URL:

- Selecting the URL radio button enables the URL input text box.
- Enter the URL from which you want to download a JSON schema file.Note: If the endpoint must be trusted, you must import the root certificate into the
ses\applicationcontainer_internalserver's trust store.
If you choose File:
Click the upload icon and choose the file to use in the import.

Choose the file and click Open.

Click Next.
The file contents are validated. The validation results are displayed after completion.

If your file is corrupt and cannot be parsed, processing errors are displayed.

Sometimes, it could be a logical (not syntactical) schema error.

The Validation Results describe:
- Objects to be created
- Warnings from parsing document
- Errors from parsing document
- By-passed paths: not processed
- Unresolved server address: substituted with "hostname:port"
- Failures: why the errors occurred and what you can do to resolve them
Note: When large JSON files are imported, Web Tools may sometimes timeout while theSWToolsObjMgrkeeps processing. Due to the large JSON file, there might be thousands of records being inserted into the repository, which will take time. Sometimes the Web Tools UI might become unresponsive. This issue will be resolved in a future release.When the JSON schema has been parsed, the Admin Data for the user interface is created and inserted into the database.
Click the Submit button.
This creates the repository artifacts and populates the Admin Data. An XML file is also generated. In the future, if the Admin data gets deleted or changed, you can use this XML file to import artefacts into the Outbound REST Services UI in Siebel.
Note: If you decide not to deliver the workspace with the newly created repository objects, you must manually delete the new outbound REST service in the Outbound REST Services UI in Siebel. This prevents stale service records remaining in the database and helps you avoid naming conflicts during future imports.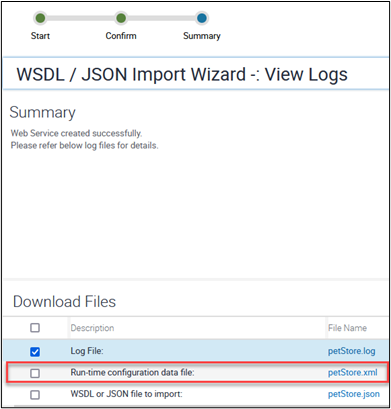
Here is a list of downloaded files:
- Log file for the import process
- XML file containing the Admin Data for the Outbound REST Service
- JSON file imported
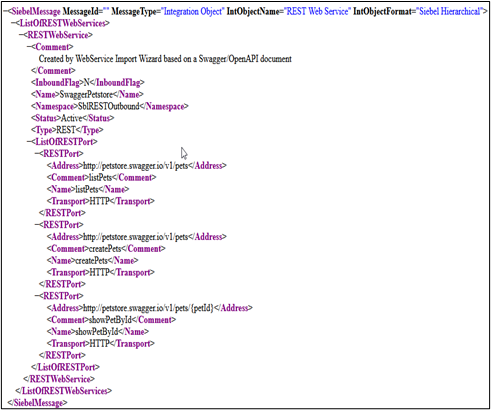
Here is a sample generated XML file.
Here is a list of log files, which you can use for troubleshooting, in case of failures:
- For Java related issues, see
ses/applicationcontainer_internal/logs/restoutbound.log - For Java Heap Size error, which occurs if you import a large JSON file,
see
ses/applicationcontainer_internal/logs/siebeljbs.logIf you get this error, you need to increase the Java Heap Size for ses/applicationcontainer_internal tomcat.
- For debug logs, see Setting the Log Level for REST Outbound Services.
- For Siebel OM related errors, see
SWToolsMgr_enu.logs - For information about Siebel Server log files, see Siebel System Monitoring and Diagnostics Guide.
To view the new outbound REST service, do the following:
- Open an application, such as Call Center.
- Navigate to Administration - Web Services.
- Navigate to Outbound REST Services.
The following Outbound REST Services screen shows the names for the Service, the Endpoint URLs, and operations. Here, the input for Filter Service can be provided against each operation. For more information, see Overview of the REST Outbound Filter Service.

Click Finish to close the Web Service Wizard.

The created objects are listed in the Developer Workspace. You need to deliver the workspace to use the newly created artefacts at runtime.
