18. Interface
18.1 Introduction
This chapter discusses about the interfaces available in the application which supports following interfaces:
- AP Transaction
- GL Transaction
- Conversion Accounts
18.2 AP Transactions
The AP Transactions screen enables you to view accounts payable in Oracle Financial Services Lending and Leasing and complete the following tasks:
- View requisitions for all payees
- Change Payee Details and Track History
- Put a requisition on hold
- Close a requisition
- Cancel a requisition
- Print check details
The AP Transactions screen displays information regarding advance payments, such as payee type, mode of payment, status, and other details. Whenever there is a refund to be sent to the trustee or estate, you can modify the payee details. System automatically records the changes and maintains a history of changes done on a particular requisition.
To view requisitions for all payees
- On the Oracle Financial Services Lending and Leasing home screen, Servicing > Servicing > Interfaces > AP Transaction.
The AP Transactions screen appears.
![]()
The AP Transactions screen contains four sets of option buttons, each in its own section: Payee Type, Pmt Mode, Status, and View Last. These option buttons allow you to narrow the range of the requisitions Oracle Financial Services Lending and Leasing displays.
The Payee Type section enables you to view requisitions according to whom the payment is made.
Choose: |
Oracle Financial Services Lending and Leasing displays: |
All |
All payees. |
Producer |
Producer payees. |
Third Party |
Third party payees. |
Vendor |
Vendor payees. |
Customer |
Customer payees. |
Business |
Business payees. |
The Pmt Mode section enables you to view requisitions by how the payment is made.
Choose: |
Oracle Financial Services Lending and Leasing displays: |
All |
All requisitions. |
ACH |
Requisitions paid by ACH. |
Check |
Requisitions paid by check. |
The Status section enables you to view requisitions according to status.
Choose: |
Oracle Financial Services Lending and Leasing displays: |
All |
All requisitions. |
Open |
Open requisitions. |
Close |
Closed requisitions. |
Hold |
Requisitions on hold. |
Void |
Cancelled requisitions. |
The View Last section enables you to view requisitions based on elapsed days.
Choose: |
Oracle Financial Services Lending and Leasing displays: |
1 Day |
All the transactions in last one day. |
1 Week |
All the transactions in last one week. |
1 Month |
All the transactions in last one month. |
By Date |
Specify a date range (within 3 months) in ‘Start Dt’ and ‘End Dt’ fields using the adjoining calendar and click ‘Search’. |
- Use the Payee Type, Pmt Mode, Status, and View Last buttons to select the requisitions you want to view.
- On the AP Transactions screen’s Requisitions section, select the record you want to work with.
- In the Requisitions section, perform any of the Basic Operations mentioned in Navigation chapter. You can view the following information:
Field:
Oracle Financial Services Lending and Leasing displays:
Requisition Id
View the Requisition Id of the selected AP transaction.
Company
The AP transaction company.
Branch
The AP transaction branch.
Transaction Date
The AP transaction date.
Status
The AP transaction status (Open, Close, Hold, or Void).Transaction in OPEN status will not have a credit reference number, as it has not been entered or generated.
Sub Status
The AP transaction sub status.
Payee Type
The AP transaction payee type (Producer, Third Party, Vendor, Customer, or BUSINESS).
Payee
The AP transaction payee name.
Note: For Producer and Third Party disbursements, there is ‘Account Number’ appended at end in the ‘Payee’ column separated by hyphen. This helps to filter records based on Account Number.
Payee Account#
The AP transaction payee account number.
Currency
The AP transaction payment currency.
Amount
The AP transaction payment amount.
Disbursement Currency
The disbursement currency.
Disbursement Amount
The AP transaction disbursement amount.
Pmt Mode
The AP transaction payment mode.
Check Ref No
The AP transaction check reference number.
Check Dt
The AP transaction check date.
Sub Unit
The sub unit associated with the AP transaction.
Country
The AP transaction country.
Address Line 1
The AP transaction payment address.
Address Line 2
The AP transaction payment address.
Zip
The AP transaction zip code.
Zip Extn
The AP transaction zip code extension.
City
The AP transaction city.
State
The AP transaction State.
Transaction Comment
The AP transaction comments received in response format are displayed. You can update the details if required.
- On the Details sub tab, perform any of the Basic Operations mentioned in Navigation chapter. You can view the following information:
Field:
Oracle Financial Services Lending and Leasing displays:
Effective Dt
The transaction detail effective date.
Description
The transaction detail description.
Payment Id
The payment ID of the AP transaction.
Amount
The transaction detail payment amount.
- On the History sub tab, perform any of the Basic Operations mentioned in Navigation chapter.
The ‘Requisitions History’ section in History sub tab displays all the requisition changes that was performed on a particular AP transaction requisitions. The Requisitions History sub tab has similar field information of ‘Requisitions’ tab which is explained in point 4 above.
The Requisitions History table displays the modified fields and you can only view the requisition changes by clicking on ‘View’. The details of Updated By and Updated date are displayed below the Requisitions History details.
Closing a requisition
When the transactions are paid, the requisition should be closed. When you close a requisition, Oracle Financial Services Lending and Leasing changes its status to closed and it cannot be paid again. Oracle Financial Services Lending and Leasing then generates the appropriate GL (general ledger) transactions.
To close a requisition
- Open the AP Transaction screen and use Payee Type, Pmt Mode, and Status sections to load the requisition you want to close.
- In the Requisition section, select the requisition you want to close.
- In the Action section, click Close.
- Complete the other fields if required. Select the Sub Action from the drop-down list and specify Check Ref # field with the check reference number and Check Dt field when the check was issued.
- In the Action section, click Save.
- In the Status section, click Close and view the account.
Putting a requisition on hold
To ensure that the requisition is not paid or closed, you can change its status to hold. When a requisition is on hold, it cannot be closed.
To put a requisition on hold
- Open the AP Transaction screen and use Payee Type, Pmt Mode, and Status sections to load requisition you want to close.
- In the Requisition section, select the requisition you want to put on hold.
- In the Action section, click Open/Hold.
Note
The same option is to be selected while moving a requisition from Hold to Open status.
- Complete the other fields if required. Select the Sub Action from the drop-down list and specify Check Ref # field with the check reference number and Check Dt field when the check was issued.
- In the Action section, click Save.
- In the Status section, choose Hold and view the account.
Voiding a requisition
Changing the status of a requisition to void cancels the requisition.
To void a requisition
- Open the AP Transaction screen and use Payee Type, Pmt Mode, and Status sections to load requisition you want to close.
- In the Requisition section, select the requisition you want to void.
- In the Action section, select Void.
- Complete the other fields if required. Select the Sub Action from the drop-down list and specify Check Ref # field with the check reference number and Check Dt field when the check was issued.
- In the Action section, click Save.
- In the Status section, click Void and view the account.
Printing Check Details
Print the requisition details of an open AP transactions.
- Open the AP Transaction screen and use Payee Type, Pmt Mode, and Status sections to load requisition you want to close.
- In the Requisition section, select the requisition you want to print.
- In the Action section, click on Print Check button. System generates a PDF report with requisition and payee details.
18.3 GL Transactions
Oracle Financial Services Lending and Leasing allows you to view the details regarding general ledger entry as well as amortized transactions posted on a monthly basis. The system updates the GL transaction screen nightly.
The GL Transactions screen contains the following tabs:
- Company
- Account
18.3.1 Company tab
The Company tab contains the following sub tabs:
- GL Transactions
- Amortized Transactions
18.3.1.1 GL Transactions
The GL Transactions screen is a display only screen that allows you to view details regarding each general ledger entry and its corresponding details.
To view the GL Transactions screen
- On the Oracle Financial Services Lending and Leasing Application home screen, Servicing > Servicing > Interfaces > GL Transaction link.
- The GL Transactions screen appears opened at GL Transactions tab.

- In the Company section, select the portfolio company you want to work with. System displays the portfolio company name, portfolio company short name and currency.
- In the GL Entries section, sort the list of GL transactions to be displayed based on elapsed days by selecting the ‘View Last’ option as 1 Day / 1 Week / 1 Month / By Date. When ‘By Date’ is selected you can specify a date range (within 3 months) in ‘Start Dt’ and ‘End Dt’ fields using the adjoining calendar. Click search and view the following information:
Field:
View this:
GL Post Dt
General ledger effective date.
Description
Segment description.
Debit Amt
The debit amount.
Credit Amt
The credit amount.
GL File/Batch #
Batch number.
Dt
Batch creation date.
Created
If selected, this box indicates that the GL interface file/batch is created.
Segment #1
Segment value.
Description
Segment description.
Segment #2
Segment value.
Description
Segment description.
Segment #3
Segment value.
Description
Segment description.
Segment #4
Segment value.
Description
Segment description.
Segment #5
Segment value.
Description
Segment description.
Segment #6
Segment value.
Description
Segment description.
Segment #7
Segment value.
Description
Segment description.
Segment #8
Segment value.
Description
Segment description.
Segment #9
Segment value.
Description
Segment description.
Segment #10
Segment value.
- In the Transactions section, view the following information:
Field:
View this:
Txn Dt
The transaction effective date.
Transaction
The description of transaction.
Amount
The transaction amount.
Account
The account.
Producer
The producer.
18.3.1.2 Amortized Transactions Tab
The Amortized Transactions screen is another display only screen. It allows you to view details of all amortized transactions posted on a monthly basis. The Transactions block displays the earned amount to date and the balance that remains to be earned for each amortized transaction.
To view the Amortized Transaction screen
- On Oracle Financial Services Lending and Leasing Application home screen Servicing > Servicing > Interfaces > GL Transaction > Amortized Transactions In the Company section, select the portfolio company you want to view.
- The Transactions section by default displays amortized transactions of only Active accounts. Select the ‘Show All’ check box to display all the transaction including Paid-Off or Charged-Off accounts.
- In the Transactions section, sort the list of GL transactions to be displayed based on elapsed days by selecting the ‘View Last’ option as 1 Day / 1 Week / 1 Month / By Date. When ‘By Date’ is selected you can specify a date range (within 3 months) in ‘Start Dt’ and ‘End Dt’ fields using the adjoining calendar. Click search and view the following information:
Field:
View this:
Transaction
The transaction type.
Account #
The account.
Account Status
The account status.
Method
The amortization calculation method.
Frequency
The amortization frequency.
Term
The term.
Balance
The balance amount.
Earned
The balance earned.
WrittenOff
The balance write-off.
- In the Amortized Transactions section, view the following information:
Field:
View this:
GL Post Dt
The GL post date.
Transaction Code
The transaction code.
Transaction Amount
The transaction amount.
18.3.2 Account tab
The Account tab is a display only tab that allows you to search and view GL Transactions by querying through account number.
In the ‘Acc #’ field, specify the account number and click ‘Search’.
![]()
System displays the following account details:
Field: |
Do this: |
Account # |
The queried account number. |
Title |
The primary and other applicant(s) attached to the account. |
Status |
The current status of the account. |
Product |
The product for the account. |
Contract Dt |
The contract funded date. |
Currency |
The currency for the account. |
The Account tab also contains the following sub tabs which are segregated to display the respective transactions maintained in the account:
- Monetary Txns
- Amortized Txns
- Securitization Txns
- Loan Sales Txns
- Payment Txns
- Funding Txns
- Producer Txns
By default, system displays only the previous day’s transactions for the selected account and you can modify the same to display the transactions for the last 2 days, 5 days or All Days by selecting the appropriate radio button.
The following table indicates the specific type of GL Transactions displayed for any selected account and the transaction details displayed in each sub tab.
Transaction Type |
Transaction Details |
Monetary Transactions Amortized Transactions Securitization Transactions Loan Sales Transactions |
Effective Date |
GL Post Date |
|
Transaction Code |
|
Transaction Description |
|
Amount |
|
Remarks |
|
Funding Transactions Producer Transactions |
Effective Date |
GL Post Date |
|
Transaction Code |
|
Transaction Description |
|
Amount |
|
Dealer/Producer Number |
|
Dealer/Producer Name |
|
Payment Transactions |
Effective Date |
GL Post Date |
|
Batch Type |
|
Reason |
|
Payment Allocation Transactions |
Effective Date |
Transaction Code |
|
Amount |
|
GL Entries sub tab |
GL Post Date |
GL Transaction Code |
|
Dr/Cr (Debit/Credit) |
|
Segment #1 upto #10 |
|
Transaction sub tab |
GL Post Date |
Segment |
|
Account # |
|
Sub Unit |
|
Category |
|
Description |
|
Debit Amount |
|
Credit amount |
18.4 Account Conversion
Oracle Financial Services Lending and Leasing Open Interface module is designed to allow businesses to convert accounts (either approved or partially completed). At the end of the process, a new account is created in system which can be viewed on Customer Service. It also allows you to board new accounts. There are two methods to enter this information into the system; a data file upload and a manual data entry.
This chapter explains how to use Oracle Financial Services Lending and Leasing’s Account Conversion screen to complete the following tasks:
- Record customer details (including employment and address information), contract information, and collateral information
- Edits to verify the completeness of data with a Verification screen.
18.4.1 Conversion of Account screen
In the Conversion Account screen, the first step in converting an account is to complete the account boarding (new/old) details.
The conversion process does not create the underlying general ledger (GL) entries at any time.
To complete the master block
- Click Servicing > Servicing > Interfaces > Conversion Accounts > Account Boarding.
- The Account Conversion screen appears..
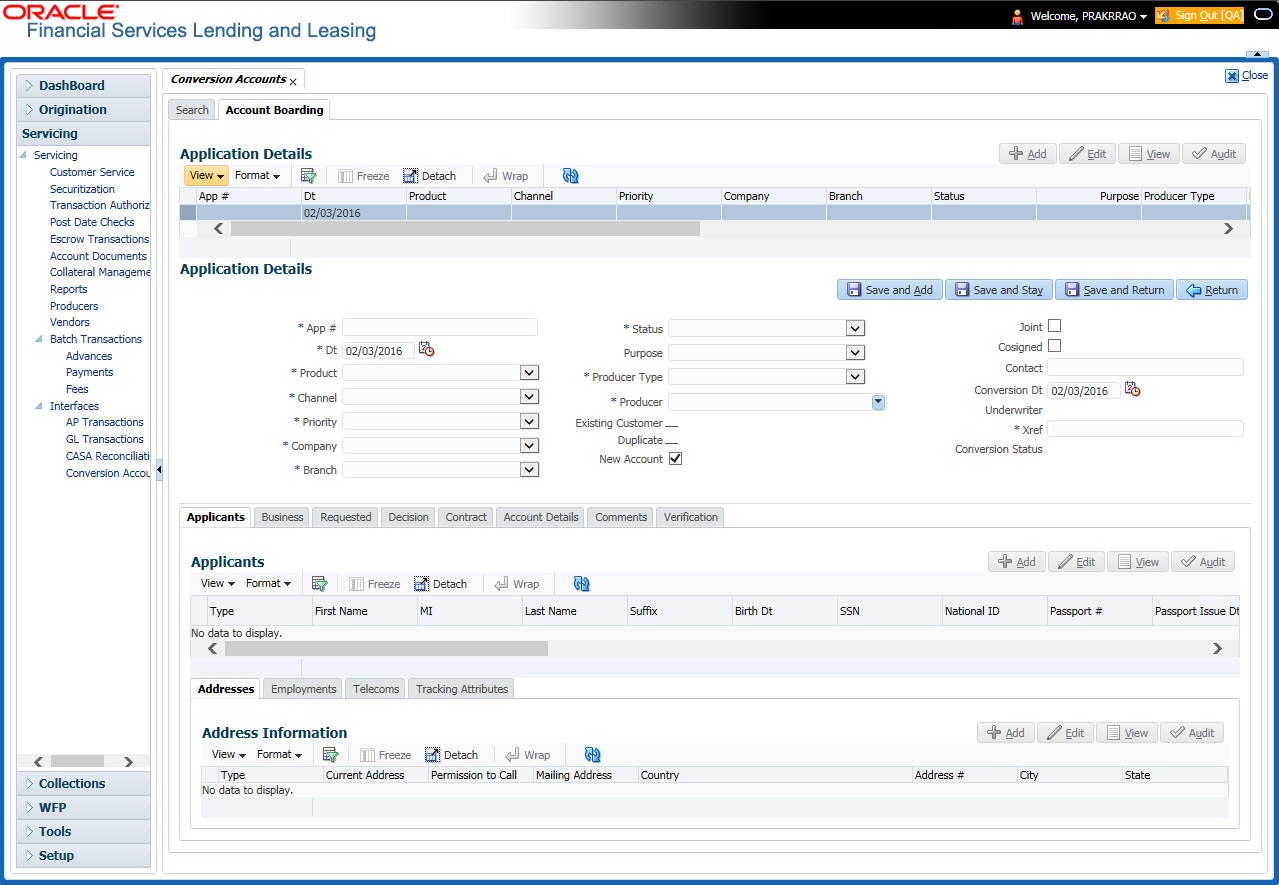
- Perform any of the Basic Operations mentioned in Navigation chapter.
A brief description of the fields is given below:
Field: |
Do this: |
|
App # |
Enter the account number. |
|
Dt |
Enter the account date ( date on which account was originally received). |
|
Product |
Select the product associated to this account. |
|
Priority |
Select the account priority. |
|
Status |
Select the account status and sub status from |
|
Sub Status (unlabelled) |
the following two choices: |
|
CONVERSION |
ACCOUNT CREATED |
|
CONVERSION |
API ACCOUNT |
|
Note: In beginning the conversion process, choose API Account. After verification process, you will change the status to Account Created. (See the Verification section for more information.) |
||
Company |
Select the portfolio company to which this account belongs. |
|
Branch (unlabelled) |
View the portfolio branch to which this account belongs. |
|
New Account |
Select box if account doesn’t exist in the legacy system. IMPORTANT: Clear this box if the account transactions need to be converted. If this box is selected, data entered on Transaction sub screen of the Account master tab will not convert. |
|
Conversion Dt |
Enter the conversion date. |
|
Joint |
Select if the account is joint. |
|
Cosigned |
Select if the account is co-signed. |
|
Purpose |
Select the purpose. |
|
Existing Customer |
Select if one of the applicants is an existing customer. |
|
Duplicate |
Select if the account is a duplicate application. |
|
Contact |
Enter the contact. |
|
Channel |
Select the account channel. |
|
Producer Type |
Select the producer type. |
|
Producer |
Select the producer. |
|
Underwriter |
View the underwriter name. |
|
Xref |
Enter the account number (if converting an existing account) or the account number (if you need to create an account for funded application). This will help to reference back to the legacy system. |
|
Conversion Status |
View the status of the conversion. |
|
- Perform any of the Basic Actions mentioned in Navigation chapter.
18.4.2 Applicants Sub Tab
The Applicants master screen allows you to record information regarding applicants associated with the account. In this section, you will use the information supplied on the application, complete Primary Applicant screen and sub screens (Address, Employments, Telecoms, and Financials sub screens). If this is a joint account, complete the Others screen as well.
18.4.3 Business sub tab
If this is a SME or Business Loan, information gathered on the application entry process regarding the business and business’s address, partners data, affiliates data, phone numbers and business credit score appears on the Customer Service screen’s Business sub tab.
Using the Business sub tab, you can add new business details to an account and/or update the existing business’s address, partners and affiliates information, or phone listing. New business details can be added even after an account is created and is usually done in case when the existing business is taken over by another business.
For detailed information, refer to ‘Business sub tab’ section.
18.4.4 Decision Tab
On the Decision screen, Oracle Financial Services Lending and Leasing system records information gathered during the underwriting process. Depending on the type of account you are working with, Oracle Financial Services Lending and Leasing will display the Loan screen. These screens all share the following sub screens: Stipulations, Itemization (Conversion form only), and Checklist (Conversion form only).
For more detailed explanation of the fields found on the Decision screen, please see the chapter Underwriting in this User Guide.
18.4.5 Contract Tab
The Contract screen allows you to perform important task of completing the truth-In-lending details. These screens include information about financed amount, payment schedule, total of these payments, finance charge, and the resulting annual percentage rate. The truth-in-lending details must be completed before a Loan can be funded.
In completing the truth-in-lending details on Contract link, you will complete the Loan screen.
The Loan screen share the following sub screens:
- Itemizations
- Insurance
- ESC
- Escrow
- Subvention
- Proceeds
- Disbursement
- Fee
- ACH
- Coupon
- PDC
18.4.6 Collateral Tab
The Collateral screen allows you to record information regarding collateral associated with the account. Depending on the type of product or producer you selected, the Collateral link opens one of the three following collateral screen: a vehicle information screen, a home information screen, or an other information screen. Complete the screen that is available on your Applications screen.
These screens all share the following sub screens: Valuations and Tracking.
18.4.7 Account Details Tab
The Account Conversion Account’s screen allows you to view and add comments regarding an account at any time.
To complete the Account Details section
- Click Servicing > Servicing > Interfaces > Conversion > Account Boarding > Accounts link.
The Account screen contains the following sub screens:
- Conditions
- Balances
- Transactions
- ACH
- Bankruptcy
- Charge off
- Compensation
- Loan Details
- Tracking Attributes
- Perform any of the Basic Operations mentioned in Navigation chapter.
A brief description of the fields is given below:
Field: |
Do this: |
Account# |
View the value entered in “Xref” field. |
Status |
Select the account status. |
Effective Dt |
Enter the effective date of the account. |
Paid Off Dt |
Enter the paid off date of the PAID account. |
Pool |
Enter the pool the account is in. |
30 |
Enter the number of times 30 days delinquent over the life of the account. |
60 |
Enter the number of times 60 days delinquent over the life of the account. |
90 |
Enter the number of times 90 days delinquent over the life of the account. |
120 |
Enter the number of times 120 days delinquent over the life of the account. |
Next Due Dt |
Enter the Next Due date. |
Last Pmt Amt |
Enter the last payment amount. |
Due Day |
Enter the due day of the account. |
Last Activity Dt |
Enter the date of last activity on the account. |
Maturity Dt |
Enter the maturity date of the account. |
Last Pmt Dt |
Enter the date the last payment was received. |
Excess Amt Pd |
Enter the amount paid that needs to be applied towards future due dates. |
- Perform any of the Basic Actions mentioned in Navigation chapter.
- In the Extensions block, perform any of the Basic Operations mentioned in Navigation chapter.
A brief description of the fields is given below:
Field: |
Do this: |
# of Extensions (Year) |
Enter the number of times extensions granted (year). |
# of Extensions (Life) |
Enter the number of times extensions granted (life). |
# of Extension Term (Year) |
Enter the number of terms extensions granted (year). |
# of Extension Term (Life) |
Enter the number of terms extensions granted (life). |
Last Extn Dt |
View the last extension date. |
- Perform any of the Basic Actions mentioned in Navigation chapter.
- In the Due Dates block, perform any of the Basic Operations mentioned in Navigation chapter.
A brief description of the fields is given below:
Field: |
Do this: |
Due Dt 1 |
Enter the latest due date for which the account is due. |
Amt Due 1 |
Enter the amount due on the latest due date of the account. |
Amt Paid 1 |
Enter the amount paid on the latest due date of the account. |
Due Dt 2 |
Enter the (latest - 1) due date of the account. |
Amt Due 2 |
Enter the amount due on the (latest -1) due date of the account. |
Amt Paid 2 |
Enter the amount paid on the (latest - 1) due date of the account. |
Due Dt 3 |
Enter the (latest - 2) due date of the account. |
Amt Due 3 |
Enter the amount due on the (latest -2) due date of the account. |
Amt Paid 3 |
Enter the amount paid on the (latest - 2) due date of the account. |
Due Dt 4 |
Enter the (latest - 3) due date of the account. |
Amt Due 4 |
Enter the amount due on the (latest -3) due date of the account. |
Amt Paid 4 |
Enter the amount paid on the (latest - 3) due date of the account. |
Due Dt 5 |
Enter the (latest - 4 cycle) due date of the account. |
Amt Due 5 |
Enter the total due amount less the sum of the last 4 due amounts on the account. |
Amt Paid 5 |
Enter the amount paid on the account till date less the value in paid buckets 1 through 4. |
- Perform any of the Basic Actions mentioned in Navigation chapter.
- In the Conditions block, perform any of the Basic Operations mentioned in Navigation chapter.
A brief description of the fields is given below.
Field: |
Do this: |
Condition |
View the condition. |
Start Dt |
View the start date. |
Followup Dt |
View the next follow-up date. |
- Perform any of the Basic Actions mentioned in Navigation chapter.
18.4.8 Account Details’ Sub Tabs
To complete the Transactions sub screen
- Click Transactions sub tab.
- Perform any of the Basic Operations mentioned in Navigation chapter.
A brief description of the fields is given below:
Field: |
Do this: |
Seq |
Enter the transaction sequence number. |
Post Dt |
Enter the date of posting this transaction. |
Dt |
Enter the effective date of this transaction. |
Txn |
Enter the transaction code. |
Balance Amt |
Enter the principal/advance (Note balance in case of PC) balance value after this transaction was executed. |
Txn Amt |
Enter the amount involved in this transaction. |
Reference |
Enter the reference for this transaction. |
Mode |
Select the mode in which the transaction was performed. |
Reason |
Select the reason code for this transaction. |
Ext Amt |
Enter the part of the payment that was allocated towards the extension fee. |
Memo Amt |
Enter the part of the payment that was allocated towards the membership fee. |
Ovr Amt |
Enter the part of the payment that was allocated towards the over limit fee. |
Fee Adv |
Enter the part of the payment that was allocated towards the advance transaction fee. |
Pre-Payment |
Enter the part of the payment that was allocated towards the prepayment penalty. |
Spread Code |
Enter the spread code used if this is a payment transaction. |
Advance |
Enter the part of the payment that was allocated towards the advance balance. |
Interest |
Enter the part of the payment that was allocated towards the interest balance. |
Late Charge |
Enter the part of the payment that was allocated towards the late charge balance. |
NSF |
Enter the part of the payment that was allocated towards the NSF balance. |
Overage |
Enter the amount that has been overpaid. Used in the case of the last payment received that pays off all the balances. |
Comment |
Enter any comments associated with this transaction. |
- Perform any of the Basic Actions mentioned in Navigation chapter and choose Update Account.
To complete the ACH sub screen
- Click ACH sub tab.
- In the ACH sub screen, perform any of the Basic Operations mentioned in Navigation chapter.
A brief description of the fields is given below:
Field: |
Do this: |
Bank Name |
Enter the current ACH bank name. |
Bank Routing # |
Enter the current ACH bank routing number. |
Status |
Select the status as either Active or Inactive from the drop-down list. |
Start Dt |
Enter the ACH start date. |
End Date |
Enter the ACH end date. |
Default |
Select the check box to indicate if this is default account. |
Account Type |
Select the current ACH account type. |
Account # |
Enter the current ACH account number. If the organizational parameter UIX_HIDE_RESTRICTED_DATA is set to Y, this appears as a masked number; for example, XXXXX1234. |
BIC |
Select the Business Identifier Code from the drop-down list. The list displays the BIC codes defined in the system. |
IBAN |
Specify the IBAN (International Bank Account Number). IBAN is used for identifying bank accounts across national borders with a minimal of risk of propagating transcription errors. Ensure that value entered satisfies the check-digit validation based on modulo 97. On save, system automatically validates the IBAN number length based on country code, characters, white spaces, and checksum. Validation is also done during posting non-monetary transaction (ACH Maintenance). You can maintain the IBAN length and other details required as per the country code in the user defined table (Setup > Administration > System > User Defined Tables). Note: IBAN for 'NL' country code (IBAN_FORMAT_NL) is defined by default with length of IBAN as 18. |
Pmt Day |
Specify the day of payment. |
Pmt Amt |
Specify the payment amount. |
Payment Amt Excess |
Specify the excess payment amount if any. |
Pmt Freq |
Select the payment fee from the drop-down list. |
Fee |
Select the check box to indicate the fee indicator. |
- Perform any of the Basic Actions mentioned in Navigation chapter.
To complete the Bankruptcy sub screen
- Click Bankruptcy sub tab.
- On the Bankruptcy sub screen, perform any of the Basic Operations mentioned in Navigation chapter.
A brief description of the fields is given below:
Field: |
Do this: |
Bankruptcy |
Select if account has declared a bankruptcy currently. |
Disposition |
Select the bankruptcy disposition. |
Start Dt |
Enter the bankruptcy start date. |
Type |
Select the bankruptcy type. |
Comment |
Enter a comment relevant to the bankruptcy of the account. |
- Perform any of the Basic Actions mentioned in Navigation chapter.
To complete the Charge off sub screen
- Click Charge off sub tab.
- In the Charge off sub screen, perform any of the Basic Operations mentioned in Navigation chapter.
A brief description of the fields is given below:
Field: |
Do this: |
Charge-off |
Select if account has been declared as a charge off. |
Disposition |
Select the charge-off disposition. |
Charge off Dt |
Enter the charge-off start date. |
Type |
Select the charge-off type. |
Comment |
Enter a comment relevant to the bankruptcy of the account. |
- In the Repo/Forc sub screen, enter the following information:
In this field:
Do this:
Repo/Forc
Select if foreclosure or repossession proceedings are underway for this account.
- Perform any of the Basic Actions mentioned in Navigation chapter.
To complete the Compensation sub screen
- Click Compensation sub tab.
- On the Compensation sub screen, perform any of the Basic Operations mentioned in Navigation chapter.
A brief description of the fields is given below:
Field: |
Do this: |
Amt Earned |
Enter the transaction code for the amortization balance Five different balance types can be entered in the rows marked 1...5. |
Int Amt Earned |
Enter the original balance amount. |
Amt Paid |
Enter the amount of the balance earned as of previous month-end. |
Amt Writeoff |
Enter the amount of the balance written off as of the previous month-end. |
Next Pmt Dt |
Enter the amount of the balance written off as of the previous month-end. |
Last Pmt Dt |
Enter the amount of the balance written off as of the previous month-end. |
Chbk Amt |
Enter the amount of the balance written off as of the previous month-end. |
- Perform any of the Basic Actions mentioned in Navigation chapter.
To complete the Loan Details sub screen
- Click Loan Details sub tab.
- In the Additional Loan Details block, perform any of the Basic Operations mentioned in Navigation chapter.
A brief description of the fields is given below:
Field: |
Do this: |
Current Rate |
Enter the current rate. |
Current Pmt |
Enter the current payment amount. |
Stop Accrual |
Select if the interest accrual is stopped on this account. |
Balloon Amt |
Enter the balloon amount. |
Current Term |
Enter the current term. |
Paid Term |
Enter the paid term. |
Last Accrual Dt |
Enter the last accrual date for this account. |
- Perform any of the Basic Actions mentioned in Navigation chapter.
- In the Non Performing Rebate block, perform any of the Basic Operations mentioned in Navigation chapter.
A brief description of the fields is given below:
Field: |
Do this: |
Non Performing Type Code |
Enter the non performing type code. |
Interest Rebate |
Enter the interest rebate. |
Promotion End date |
Enter the promotion end date. |
Non Perform Indicator |
Select to indicate that this is a non performing account. |
- Perform any of the Basic Actions mentioned in Navigation chapter.
To complete the Tracking Attributes sub screen
- Click Tracking Attributes sub tab.
- Choose Create Tracking. Oracle Financial Services Lending and Leasing loads all the Customer Service (2) account attributes tracking parameters.
- Sub Attribute field, only attributes in a particular group appear in the Parameter display.
- Complete Tracking Details block by entering requested parameter in the Value field.
- Save any changes you made to the account.
18.4.9 Comment Tab
The Comments screen allows you to view and add comments regarding an account at any time.
To add a comment
- Click the Comment link
- In the Type block, use drop down list to select the type of comment you are adding.
- In the Sub Type block, use drop down list to select the sub type of comment you are adding.
- In the Comments block, type your comment.
- If you want Financial Services to recognize this comment as an alert, select Alert. When you select the Alert box, the comment appears on Customer Service form’s Account Details screen in Comment sub screen.
- Save your entry.
18.4.10 Verification Tab
Oracle Financial Services Lending and Leasing can be configured to automatically validate portions of an application when you attempt to change its status. The results of this data check appear on the Verification (8) master tab’s Edit screen as an Error, a Warning, or an Override.
If it is an Error, Oracle Financial Services Lending and Leasing will not allow you change the application's status and approve the Loan until you fix all the errors.
If it is a Warning, Oracle Financial Services Lending and Leasing allows you to change an application’s status without correcting the matter. While you should still investigate the problem, Warning messages are of a lesser importance than Error messages.
If it is an Override, Oracle Financial Services Lending and Leasing displays a dialog box informing you that an override is needed; your responsibility level does not have the authority required to process this step. (Choose Yes on dialog box to move the application to queue of the user with the required authority.)
Oracle Financial Services Lending and Leasing can be configured to verify different sets of information; for example, Financial Services could check one set of data when checking application entries for completeness and another when approving auto Loan . Each one of these “edit types” has its on set of “edit details.”
To verify the data required for decisioning the account
- Click the Verification link, then choose the Edits tab.
- In the Edit Type block, select the type of edit you want to verify using the drop down list.
- Choose Check Edits. Financial Services checks data for the verification process selected in Edit Type block and displays results in the Edit Details block.
- In the Edit Details block, view verification results and begin making corrections on conversion form.
- When you are finished correcting errors, change the status in the master block Status field from API ACCOUNT to ACCOUNT CREATED.
After entering existing data and successfully changing status of the account, the conversion process is over.
At this point, the account information you entered in this module can be viewed on the Lending menu’s Customer Service form. However, new accounts cannot be viewed since they need to have the set-up run prior to account creation.
18.4.11 Calculator Tab
The Loan Calculator link is only available for the loan product. During the account conversion process, the Loan Calculator screen can be used to complete the information.
To open the Loan Calculator screen
- Click the Calculator link
For more details about using the Loan Calculator screen, refer Tools chapter.
18.4.12 Search Tab
The Account Conversion’s Search tab opens the Criteria screen.
Loading an Application on the Account Conversion screen
The first step in account conversion process is to load application you want to work with using the Conversion Account screen’s Search link.
To load an application
- On the Oracle Financial Services Lending and Leasing Application home screen, click the Servicing master tab.
- Click Interfaces drop-down link and then click Account Conversion link. The Conversion Account screen is displayed.
- On the Results screen, select the application you want to load and click Submit.
You can use the Search Criteria tab to limit or change display of applications on the Results screen.