Creating Tables
This section provides an overview of the Create Table process and discusses how to:
Create a table.
Specify Create options.
Specify Logging options.
Specify Script options.
Confirm a table build.
The Build process generates the appropriate SQL Create statements to build tables based on both your record definition and your platform. It prefaces each new application SQL table with PS_ to identify it as an application that was built using PeopleTools. For example:
PS_ABSENCE_HISTNote: PeopleTools does not preface table names with PS_ if you specified a custom name in the Non-Standard SQL Table Name edit box located on the Type tab of the Record Properties dialog box.
The Build process also creates the appropriate indexes. Because long-character fields operate more efficiently in some database environments when they are located at the end of a table, the Build process automatically positions long-character fields at the end of the table for each database environment.
The Create Table process creates a new application table based on parameters defined in the record definition. When a new table is created, the database management system updates the system catalog tables to reflect the attributes of the new table.
The Create Table process is illustrated by the following diagram:
Image: Create Table process
The following diagram illustrates the process of Create Table that creates a new application table based on the parameters defined in the record definition

After you create an updated SQL build script and run it, the PeopleTools tables and the system catalog tables are synchronized; and the record definition and the application data table are synchronized. The following table lists the steps of the Create Table process and the associated record definition parameters:
|
Create Table Process |
Record Definition Parameter |
Usage |
|---|---|---|
|
Drop the table if it already exists. |
NA |
NA |
|
Create the application data table. |
Record definition name. Field names. Field type. Field length. |
Table name (add PS_ prefix). Column names. Column type. Column length. |
|
Create indexes. |
Key fields. Alternate search key fields. Custom indexes. |
Unique index: (_) Alternate index: 10 (0–9) per table. Custom index: (A–V) per table. |
The following procedure covers all of the high-level steps that you need to successfully complete for the Create Table build process. Steps that involve a variety of options include links to the area where those options appear in this product documentation.
Note: You can have a maximum of 500 columns per table.
To create a table:
Open the project for which you want to build SQL tables.
Select
From the Build menu, select the appropriate scope of your build.
See Selecting the Build Scope.
The Build dialog box appears.
Select the Create Tables in the Build Options group box.
PeopleSoft Application Designer automatically activates the Create Indexes option. If you are rebuild or recreate tables, then the indexes that the system uses to extract information from those tables must also be updated. Definitions to be built appear in the Build Scope list box, which does not allow you to edit, remove, or add definitions.
Select one of the Build Execute options.
The default option builds an SQL script file containing the commands to run the selected build options.
Click the Settings button in the Build dialog box to set user-defined defaults.
The Create tab in the Build Settings dialog box appears.
Select the appropriate settings on the Create tab.
See Specifying Create Options.
Recreating a table removes all data contained in the table as well as views or grants referencing that table.
Select the Logging tab.
Set the Logging Levels and associated options.
Select the Scripts tab.
Specify the script file options.
If you selected Execute SQL Now as your build option in the Build dialog box, you can skip the Scripts tab because you will run the SQL online. Settings on the Scripts tab are relevant only if you are building a SQL script to run later.
Click OK to close the Build Settings dialog box.
In the Build dialog box, click the Build button to run your build option.
The length of a Build process depends on the number of definitions that require building. Watch the Build Progress dialog box to monitor the Build process. When the process completes, check any errors listed in the log file.
Access the Build Settings dialog box and select the Create tab.
Image: Build Settings dialog box: Create tab
This example illustrates the fields and controls on the Build Settings dialog box: Create tab. You can find definitions for the fields and controls later on this page.
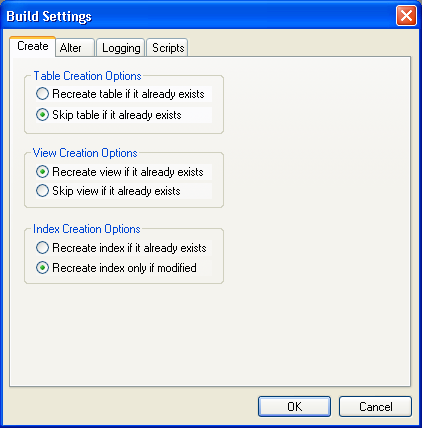
Table Creation Options
These options determine when a table should and should not be created.
|
Field or Control |
Definition |
|---|---|
| Recreate table if it already exists |
Select to drop and recreate a table if it already exists. Select this option with extreme care because if data already resides in the table, it is also dropped. If you select this option, the Build process prompts you to confirm your intention before performing any destructive action. If you do not care about losing the data that resides in the table, then this option is faster than the Alter Tables option. |
| Skip table if it already exists |
Select to create only newly defined tables. If you want to preserve the data that already resides in existing tables or if you are only interested in creating the tables that do not already exist, select this option. |
View Creation Options
Similar settings are available for creating views that you use for creating tables.
|
Field or Control |
Definition |
|---|---|
| Recreate view if it already exists |
Because views are only logical views of data, you can safely select this option; you do not run the risk of losing physical data. Using this option ensures that all views in the project are rebuilt, whether they need to be or not. |
| Skip view if it already exists |
If you are concerned only with creating views that do not already exist in the database, select this option. This option is useful if you want to run Build Project on a large project and only a subset of the views in the project must be created. This option consumes less time than recreating all of the views in the project. |
Index Creation Options
These options determine when an index should be recreated.
|
Field or Control |
Definition |
|---|---|
| Recreate index if it already exists |
Select to recreate the index for your tables, even if you already have one in place. This option recreates the index no matter what the situation. |
| Recreate index only if modified |
Select to recreate the index only if the data in the indexes is being modified. |
Access the Build Settings dialog box and select the Logging tab.
Image: Build Settings dialog box: Logging tab
This example illustrates the fields and controls on the Build Settings dialog box: Logging tab. You can find definitions for the fields and controls later on this page.
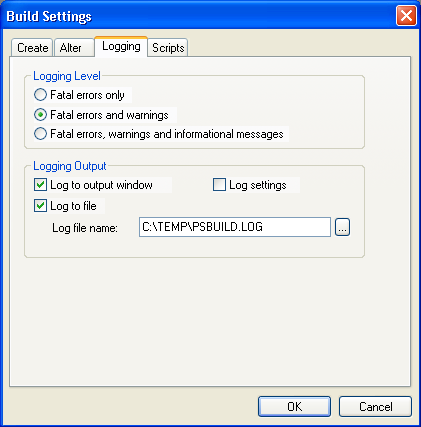
Logging Level
Specify the level of detail of information that you want in your Build log output.
|
Field or Control |
Definition |
|---|---|
| Fatal errors only |
Select this option if you want to see only the operations that failed. |
| Fatal errors and warnings |
Select this option to add warnings to the fatal errors. |
| Fatal errors, warnings and informational messages |
Select this option to see all the definitions that processed successfully and all of the errors and warnings. |
Note: These options are personal preferences and do not affect the actual build of your SQL tables, but they might help you track down potential failures. For example, if you are processing a large number of definitions, you will want to see only the operations that failed. Whereas, if you are processing a small number of definitions, you will want to see all of the successful operations, too.
Logging Output
Specify where and in what form you want to view your log output.
|
Field or Control |
Definition |
|---|---|
| Log to output window |
Select to write the same information that appears in the log file to the PeopleSoft Application Designer output window. Always be aware of the level that you select. If you expect a lot of detail (high logging level plus many records to process), you may want to copy the logging information to a file and print it later. |
| Log to file |
Select to write the log to a file. If you select this check box, you can specify a location and name for your log file in the Log file name edit box. To search for a name, click the Browse button. Select a .LOG type file from the Build File Selection dialog box. If you do not select this check box, the edit box is unavailable for entry. |
| Log settings |
Select to write all of the runtime options to the log. If you select this check box, you do not need to rerun a test when you have a problem. If you must report a problem with the Build process or troubleshoot, you need to know the settings that were active. |
Note: You should select the Log to file check box and the Log to output window check box with a minimum logging level of fatal errors and warnings. In case you run into a problem, you already have the information you need to research the problem. Otherwise, you must run the process again with a higher logging level.
Example Log Results
The following are samples of the type of information that you can expect to see in your log output that corresponds to the selections that you make on the Logging tab:
Fatal errors:
SQL Build process began on 7/30/2003 at 8:46:46 PM for database
OM51U20
Error: BI_BILL_BY_F_VW - Unable to retrieve current DDL space name.
 Alter processed failed.  (76,47)
Error: BI_CHARGE_VW - Unable to retrieve current DDL space name.
Alter processed failed.  (76,47)
Error: PS_BI_CYCLE_VW - alter failed due to an unknown column type
(UNDEFINED) found for field BILL_CYCLE_ID.  (76,22)
Error: PS_BI_IVCLAYOUT_VW - alter failed due to an unknown column
type (UNDEFINED) found for field INVOICE_LAYOUT_ID.  (76,22)
Error: CARINA - alter failed because SQL table does not exist.  (76,7)
SQL Build process ended on 7/30/2003 at 8:54:34 PM.
2487 records processed, 11 errors, 0 warnings
SQL Build script for all processes written to file C:\TEMP\step38.SQL.
SQL Build log file written to C:\TEMP\step38.LOG
Warnings:
SQL Build process began on 8/27/2003 at 4:00:32 PM for database DXD7L
Warning: ABSENCE_HIST2 - data would be truncated by altering
REASON.  Record processed.  (76,24)
Fatal errors, warnings, and informational messages:
SQL Build process began on 8/27/2003 at 3:58:58 PM for database DXD7L
Warning: ABSENCE_HIST2 - data would be truncated by altering
REASON.  Record processed.  (76,24)
Error: ABSENCE_HIST2 - field PAID_UNPAID to be deleted has data
present.  Record skipped.  (76,23)
Informational: ACCOMPLISHMT_VW - view created and scripted
successfully.  (76,18)
Informational: ACCT_AD2_INV_VW - view created and scripted
successfully.  (76,18)
Informational: ACCT_ADJ_INV_VW - view created and scripted
successfully.  (76,18)
Informational: ACCT_ISS_INV_VW - view created and scripted
successfully.  (76,18)
Informational: ACCT_STK_INV_VW - view created and scripted
successfully.  (76,18)
Informational: ACCT_TYPE_VW - view created and scripted
successfully.  (76,18)
Informational: ACTION_SP_VW - view created and scripted
successfully.  (76,18)
Informational: ACTION_XLAT_VW - view created and scripted
successfully.  (76,18)
Informational: ADJUST_INV2_VW - view created and scripted
successfully.  (76,18)
Informational: ADJUST_INV_VW - view created and scripted
successfully.  (76,18)
11 records processed, 1 errors, 1 warnings
SQL Build script for all processes written to file
C:\TEMP\PSBUILD.SQL.
SQL executed online.
SQL Build log file written to C:\TEMP\PSBLD.log
Log settings:
**** Begin Build Settings for this Run
Create Tables = No
Create Indexes = Yes
Create Views = No
Create Triggers = Yes
Alter Tables = Yes
Log to File = Yes
Log to Window = Yes
Write comments to script = No
Always overwrite files = Yes
Execute SQL Now = No
Write SQL to script file = Yes
Logging level = Log fatal errors, warnings and informational messages
Table creation option = Skip table if it exists
View creation option = Drop and recreate view if it exists
IndexCreationOption = Drop and recreate index always
Alter Adds = Yes
Alter Changes = Yes
Alter Renames = Yes
Alter Deletes = Yes
Alter even if no changes = No
Alter Table Option = Alter by Table Rename
Write script output to: Single file
Log filename = c:\temp\PSBUILD.LOG
Single script filename = c:\temp\PSBUILD.SQL
Alter drop column option = skip record if data present
Alter truncate column option = skip record if data would be truncated
Target database platform = MICROSFT
Target sizing set = 0
Working With the Output Window
You can navigate from error messages in the PeopleSoft Application Designer output window to the corresponding record definition by selecting the appropriate line in the Build log and double-clicking anywhere on that line. PeopleSoft Application Designer opens the corresponding record in the definition workspace.
Also, you can double-click any line in the output window that corresponds to a file, not just a record. PeopleSoft Application Designer opens that file with whatever application that you defined to open files with a particular extension. For example, if you associated SQL files with your native SQL command utility, then your SQL utility opens and loads your PSBUILD.SQL script when you double-click the line that reads:
Single script file name = C:\TEMP\PSBUILD.SQLNote: PeopleSoft Application Designer uses the standard Microsoft Windows method for defining which programs are associated with particular file types. To modify the file associations, open My Computer, select and then select the File Types tab.
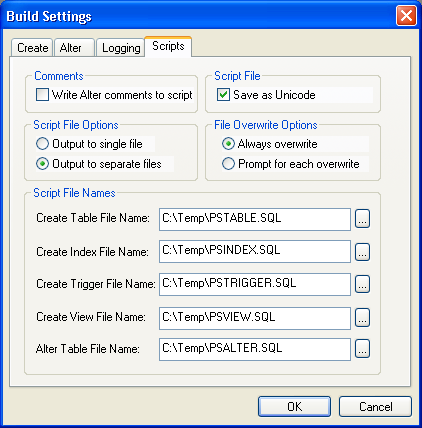
Access the Build Settings dialog box and select the Scripts tab.
Image: Build Settings dialog box: Scripts tab
This example illustrates the fields and controls on the Build Settings dialog box: Scripts tab. You can find definitions for the fields and controls later on this page.
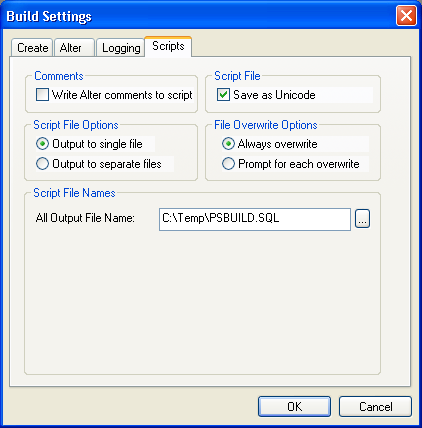
Comments
The Write Alter comments to script check box enables you to either include or suppress alter comments. The following example displays the types of comments that you see in your PSALTER.SQL script if you enable this option:
-- Alters for record PS_AE_RUN_CONTROL ;
--           AE_THREAD - change ;
--               OPRID - change ;

-- Start the Transaction ;


-- Data Conversion ;


-- Drop Old Indexes ;

DROP INDEX SYSADM.PS_AE_RUN_CONTROL
/

-- Add Columns ;

ALTER TABLE PS_AE_RUN_CONTROL ADD Z_TMP_ALTER_1 DECIMAL(12,4)
/
ALTER TABLE PS_AE_RUN_CONTROL ADD Z_TMP_ALTER_2 CHAR(12)
/
UPDATE PS_AE_RUN_CONTROL SET
    Z_TMP_ALTER_1 = AE_THREAD,
    Z_TMP_ALTER_2 = OPRID
/
If you do not view the alter comments, the script containing the same commands as the previous script looks like this:
DROP INDEX SYSADM.PS_AE_RUN_CONTROL
/
ALTER TABLE PS_AE_RUN_CONTROL ADD Z_TMP_ALTER_1 DECIMAL(12,4)
/
ALTER TABLE PS_AE_RUN_CONTROL ADD Z_TMP_ALTER_2 CHAR(12)
/
UPDATE PS_AE_RUN_CONTROL SET
    Z_TMP_ALTER_1 = AE_THREAD,
    Z_TMP_ALTER_2 = OPRID
/
Script File
The default for the Save as Unicode check box is based on the UNICODE/ANSI database. This check box is available when using Oracle, Microsoft SQLServer, DB2/UDB for Linux, UNIX, and Windows, and DB2 UDB z/OS databases.
The following table lists the default settings for the Save as Unicode check box:
|
Database Type |
Default for Save as Unicode Check Box |
|---|---|
|
Unicode |
Selected |
|
ANSI |
Unavailable |
The script file option, Save as Unicode, is stored in the registry with the other build settings. Therefore, the previous setting is always the default every time that the dialog box is opened.
The type of script file that is generated during the Build process is based on the Save as Unicode check box setting for the UNICODE/ANSI build and UNICODE/ANSI database. This table lists details:
|
Database Platform |
Unicode |
ANSI |
|---|---|---|
|
MSSQL Server |
UCS2 |
ANSI |
|
Oracle |
UTF8 |
ANSI |
|
DB2/UDB for Linux, UNIX, and Windows |
UTF8 |
ANSI |
|
DB2 UDB for OS/390 and z/OS |
UTF8 |
ANSI |
Script File Options
If you want all of your CREATE TABLE statements to be written to one SQL script file and your CREATE INDEX statements to another, then select the Output to separate files option. If you prefer to have all of your statements, CREATE, ALTER, and so on, contained in a single file, then select the Output to single file option.
Note: Script files can be quite large. To reduce the size of files so that they are easier to manage, select the Output to separate files option. Also, the system never appends script files; it overwrites them or you can terminate the process if you elected to be prompted before a build script file is overwritten.
Depending on which output option you select, the options in the Script File Names group box change to suit one file or multiple files.
File Overwrite Options
These options indicate whether you want to overwrite automatically or be prompted before script files are overwritten. Your personal preference determines which technique you employ.
|
Field or Control |
Definition |
|---|---|
| Always overwrite |
Select to overwrite your previous build scripts. |
| Prompt for each overwrite |
Select to be alerted when a script is about to be overwritten. To avoid the possibility of overwriting files altogether, you can use a naming convention that, in itself, prevents any overwrites. For example, you could specify a unique name for each build script, as shown:
|
Script File Names
The options available to select in this group box depend on your selection in the Script File Options group box.
|
Field or Control |
Definition |
|---|---|
| Output to single file |
When you select this option, an edit box appears in the Script File Names group box: All Output File Name. The default name for the generated script is PSBUILD.SQL. Note: Script files can be quite large. To reduce the size of files so that they are easier to manage, select the Output to separate files option. Also, the system never appends script files; it overwrites them or you can terminate the process if you elected to be prompted before a build script file is overwritten. |
| Output to separate files |
If you select this option, the following edit boxes appear, one for each build option:
|
Image: Output to separate files
This example illustrates the fields and controls on the Output to separate files. You can find definitions for the fields and controls later on this page.
If you are running SQL online, complete Steps 1 and 3; Step 2 is not required.
To confirm a table build:
Review the SQL script that was generated by the Build process.
Use your native SQL command processor to open the SQL script. The script is located where you specified on the Scripts tab of the Build Settings dialog box.
Run the script against your database.
Confirm that the tables now exist.
Use your query tool and SQL Select statements to confirm that the Create Table process created an application table that corresponds to your record definition and updated the system catalog tables. The SQL statement that you use to confirm depends on the table that you just created.