Previewing Pages in the Browser
This section discusses how to:
Work with the View in Browser feature.
Maintain the list of browsers.
Preview fluid pages.
Preview classic pages.
Generate HTML.
During the page design process, you might want to periodically preview how your page looks in the browser. How your page appears in Application Designer at design time may look different when viewed online. This is particularly true for fluid pages, which do not follow the pixel perfect WYSIWYG paradigm of classic pages. With fluid pages, CSS determines how the page and how the page elements are displayed to the user. The physical placement of the page elements often has no bearing on how the fluid page will appear at run time. Therefore, you must either preview fluid pages from Application Designer or view them in a runtime browser session.
After you open either a fluid or classic page definition in Application Designer, you can select , and then select a browser from the list of configured browsers to preview the page.
Limitations
The View in Browser feature provides an approximate idea of how your page will look. For the complete view of the page at run time, including any component settings, assign your page to a component and register the component to the portal registry structure using the Registration Wizard. Then, you can access the component and page in a browser online.
Note the following limitations on previewing pages from Application Designer:
Only page definitions as a standalone definition can be previewed. Therefore, none of the component properties or settings are available as part of a page preview.
No PeopleCode or JavaScript is run during page preview.
For example, flex grid column headings will not be aligned properly because this relies on JavaScript. In addition, scrolling enabled in Application Designer will not function since this also relies on JavaScript.
The content of an HTML area that is populated dynamically via the value of a record field (that is, via PeopleCode) is not displayed. However, the content of an HTML area that is populated statically via a constant value is displayed.
Application data such as high-level keys, related display data, and grid or scroll data is not displayed.
Most page controls are inoperable.
In addition, for fluid pages, the following limitations apply:
You can preview the following page types only: Standard, Subpage, and Secondary. For other fluid page types, the View in Browser menu item displays this message: (Not available for this page type).
Any styles applied via PeopleCode or JavaScript will not be in effect.
Pages are previewed in extra large form factor only; styles and overrides specific to this form factor will be applied. However, form factor overrides for any other form factor will be ignored.
An empty fluid banner is displayed at the top of the page for standard page types only. Since the component definition includes all the settings that determine what is displayed in the fluid banner, none of this information is available in the page definition during page preview.
Secondary page types are not displayed in a modal window; the content is previewed in a full screen.
In addition, for classic pages, the portal wrapper (the portal header and footer defined in PeopleTools branding) is not displayed.
The following examples demonstrate the rendering of a fluid page preview using the PeopleTools-delivered Change Password (CHANGE_PASSWORD) page.
Image: CHANGE_PASSWORD page definition
The following example shows the CHANGE_PASSWORD page definition in Application Designer:
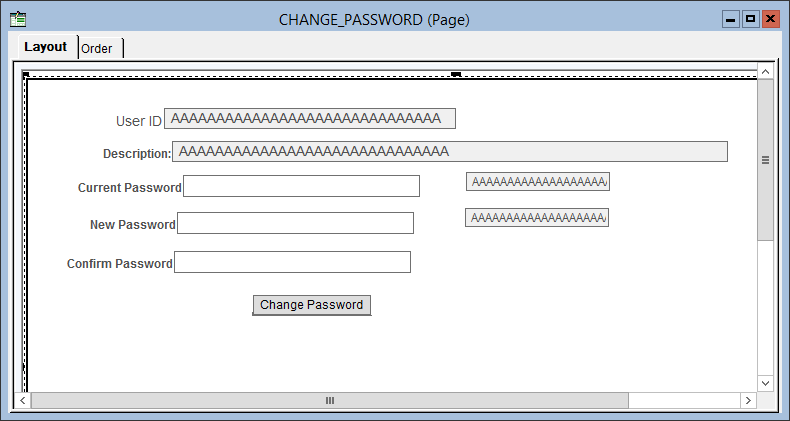
Image: Change Password page: Preview rendering
The following example shows the Change Password page when rendered using the page preview feature in Application Designer:
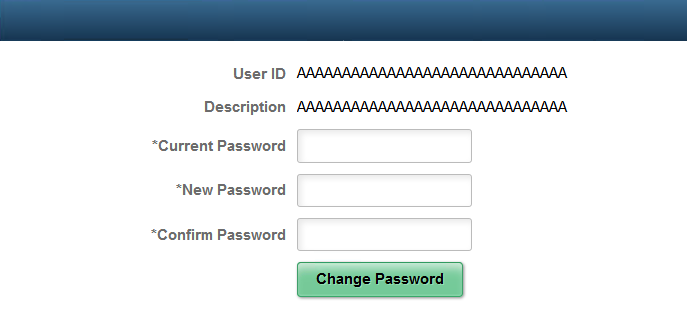
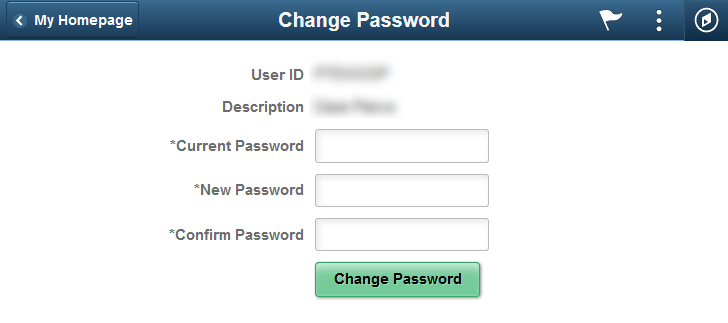
Image: Change Password page: Runtime rendering
The following example shows the Change Password page when rendered at run time:
Note that the following styles and settings are honored when previewing fluid pages:
Styles and settings on the Fluid tab of the Page Properties dialog box. Form factor overrides for the extra large form factor are honored; overrides for all other form factors are ignored.
Styles and settings on the Fluid tab of any page field properties dialog box. Form factor overrides for the extra large form factor are honored; overrides for all other form factors are ignored.
In addition, any browser-specific styles are applied.
Because page-specific style sheets are added via PeopleCode, these style sheets are not automatically included during page preview like they would be in the a runtime rendering. Therefore, use the Apply Additional Style Sheets menu item to apply page-specific style sheets in page preview. See "Applying Additional Style Sheets" in this topic for more information.
Viewing Related Content Drop Zones
You might also want to preview the location of the group boxes configured as related content drop zones in relation to other page controls when previewing a fluid page.
Note: However, because embedded related content and dynamic subpages are configured outside of Application Designer and rely on data that is only available at runtime, the content within these drop zones cannot be displayed as part of fluid page preview.
To view drop zone group boxes during fluid page preview:
Select Layout, View in Browser, View Related Content Drop Zones.
Once this option has been selected, a check mark will appear next to View Related Content Drop Zones in the menu indicating that drop zone group boxes will be displayed during fluid page preview. This setting remains in effect only for the duration of the Application Designer session or until it has been deselected.
Select Layout, View in Browser and select a browser to preview a fluid page displaying drop zone group boxes.
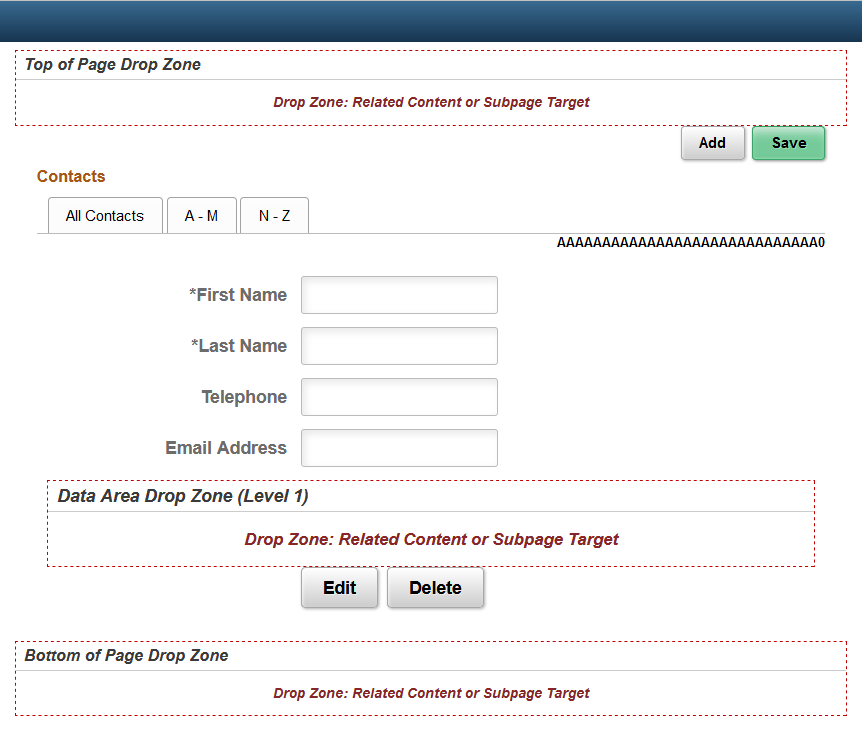
Image: MYQUICKCONTACTS page with drop zone group boxes
The following is an example only, which shows three drop zone group boxes on the MYQUICKCONTACTS page definition in Application Designer:
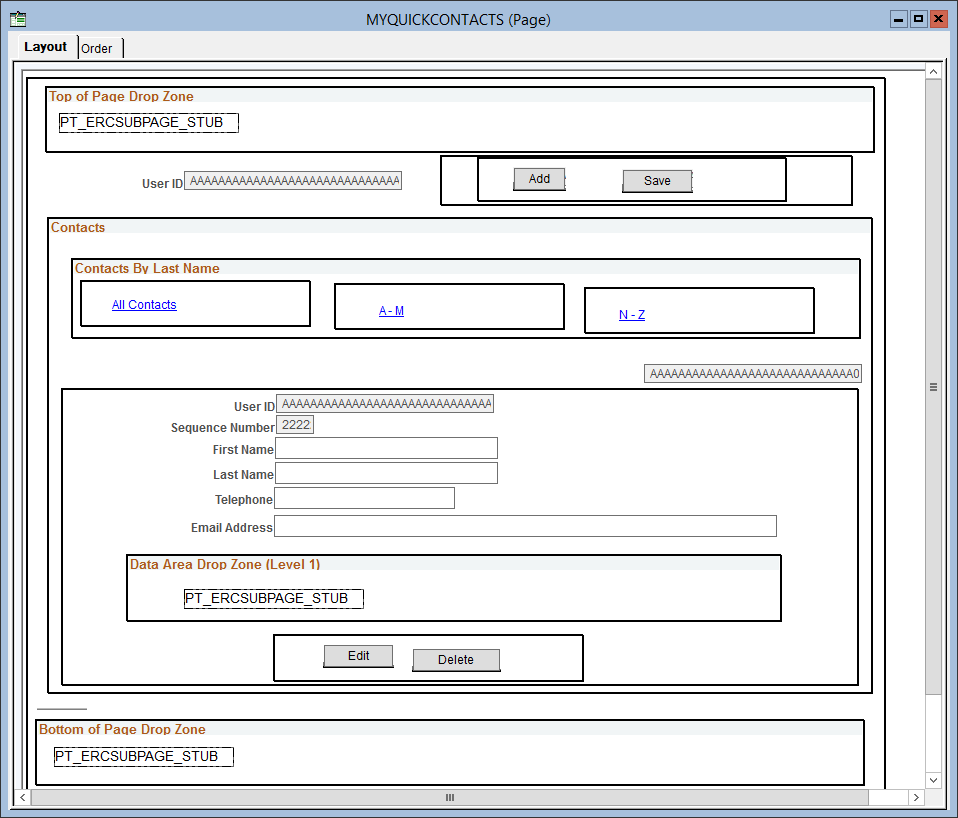
Image: MYQUICKCONTACTS page: Preview rendering with related content drop zones
The following example shows related content drop zones on the MYQUICKCONTACTS page when rendered using the page preview feature in Application Designer:
Note: Page preview includes the labels for the related content drop zones for configuration purposes only. These labels are available to the administrators who are configuring embedded related content or dynamic subpages. At run time, these labels are not displayed. In addition, if no label is defined on the group box, the label displayed in fluid page preview will differ from what is shown in the example here and what is available to administrators who are configuring embedded related content or dynamic subpages.
Applying Additional Style Sheets
While page preview does apply the standard system style sheet, since custom style sheets are applied via PeopleCode, they are not available during page preview.
Therefore, to apply custom free form style sheets, you need to create a text file on the local file system that lists the custom style sheets, one per line. Specify the Application Designer definition name for each custom free form style sheet. You can also include comments in this file preceded by the # symbol only. The following example illustrates the contents of a text file that identifies two custom free form style sheets:
# Custom style sheets for fluid page preview:
MY_STYLESHEET_1
STYLESHEET_25
To apply custom free form style sheets during fluid page preview:
Create a text file listing the style sheets on the local file system.
In Application Designer, select Layout, View in Browser, Apply Additional Style Sheets.
In the Apply Additional Style Sheets dialog box, browse to and select the text file.
Select the Apply Style Sheets check box.
Click OK.
Once the Apply Style Sheets check box has been selected, a check mark will appear next to Apply Additional Style Sheets in the menu indicating that custom style sheets will be applied to each fluid page that is previewed. This setting even remains in effect between Application Designer sessions. To preview fluid pages without applying custom style sheets, deselect the Apply Style Sheets check box.
Select Layout, View in Browser and select a browser to preview a fluid page with the specified style sheets applied.
The following examples demonstrate the rendering of a classic page preview using the PeopleTools-delivered My System Profile (USER_SELF_SERVICE) page.
Image: USER_SELF_SERVICE page definition
The following example shows the USER_SELF_SERVICE page definition in Application Designer.

Image: My System Profile page: preview rendering
The following example shows the My System Profile page as previewed from Application Designer:
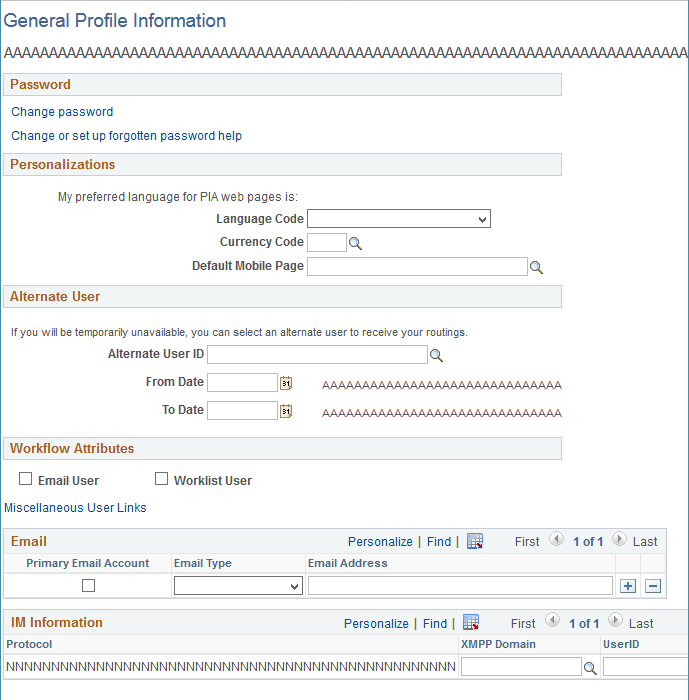
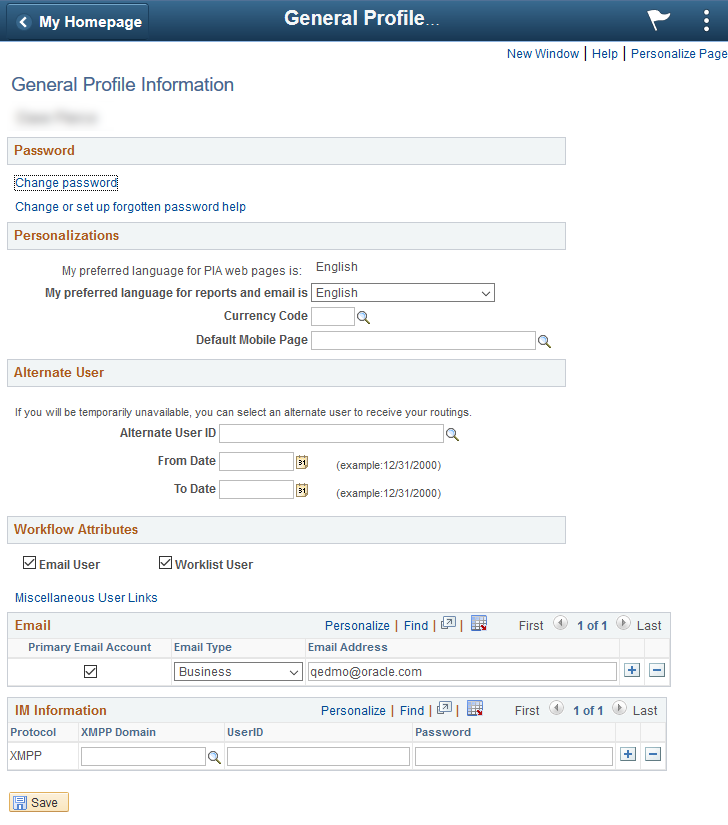
Image: My System Profile page: run-time rendering
The following example shows the My System Profile page as rendered at run time:
Previewing a Page as Classic Plus
When working with classic pages, you can preview a page as classic plus regardless of component settings and regardless whether any reworking has been completed to make the page more suitable for classic plus. In fact, you can use this feature to assess what rework might be required. For guidance on what may need to be reworked, see Reworking Components for Classic Plus Display.
To preview a classic page as classic plus:
Select Layout, View in Browser, View as Classic Plus.
Once this option has been selected, a check mark will appear next to View as Classic Plus in the menu indicating that classic plus styling will be applied to each classic page during page preview. This setting remains in effect only for the duration of the Application Designer session or until it has been deselected.
Select Layout, View in Browser and select a browser to preview a classic page as classic plus.
The following examples demonstrate the classic plus rendering of the PeopleTools-delivered My System Profile page.
Image: My System Profile page: Preview rendering as classic plus
The following example shows the My System Profile page when previewed as classic plus from Application Designer:
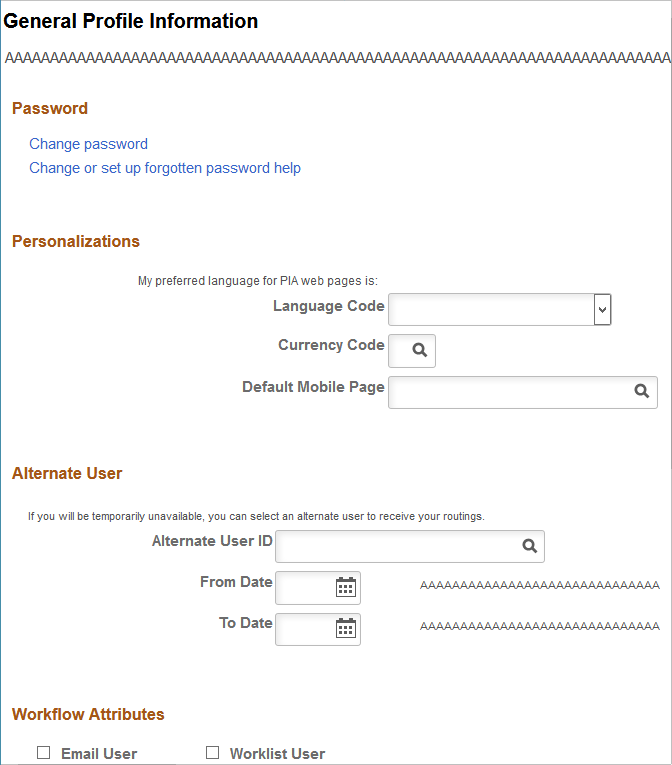
Image: My System Profile page: Runtime rendering as classic plus
The following example shows the My System Profile page when rendered as classic plus at run time:

Application Designer will automatically detect your default system browser. You can add additional browsers to the list of browsers to use for previewing. After you set up a new browser, you can select in which browser you want to view your pages.
To maintain the list of browsers:
Open a page definition in Application Designer.
Select
The Browsers dialog box is displayed.
Click the Add button to add a browser to the list.
The Browser Definition dialog box is displayed.
Click the Browse button to locate the browser to add.
You must select the correct path and browser application for the new browser to function properly.
Click the Find Name/Type/Version button to automatically enter the name, type, and version of the browser.
The name and version that you enter appears in the Layout, View in Browser menu.
Note: If the browser is updated in the future, this version information will be out of sync with the actual browser version. However, the preview function will still work unless the location or name of the executable has changed.
You can view the HTML that is created for classic or fluid pages page by using the Generate HTML menu item. This feature writes the HTML code to a file in a subfolder of the folder defined by the TMP environment variable—for example, in %TMP%\2\pshtml. This feature is mainly used for debugging purposes and typically is not needed when you're designing and developing pages.