Setting Custom Field Formats
This section provides overviews of custom field formats and format notation and discusses how to:
Change format families.
Edit formats.
Use family options.
Test formats.
PeopleTools has formatting provisions at both the field and page levels. The field format specifications affect internal values that are stored in the database, and the page formats affect the visual presentation of values.
Several formatting options are available for U.S. Social Security Numbers, Canadian Social Insurance Numbers, postal codes, telephone numbers, and various currencies, dates, and times. Custom field formats extend these formatting provisions to support the same types of data in other countries. They also support other types of formatted information, such as bank codes, credit card numbers, part numbers, or serial numbers.
Stored and display formats are defined by strings that contain lexical, literal, and meta characters:
Lexical characters delimit character expressions and designate interpretation rules.
Literal characters represent only themselves.
Meta characters represent a class of characters.
Use the format symbols in the following tables to create the format notation for your own custom field formats:
|
Meta Symbol |
Description |
|---|---|
|
# |
Digit placeholder. If the number has more digits to the right of the decimal point than there are # symbols to the right in the format, the system truncates the number to as many decimal places as there are # symbols to the right. If the number has more digits to the left of the decimal point than there are # symbols to the left in the format, the system displays the extra digits. If the number has fewer digits to the right of the decimal point than there are # symbols to the right of the decimal point in the format, the system adds spaces. If the number has fewer digits to the left of the decimal point than # symbols to the left of the decimal point in the format, the system also adds spaces. Example format: ###.## Input: 1234.567 - Matches? Yes - Output: 1234.56 |
|
0 (zero) |
Digit placeholder. Follows the same rules as for #, except that if the number has fewer digits than there are 0s in the format, the system displays the extra 0s. Example format: 000.00 Input: 1.2345 - Matches? Yes - Output: 001.23 |
|
(period) |
Decimal point. This symbol determines how many digits (0 or #) appear to the right and left of the decimal point. If the format contains only # symbols to the left of this symbol, numbers less than one appear with a decimal point. This symbol has meaning only in conjunction with the # and 0 symbols. Example format: ###.## Input: .12345 - Matches? Yes - Output: .12 |
|
9 |
Required numeric placeholder. If the number does not have the same number of digits as there are 9s, the system displays an error message. Example format: 999 Input: 123 - Matches? Yes - Output: 123 Input: 12 - Matches? No |
|
A |
Matches any alphabetic character: A− Z or a−z. Example format: AA Input: Sd - Matches? Yes - Output: Sd Input: 4A - Matches? No |
|
Z |
Matches any alphabetic or numeric value: A−Z, a−z, or 0−9. Example format: ZZ Input: 3g - Matches? Yes - Output: 3g Input: A3C - Matches? No |
|
@ |
Matches any character. Example format: @@@ Input: 1q? - Matches? Yes - Output: 1q? |
|
Lexical Symbol |
Description |
|---|---|
|
* |
Matches zero or more occurrences of this character expression. Example format: a*b Input: b - Matches? Yes - Output: b Input: ab - Matches? Yes - Output: ab Input: aab - Matches? Yes - Output: aab |
|
+ |
Matches occurrences of this character expression. Example format: a+b Input: b - Matches? No Input: ab - Matches? Yes - Output: ab Input: aab - Matches? Yes - Output: aab |
|
[ ] |
Denotes a character expression that matches the input character if the input character is the same as any character in the list enclosed by square brackets. If the expression matches, the input character appears. The system interprets all characters enclosed in square brackets as literal characters. Example format: [ab]c Input: ac - Matches? Yes - Output: ac Input: bc - Matches? Yes - Output: bc |
|
{ } |
Denotes a character expression that matches the input character if the input character matches any character in the list enclosed by curly braces. If the expression matches, the first character in the list (not the input character) is copied to output. All characters enclosed in curly braces are interpreted as literal characters. Example format: {ab}c Input: ac - Matches? Yes - Output: ac Input: bc - Matches? Yes - Output: ac |
|
? |
This expression is optional. It is copied to output only if it appeared in input. Example format: a?b Input: ab - Matches? Yes - Output: ab Input: b - Matches? Yes - Output: b |
|
! |
This expression is optional. It is copied to output regardless of whether or not it is matched. Example format: a!b Input: ab - Matches? Yes - Output: ab Input: b - Matches? Yes - Output: ab |
|
~ |
This expression is optional. It is copied to output regardless of whether or not it is matched. Example format: a~b Input: ab - Matches? Yes - Output: b Input: b - Matches? Yes - Output: b |
|
\ |
Example format: a\?b Input: ab - Matches? No Input: a?b - Matches? Yes - Output: a?b |
|
( ) |
Groups expressions. Example format: (abc)!99 Input: abc12 - Matches? Yes - Output: abc12 Input: 12 - Matches? Yes - Output: abc12 |
Custom field formats enable you to create your own format definitions using format notation and apply them to fields. These formats are organized into format families, which can include one or more unique formats.
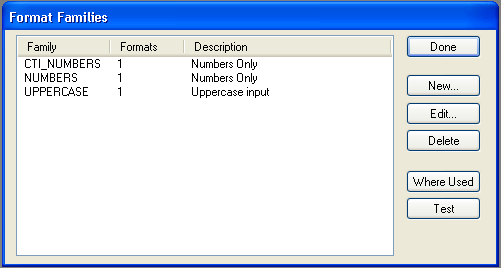
Image: Format Families dialog box
This example illustrates the fields and controls on the Format Families dialog box. You can find definitions for the fields and controls later on this page.
To change format families:
Select to access the Format Families dialog box.
The Format Families dialog box lists the defined format families and enables you to edit, delete, or create new families. You can also determine where each family is used in your applications and perform tests.
To define a new format family, click the New button.
The New Family dialog box appears.
Enter a name for your new format family, and click OK.
The Formats dialog box appears.
In the Stored group box, enter a name and format.
This information defines how the format family is to be stored in the database and printed in reports.
Enter the format notation that you want to use for storing the data in the Format field.
Because a stored format cannot exist alone, a display format is always required. If you are adding to a family that has existing stored formats, a display name and format pair is optional. PeopleSoft Application Designer automatically places all of the current display formats in the new stored format. The display format default is the stored format that you can redefine later.
In the Display group box, enter a name for the format.
This information defines how the format family appears online.
Enter the format notation that you want to use for displaying the data in the Format field.
Click the Add button to add the new format family, and then click OK when you are finished.
Max Display Length
Max Display Length (maximum display length) enables you to override the default length that PeopleSoft Application Designer uses to determine the length of the edit field in custom format. This setting is useful when the displayed data is longer than the defined field length. For example, you might store data as 999 (field length in the database is 3 characters), but the display format of the data is 9-9-9 (5 characters).
PeopleSoft Application Designer uses the field length of 3, by default, for the edit field, which is not long enough to hold the five characters of the reformatted data. By entering 5 in the Max Display Len (maximum display length) field, the page uses five characters for the edit field without requiring that the field length in the database be five characters long.
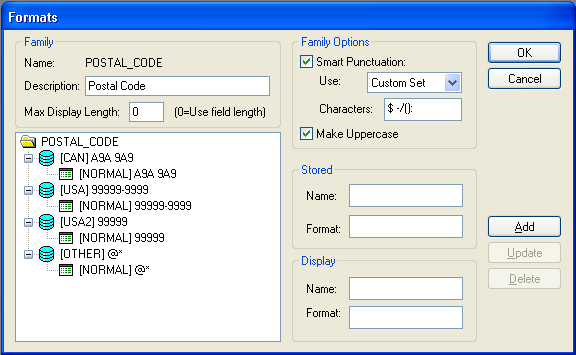
The Edit Formats dialog box presents a tree where you define the stored and display formats for a family and all options and attributes. This dialog box enables you to:
Add, update, and delete stored and display formats.
Enter a description for the family.
Specify options, such as uppercase and smart punctuation, for the family.
Click OK to save changes.
Image: Formats dialog box
This example illustrates the fields and controls on the Formats dialog box. You can find definitions for the fields and controls later on this page.
This section discusses how to:
Add a new stored format.
Add a new display format to a stored format.
Update a display format.
Delete stored formats.
Adding a New Stored Format
To add a new stored format:
Open the format family to which you want to add a format.
Select the format family name.
Enter the stored and display names and format notation.
Click Add.
The new format appears in the tree below the existing formats.
Adding a New Display Format to a Stored Format
To add a new display format to a stored format:
In the tree, select the stored format name to which you want to add a display format.
In the Display group box, enter a new name and format notation.
Click the Add button to add the display format.
The new display format appears in the tree, attached to the stored format to which it belongs.
Updating a Display Format
To update a display format:
Select the display format in the tree view.
Note: Clicking the Update button applies only to display formats.
Select a display format and enter the enabled fields.
Click Update to update the display.
Deleting Stored Formats
To delete a stored format:
Select the display format.
Click the Delete button.
PeopleSoft Application Designer displays a warning message indicating that deleting a display format might strand stored data. Select Yes to continue with the deletion.
Note: Stored formats cannot be deleted directly. Therefore, all display formats for a specific stored format must be deleted first to ensure that data is not stranded in the database under an invalid format. When the last display format is deleted for a stored format, the stored format is automatically deleted.
Family options include:
Smart punctuation
Make uppercase
Smart Punctuation
Smart punctuation automatically adds or removes punctuation characters to the data that users enter. For instance, if you enter a phone number, 8005551212 and press the tab key to exit the entry field, the system reformats the value as 800-555-1212.
The system uses the punctuation characters specified in the punctuation list to strip out unwanted input and to modify the pattern specified before applying the pattern to the data.
Note: Smart punctuation and the standard set of characters are enabled by default.
You can modify the standard set of characters by selecting Custom in the options drop-down list box and typing another set of punctuation characters to use. Smart punctuation processes the characters defined in the standard set or custom set as follows:
The input has all characters in the punctuation set stripped out—similar to ignoring white spaces.
The pattern has all characters in the punctuation set expanded if they are not found in the input.
To do this, enclose each punctuation character in the punctuation set with "[ puncchar]!".
The formatter runs on the modified data to apply the modified pattern.
Warning! Use meta characters and lexical characters in the punctuation sets with caution. Step 2 of the transformation process modifies the format pattern so that PeopleSoft Application Designer might sometimes convert special characters to literals (when they are inside the left or right brace).
For example:
Input: (800)555-1212.
Display pattern: 999-999-9999.
Punctuation set: ()-.
Stored pattern: 999999999.
The "(" , ")", and "-"are stripped out of the input because they appear in the punctuation set.
Now the input looks as follows: 8005551212.
The display pattern is modified to 999[-]!999[-]!9999 because "-" is in the punctuation set. The transformed data (8005551212) is matched against the display pattern of 999[-]!999[-]!9999. The match is successful, so the raw data is transformed into 800-555-1212.
Now, the input data has successfully matched the expected display format. The next step is to transform this data into what we want stored. In this case, the stored format has no dashes, as in 999999999.
The transformed data (800-555-1212) is stripped of the smart punctuation characters (8005551212), and the pattern of the stored format is 999999999. A match is made so that the system stores 8005551212 in the database.
Finally, the stored data is reformatted back to the display using 8005551212 and the display pattern. Output to the display is reformatted to 800-555-1212.
Make Uppercase
Custom format fields support mixed case. With uppercase activated, PeopleSoft Application Designer transforms the data into uppercase when you press the tab key to exit the field.
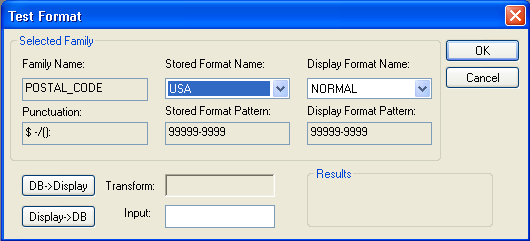
The Test Format dialog box enables you to test a specific format or unformatted path for a family without having to build a page:
Image: Test Format dialog box
This example illustrates the fields and controls on the Test Format dialog box. You can find definitions for the fields and controls later on this page.
|
Field or Control |
Definition |
|---|---|
| Stored Format Name and Display Format Name |
Select a stored and display format pair to test. |
| DB->Display |
Click this button to process the input field like data from the database. The system applies the stored format pattern to the input, and then applies the display format pattern to the result. The output appears in the Transform field, which is the same output displayed for a field using this format. |
| Display->DB |
Click this button to process the input field like user input from a page. The system applies the display format pattern to the input, and then applies the stored format pattern to the result. The transformed output appears in the Transform field. This output reflects what is stored in the database if the operation is successful. On an actual page, when the user presses the tab key to exit the field, the system calls the DB->Display function to reformat the user input for the display. |