Creating Templates
The template page is a graphical representation of the component interface structure that you will be using to load data. The structure of the component interface is retrieved from the database when a new template is built. All of the fields that are exposed through the component interface appear on the template page. Fields that are read-only on the component interface will not appear on the template.
The new template macro builds the parent-child relationship within Microsoft Excel based upon the component interface scroll-level definition. The system adds a new row for each scroll level and assigns a unique identifier to it.
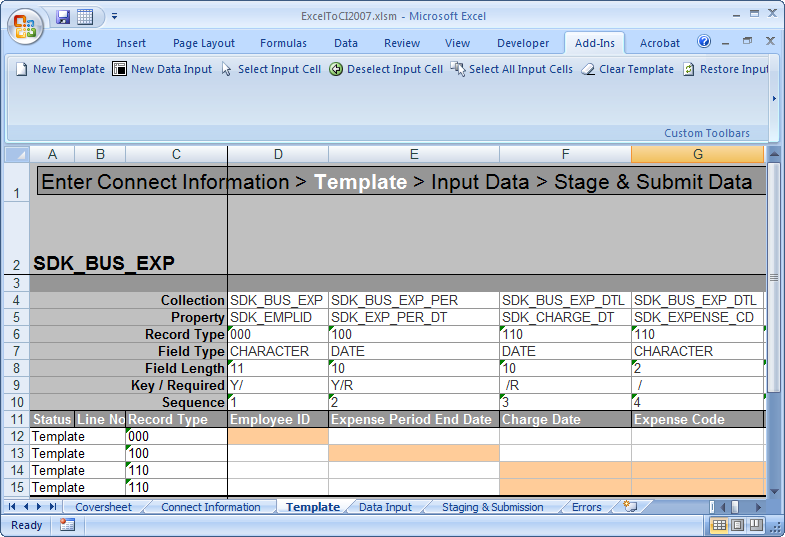
Access the Template tab in ExcelToCI.xlsm to create your template:
Image: Template tab in Excel to Component Interface Utility.
This example illustrates the Template tab in the Excel to Component Interface utility.
|
Field or Control |
Definition |
|---|---|
| Collection |
The name of the component interface collection. A collection is a property that points to a scroll, rather than a field, in the underlying component for a component interface. |
| Property |
The component interface property name. Typically, this is also the name of the field on the page. |
| Record Type |
This number represents the parent/child relationship of the records. The level 0 scroll record is always represented by 000. Level 1 scroll records appear with numbers that start with 100 and always have 00 as the last two numbers. Level 2 scrolls are identified by numbers that start with the identifier of their level 1 parent and end with a 0. Level 3 scrolls are identified by the first number from the level 1 parent, the second number from its level 2 parent, and then the third number from its own position in the list. The numbers for each scroll level are incremented based on the number of records that exist at that level. For example, level 0 would be 000, level 1 would be 100, level 2 would be 110, and so on. Note: Component interfaces that have more than 10 collections at a given level will be incremented with alphabetic identifiers. For example, 800, 900, A00, and so on. |
| Field Type |
The standard PeopleSoft type for the field, for example, Date, Character, and so on. |
| Field Length |
The length of the field as defined by PeopleSoft. For numeric fields and signed number fields, the length is broken down into integer and decimal positions. For example, a length of 15.3 indicates 15 integer positions and three decimal positions. |
| Key/Required |
If the field is a key field, the system will display a Y to the left of the forward slash. When the field is not a key, it will be blank. If the field is a required field, the system will display an R to the right of the forward slash. When the field is not required, it will be blank. This information comes from the record definition itself. Note: Fields that are either keys or required must be set in order to submit data successfully. |
| Sequence |
The sequence number represents the property order in the template. |
| Status |
This field displays the load status on the Staging and Submission page. |
| Line No |
This corresponds to the line number on the Input Data and the Staging and Submission pages. |
The template actions toolbar is made up of buttons that you use to create and modify a template, as well as create a data input sheet. Each button on the toolbar has help text that describes the purpose and use of each of the buttons when you place the cursor over the button. You can access the toolbar from Add-Ins tab on the Excel standard menu bar in Template, Data Input, and Stage and Submission tabs.
|
Field or Control |
Definition |
|---|---|
| New Template |
Builds a new template based upon a component interface. The New Template macro builds the parent-child relationship within Microsoft Excel based upon the component interface structure. When you build a new template, the system prompts you for your sign in information. |
| New Data Input |
Builds a new data input sheet based upon the selected input cells. When you build a new data input sheet, the system prompts you as to whether you want to overwrite the existing sheet. If you select Yes, a new data input sheet is created, overwriting the former one. |
| Select Input Cell |
Selects an individual cell to be included in the data input sheet. Cells that have been selected as input cells are highlighted in pink. |
| Select All Input Cells |
Selects all properties to be included in the data input as input cells. When a cell is selected as an input cell, it is highlighted in pink. |
| Restore Input Cells |
Restores the template to its original state and clears default values. The fields in the template will be highlighted in gray, indicating that nothing is included for submission. |
| Insert New Child |
Copies the selected row to be inserted as a new child. This creates multiple occurrences of the same record type. For example, if the selected row has a template identifier of 100, a new row is inserted that also has an identifier of 100 and is an exact duplicate of the selected row. Note: Use Insert New Child when multiple children must be submitted under the same parent record. Multiple children should not be created at identifier 000. |
| Include All for Submission |
Includes all properties on the spreadsheet to be included for submission to the database. Cells that are included for submission appear only on the Staging and Submission sheet and do not appear on the data input sheet. Properties that are included for submission are highlighted in blue. |
| Include for Submission |
Includes a single property to be included on the Staging and Submission sheet. Properties that use default values from the template must be included for submission. Cells that are included for submission generally are properties that contain default values or properties that you would like to see in the structure of the Staging and Submission sheet. Properties that are included for submission are highlighted in blue. |
| Deselect Input Cell |
Changes a cell that was previously selected as an input cell to a cell that is included for submission. The cell is no longer included on the data input sheet but appears as part of the structure on the Staging and Submission sheet. |
| Clear Template |
Clears all the data and structures on this sheet. |
| Do Not Include for Submission |
Does not include the selected property for submission to the database. If a property is not included for submission, it will not appear in the structure that is submitted to the database on the Staging and Submission sheet. Properties that are not included for submission will appear only on the template worksheet and are not submitted to the database. Properties that are not included for submission are highlighted in gray. |
Note: When you create a new template or a new data input sheet, the system clears the existing worksheet of all existing information. If you have a template or data input sheet that you need to save from previous uploads, save a copy of the worksheet before you create a new template or data input sheet.
When determining which properties to include as input cells and which properties to include for submission, remember that the component interface uses the same business logic and executes the same PeopleCode as if the record were entered online using the page in your PeopleSoft application. To provide the minimal data necessary, these fields must be provided either with default (hard-coded) values or values that you provide using the data input sheet.
Note: You should unit test the template that you created with a few sample entries, and then verify your results before using the interface for mass input. For example, if you forgot to select a property, you will need to build a new data input sheet. If the results of the submission are satisfactory, continue entering data.
Adding a New Child Record
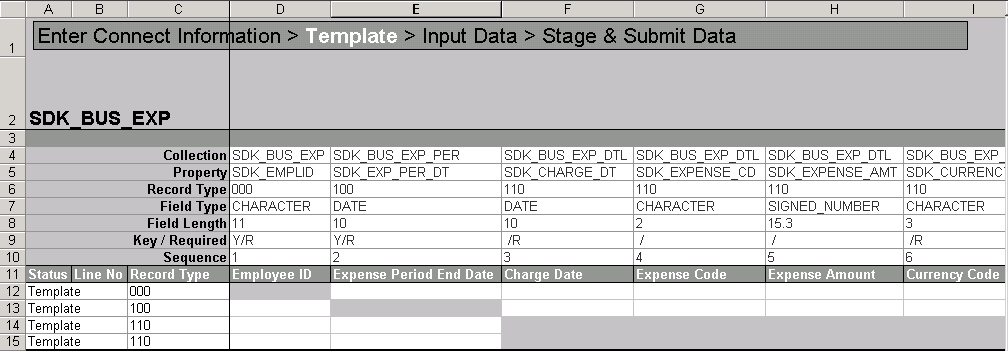
By default, each collection is represented once on the template. To insert copies of a given collection, select that collection and click the Insert New Child button to create a copy of the selected row. The collection that you selected is copied so that you can have two rows under the same parent.
Image: Excel to Component Interface utility
This example illustrates the Template tab in the Excel to Component Interface utility when a child row is added.
Note: On the data input sheet (when the hierarchy is flattened) you will see duplicate columns where multiple children exist.
Adding Default Values
Some fields have default values associated with them, either in the record definition or at runtime when the record is created on the database. Additionally, many components trigger PeopleCode, which supplies default values, as well. To accept the database default, include the property for submission and the system default will be used.
Some fields may exist for which you want to create your own default. For example, if you want to set the value of a field named Status as of Effective Date to A for every row that you submit, enter that value for the field in the template. Then include the cell for submission on the template. The field will not appear on the data input page, but the value will appear in the field on the Submit to Database page. This is useful for effective dates, status fields, set IDs for simple imports, and so on.
When providing values for translate fields or prompt tables, provide the field value rather than the short or long description for the translate value. If you are unsure of the field values, check in the record or field definition in PeopleSoft Application Designer.