Setting Up Connection Information
This section discusses how to set up the connection information.
Access the Connect Information tab in ExcelToCI2007.xlsm by clicking the Connect Information tab:
Image: Connect Information tab
This example illustrates the Connect Information tab in the Excel to Component Interface Utility.
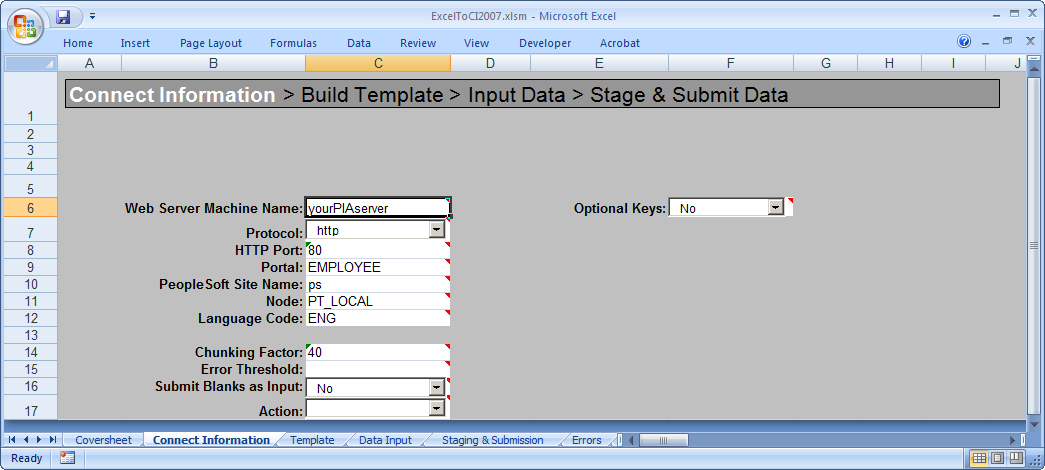
The information on this page is required to create a new template or to submit data to the database. You will need to specify environment information as well as information about how data should be transmitted. The Action field will be populated automatically based on your setup and the component interface that the template is associated with.
The initial connection settings will be the PeopleSoft default values. You will need to modify these values for your specific implementation of PeopleSoft. If you are unsure what to enter for these values, check with your system administrator.
The connection options are:
|
Field or Control |
Definition |
|---|---|
| Web Server Machine Name |
The name of the PeopleSoft web server to which you are connecting. |
| Protocol |
The protocol used to access the web server. The default is HTTP. The preferred protocol is HTTPS. |
| HTTP Port |
The HTTP port number that the web server uses. The default is 80. |
| Portal |
The name of the portal you are using. EMPLOYEE is a default portal shipped with PeopleSoft. |
| PeopleSoft Site Name |
The PeopleSoft site name that you entered when you installed the PeopleSoft Internet Architecture. The default is ps. |
| Node |
The PeopleSoft default local node name. The default is PT_LOCAL. |
| Language Code |
The code for the language in which the data is submitted to the database. If no language code is specified, the base language is used. |
| Chunking Factor |
The number of rows of data to be transmitted to the database at one time. The default is 40. |
| Error Threshold |
The total number of errors that are permitted before submission to the database ceases. When the error threshold is exceeded, an error message appears and submission to the database stops. |
| Submit Blanks as Input |
When this option is set to Yes and a character input field selected for input contains only blank spaces, the field will be included for submission instead of being ignored. This option is set to No by default, for backwards compatibility. If full-width blank space Unicode characters are entered as an input value in ExcelToCI, (this is achieved by using an encoding that supports such Unicode characters) the field will be submitted, the blanks will be sent, and the value will not be trimmed before it is saved to the database. If regular ASCII blank spaces (also known as half-width characters) are entered as a value for a character field, the field will be submitted, but the value will be trimmed, so an empty string will be saved. In essence, the field value will be cleared. |
| Action |
The value for this field is supplied by the system when the component interface is retrieved from the database. However, you can change the supplied value by selecting it from the Action drop-down list. The types of actions available are based on the structure of the component interface. The actions are:
Note: If you want to insert an effective-dated collection at Level 1 containing a child collection at Level 2, you may need to use UPDATE to insert the parent row at level 1 and then use UPDATEDATA to insert the child row at level 2. This is because child rows are copied forward from the current effective-dated collection as a result of the insertion of a new effective-dated parent row. These child rows will be updated by the component processor with the new effective date, and may have the same level 2 keys as the Level 2 child row that you are trying to submit from ExcelToCI. |
| Optional Keys |
This field is reserved for PeopleSoft internal use |
Error Thresholds and Chunking
A running error count is kept for each chunk of data that is being submitted to the database. When the total error count exceeds the error threshold that you specified on the Connection Information tab, submission to the database stops and the system displays an error message. Rows that errored out will have a status of Error on the data input page and should be corrected. The data submitted to the database before the error threshold was reached will remain in the target database. Rows not yet submitted will be submitted when the data is restaged and submitted.
You can use the Excel to Component Interface utility to upload data from any installed language. The Excel to CI utility delivers separate Excel macros for each delivered language. The macros contain the translated strings used as labels on the main spreadsheet. The macros are located in the appropriate language directory found in the PS_HOME/EXCEL directory.
Enabling Non-English Languages
To enable a non-English language in the Excel to CI Utility:
Change the language code on the spreadsheet Connect Information tab to the language to the language you want to use.
Change the reference to the related language macro to be used, as the default macro contains English language strings.
To change the related language macro, in Excel select the Tools, Macro and right-click on the Visual Basic Editor option. Once in Visual Basic, select Tools, References, and click on the RelLangMcro entry. Change the file to be used to the one with the same name but located inside the translated language directory of your choice. Click OK and then save the change.
If you are using a language in which a different character set or numeric formatting is used, you need to set the locale of your client machine to match that language. To do so, open Control Panel, Regional settings, and select the correct language and input locale.
Your PeopleSoft login information is needed for both creating the template and submitting data to the database.
Access the Login dialog box by selecting the Template tab and then clicking the New Template button, or by clicking the Submit Data button on the Staging and Submission tab:
Image: Login dialog box
This example shows the Login dialog box for the Excel-to-Component Interface utility.
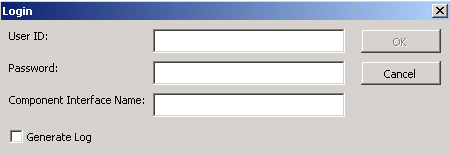
The system uses your user ID and password to ensure that you have the correct permissions to access the component interface that you are creating the template on. You must be granted permission to access the component interface that you are using.
|
Field or Control |
Definition |
|---|---|
| User ID/Password |
Enter your PeopleSoft user ID and password. |
| Component Interface Name |
Enter the name of the component interface for which you want the template created. |
| Generate Log |
Select the Generate Log check box to create one log file for ExcelToCI2007.xlsm and one for the SOAPTOCI Web Library. Note: Unless you are troubleshooting errors, you should run the Excel to Component Interface utility without creating log files. Logs should be generated for debugging purposes only. |