Testing Component Interfaces
After setting the security for a component interface, you can test the contents and behavior using the component interface tester. You should test the component interface before using it in your external system. This proactive tool helps you discover problems with the underlying component or the component interface itself, including user-defined methods. When you are testing a component interface, real data from the database is used. Therefore, if you save the information that you change by calling the Save method, the information is changed in the database.
With the component interface tester, you can:
Test the component interface in interactive mode.
Retrieve history items.
Test the standard, custom, and collection methods.
To test the component interface, you search for the component interface to test, and then you test it.
Access the Component Interface Tester search dialog box:
Image: Component Interface Tester – Enter key values, choose function dialog box
This example illustrates the fields and controls on the Component Interface Tester – Enter key values, choose function dialog box . You can find definitions for the fields and controls later on this page.

To search for a component interface to test:
Open the component interface in PeopleSoft Application Designer.
Select from the PeopleSoft Application Designer menu.
The Component Interface Tester search dialog box appears. This dialog box displays the keys (in the left-hand columns) for getting, creating, or finding an instance of the component interface. The right-hand columns provide a place for you to enter sample key values for testing.
Enter key values.
Double-click the column to the right of any displayed keys.
Enter the value in the right-hand column.
The data that is used for the test corresponds to the key values that you enter here. In the preceding example, we have entered an employee ID of 6602.
|
Field or Control |
Definition |
|---|---|
| Interactive Mode |
In interactive mode, any action request occurs immediately. Each property being set causes an immediate trip to the application server (or database server in two-tier mode). This differs from noninteractive mode, in which actions are often held and later sent in batches. For example, in noninteractive mode, if you set a property, the property is not validated until you perform the save. However, in interactive mode the property is validated immediately. This means that edit processing (and other processing, such as FieldChange PeopleCode) occurs for each set property. Whether you select this option depends on how you expect a particular component interface to be used and what you are currently testing. In a real production system, this parameter can significantly affect performance, but it makes little difference in the test component. In noninteractive mode, errors and properties are not updated until a method is run. By default, Interactive Mode is selected in the component interface tester. |
| Get History Items |
Select to retrieves history data. This option applies to effective-dated fields only and is equivalent to running in either Update/Display or Update/Display All mode. |
| Edit History Items |
Select to enable editing and saving of history data. This option applies to effective-dated fields only and is equivalent to running in either Update/Display or Correction mode. |
| Get Dummy Rows |
Specify whether to get dummy rows. This option is selected as a default. The component processor provides dummy rows to enable quick data entry when the level you are accessing does not have any data. Because of this, an API that does not need this row finds it and exposes it to the user. The application that uses the API now has to determine whether the row is a dummy row and accordingly decides to execute Item or InsertItem. Setting the GetDummyRow to false enables the component interface processor to handle the counts accordingly. With this property set to false, users do not have to use item and InsertItem when adding new data at levels 1 to 3. Instead, they can comfortably always use InsertItem. |
| Get Existing |
Clicking Get Existing is equivalent to opening a record in Update/Display or Correction mode online. It retrieves one instance from the database. After you click the Get Existing button, the Component Interface Tester dialog box appears. |
| Create New |
Clicking Create New is equivalent to creating a new row in Add mode online. If your component does not support the Create method, this button is disabled. After you click the Create New button, the Component Interface Tester dialog box appears. |
Getting Existing Records by Using Partial Keys
If you want to retrieve a partial key, click the Find button on the Component Interface Tester page. The Find Results dialog box appears:
Image: Component Interface Tester — Find Results dialog box
This example illustrates the Component Interface Tester – Find Results dialog box. Use the page to get existing records by using partial keys.
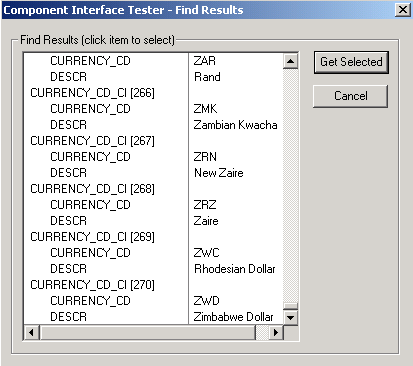
You can choose the specific instance by selecting and clicking the Get Selected button. If you do not enter a partial key before clicking Find, all key values in the database are returned (subject to the maximum count of 300, just as when online). This is the same as calling the Find method through the component interface API, followed by selecting a value from the Find results, setting the Get key, and calling the Get method. After you click the Get Selected button, the Component Interface Tester dialog box appears.
After you have searched for and retrieved the component interface, the Component Interface Tester dialog box appears.
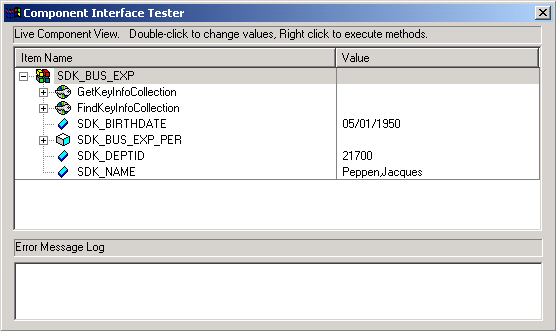
Image: Component Interface Tester dialog box
This example illustrates the Component Interface Tester dialog box. Use the page to test component interface properties and methods.
Testing Component Interface Properties
From the Component Interface Tester dialog box, change the value of a property, double-click a value, and enter a new value. Some basic validation is done when you leave the field, which is equivalent to leaving a field using the Tab key in the online case. This validation includes system edit, FieldChange PeopleCode events, and FieldEdit PeopleCode events. Further validation can be done when the Save method is called (SaveEdit, SavePreChange, Workflow, and SavePostChange). If errors occur or warnings are encountered, messages are displayed in the Error Message Log area at the bottom of the window. The error message log displays the same text that would appear in the PSMessages collection of the Session object if you accessed the component through the Component Interface API.
Testing Component Interface Methods
Test component interface methods by right-clicking the component interface name.
A menu appears that shows the Save and Cancel standard methods and any user-defined methods that exist for the component interface. The Find, Create, and Get standard methods are not valid for an instantiated component, and therefore are not shown.
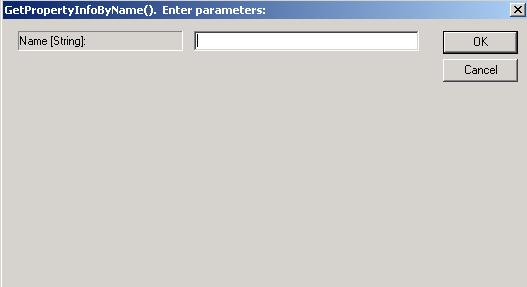
If a component interface method requires one or more parameters, a dialog box in which you can enter the parameters appears. After the method is executed, the same dialog box appears again, displaying changes to the parameters that were caused by the method. The return value of the function appears in the title of the dialog box. If a component interface requires no parameters, you do not see the initial dialog box, but you do see the return value dialog box following the function call.
Image: Enter parameters dialog box
This example illustrates the Enter parameters dialog box. Use the page to enter required parameters for component interface methods.
Note: Because running a component interface method can result in a change to the component interface structure, PeopleSoft Application Designer always redraws the component interface tree in its collapsed form following a method call.
Testing Collection Methods
Test collection methods by right-clicking the collection name.
A menu appears that shows the standard collection methods. Select the collection method that you want to test for this component interface. After you select a collection method to test, the Enter parameters dialog box prompts you to enter an item number for the collection method that you are testing. The value that you enter for index [Number] is used to retrieve, insert, or delete an item, according to the following rules.
After you enter an index number, the result appears in the dialog box. If a return value is sent, it is displayed in the title bar. Otherwise, the message No value is displayed. Click OK or Cancel to dismiss the dialog box.
Collection Method Rules
This table describes the collection method rules:
|
Collection Method |
Purpose |
|---|---|
|
Item(index) |
Returns the row at the specified index. Only the success or failure of this routine is of interest from inside the test component. |
|
InsertItem(index) |
Inserts a new row either before the index that you specify if the collection is effective-dated or following the index if it isn’t effective-dated. |
|
DeleteItem(index) |
Deletes the row that is designated by the index number that you specified in the Enter parameters dialog box. |
|
ItemByKeys(key1, key2, …) |
Returns the row corresponding to the specified keys. Only the success or failure of this routine is of interest from inside the test component. |
|
CurrentItem |
This method returns the effective row in an effective-dated record. Only the success or failure of this routine is of interest from inside the test component. |
|
GetEffectiveItem(DateString, SeqNum) |
Returns the data row that would be effective for the specified date and sequence number. This is a more general case of the GetCurrentItem function, which returns the definition that is effective at this moment. This method works with effective-dated records only. |
|
GetEffectiveItemNum(DateString, SeqNum) |
Returns the item number inside the collection of the data row that would be effective for the specified date and sequence number. This is a more general case of the GetCurrentItemNum function, which returns the number of the definition that is effective at this moment. This method works with effective-dated records only. |
Note: Component interface classes contain information about collection methods.
You can get the signature for the ItemByKeys method (or any other method) when testing a component interface. This is helpful for the ItemByKeys method, because its signature is different for each component interface.
Image: Enter parameters dialog box
This example illustrates the Enter parameters dialog box for the ItemByKeys method. Use the page to get the signature for any component interface.

To determine ItemByKeys parameters:
Open the definition.
Select
Find or get an appropriate populated component interface.
Navigate to the appropriate collection.
Right-click, and select ItemByKeys from the menu.
A dialog box appears, showing the specific parameters and types and the order in which you should call ItemByKeys.
In the preceding example, the keys for the SDK_BUS_EXP_PER ItemByKeys method are SDK_EMPID (String) and SDK_EXP_PER_DT (String).