Deploying Your Mobile Application
When distributing a MAF application you have the option to distribute the application internally using your own application repository, or you may elect to distribute the application externally to the Apple App Store or Google Play repositories.
Note: These steps are documented in detail in the MAF documentation. The sections in this document outline specific items to complete from a PeopleSoft perspective.
This section describes:
Distributing an Android Application Externally.
Distributing an Android Application Internally.
Distributing an Android Application Externally
To deploy an application for Android:
In JDeveloper, create a deployment profile, by selecting Application > Deploy > New Deployment Profile.
For the Profile Type, select MAF for Android from the drop-down list, and enter your Deployment Profile Name.
For the deployment of the Android application to package, it is recommended to set the deployment profile to Release mode instead of Debug mode.
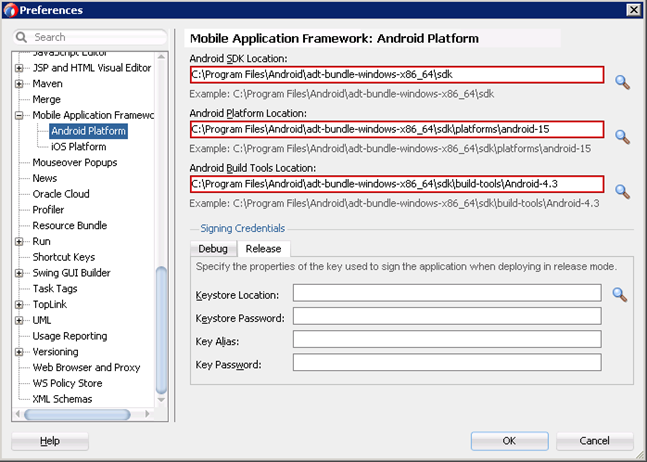
For this you need to sign the application, and map the same key store in the Tools > Preferences > Mobile Application Framework > Android Platform and browsing through the key store created in the Release tab under Signing Credentials.
Image: Mobile Application Framework: Android Platform
This example illustrates settings required for deploying applications for the Android platform.

Deploy the Android application to distribution package.
The result is the .apk file in the <path to app location>/deploy/<deployment profile>/<app name>.apk.
You distribute the .apk file.
Deploying an Android Application Internally
The same .apk file generated using the steps in the previous section can be used to distribute internally. However, you would upload the file to an internal repository.
For example, you can store the .apk on your web server and have a link pointing to this .apk file from an HTML page for users to access.
This section describes:
Distributing an iOS Application Externally.
Distributing an iOS Application Internally.
Deploying an iOS Application Externally
To deploy an application for iOS:
Create a deployment profile in JDeveloper, by selecting Application > Deploy > New Deployment Profile.
For the Profile Type, select MAF for iOS from the drop-down list, and enter your Deployment Profile Name.
For the deployment of the iOS application to a package, you need to complete the steps in the following sections:
Registering the Certificate.
Registering the Provisioning Profile.
Setting JDeveloper Preferences.
Defining Your Application Bundle ID.
Registering the Certificate
To register the certificate:
From your Applications > Utilities folder open the KeyChain Access utility.
Ensure that the login keychain is the default (shown in bold).
Select the login keychain and choose File > Import Items from the Menu.
In the Import dialog select your certificate. Ensure that "login" is shown as the Destination Keychain in the drop down at the bottom of the dialog.
When prompted, enter the password.
Registering the Provisioning Profile
To register the provisioning profile:
Start XCode.
In XCode, choose XCode > Preferences.
On the Accounts tab, click the “+” button at the bottom, left corner.
Select Apple ID from the drop-down list options.
Sign in with your Apple ID.
Note: The certificate must be issued with this ID.
Setting JDeveloper Preferences
To set JDeveloper preferences:
Start JDeveloper and navigate to the preferences screen (Tools > Preferences).
In the Preferences screen navigator navigate to Mobile Application Framework > iOS Platform.
In the Device Signing section, for the Provisioning Profile field, click the Browse button and navigate to your provisioning profile.
In the Certificate field, copy and paste the certificate value from your keychain, making sure to include the entire certificate. You can right-click on the certificate and copy the text against Get Info.
Click OK to save the preferences.
Defining Your Application Bundle ID
To define the application bundle ID:
For every application that you want to deploy to a package with this profile, edit the deployment profile you are using through the Application Properties dialog box.
Select iOS Options in the Deployment Profile dialog box.
Ensure that the prefix of the value in the Application Bundle ID of the deployment profile property is taken from the link. Refer to your member center in the Apple developer site for more information.
Associated with the profile name, locate the ID, and append the Application Name to this ID.
Deploying the iOS Application Internally
To deploy the iOS application to the distribution package:
Open Xcode, and select File > Open, and navigate to <path to app location>/deploy/<deployment folder>/temporary_xcode_project/Oracle_ADFmc_Container_Template.xcodeproj.
When the project opens, change all the attributes under Signings in Build Settings to your provisioning profile. Also, ensure the application is reaching targeted customers by selecting the device support on the top after the application name.
Select Product > Archive, select Distribute, then click Next.
Select Save for Enterprise or Ad Hoc Deployment, and click Export.
Select your Mobile Provisioning Profile, and click Export.
Save the ipa into the desired location, and enter the file name.